

前言
日常工作多人协作项目非常常见,多人协作也就意味着需要一定的规范,众所周知eslint、tslint、stylelint、prettier等工具来帮助团队统一代码层面规范,同时提交代码也需要规范,这也是前端工程化进程中不可或缺的
下图是element的日常commit,可以看到commit的格式为key: value 形式的,key是功能模块,value则是对具体改动的描述,这样是不是能够比较清晰的描述commit
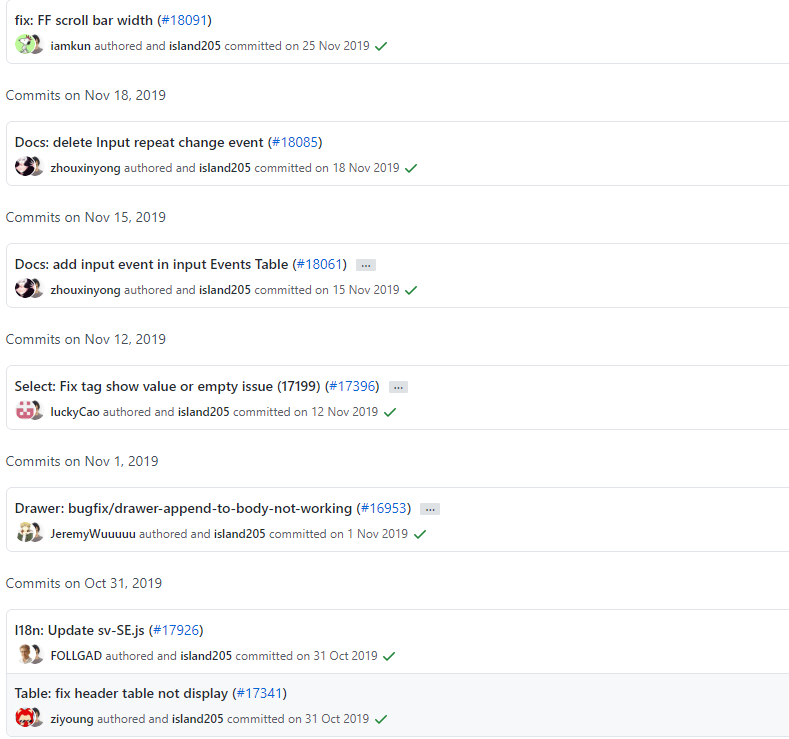
好的commit规范可以提供清晰的改动模块、信息、日志,目前业界比较认可Angular规范,我们先来间了解一下
规范
一个commit messgae分为三部分:Header、Body、Footer,其中Header是必填的
- Header
Header中包含type、scope、subject
type类型,除了以下类型你也可以根据自己的项目自定义类型
| type | 描述 |
|---|---|
| feat | 新功能 |
| fix | 修复bug |
| refactor | 代码重构 |
| docs | 文档 |
| style | 样式 |
| test | 测试代码 |
| chore | 其他修改 |
| pref | 优化 |
| build | 构建依赖包改动 |
| ci | CI修改 |
scope: 此次commit影响范围或涉及模块(例: package.json)
subject: 此次改动的描述
- Body
Body是对此次改动的详细描述
- Footer
Footer是一些备注, 通常是 BREAKING CHANGE 或修复的 bug 的链接
Commitizen
Commitizen是一个 Commit message 的工具,可以很好的帮助我们
安装
npm install Commitizen -g
安装完成后进入项目执行(node项目 )
commitizen init cz-conventional-changelog --save --save-exact
安装完毕之后,git commit操作就要用git cz来代替,当然你可以继续使用git commit,至于如何避免git commit提交的信息不规范我们稍后再讨论,先来看一下git cz命令,如下:
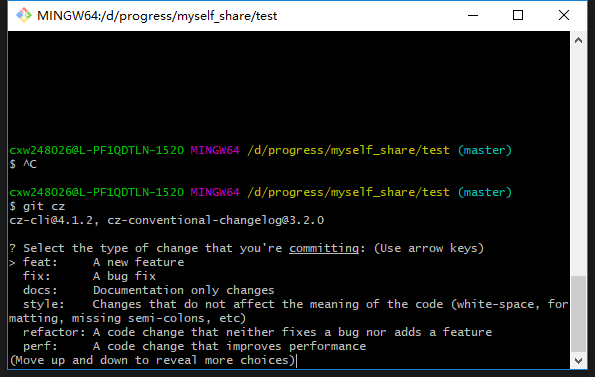
这一步是让选择此次commit的类型,选择相应类型回车即可,之后会有如下步骤:
# 填写此次的改动影响范围,继续
What is the scope of this change (e.g. component or file name): (press enter t
o skip)
# 写一个简短的描述,继续
 Write a short, imperative tense description of the change (max 88 chars)
# 做个详细描述,继续
Provide a longer description of the change
# 是否是BREAKING CHANGE,没有回车即可
Are there any breaking changes
# 是否关联已开启的问题,没有回车
Does this change affect any open issues
ok到此我们已经完成一个标准的commit,git log看一下:
Author: sf_cxw <17681828640@163.com>
Date:   Thu Jul 23 12:06:32 2020 +0800

    feat(用户管理): 添加黑白名单

    为了控各个用户权限
commit校验
回到刚刚提到的git commit使用不规范的问题,我们需要在commit message时加入检验
安装@commitlint/cli、@commitlint/config-conventional(检验规则)
npm|cnpm install @commitlint/config-conventional @commitlint/cli -D
生成commitlint.config.js,也可选择在commitlint.config.js中自行配置,配置
echo "module.exports = {extends: ['@commitlint/config-conventional']}" > commitlint.config.js
husky
如何触发校验呢???这里需要了解一下Git hooks,Git Hooks 就是那些在Git执行特定事件(如commit、push等)后触发运行的脚本,当我们git init操作时.git/hooks目录下回默认生成一些挂钩,.sample 拓展名防止它们默认被执行。提交代码时的eslint、stylelint检验其实也是这个道理。
在这里使用husky来帮助我们完成校验工作,husky安装的过程中会在.git/hooks目录中生成一些我们需要的钩子。
安装
npm|cnpm install husky -D
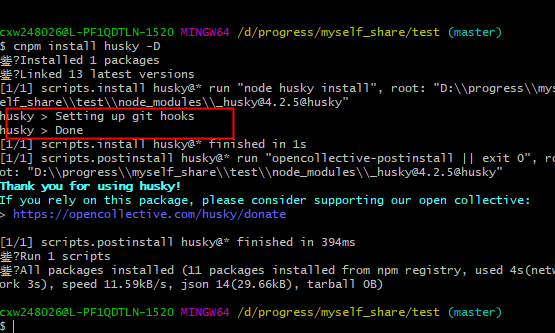
如上图所示表示安装成功(一定要看清楚自己是否安装成功,博主吃过亏:cry: :cry: :cry:)
安装完成后在package.json中加入
"husky": {
    "hooks": {
      "pre-commit": "lint-staged", // 此处是你的eslint、stylelint等校验,没有无需配置
      "commit-msg": "commitlint -E HUSKY_GIT_PARAMS"
    }
  }
到此commit校验也已经配置完毕,看一下执行效果
$ git commit -m '1'
husky > commit-msg (node v10.16.0)
猝?  input: 1
鉁?  subject may not be empty [subject-empty]
鉁?  type may not be empty [type-empty]

鉁?  found 2 problems, 0 warnings
鈸?  Get help: https://github.com/conventional-changelog/commitlint/#what-is-commitlint

husky > commit-msg hook failed (add --no-verify to bypass)
现在不按着规范来已经不能正常commit代码了,按照规范提交代码就能够通过,如下
$ git commit -m 'fix: 修复了一万个bug'
husky > commit-msg (node v10.16.0)
[master (root-commit) 79f5922] fix: 淇浜嗕竴涓囦釜bug
4 files changed, 2001 insertions(+)
create mode 100644 .gitignore
create mode 100644 commitlint.config.js
create mode 100644 package-lock.json
create mode 100644 package.json
现在使用git commit已经变得很麻烦了,所有我们以后都用git cz来代替git commit
日志及版本
上文提到了好的commit规范还能够提供不错的日志,conventional-changelog,便可以给我们提供日志,但是我们有更好的选择:standard-version
standard-version除了帮助我们生成日志外,还可以协助我们控制项目版本及打tag
全局安装
npm|cnpm install standard-version -g
package.json中加入
"scripts": {
    "release": "standard-version --release-as",
    "release:100": "npm run release -- major",
    "release:010": "npm run release -- minor",
    "release:001": "npm run release -- patch"
}
- major:主版本
- minor:次版本
- patch:修订版
- release:自定义版本npm run release -- 1.0.0
- release:100:执行该脚本, 那么如果当前版本是 1.0.0 那么版本将被提升至 2.0.0
- release:010: 执行该脚本, 那么如果当前版本是 1.0.0 那么版本将被提升至 1.1.0
- release:001: 执行该脚本, 那么如果当前版本是 1.0.0 那么版本将被提升至 1.0.1
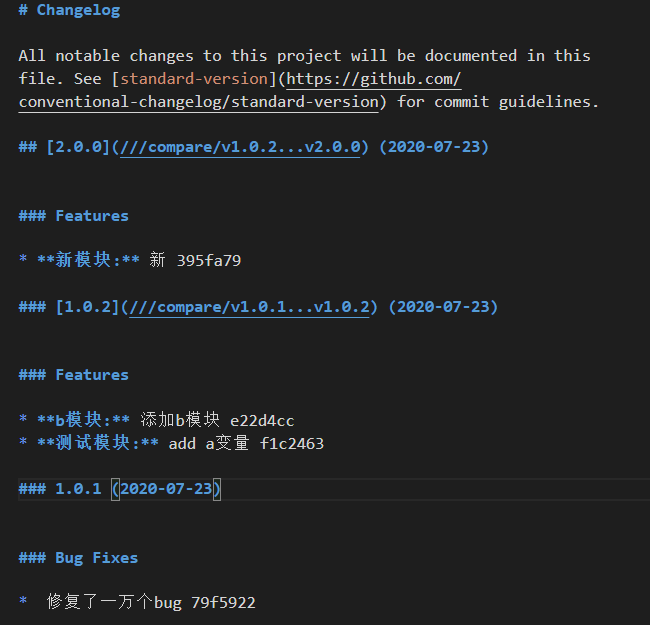
执行上述命令时,会有三个动作:生成版本、打tag、生成日志,日志存放于CHANGELOG.md中,具体效果如下
$ git tag
v1.0.1
v1.0.2
v2.0.0
日志实际效果见追旅博客日志
结语
学海真滴无涯 :joy: :joy:
