

1.双向绑定代码实现步骤及总结
定义:vue利用Object.defineProperty属性,对data里面的每一个数据使用Object.defineProperty,为每一个数据添加了get和set属性,使得能监听到每个数据的变化,能对变化的数据实行更新 方法:Object.defineProperty(obj,prop,descriptor),参数说明 1)obj: 可以理解为目标对象。 2)prop: 目标对象的属性名 3)descriptor: 对属性的描述
<!DOCTYPE html>
<html lang="en">
<head>
    <meta charset="UTF-8">
    <meta name="viewport" content="width=device-width, initial-scale=1.0">
    <title>Document</title>
</head>
<body>
    <div id="nametext"></div>
</body>
<script type="text/javascript">
    let obj = {}
    Object.defineProperty(obj,'name',{
        get(){
            return document.getElementById("nametext").innerHTML
        },
        set(val){
            document.getElementById("nametext").innerHTML  = val
        }
    })
    obj.name = 'vue数据劫持'
</script>
</html>
浏览器运行结果:

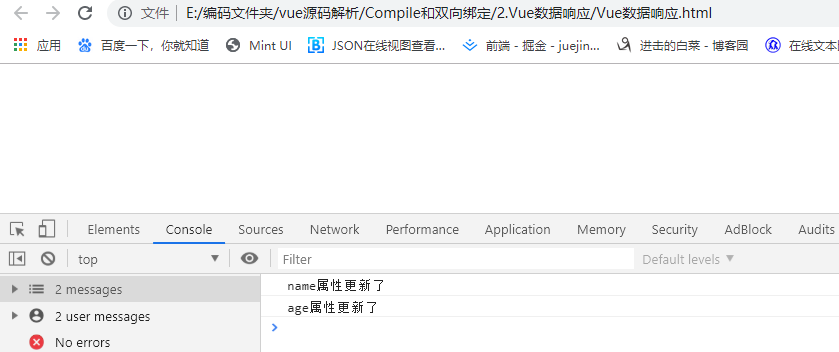
2.数据响应
有了Object.defineProperty 的基础掌握;接着实现一个Vue的数据响应式,Vue的数据响应的原理是利用Object.defineProperty对data中的每个数据都添加get,set方法,监听到数据变化,通知相应的地方做更新操作
代码实现:
数据响应的核心代码是对每个一个data中的数据添加get和set,当我执行
obj.$data.name = '张思'
obj.$data.list.age = '30'
这两句代码时会触发name和age对应的set方法,浏览器的后台能打印更新提示,vue也能在对应的set的操作中实现数据更新,其中有一点需要注意的是:第20行的时候执行了this.observe(val);解决data里面数据嵌套问题
<!DOCTYPE html>
<html lang="en">
<head>
    <meta charset="UTF-8">
    <meta name="viewport" content="width=device-width, initial-scale=1.0">
    <title>Document</title>
</head>
<body>
    <script src="./Vue数据响应.js"></script>
    <script>
        const options = {
            data:{
                name:'张三',
                list:{
                    age:'20'
                }
            }
        }
        let obj = new Kvue(options);
        obj.$data.name = '张思'
        obj.$data.list.age = '30'
    </script>
</body>
</html>
Vue数据响应.js
//期望的用法 new Kvue({...data})
class Kvue{
    constructor(options){
        //缓存data数据
        this.$data = options.data
        //观察data数据,便于更新data
        this.observe(this.$data)
    }
    observe(data){
        //判断data是否为一个对象
        if(!data || typeof(data) !== 'object'){
            return;
        }
        //遍历该对象 为对象的每个key添加Object.defineProperty
        Object.keys(data).forEach(key=>{
            this.defineReactive(data,key,data[key])
        })
    }
    defineReactive(obj,key,val){
        this.observe(val);//递归解决数据嵌套
        Object.defineProperty(obj,key,{
            get(){
                return val;
            },
            set(newValue){
                if(newValue === val){
                    return;
                }
                val = newValue;
                console.log(`${key}属性更新了`)
            }
        })
    }
}
浏览器执行结果截图:
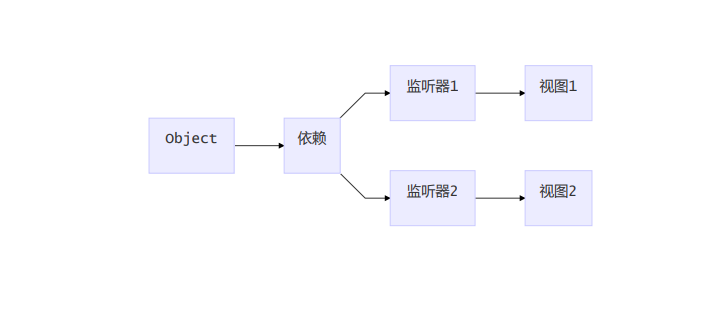
3.依赖收集
了解了Vue响应式的原理,但有一个问题是我们在数据响应中监听到了数据变化,但是我们并不知道应该去那个具体位置实现数据更新,在对应的地方实现数据更新就是接下来要介绍的依赖收集
<!DOCTYPE html>
<html lang="en">
<head>
    <meta charset="UTF-8">
    <meta name="viewport" content="width=device-width, initial-scale=1.0">
    <title>Document</title>
</head>
<body>
    <script src="./Vue依赖收集.js"></script>
    <script>
        const options = {
            data:{
                name:'张三',
                list:{
                    age:'20'
                }
            }
        }
        //通过对name 和 age 重新赋值 监测依赖收集是否生效
        obj.$data.name = '张思'
        obj.$data.list.age = '30'
        let obj = new Kvue(options);
    </script>
</body>
</html>
//期望的用法 new Kvue({...data})
class Kvue{
    constructor(options){
        //缓存options 便于其他类使用
        this.$options = options
        this.$data = options.data
        //观察data数据,便于更新data
        this.observe(this.$data)
        /*请大概浏览全部代码之后再回头看这段测试代码 对watcher写的测试代码开始*/
        new Watcher()// 新建一个Watcher观察者对象,这时候Dep.target会指向这个Watcher对象
        this.$data.name;// 在这里模拟render的过程,为了触发name属性的get函数
        new Watcher()
        this.$data.list.age;
        /*对watcher写的测试代码结束*/
    }
    observe(data){
        //判断data是否为一个对象
        if(!data || typeof(data) !== 'object'){
            return;
        }
        //遍历该对象 为对象的每个key添加Object.defineProperty
        Object.keys(data).forEach(key=>{
            this.defineReactive(data,key,data[key])
        })
    }
    defineReactive(obj,key,val){
        this.observe(val);//递归解决数据嵌套
        const dep = new Dep();//在函数作用域中每一个Dep都是相对独立的
        Object.defineProperty(obj,key,{
            get(){

                Dep.target && dep.addDep(Dep.target)// 将Dep.target(即当前的Watcher对象存入Dep的deps中)
                return val;
            },
            set(newValue){
                if(newValue === val){
                    return;
                }
                val = newValue;
                dep.notify()// 在set的时候触发dep的notify来通知所有的Watcher对象更新视图

            }
        })
    }
}
//实现一个Dep类用于订阅watcher -->Dep为订阅者
class Dep{
    constructor(){
        this.deps = []//用于管理所有的watcher
    }
    addDep(dep){//将watcher添加到Deps中管理
        this.deps.push(dep)
    }
    notify(){//通知所有的watcher去做更新,调用dep自身提供的update方法
        this.deps.forEach(dep=>dep.update())
    }
}
//实现一个Watcher类用于对所有data对象的监听  --->Watcher是观察者
class Watcher{
    constructor(){
        //将this作用域指向当前的Dep的静态属性target
        Dep.target = this
    }
    update(){//实现watcher的更新方法
        console.log("更新了")
    }
}
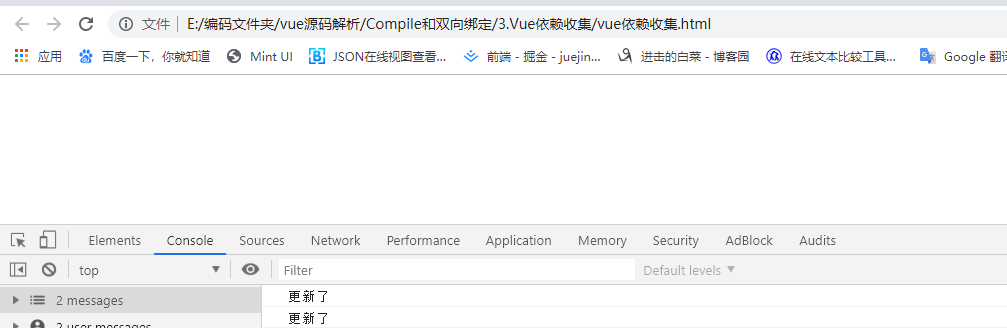
浏览器运行截图:
4.编译compile
定义:遵循3W1H原则,什么是编译,为什么要编译。首先写的这些模板的语句,html根本就不能识别,我们通过编译的过程,可以进行依赖的收集,进行依赖收集以后,我们就把data中的数据模型和视图之间产生了绑定关系,产生了依赖关系,那么以后模型发生变化的时候,我们就会通知这些依赖的地方让他们进行更新,这就是我们执行编译的目的,这样就做到了模型驱动视图的变化。 核心逻辑:获取dom,遍历dom,获取{{}}、k-和@开头的 ,设置响应式 下面这张为Vue编译的思维逻辑图,可以先预热一哈
下面将直接上代码,接着会有核心逻辑代码的解读,足够面对面试提问
<!DOCTYPE html>
<html lang="en">

<head>
    <meta charset="UTF-8">
    <meta name="viewport" content="width=device-width, initial-scale=1.0">
    <title>Document</title>
</head>

<body>
    <div id="app">
        <!--插值绑定-->
        <p>{{name}}</p>
        <!--指令-->
        <p k-text="name"></p>
        <p>{{age}}</p>
        <p>
            {{doubleAge}}
        </p>
        <!--双向绑定-->
        <input type="text" k-model="name">
        <!--事件-->
        <button @click="changeName">呵呵</button>
        compile.js
        <!--html-->
        <div k-html="html"></div>
    </div>
    <script src='./compile.js'></script>
    <script src='./k-vue.js'></script>
    <script>
        let helloVue = new KVue({
            el: '#app',
            data: {
                name: "I am test.",
                age: 12,
                html: '<button>这是一个按钮</button>'
            },
            created() {
                console.log('开始啦')
                setTimeout(() => {
                    this.name = '我是蜗牛'
                }, 1500)
            },
            methods: {
                changeName() {
                    this.name = '哈喽,Vue'
                    this.age = 1
                    this.id = 'xx'
                    console.log(1, this)
                }
            }
        })
    </script>
</body>

</html>
//期望的用法 new Kvue({...data})
class KVue{
    constructor(options){
        //缓存options 便于其他类使用
        this.$options = options
        this.$data = options.data
        //观察data数据,便于更新data

        this.observe(this.$data)
        //对watcher写一个测试代码
        // new Watcher()
        // this.$data.name;
        // new Watcher()
        // this.$data.list.age;
        new Compile (options.el,this)
    }
    observe(data){
        //判断data是否为一个对象
        if(!data || typeof(data) !== 'object'){
            return;
        }
        //遍历该对象 为对象的每个key添加Object.defineProperty
        Object.keys(data).forEach(key=>{
            this.defineReactive(data,key,data[key])
            this.proxyData(key);//代理data到Vue的实例上 能直接使用this.data获取到数据
        })
    }
    defineReactive(obj,key,val){
        this.observe(val);
        const dep = new Dep();//在函数作用域中每一个Dep都是相对独立的
        Object.defineProperty(obj,key,{
            get(){
                //对watcher写的测试代码,触发get的时候将变量添加到watcher中
                Dep.target && dep.addDep(Dep.target)
                return val;
            },
            set(newValue){
                if(newValue === val){
                    return;
                }
                val = newValue;
                //当属性更新的时候通知watcher做更新操作
                dep.notify()
                // console.log(`${key}属性更新了`)
            }
        })
    }

    proxyData(key){
        Object.defineProperty(this,key,{
            get(){
                return this.$data[key]
            },
            set(newVlaue){
                return this.$data[key] = newVlaue
            }
        })
    }
}
//实现一个Dep类用于订阅watcher -->Dep为订阅者
class Dep{
    constructor(){
        this.deps = []//用于管理所有的watcher
    }
    addDep(dep){//将watcher添加到Deps中管理
        this.deps.push(dep)
    }
    notify(){//通知所有的watcher去做更新,调用dep自身提供的update方法
        this.deps.forEach(dep=>dep.update())
    }
}
//实现一个Watcher类用于对所有data对象的监听  --->Watcher是观察者
class Watcher{
    constructor(vm,key,cb){
        this.vm = vm;
        this.key = key;
        this.cb = cb;

        Dep.target = this//将this作用域指向当前的Dep的静态属性target
        this.vm[this.key];//触发getter 添加依赖
        Dep.target = null;//添加完依赖 置空 避免重复添加
    }
    update(){//实现watcher的更新方法
        console.log("更新了")
        this.cb.call(this.vm,this.vm[this.key])//更新之后 执行回调函数 并绑定上下文 方便直接使用this
    }
}


//期望的用法new Compile(el,vm)
class Compile {
    constructor(el, vm) {
        this.$el = document.querySelector(el)//获取到当前el元素
        this.$vm = vm;//将Vue对象挂载到$vm上
        if (this.$el) {//$el存在开始编译
            this.$fragment = this.nodeToFragment(this.$el);//将$el转换为片段,不直接操作dom元素,直接操作不利于性能优化
            this.compile(this.$fragment)//执行编译
            this.$el.appendChild(this.$fragment)//将this.$fragment追加到this.$el上
        }
        if (vm.$options.created) {
            vm.$options.created.call(this.$vm);//call绑定作用域,使用this.name 能直接访问到
        }
    }

    // 新建文档碎片 dom接口
    nodeToFragment(el) {
        const fragment = document.createDocumentFragment();//创建代码片段
        //将el中的元素搬家到fragment 中,目的是避免直接操作Dom
        let child;
        while (child = el.firstChild) {
            fragment.appendChild(child)
        }
        return fragment;
    }

    //执行编译
    compile(el) {
        const childNodes = el.childNodes;//获取el中所有节点
        Array.from(childNodes).map(node => {
            //判断每个节点的类型
            if (this.isElement(node)) {
                console.log(`编译元素${node.nodeName}`)
                const nodeAttrs = node.attributes;
                Array.from(nodeAttrs).forEach(attr => {
                    const attrName = attr.name;
                    const exp = attr.value;
                    if (this.isDirective(attrName)) {
                        //k-text k-model
                        const dir = attrName.substring(2);
                        this[dir] && this[dir](node, this.$vm, exp)
                    }
                    if (this.isEvent(attrName)) {
                        const dir = attrName.substring(1) // @click
                        this.eventHandler(node, this.$vm, exp, dir)
                    }
                })

            } else if (this.isInterprolation(node)) {
                console.log(`编译文本${node.textContent}`)
                this.compileText(node)

            }

            //递归子节点
            if (node.childNodes && node.childNodes.length > 0) {
                this.compile(node)
            }
        })
    }

    //元素类型
    isElement(node) {
        return node.nodeType === 1;
    }

    //指令类型
    isDirective(attr) {
        return attr.indexOf('k-') === 0
    }

    //事件类型
    isEvent(attr) {
        return attr.indexOf("@") === 0
    }

    //插值类型 并且为{{}}包裹的插值
    isInterprolation(node) {
        return node.nodeType === 3 && /\{\{(.*)\}\}/.test(node.textContent);
    }

    //编译文本
    compileText(node) {
        this.update(node, this.$vm, RegExp.$1, 'text')
        //node.textContent  = this.$vm.$data[RegExp.$1];
    }

    //更新函数,添加依赖
    update(node, vm, exp, dar) {
        const updaterFn = this[dar + 'Updater'];
        updaterFn && updaterFn(node, vm[exp]);//第一次初始化
        new Watcher(vm, exp, function (vlaue) {//添加依赖
            updaterFn && updaterFn(node, vlaue)
        })
    }

    //更新text类型的属性
    textUpdater(node, value) {
        node.textContent = value;
    }

    //编译k-text 函数
    text(node, vm, exp) {
        this.update(node, vm, exp, 'text')
    }

    // 事件处理
    eventHandler(node, vm, exp, dir) {
        let fn = vm.$options.methods && vm.$options.methods[exp]
        if (dir && fn) {
            node.addEventListener(dir, fn.bind(vm), false)
        }
    }

    //双向绑定
    model(node, vm, exp) {
        //指定input的value属性
        this.update(node, vm, exp, 'model')
        //视图对模型的响应
        node.addEventListener('input', (e) => {
            vm[exp] = e.target.value
        })
    }

    //更新mode类型数据
    modelUpdater(node, value) {
        node.value = value
    }

    //k-html
    html(node, vm, exp) {
        this.update(node, vm, exp, 'html')
    }

    htmlUpdater(node, value) {
        node.innerHTML = value
    }
}
代码中都已经有足够的注释,接下来我们来梳理梳理编译过程代码的处理逻辑:
1)KVue中执行this.observe(),做两个事情,一.是将data里面的属性全部添加get,set方法;并且对所有属性进行依赖收集.二.是通过this.proxyData(key)将data属性挂载到vue实例中,使得能通过this 直接访问到属性名
2)Compile 中使用this.nodeToFragement(this.$el) 将原本的dom元素转换为代码片段,目的是避免直接操作Dom节约性能;其中是用的核心api为document.createDocumentFragment()
const fragment = document.createDocumentFragment();//创建代码片段
在this.compile(this.$fragment)执行编译函数中核心的方法为 update 方法,其他比较偏业务的方法了解一哈就可以了
update(node, vm, exp, dar) {
     const updaterFn = this[dar + 'Updater'];
     updaterFn && updaterFn(node, vm[exp]);//第一次初始化
     new Watcher(vm, exp, function (vlaue) {//对每个属性添加依赖
         updaterFn && updaterFn(node, vlaue)//调用属性对应的更新方法
     })
 }
如果还有不太懂的地方欢迎访问我的git地址:htmlpreview.github.io/?https://gi… 使用F12大法跟踪代码
