

测试是每个软件开发过程的关键部分。它可以大大降低项目成本,并可以提高团队的生产力。基本上有三种主要的测试类型:
- 单元测试—通过单元测试,可以测试代码中独立小片段,例如一个组件,一个函数。
- 集成测试—在这种类型的测试中,我们组合并测试各个单元,并将它们作为一个整体进行测试。
- 端到端(E2E)测试-定义为某些应用程序完整功能的测试。
这篇内容主要介绍使用Jest和preact-render-spy 对preact代码进行单元测试。
我们将使用两个强大的工具Jest和Pupeeteer编写测试:
- Jest:是功能齐全的测试框架,由Facebook开发。它只需要很少的配置就可以直接使用。
- preact-render-spy:类似于Enzyme的测试实用程序,不过没有Enzyme那么多的选项,主要函数有:deep,shallow, render。
deep: 深度渲染,子组件dom也会渲染
shallow: 浅渲染,子组件内部dom不渲染,在快照中子组件以独立标签显示,如<Card></Card>
render: 手动渲染,一般用于组件state变更时手动触发渲染
安装工具
npm install preact-render-spy jest配置
Jest Configuration
setup.ts 可设置全局变量或mock
{
"globals": {
  "ts-jest": {
    "diagnostics": false
  },
  "setupFiles": [
  "./test/e2e/setup.ts"  ],
  "moduleFileExtensions": [    "ts", "tsx", "js","jsx"  ],
 "testPathIgnorePatterns": [    "<rootDir>/test/e2e" ],
  //测试代码覆盖率配置
  "coverageDirectory": "<rootDir>/test/unit/coverage",  "collectCoverageFrom": [    "src/**/*.{js,jsx,ts,tsx}",    "!src/*.{js,jsx,ts,tsx}",    "!src/i18n/**/*.ts",    "!src/doc/**/*.ts",    "!src/finance/models/*.ts",    "!src/environments/*.ts",    "!src/**/index.ts",    "!src/**/public_api.ts",    "!src/**/type.d.ts",    "!src/assets/**/*.js"  ],  "coverageThreshold": {    "global": {      "branches": 80,      "functions": 80,      "lines": 80,      "statements": 80    }  },  "snapshotSerializers": [    "preact-render-spy/snapshot"  ]}
运行测试代码
"scripts": { "unit": "jest --config jest-unit.config.json --coverage"}根据个人需要运行以下命令行:
yarn unit
yarn unit t- 'Test Name' // 单独运行某个测试用例
编写测试代码
组件生命周期测试
测试组件生命周期函数正常调用
import { h, Component } from 'preact';
import { shallow } from 'preact-render-spy';
import { Home } from '../src/home-page';it('componentDidAmount', () => {
  const spy = jest.spyOn(Home.prototype, 'componentDidMount');
  const context = deep(<Home />);
  const instance = context.component();
  expect(instance).toBeInstanceOf(Home);
  expect(spy).toHaveBeenCalled();
  spy.mockRestore();
});
recevive props
测试组件成功接收props并渲染
class Card extends Component<any>{
  render(){
    const { title, content } = this.props
    return(
    <div className="card">
      <p className="card-title">{title}</p>
      <p className="card-content" dangerouslySetInnerHTML={{__html: content}}></p>
    </div>
    )
}}

it('receives props', () => {
  const context = shallow(<Card title="评论" content="评论列表"/>);
  expect(context.find('.card-title').text()).toBe('评论');
})})
state change
测试state改变后组件重新渲染新的数据
class User extends Component<any>{
  public state = {    name: 'Lynne'  }
  public changeName(){
  this.setState({name: 'Lisa'});  }
  render(){
    const { name } = this.state
    return(
      <div className="user">
      <p className="user-name">{name}</p>
    </div>
  )
}}

it('username has changed', async() => {
  const context = shallow(<User />);
  expect(context.find('.user-name').text()).toBe('Lynne');
  await context.simulate('changeName');
  context.render(<User />);
  expect(context.find('.user-name').text()).toBe('Lisa');
})
组件节点测试
测试组件是否如预期的渲染:
class Buttons extends Component<any>{
  public btns = ['同意', '拒绝', '关闭'];
  public clickHandler(text){
  console.log(text)  }
  render(){
    return(
      <div className="buttons">
       {this.btns.map((btn) => <button onClick={() => this.clickHandler(btn)}>{btn}</button>)}
      </div>
    )
  }
}

it('component rendered', async() => {
  const context = deep(<Buttons />);
  expect(context.find('button').length).toBe(3);
  const spy = jest.spyOn(context.component(), 'clickHandler');
  context.find('button').at(0).simulate('click');
  expect(spy).toHaveBeenCalled();
  spy.mockRestore();
})
判断组件有3个button,点击button会触发点击处理函数;
snapshot快照UI测试
当使用toMatchSnapshot的时候,会生成一份组件DOM的快照,以后每次运行测试用例的时候,都会生成一份组件快照和第一次生成的快照进行对比,如果对组件的结构进行修改,那么生成的快照就会对比失败。可以通过更新快照重新进行UI测试。
it('snapshot', async() => {
  const context = shallow(<User />);
  expect(context.toString()).toMatchSnapshot();
})
// Jest Snapshot v1, https://goo.gl/fbAQLP
exports[`User snapshot 1`] = `
"preact-render-spy (1 nodes)
-------
<div class=\\"user\\">
<p class=\\"user-name\\">Lynne</p>
</div>
"
`; 组件内部函数调用
it('function call', async() => {
  const context = deep(<Home />);
  spy = jest.spyOn(context.component(), 'queryDetail');  context.component().queryDetail();  expect(spy).toHaveBeenCalled();})

it('function call', async() => {    const context = deep(<Home />);
  spy = jest.spyOn(context.component(), 'queryDetail');
  await context.simulate('queryDetail');  expect(spy).toHaveBeenCalled();
  spy.mockRestore();
})使用context.component()来取得组件的实例,并用spyOn方法来mock实例上的内部方法,然后用这个实例去调用那个内部方法,就可以用替身来判断这个内部函数是否被调用
定时器的测试
原生的定时器函数(如:setTimeout, setInterval, clearTimeout, clearInterval)并不是很方便测试,因为程序需要等待相应的延时。
在这里我们通过jest.useFakeTimers();来模拟定时器函数。 通过mock函数可以模拟setTimeout和其他的定时器函数。为了判断回调函数是否在设置的时间后被调用,可以通过jest.runAllTimers()将时间“快进”到正确的时间点。
延时定时器
测试代码中的定时器正常执行
class User extends Component<any>{
  public timer:any = null;
  public state = {    name: 'Lynne'  }
  componentDidMount(){
    this.timer = setTimeout(() => this.setState({name: 'Lisa'}), 1000)
  }
  render(){
    const { name } = this.state
    return(
      <div className="user">
        <p className="user-name">{name}</p>
      </div>
    )
  }
}

// test
jest.useFakeTimers();
it('setTimeout called', async() => {
  const context = shallow(<User />);
  expect(context.find('.user-name').text()).toBe('Lynne');
  jest.runAllTimers();
  context.render(<User />);
  expect(context.find('.user-name').text()).toBe('Lisa');
})
如果想在测试代码中添加定时器呢?同样的方式
jest.useFakeTimers();
it('add timeout', async() => {
const context = shallow(<User />);
setTimeout(() => {
console.log('setTimeout')
}, 1000)
jest.runAllTimers();
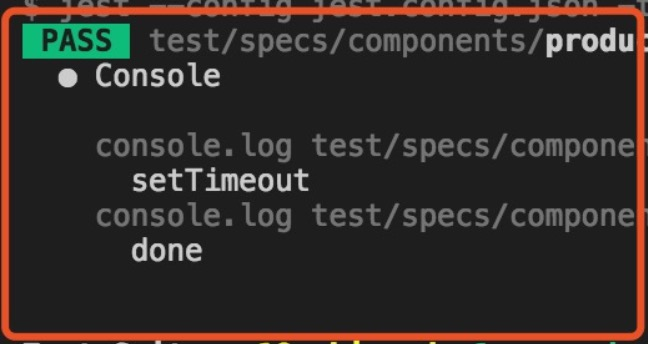
console.log('done')
})
循环计数器
在某些场景下你可能还需要“循环定时器”,例如轮播组件。 对于这种情况,如果将定时器一直运行下去那将陷入死循环,所以在此场景下不应该使用jest.runAllTimers()而可以采用jest.runOnlyPendingTimers()使计数器每次只执行一次
it('swiper autoplay', () => {
  context = deep(<Swiper active="1" auto={1000}>
    <SwiperItem>one</SwiperItem>
    <SwiperItem>two</SwiperItem>
    <SwiperItem>three</SwiperItem>
  </Swiper>)
  const instance = context.component();
  const items = instance.wrapRef.current.querySelectorAll('.swiper-item');
  instance.itemWidth = 300;
  spy = jest.spyOn(instance, 'next');
  instance.autoplay();    // 循环播放
  jest.runOnlyPendingTimers();
  expect(spy).toHaveBeenCalledTimes(1);
  expect(instance.active).toBe(2);
  expect(items[1].style.transform).toBe(`translate3d(-300px, 0, 0)`);
  jest.runOnlyPendingTimers();
  expect(spy).toHaveBeenCalledTimes(2);
  expect(instance.active).toBe(0);
  expect(items[1].style.transform).toBe(`translate3d(300px, 0, 0)`);
  spy.mockRestore();
})
手动模拟
在测试过程中,对于一些测试环境不存在的对象、不容易构造/获取的对象,以及不想调用真实模块时,可以通过手动模拟来使测试正常运行
模拟函数
it('function call', async() => {
  const context = deep(<Home />);
  spy = jest.spyOn(context.component(), 'queryDetail');
  context.component().queryDetail();
  expect(spy).toHaveBeenCalled();
})
模拟本地模块
对某个文件进行手动模拟,需要在被模拟的文件平级的位置新建一个__mocks__文件夹,然后在文件夹中新建一个同名的文件。
// __mocks__/user.api.ts
queryUser() {
  return of({
    code: 0,
    data: {
      name: 'Lynne'
    }
  })
}

// user.test.tsx
jest.mock('../api/user.api');处理全局变量
// storage
const mock = () => {
  let storage = {};
  return {
    getItem   : key => key in storage ? storage[key] : null,
    setItem   : (key, value) => storage[key] = value || '',
    removeItem: key => delete storage[key],
    clear     : () => storage = {},  };
};
Object.defineProperty(window, 'localStorage', { value: mock() });
Object.defineProperty(window, 'sessionStorage', { value: mock() });

// location
const windowLocation = JSON.stringify(window.location);delete window.location;Object.defineProperty(window, 'location', {  value: JSON.parse(windowLocation)});

//getComputedStyleObject.defineProperty(window, 'getComputedStyle', {  value: () => {    return {      display   : 'none',      appearance: ['-webkit-appearance'],    };  },});
// scrollwindow.scroll = jest.fn();

// IntersectionObserver
class IntersectionObserver1{  observe = () => null;  unobserve = () => null;}Object.defineProperty(  window,  'IntersectionObserver',  { writable: true, configurable: true, value: IntersectionObserver1 });Object.defineProperty(  global,  'IntersectionObserver',  { writable: true, configurable: true, value: IntersectionObserver1 });
模拟触摸
function createClientXY(x, y) {
  return { pageX: x, pageY: y, clientX: x, clientY: y };
}

export function createStartTouchEventObject({ x = 0, y = 0 }, fingers = 1) {
  const touches = [];
  for(let i = 0; i < fingers; i++){
    touches.push(createClientXY(x, y))
  }
  return { changedTouches: touches, touches: touches };
}
export function createMoveTouchEventObject({ x = 0, y = 0}, fingers = 1) {
  const touches = [];
  for(let i = 0; i < fingers; i++){
    touches.push(createClientXY(x, y))
  }
  return { preventDefault() {}, changedTouches: touches, touches: touches };
}
代码覆盖率
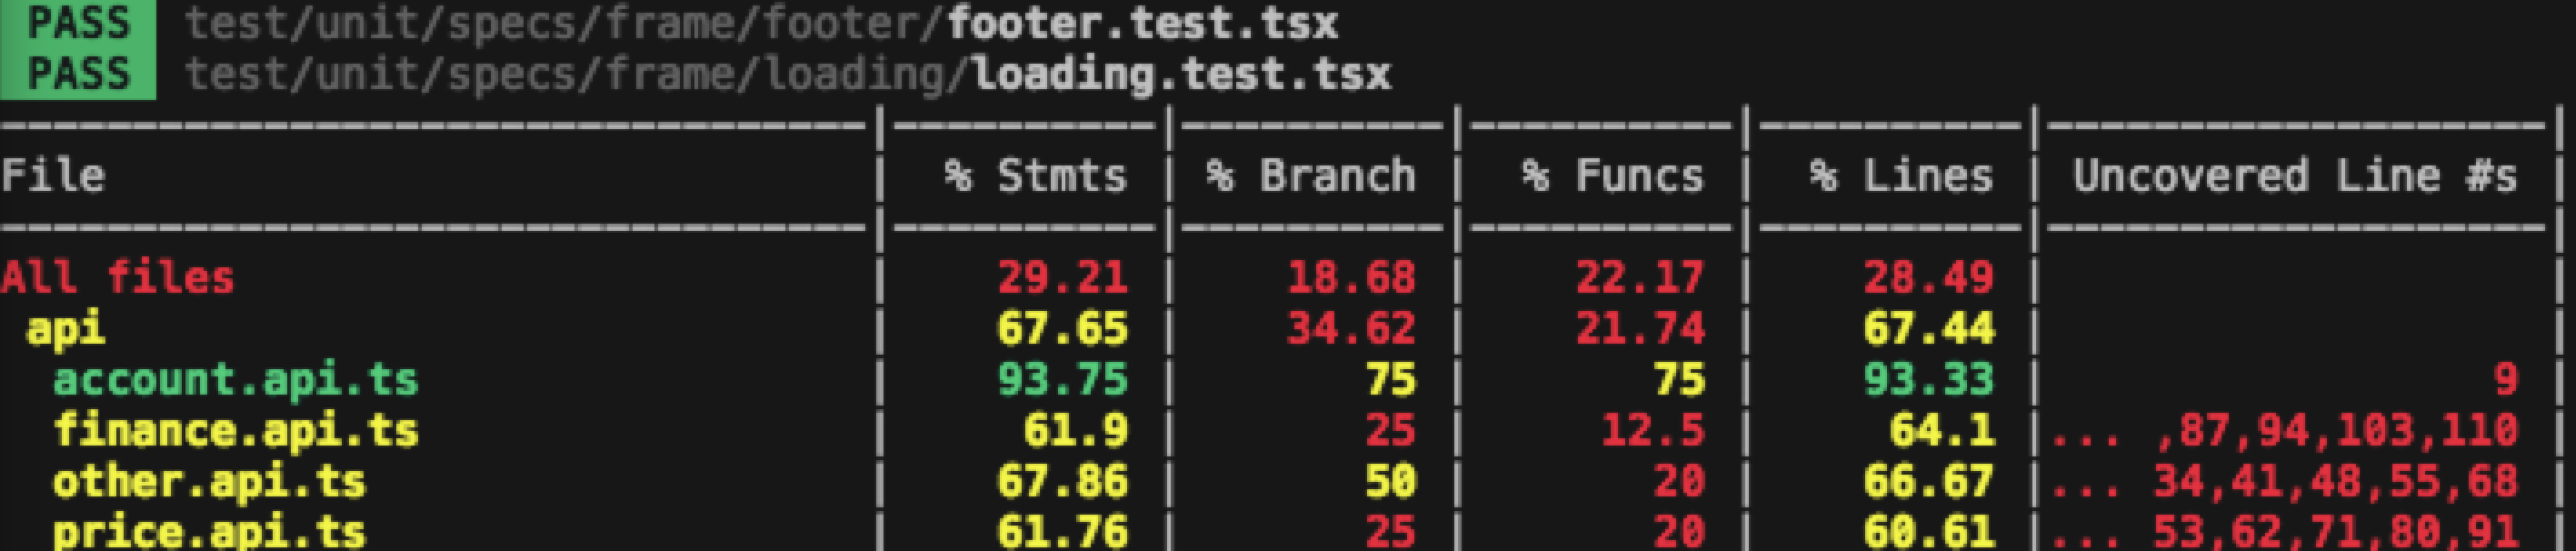
在做单元测试时,代码覆盖率常常被拿来作为衡量测试好坏的指标。但也代码覆盖率高不能说明代码质量高,但是反过来看,代码覆盖率低,代码质量不会高到哪里去,可以作为测试自我审视的重要工具之一。
使用jest编写测试,可以运行命令时通过添加--coverage标志生成代码覆盖率报告,无需额外设置。Jest可以从整个项目收集代码覆盖面信息,包括未经测试的文件。
总结
编写测试代码时,本人专情于Jest。Jest不限技术栈,无论编写api测试、单元测试、集成测试都非常好用,配置简单。
