

painter生成海报
这是我正常生成的海报painter.js就是通过canvas的封装实现相关功能点,我也使用过直接使用wx.canvas直接去画,生成画布但是感觉非常繁琐,不利于开发以及调试.
1.引入painter组件放到common自定义组件
2.引入相关组件
"usingComponents": {
"painter": "/common/painter/painter"
},
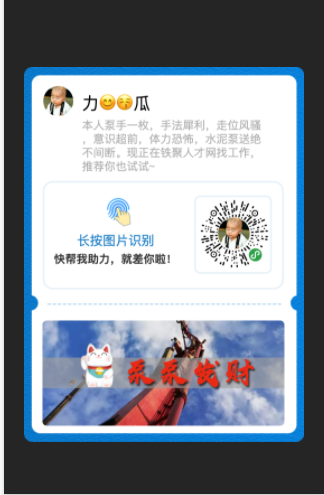
data: ---传入数据;
widthPixels:1000 ---生成海报的分辨率
bind:imgOK="onImgOK" --- 生成海报成功的调用
<painter palette="{{data}}" widthPixels='1000' wx:if="{{!hidden}}" bind:imgOK="onImgOK" data-url='{{fileData}}' class='painter'></painter>
3.在js中配置data数据
  getImgerBanner() {
    //http://service.tiejumall.xyz/machinery/popupSet?appKey=JYT&type=POSTER
    let url = "/popupSet?appKey=JYT&type=POSTER"
    request(url, '', 'machinery', 'get', false).then(res => {
      console.log(res.data)
      let banner = res.data.data[0].imgUrl
      let explainInfo = res.data.data[0].explainInfo
      let data = {
        background: this.data.backUrl,
        width: '657rpx',
        height: '881rpx',
        borderRadius: '20rpx',
        views: [{
          type: 'image',
          url: app.globalData.userInfo.avatar,
          css: {
            top: '45rpx',
            left: '45rpx',
            width: '70rpx',
            height: '70rpx',
            borderRadius: '35rpx'
          }
        }, {
          type: 'text',
          text:  app.globalData.userInfo.nickName,
          css: {
            left: '136rpx',
            top: '60rpx',
            fontSize: '40rpx'
          }
        }, {
          type: "text",
          text: explainInfo,
          css: {
            width: '430rpx',
            fontSize: '26rpx',
            color: '#AFAFAF',
            top: '120rpx',
            left: '136rpx',
            maxLines: 4,
            lineHeight: '32rpx'
          }
        }, {
          type: 'rect',
          css: {
            height: '247rpx',
            width: '557rpx',
            borderRadius: '20rpx',
            color: '#fff',
            borderWidth: '4rpx',
            borderColor: 'rgba(12,117,195,0.1)',
            left: '48rpx',
            top: '272rpx'
          }
        }, {
          type: 'image',
          url: this.data.finger,
          css: {
            wdith: '55rpx',
            height: '66rpx',
            left: '195rpx',
            top: '308rpx'
          }
        }, {
          type: "text",
          text: '长按图片识别',
          css: {
            fontSize: '30rpx',
            color: '#157AC5',
            top: '388rpx',
            left: '124rpx'
          }
        }, {
          type: "text",
          text: '快帮我助力,就差你啦!',
          css: {
            fontSize: '26rpx',
            color: '#323232',
            top: '434rpx',
            left: '70rpx',
            fontWeight: 'bold'
          }
        }, {
          type: 'rect',
          css: {
            width: '174rpx',
            height: '176rpx',
            borderWidth: '4rpx',
            borderColor: 'rgba(12,117,195,.1)',
            borderRadius: '10rpx',
            color: '#fff',
            left: '403rpx',
            top: '306rpx'
          }
        }, {
          type: "image",
          url:app.globalData.uploadqrCode,
          css: {
            width: '160rpx',
            height: '164rpx',
            left: '413rpx',
            top: '310rpx'
          }
        }, {
          type: 'image',
          url: banner || 'https://tj-t.oss-cn-shenzhen.aliyuncs.com/images/2019-10-19/14/43/28_0a6a247db5111195a5691901ffda0823.png',
          css: {
            width: '567rpx',
            height: '247rpx',
            left: '43rpx',
            bottom: '39rpx',
            borderRadius: '10rpx'
          }
        }]
      }
      this.setData({
        data
      })
    })
  },
  //

  onImgOK(e) {
    //拿到文件路径上传到服务器
    let res = e.detail.path;
    console.log(res)
    wx.uploadFile({
      url: app.globalData.uploadUrl,
      filePath: res,
      name: 'file',
      success: (res) => {
        wx.hideLoading()
        let resData = JSON.parse(res.data)
        console.log(resData)
        this.setData({
          fileData: resData.data.fileUrl,
        })
      }
    })
  }
重点❎
1. 出现的问题:生成海报不清晰问题,可以通过调节分辨率变得清晰.
2. 生成海报海很凌乱:原因是因为海报还没有画完就开始生成海报(偶发性错误❌
解决方案: 生成海边setTimeout时间上调整下,默认是300.就没有出现不清晰的情况.但会显示很慢,你可以适当调节下.
  setTimeout(() => {
     wx.canvasToTempFilePath({
       canvasId: 'k-canvas',
       destWidth: that.canvasWidthInPx,
       destHeight: that.canvasHeightInPx,
       success: function (res) {
         that.getImageInfo(res.tempFilePath);
       },
       fail: function (error) {
         console.error(`canvasToTempFilePath failed, ${JSON.stringify(error)}`);
         that.triggerEvent('imgErr', {
           error: error
         });
       },
     }, this);
   }, 1000);
(可以参考文档:juejin.cn/post/684490…)
