

最近在做研发版企业微信/飞书的对接,其中的工作内容之一是:消息推送。为了让用户更好的协同办公,我们需要通过企业微信/飞书等平台推送提醒或消息给其他协作者,项目中采用 redis 的 pub/sub 模式(使用及其简单,跟我以往使用 mq 相比),所以对这块重新学习了下。
ok,废话不多说了,本文将简单介绍发布订阅模式,并从 redis pub/sub 的使用,自己用 nodejs 实现一个跟其类似的功能,过程中主要用到的 是 nodejs 原生模块 net。
介绍
发布订阅模式,是常见处理消息的模式,这里贴出烂大街,但描述很好的图:
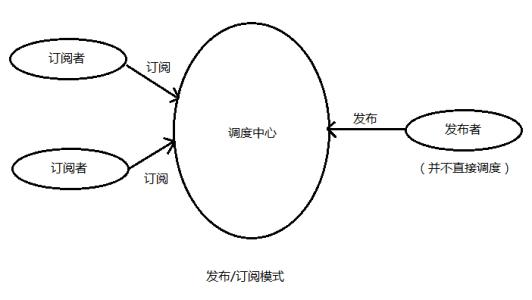
从图上可以看到,订阅者通过调度中心进行订阅,发布者发布消息给调度中心,调度中心再将消息分发到各个订阅者。而订阅者和发布者都是通过调度中心来完成对应操作的,这里的调度中心就是 发布/订阅 模式。那么为什么要有该模式呢?下面就讲一下它具体做了什么事,有什么好处!
好处
- 解耦:它抽象了 订阅者和发布者,他们彼此是不知道对方的存在,他们甚至是不同平台、基于不同语言的,而他们只需要做好自己的事情,这当然也符合编程中的单一原则。
- 伸缩性: 发布者只管发布消息,发完一次消息他就可以再去发其他消息,不必等待后续子系统的一个响应情况。
- 可靠性:主要是采用异步的方式传递,异步的好处在座各位都是写 js 的,主要体现在负载方面。
ok,介绍了其好处,下面根据 redis 的 pub/sub 模式,用 nodejs 实现一个跟其一样的功能,在实现之前介绍一下 redis 的 pub/sub 模式
redis 的 pub/sub 模式
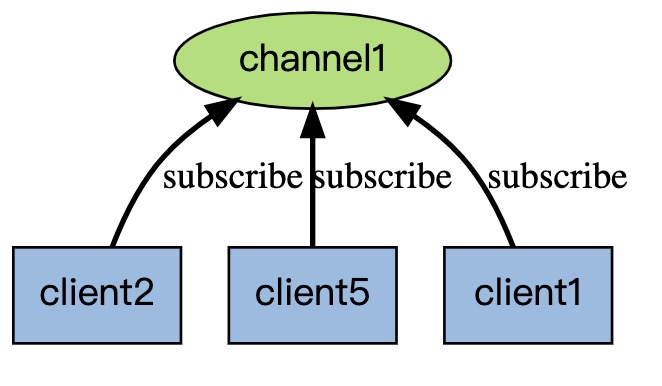
redis 中的发布订阅模式多种多样,根据业务制定出的场景,这里只讲一个最简单的。
实现
ioredis 是 nodejs 常用的驱动之一,封装了 redis 的常用 API,下面使用 ioredis 展示上述模式:
- 订阅 sub.js
import Redis from "ioredis";
const client = new Redis({
  host: "127.0.0.1",
  port: 6379,
  password: "123456",
  name: "myRedis",
});
// 订阅频道:myChannel
client.subscribe("mychannel", (e) => {
  console.log("subscribe channel: mychannel");
});
// 监听 发来的消息
client.on("message", (channel, message) => {
  console.log(`channel: ${channel},message: ${message}`);
});
// 监听 错误
client.on("error", (err) => {
  console.log("response err:" + err);
});
- 发布 pub.js
import Redis from "ioredis";
const client = new Redis({
  host: "127.0.0.1",
  port: 6379,
  password: "123456",
  name: "myserver-3y",
});
const msg = { id: 1, name: "ipenman", content: "明天不上班" };
client.publish("mychannel", JSON.stringify(msg));
node 启动 sub.js、pub.js,展示效果看下图:

刚才的例子中,可以看到通过配置进行连接,然后再进行订阅(subscribe)或发布(publish),还有一个监听功能,效果图中可以看到订阅启动监听之后是不可打断的,所以判断是个长连接,根据使用我们从客户端入手。
一、创建 client.ts
import { connect, Socket, SocketConnectOpts } from "net";
class Client {
  private connection: Socket;
  private config: SocketConnectOpts;

  constructor(config: SocketConnectOpts) {
    this.config = config;
    // 创建一个客户端连接
    this.connection = connect(config);
  }

  subscribe(channelName: string, handle: (err: Error)|Function => void) {
    this.connection.write(JSON.stringify({ type: "subscribe", name: channelName }), handle);
    return this; // this 是为了能够像redis一样链式调用
  }
  publish(channelName: string, message: string) {
    this.connection.write(JSON.stringify({ type: "publish", name: channelName, message: message }));
    return this;
  }

  on(eventName: string, handle: (...args) => void | Function) {
        // 这里只是举例,所以只写了一个message,复杂的可以用switch或策略模式
		if (eventName === 'message') {
			this.connection.on('data', (data) => {
				const sData = data.toString()
				const { name, message } = JSON.parse(sData)
				handle(name, message)
			})
		}
		return this
	}
}
客户端很简单,只是给服务端发送请求指令。
二、服务端 server.ts
import { createServer, AddressInfo, Socket } from "net";
const pubsub = new PubSub(); // PubSub:订阅发布模式
const server = createServer(); // 创建服务
server
  .on("connection", (socket) => {
    const id = new Date().getTime(); // 生成该连接唯一标识id
    socket
      // 收到客户端请求指令
      .on("data", (data) => {
        const sData = data.toString();
        const { type, name, message }: Data = JSON.parse(sData);
        if (type === "subscribe") {
          pubsub.subscriber(name, { id, socket });
        } else if (type === "publish") {
          pubsub.publish(name, message);
        }
      });
  })
  .on("error", (e) => {
    console.error(e);
  })
  .listen(3300);
上边先实现了简单的服务端收到客户端指令,调用 pubsub 对应的方法,该模式的重点 就是上面的 PubSub,下面看下具体实现:
class PubSub {
  private channels: Map<string, Channel>;
  constructor() {
    this.channels = new Map();
  }

  subscriber(channelName: string, subscriber: Subscriber) {
    const channel = this.channels.get(channelName);
    if (!channel) {
      const channel = new Channel(channelName, subscriber);
      this.channels.set(channelName, channel);
    } else {
      channel.subscribe(subscriber);
    }
  }
  publish(channelName: string, message: string) {
    // 找出对应channel,推送消息
    const channel = this.channels.get(channelName);
    channel && channel.publish(message);
  }
}
interface Subscriber {
  id: number;
  socket: Socket;
}
export interface Data {
  type?: string;
  name?: string;
  message?: string;
}

// 管道、频道
class Channel {
  private _name: string;
  private _subscribers: Subscriber[] = [];

  constructor(name, subscriber) {
    this._name = name;
    this._subscribers.push(subscriber);
  }

  subscribe(subscriber: Subscriber) {
    this._subscribers.push(subscriber);
  }

  publish(message: string) {
    // 推送消息
    this._subscribers.forEach((subscriber) => subscriber.socket.write(JSON.stringify({ name: this._name, message: message })));
  }
}
至此,一个基础的发布订阅模式就出来了。为了更好的解耦,后续我做了一些优化并添加了几个功能,如取消订阅,销毁连接等操作,下面是完整代码:
server.ts
import { createServer, AddressInfo, Socket } from "net";

class PubSub {
  private channels: Map<string, Channel>;
  constructor() {
    this.channels = new Map();
  }
  getSubscribers(channelName: string) {
    const channel = this.channels.get(channelName);
    if (channel) {
      return channel.subscribers.length;
    }
  }
  subscriber(channelName: string, subscriber: Subscriber) {
    const channel = this.channels.get(channelName);
    if (!channel) {
      const channel = new Channel(channelName, subscriber);
      this.channels.set(channelName, channel);
    } else {
      channel.subscribe(subscriber);
    }
  }
  unsubscriber(channelName: string, subscriber: Subscriber) {
    const channel = this.channels.get(channelName);
    channel.subscribe(subscriber);
  }
  publish(channelName: string, message: string) {
    const channel = this.channels.get(channelName);
    channel && channel.publish(message);
  }
  destroy(subscriber: Subscriber) {
    for (const [channelName, channel] of this.channels) {
      channel.unsubscribe(subscriber);
    }
  }
}
interface Subscriber {
  id: number;
  socket: Socket;
}
export interface Data {
  type?: string;
  name?: string;
  message?: string;
}
class Channel {
  private _name: string;
  private _subscribers: Subscriber[] = [];

  constructor(name, subscriber) {
    this._name = name;
    this._subscribers.push(subscriber);
  }
  get name() {
    return this._name;
  }
  get subscribers() {
    return this._subscribers;
  }
  subscribe(subscriber: Subscriber) {
    this._subscribers.push(subscriber);
  }
  unsubscribe(subscriber: Subscriber) {
    const subscriberIndex = this._subscribers.findIndex((sub) => subscriber.id === sub.id);
    if (subscriberIndex !== -1) {
      this._subscribers.splice(subscriberIndex, 1);
      subscriber.socket.write(JSON.stringify({ name: this._name, message: `取消订阅成功` }));
    }
  }

  publish(message: string) {
    this._subscribers.forEach((subscriber) => subscriber.socket.write(JSON.stringify({ name: this._name, message: message })));
  }
}
const pubsub = new PubSub();
const server = createServer();
server
  .on("connection", (socket) => {
    const id = new Date().getTime();
    socket
      .on("data", (data) => {
        const sData = data.toString();
        const { type, name, message }: Data = JSON.parse(sData);
        if (type === "subscribe") {
          pubsub.subscriber(name, { id, socket });
          console.log(`当前订阅人数:${pubsub.getSubscribers(name)}`);
        } else if (type === "unsubcribe") {
          pubsub.unsubscriber(name, { id, socket });
        } else if (type === "publish") {
          pubsub.publish(name, message);
        }
      })
      .on("close", function (status) {
        console.log("关闭连接", status);
        pubsub.destroy({ id, socket });
      })
      .on("error", (e) => {
        socket.destroy();
      });
  })
  .on("error", (e) => {
    console.error(e);
  })
  .listen(6379);
client.ts
import { connect, Socket, SocketConnectOpts } from "net";
export class Client {
  private connection: Socket;
  private config: SocketConnectOpts;
  constructor(config: SocketConnectOpts) {
    this.config = config;
    this.connection = this.createConnection();
  }
  private createConnection() {
    return connect(this.config);
  }
  on(eventName: string, handle: (...args) => void | Function) {
    if (eventName === "message") {
      this.connection.on("data", (data) => {
        const sData = data.toString();
        const { name, message } = JSON.parse(sData);
        handle(name, message);
      });
    }
    return this;
  }
  unsubscribe(channelName: string, handle: (err: Error) => void) {
    this.connection.write(JSON.stringify({ type: "unsubscribe", name: channelName }), handle);
    return this;
  }
  subscribe(channelName: string, handle: (err: Error) => void) {
    this.connection.write(JSON.stringify({ type: "subscribe", name: channelName }), handle);
    return this;
  }
  publish(channelName: string, message: string) {
    this.connection.write(JSON.stringify({ type: "publish", name: channelName, message: message }));
    return this;
  }
}
认真看到这里,觉得也耽误大伙很长时间了,下面就进入使用和测试环节。
使用
使用方式跟 redis 的 pub、sub 一毛一样。
sub.ts
import { Client } from "./client";
const client = new Client({ port: 6379, host: "127.0.0.1" });
client.subscribe("mychannel", () => {
  console.log("订阅成功!");
});
client.on("message", (channel, data) => {
  console.log(channel, data);
});
pub.ts
import { Client } from "./client";
const client = new Client({ port: 6379, host: "127.0.0.1" });
const msg = { id: 1, name: "ipenman", content: "明天不上班" };
client.publish("mychannel", JSON.stringify(msg));
启动 server.ts 启动 sub.ts 订阅 启动 pub.ts 发布消息
测试结果如下:

perfect!
最后
实际开发中大多数直接用主流现成的库,而不会去造轮子,然造轮子非我本意,但是可以通过造轮子的方式,能够更弄清楚他的原理,岂不乐乎!
