1、文件上传的必要前提
A form 表单的 enctype 取值必须是: multipart/form-data (默认值是:application/x-www-form-urlencoded)
enctype:是表单请求正文的类型
B method 属性取值必须是 Post
C 提供一个文件选择域<input type=”file” />
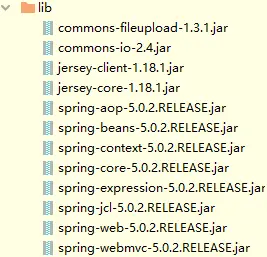
D <dependency><!--文件上传-->
<groupId>commons-fileupload</groupId>
<artifactId>commons-fileupload</artifactId>
<version>1.3.1</version>
</dependency>
<dependency>
<groupId>commons-io</groupId>
<artifactId>commons-io</artifactId>
<version>2.4</version>
</dependency>
<dependency><!--文件跨域上传-->
<groupId>com.sun.jersey</groupId>
<artifactId>jersey-core</artifactId>
<version>1.18.1</version>
</dependency>
<dependency>
<groupId>com.sun.jersey</groupId>
<artifactId>jersey-client</artifactId>
<version>1.18.1</version>
</dependency>
2、文件上传的原理分析
当 form 表单的 enctype 取值不是默认值后, request.getParameter()将失效。
enctype=”application/x-www-form-urlencoded”时, form 表单的正文内容是:
key=value&key=value&key=value
当 form 表单的 enctype 取值为 Mutilpart/form-data 时,请求正文内容就变成:
每一部分都是 MIME 类型描述的正文
-----------------------------7de1a433602ac 分界符
Content-Disposition: form-data; name="userName" 协议头
aaa 协议的正文
-----------------------------7de1a433602ac
Content-Disposition: form-data; name="file";
filename="C:\Users\zhy\Desktop\fileupload_demofile\b.txt"
Content-Type: text/plain 协议的类型( MIME 类型)
bbbbbbbbbbbbbbbbbbbbbbbbbbbbbbbb
-----------------------------7de1a433602ac--
3、使用springmvc进行文件上传的事项
maxUploadSize=10*1024*1024是10M最大上传的大小
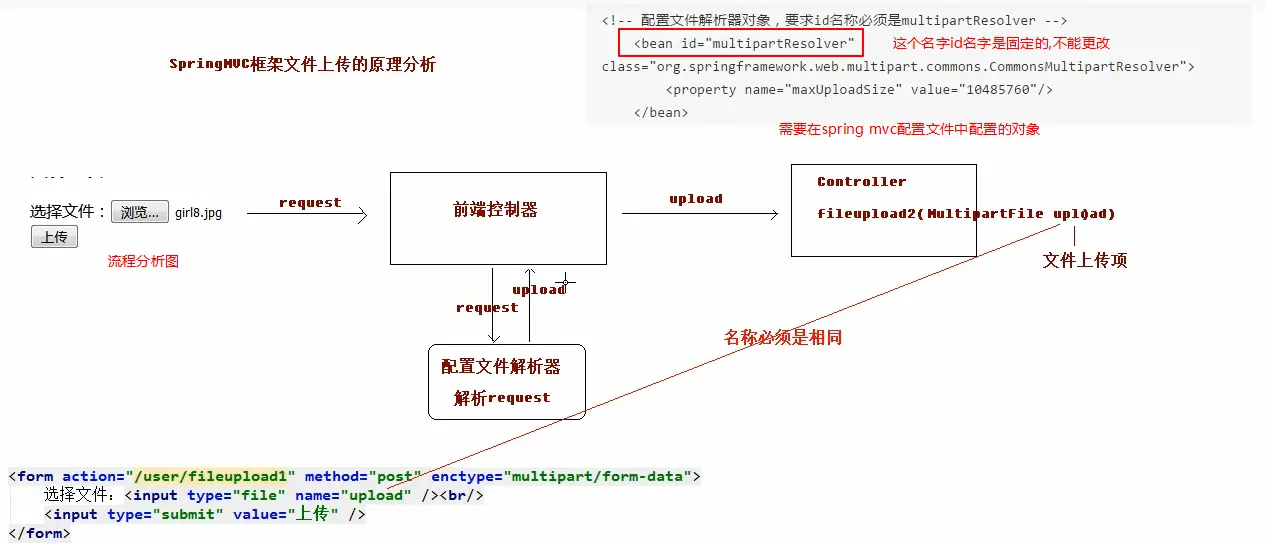
<bean id="multipartResolver"     class="org.springframework.web.multipart.commons.CommonsMultipartResolver">
    <property name="maxUploadSize" value="10485760" />
</bean>
代码实现:
@RequestMapping("/fileupload2")
public String fileupload2(HttpServletRequest request, MultipartFile upload) throws Exception {
    // 使用fileupload组件完成文件上传
    // 上传的位置
    String path = request.getSession().getServletContext().getRealPath("/uploads/");
    // 判断,该路径是否存在
    File file = new File(path);
    if(!file.exists()){
        // 创建该文件夹
        file.mkdirs();
    }
    // 获取上传文件的名称
    String filename = upload.getOriginalFilename();
    // 把文件的名称设置唯一值,uuid
    String uuid = UUID.randomUUID().toString().replace("-", "");
    filename = uuid+"_"+filename;
    // 完成文件上传
    upload.transferTo(new File(path,filename));
    return "success";
}
4、ssm 整合
1、搭建spring
<!--开启注解的扫描,希望处理service和dao,controller不需要Spring框架去处理-->
a.resource文件夹下编写applicationContext.xml如下:
    <context:component-scan base-package="cn.itcast" >
        <!--配置哪些注解不扫描 controller不扫描 留给springmvc去扫描-->
        <context:exclude-filter type="annotation" expression="org.springframework.stereotype.Controller" />
    </context:component-scan>
b.单元测试Service层的一个方法:
    public List<Account> findAll() {
        System.out.println("业务层:查询所有账户...");
        return accountDao.findAll();
    }这是要测试的方法
c.测试代码如下
    @Test
    public void run1(){
        // 加载配置文件
        ApplicationContext ac = new ClassPathXmlApplicationContext("classpath:applicationContext.xml");
        // 获取对象
        AccountService as = (AccountService) ac.getBean("accountService");
        // 调用方法
        as.findAll();
    }
2.搭建springmvc
a.resource文件夹下编写springmvc.xml如下:
    <!--开启注解扫描,只扫描Controller注解-->
    <context:component-scan base-package="cn.itcast">
        <context:include-filter type="annotation" expression="org.springframework.stereotype.Controller" />
    </context:component-scan>

    <!--配置的视图解析器对象-->
    <bean id="internalResourceViewResolver" class="org.springframework.web.servlet.view.InternalResourceViewResolver">
        <property name="prefix" value="/WEB-INF/pages/"/>
        <property name="suffix" value=".jsp"/>
    </bean>

    <!--过滤静态资源-->
    <mvc:resources location="/css/" mapping="/css/**" />
    <mvc:resources location="/images/" mapping="/images/**" />
    <mvc:resources location="/js/" mapping="/js/**" />

    <!--开启SpringMVC注解的支持-->
    <mvc:annotation-driven/>
b.web.xml配置如下
  <!--设置配置文件的路径-->
  <context-param>
    <param-name>contextConfigLocation</param-name>
    <param-value>classpath:applicationContext.xml</param-value>
  </context-param>
  <!--配置前端控制器-->
  <servlet>
    <servlet-name>dispatcherServlet</servlet-name>
    <servlet-class>org.springframework.web.servlet.DispatcherServlet</servlet-class>
    <!--加载springmvc.xml配置文件-->
    <init-param>
      <param-name>contextConfigLocation</param-name>
      <param-value>classpath:springmvc.xml</param-value>
    </init-param>
    <!--启动服务器,创建该servlet-->
    <load-on-startup>1</load-on-startup>
  </servlet>
  <servlet-mapping>
    <servlet-name>dispatcherServlet</servlet-name>
    <url-pattern>/</url-pattern>
  </servlet-mapping>

  <!--解决中文乱码的过滤器-->
  <filter>
    <filter-name>characterEncodingFilter</filter-name>
    <filter-class>org.springframework.web.filter.CharacterEncodingFilter</filter-class>
    <init-param>
      <param-name>encoding</param-name>
      <param-value>UTF-8</param-value>
    </init-param>
  </filter>
  <filter-mapping>
    <filter-name>characterEncodingFilter</filter-name>
    <url-pattern>/*</url-pattern>
  </filter-mapping>
c.编写一个controller进行测试
    @Controller
    @RequestMapping("/account")
    public class AccountController {
        @RequestMapping("/findAll")
        public String findAll(Model model){
            System.out.println("表现层:查询所有账户...");
            return "success";
        }
    }
3.整合springmvc和spring
    a.tomcat启动的时候需要加载applicationContext.xml的配置文件
    b.ServletContext创建==》ServletContext的监听器的方法加载resource下的applicationContext.xml
    c.于是创建了WEB版本工厂,存储ServletContext对象
    d.javax.servlet.ServletContextListener存在于spring-web这个依赖中
    e. <!--配置由spring实现了ServletContextListener的监听器类,默认只加载WEB-INF目录下的applicationContext.xml配置文件-->
      <listener>
        <listener-class>org.springframework.web.context.ContextLoaderListener</listener-class>
      </listener>
        <!--设置配置文件的路径-->
      <context-param>
        <param-name>contextConfigLocation</param-name>
        <param-value>classpath:applicationContext.xml</param-value>
      </context-param>
      实现监听器中的初始化和销毁的方法
    注意:编写的applicationContext.xml的是在resource目录下面的,但是生成的war包会把applicationContext.xml放在WEB-INF下的classes文件夹下面所以要配置监听器的contextConfigLocation参数为classpath:applicationContext.xml
f.编写如下测试代码
@Autowired
private AccountService accountService;
@RequestMapping("/findAll")
public String findAll(Model model){
    System.out.println("表现层:查询所有账户...");
    // 调用service的方法
    List<Account> list = accountService.findAll();
    model.addAttribute("list",list);
    return "success";
}

4.搭建mybatis
a.先在resource下面创建SqlMapConfig.xml
b.进行如下测试
    @Test
    public void run1() throws Exception {
        // 加载配置文件
        InputStream in = Resources.getResourceAsStream("SqlMapConfig.xml");
        // 创建SqlSessionFactory对象
        SqlSessionFactory factory = new SqlSessionFactoryBuilder().build(in);
        // 创建SqlSession对象
        SqlSession session = factory.openSession();
        // 获取到代理对象
        AccountDao dao = session.getMapper(AccountDao.class);
        // 查询所有数据
        List<Account> list = dao.findAll();
        for(Account account : list){
            System.out.println(account);
        }
        // 关闭资源
        session.close();
        in.close();
    }
    做增删该的话需要在关闭资源前提交事务session.commit();
5.整合spring和mybatis
a.核心思想:service层的对象已经放入容器中了,所以要做的是如何把dao层的代理对象也放入容器中,以便把dao注入到service层中

b.applicationContext.xml配置文件中添加如下内容
    <!--Spring整合MyBatis框架-->
    <!--配置连接池-->
    <bean id="dataSource" class="com.mchange.v2.c3p0.ComboPooledDataSource">
        <property name="driverClass" value="com.mysql.jdbc.Driver"/>
        <property name="jdbcUrl" value="jdbc:mysql:///ssm"/>
        <property name="user" value="root"/>
        <property name="password" value="root"/>
    </bean>

    <!--配置SqlSessionFactory工厂-->
    <bean id="sqlSessionFactory" class="org.mybatis.spring.SqlSessionFactoryBean">
        <property name="dataSource" ref="dataSource" />
        <!--用于取别名的配置:扫描pojo包,给包下所有pojo对象起别名-->
        <property name="typeAliasesPackage" value="com.itheima.domain"/>
    </bean>SqlSessionFactoryBean要用到数据源所以得需要配置

    <!--配置AccountDao接口所在包-->
    <bean id="mapperScanner" class="org.mybatis.spring.mapper.MapperScannerConfigurer">
        <property name="basePackage" value="cn.itcast.dao"/>
    </bean>MapperScannerConfigurer要用到dao接口所以得需要配置
    加上连接池,工厂,接口的配置后就无须SqlMapConfig.xml的配置了
    因为指定了要扫描的接口所以不用在dao层中加@repository注解
6.优化数据源的配置
    在resource文件夹下添加配置文件druid.properties:内容如下
    jdbc.driverClassName=com.mysql.jdbc.Driver
    jdbc.url=jdbc:mysql://localhost:3306/peanut_wifi
    jdbc.username=root
    jdbc.password=root
    修改applicationContext.xml的部分配置
    <!--1.1加载数据库配置文件-->
    <context:property-placeholder location="classpath:druid.properties"/>
    <!--1.1.1配置连接池-->
    <bean id="dataSource" class="com.alibaba.druid.pool.DruidDataSource">
        <property name="driverClassName" value="${jdbc.driverClassName}"></property>
        <property name="url" value="${jdbc.url}"></property>
        <property name="username" value="${jdbc.username}"></property>
        <property name="password" value="${jdbc.password}"></property>
    </bean>
7.可以跑通ssm框架 再添加spring的声明式事务 resource下再加上log4j.properties
    方式一:注解和xml结合
    <bean id="transactionManager" class="org.springframework.jdbc.datasource.DataSourceTransactionManager">
        <property name="dataSource" ref="dataSource"></property>
    </bean>
    <tx:annotation-driven transaction-manager="transactionManager"></tx:annotation-driven>
    方式二:纯注解
    <!--配置事务管理器-->
    <bean id="transactionManager" class="org.springframework.jdbc.datasource.DataSourceTransactionManager">
        <property name="dataSource" ref="dataSource" />
    </bean>

    <!--配置事务通知的属性-->
    <tx:advice id="txAdvice" transaction-manager="transactionManager">
        <tx:attributes>
            <tx:method name="find*" read-only="true"/>
            <tx:method name="*" isolation="DEFAULT"/>
            <tx:method name="save*" propagation="REQUIRED"/>
            <tx:method name="update*" propagation="REQUIRED"/>
            <tx:method name="delete*" propagation="REQUIRED"/>
            <tx:method name="*" propagation="REQUIRED"/>
        </tx:attributes>
    </tx:advice>

    <!--配置AOP切面方式一:-->
    <aop:config>
        <aop:advisor advice-ref="txAdvice" pointcut="execution(* cn.itcast.service.impl.*ServiceImpl.*(..))"/>
    </aop:config>

    <!--配置AOP切面方式二:-->
    <aop:config>
        <aop:pointcut id="pointcut" expression="execution(* com.itheima.service.impl.*.*(..))"/>
        <aop:advisor advice-ref="advice" pointcut-ref="pointcut"/>
    </aop:config>
8.使用拆分聚合工程的话
把上面applicationContext.xml拆分成三个配置文件,放在各自的resources下面,如:
(1)dao层->src->main->resource->applicationContext-dao.xml
(2)service层->src->main->resource->applicationContext-service.xml
(3)web层->src->main->resource->applicationContext.xml
    web层的配置文件只要加上如下配置就可以引用到另外的连个
   <?xml version="1.0" encoding="UTF-8"?>
    <beans xmlns="http://www.springframework.org/schema/beans"
           xmlns:xsi="http://www.w3.org/2001/XMLSchema-instance"
           xmlns:context="http://www.springframework.org/schema/context"
           xmlns:aop="http://www.springframework.org/schema/aop"
           xmlns:tx="http://www.springframework.org/schema/tx"
           xmlns:mvc="http://www.springframework.org/schema/mvc"
           xsi:schemaLocation="http://www.springframework.org/schema/beans
    	http://www.springframework.org/schema/beans/spring-beans.xsd
    	http://www.springframework.org/schema/context
    	http://www.springframework.org/schema/context/spring-context.xsd
    	http://www.springframework.org/schema/aop
    	http://www.springframework.org/schema/aop/spring-aop.xsd
    	http://www.springframework.org/schema/tx
    	http://www.springframework.org/schema/tx/spring-tx.xsd
        http://www.springframework.org/schema/mvc
    	http://www.springframework.org/schema/mvc/spring-mvc.xsd">
        <import resource="classpath:spring/applicationContext-dao.xml"/>
        <import resource="classpath:spring/applicationContext-service.xml"/>
    </beans>
    web层另外再加上log4j.properties、springmvc.xml的配置文件


