

背景
大家好,我是六六。在学习裁剪功能的过程中,发现有很多文章讲的不是那么清晰易懂,让六六绕了很多弯路,所以今天呢,为了让大家不再绕弯,六六要详详细细的手把手教大家写一个裁剪功能出来。
1.目录
- 神奇canvas的那些api
- 一步一步地实战教学
- 总结
- 个人目标
2.神奇的canvas和动画
裁剪功能的核心之中当然是canvas这个技术,如果不懂的可以去mdn上过一遍这个,不用看的太深,了解它是干啥的,怎么干就行了。以我的大白话说,就是在坐标系内能够操作每个像素点的。接下来,我们先来了解一下关于裁剪核心的api和相关知识:
2.1 drawImage(image, x, y):
用法:绘制一张图片到canvas元素里面
image:image对象或者是canvas对象
x,y:为坐标的起始点
实例:
function draw() {
var ctx = document.getElementById('canvas').getContext('2d');
var img = new Image();
img.src = 'images/backdrop.png'; // 图片地址
img.onload = function(){
ctx.drawImage(img,0,0); // 拿到image对象,画入canvas上
}
}
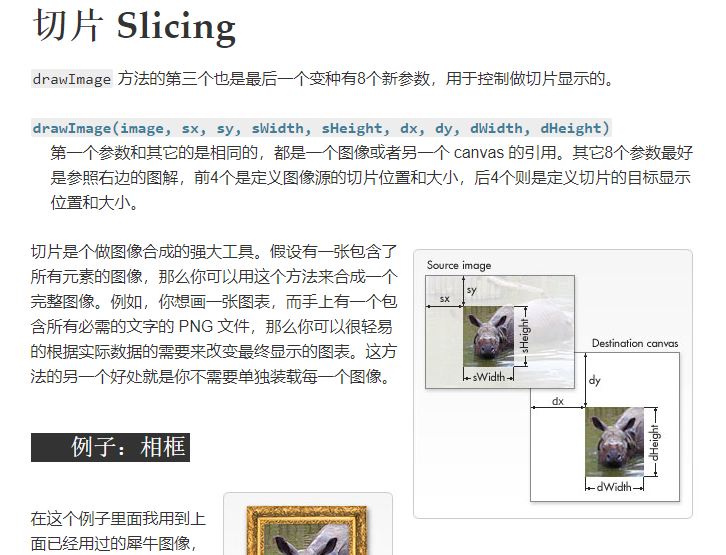
其实把,这个api有九个参数,借助官网的图:
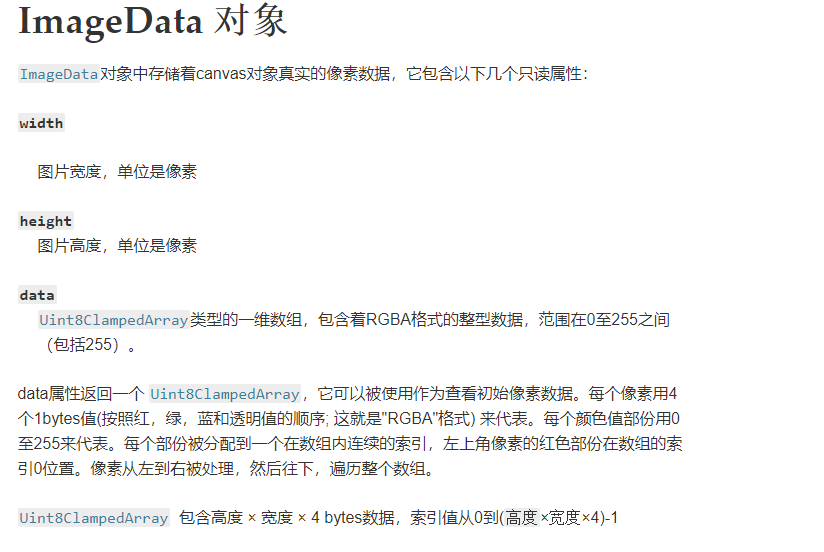
2.2 ctx.getImageData(left, top, width, height):
用法:返回一个imageData对象,包含一个data像素数组,一个width为宽,一个height为高的
2.3何为imageData对象?
关于data数据(以我的大白话理解来说,专业说法在上面),其实就是描述每个像素点的信息
(数据非常大),我们都知道rgba吧,前三个数字代表像素点的颜色,第四个数字代表透明度,
所以data数据呢,就是整个选取部分的像素点信息的集合。每个像素点有四个值,
依次push到data数据中。
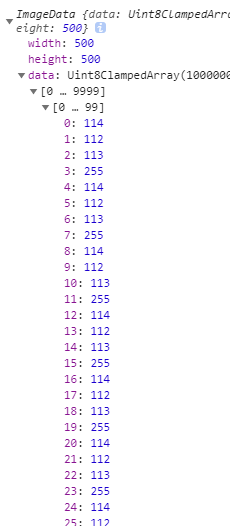
如上图所示,我们就知道第一个像素点的颜色就是rgba(114,112,113,255/255),那么他的位置
就是位于坐标(0,0)。假如选取的canvas大小为500\*500的,
那么这个data数组的大小就是500\*500\*4。
2.4 ctx.putImageData(myImageData, dx, dy);
用法:在场景中写入像素数据
myImageData:就是imageData对象
dx,dy:就是场景的坐标起点
2.5 canvas.toBlob(callback, type, encoderOptions)
用法:方法创造Blob对象,用以展示canvas上的图片;这个图片文件可以被缓存或保存到本地
callback:回调函数,可获得一个单独的Blob对象参数
type:DOMString类型,指定图片格式,默认格式为image/png。
encoderOptions :Number类型,值在0与1之间,当请求图片格式为image/jpeg
或者image/webp时用来指定图片展示质量。如果这个参数的值不在指定类型与范围之内,
则使用默认值,其余参数将被忽略。
2.6 requestanimationframe:
首先我们知道裁剪功能是需要运动,那么肯定会用到动画。
h5提供了我们一个终极动画解决的函数,就是requestanimationframe.
3实战教学
3.1思路分析
- 首先我们需要借助input元素上传图片获取img对象(易)
- 把img对象写入canvas元素中(易)
- 需要创建一个裁剪方框对象用来裁剪图片,方框随用户交互移动和缩放(难)
- 获取方框内的图片信息导入出来
- 视觉优化,将整张图片绘制灰色,选中的部分为亮色(中)
- 完成上传及其他操作
思路很容易懂,接下来我们就来一步一步实现。上面的每个api必须熟练掌握,不熟悉的回头再看一看。下面就是代码加gif图片演示,基本上每句代码都是有备注的。
3.2获取图片及显示图片:
思路:
首先通过input元素我们可以获取到img对象
,在图片加载出来后就可以画入画图中,
并可以循环动画。
<template>
  <div id="app">
    <canvas width='500' height='500' id='canvas'></canvas>
     <input type="file"
           @change="handleChange"
           multiple='true'
           accept='image/*'
           >
  </div>
</template>

<script>
export default{
  data(){
    return{
      ctx:'',
      img:''
    }
  },
  mounted(){
    // 获取canvas对象
    const canvas = document.getElementById('canvas')
    const ctx = canvas.getContext('2d')
    // 讲ctx存入data中
    this.ctx=ctx
  },
  methods:{
       // 读取图片
    handleChange (e) {
      const that = this
      // 创建一个文件读取流
      const reader = new FileReader()
      reader.readAsDataURL(e.target.files[0])
      // 文件加载完成后可以读入
      reader.onload = function () {
        // this.reslut 为图片信息,就开始调用drawImg方法将图片写入canvas中
        that.drawImg(this.result)
      }
    },
    // 创建一个图片对象 画到画布上
    drawImg (imgData) {
      const that = this
      const img = new Image()
      img.src = imgData
      this.img = img
      img.onload = function () {
        // 循环动画
        window.requestAnimationFrame(that.animate)
      }
    },
    animate(){
         // 清除画布,在下一次循环会画入重新
      this.ctx.clearRect(0,0,500,500)
      // 画照片
      this.ctx.drawImage(this.img, 0, 0, this.img.width, this.img.height, 0, 0, 500, 500)
      // 循环动画
      window.requestAnimationFrame(this.animate)
    }
  }
}
</script>

<style scoped>
canvas{
  position: absolute;
  top:50%;
  left:50%;
  transform: translate(-50%,-50%);
  border:1px solid red
}
</style>
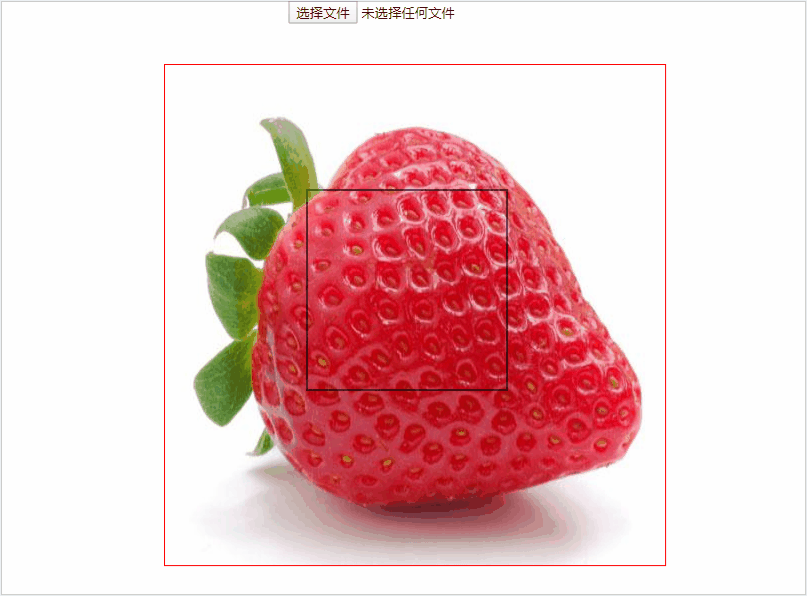
3.3 绘制裁剪框,随着鼠标移动及缩放
思路:借助三个事件,鼠标按下,移动,抬起。在移动事件
里面通过offsetX和offsetY获取鼠标在canvas内的坐标
。然后创建一个函数根据鼠标的坐标用来画出这个裁剪框,
放入animate函数里面循环。
演示:
<template>
  <div id="app">
    <canvas width='500' height='500' id='canvas'></canvas>
     <input type="file"
           @change="handleChange"
           multiple='true'
           accept='image/*'
           >
  </div>
</template>

<script>
/* eslint-disable */
export default{
  data(){
    return{
      ctx:'',
      img:'',
      rectLeft:150,
      rectTop:150,
      rectWidth:200,
      rectHeight:200
    }
  },
  mounted(){
    const that=this
    const canvas = document.getElementById('canvas')
    const ctx = canvas.getContext('2d')
    this.ctx=ctx
    // 新增----绑定点击事件,根据鼠标移动坐标画出裁剪框
      this.down=canvas.addEventListener('mousedown',()=>{
        canvas.onmousemove=function(e){
        let x=e.offsetX
        let y=e.offsetY
         x <= 100 ? that.rectLeft=0: that.rectLeft = x - 100
         y <= 100 ? that.rectTop =0: that.rectTop = y - 100
        x >= 400 ? that.rectLeft = 300 : that.rectLeft = x - 100
        y >= 400 ? that.rectTop = 300 : that.rectTop = y - 100
        if(x<=100){
          that.rectLeft=0
        }
        if(y<=100){
           that.rectTop=0
        }
      }
    })
    canvas.addEventListener('mouseup',()=>{
    console.log('抬起了')
   canvas.onmousemove=null
  })
  },
  methods:{
    handleChange (e) {
      const that = this
      const reader = new FileReader()
      reader.readAsDataURL(e.target.files[0])
      reader.onload = function () {
        that.drawImg(this.result)
      }
    },
    drawImg (imgData) {
      const that = this
      const img = new Image()
      img.src = imgData
      this.img = img
      img.onload = function () {
        window.requestAnimationFrame(that.animate)
      }
    },
    animate(){
      this.ctx.clearRect(0,0,500,500)
      this.ctx.drawImage(this.img, 0, 0, this.img.width, this.img.height, 0, 0, 500, 500)
      // 新增---画裁剪框
      this.drawRect()
      window.requestAnimationFrame(this.animate)
    },
    // 新增----画出裁剪框
    drawRect(){
      this.ctx.beginPath()
      this.ctx.lineWidth = 2
      this.ctx.strokeStyle = 'rgba(0,0,0,0.6)'
      this.ctx.strokeRect(this.rectLeft, this.rectTop, this.rectWidth, this.rectHeight)
    }
  }
}
</script>

<style scoped>
canvas{
  position: absolute;
  top:50%;
  left:50%;
  transform: translate(-50%,-50%);
  border:1px solid red
}
input{
  position: absolute;
  top:10%;
  left:50%;
  transform: translate(-50%,-50%);
}
</style>
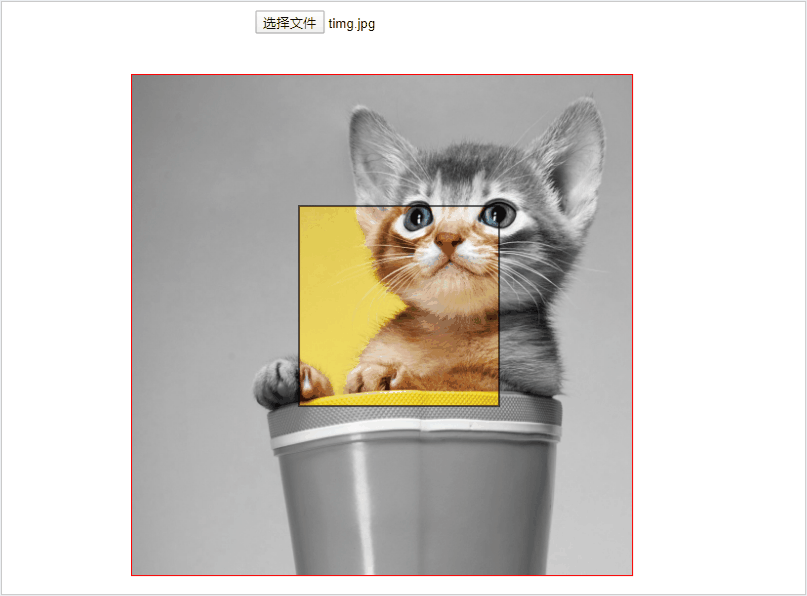
3.4 视觉优化,背景呈现灰色,裁剪出呈现亮色
为了更好的提高用户体验感,不得不得进行视觉优化:
思路:在每次循环动画的开始,我们可以先获取裁剪框
内的imageData,就是获取照片原色彩,
之后通过算法使用putImageData方法将整个canvas对象色彩变成灰色,
然后再把之前获取
裁剪框内的彩色在使用putImageData绘制上去即可。
<template>
  <div id="app">
    <canvas width='500' height='500' id='canvas'></canvas>
     <input type="file"
           @change="handleChange"
           multiple='true'
           accept='image/*'
           >
  </div>
</template>

<script>
/* eslint-disable */
export default{
  data(){
    return{
      ctx:'',
      img:'',
      rectLeft:150,
      rectTop:150,
      rectWidth:200,
      rectHeight:200,
      chooseRgb:[]
    }
  },
  mounted(){
    const that=this
    const canvas = document.getElementById('canvas')
    const ctx = canvas.getContext('2d')
    this.ctx=ctx
      this.down=canvas.addEventListener('mousedown',()=>{
        canvas.onmousemove=function(e){
        let x=e.offsetX
        let y=e.offsetY
         x <= 100 ? that.rectLeft=0: that.rectLeft = x - 100
         y <= 100 ? that.rectTop =0: that.rectTop = y - 100
        x >= 400 ? that.rectLeft = 300 : that.rectLeft = x - 100
        y >= 400 ? that.rectTop = 300 : that.rectTop = y - 100
        if(x<=100){
          that.rectLeft=0
        }
        if(y<=100){
           that.rectTop=0
        }
      }
    })
    canvas.addEventListener('mouseup',()=>{
    console.log('抬起了')
   canvas.onmousemove=null
  })
  },
  methods:{
    handleChange (e) {
      const that = this
      const reader = new FileReader()
      reader.readAsDataURL(e.target.files[0])
      reader.onload = function () {
        that.drawImg(this.result)
      }
    },
    drawImg (imgData) {
      const that = this
      const img = new Image()
      img.src = imgData
      this.img = img
      img.onload = function () {
        window.requestAnimationFrame(that.animate)
      }
    },
    animate(){
      this.ctx.clearRect(0,0,500,500)
      this.ctx.drawImage(this.img, 0, 0, this.img.width, this.img.height, 0, 0, 500, 500)
      this.drawChoose()
      this.drawHui()
      this.drawRect()
      window.requestAnimationFrame(this.animate)

    },
    drawRect(){
      this.ctx.beginPath()
      this.ctx.lineWidth = 2
      this.ctx.strokeStyle = 'rgba(0,0,0,0.6)'
      this.ctx.strokeRect(this.rectLeft, this.rectTop, this.rectWidth, this.rectHeight)
    },
       // 新增----获取裁剪框的色彩色彩
    drawChoose () {
      const data = this.ctx.getImageData(this.rectLeft, this.rectTop, this.rectWidth, this.rectHeight)
      this.chooseRgb = data
    },
        //新增---- 全部图片变灰色并且画上彩色的
    drawHui () {
      const data = this.ctx.getImageData(0, 0, 500, 500)
      for (let i = 0; i < data.data.length; i += 4) {
        const grey = (data.data[i] + data.data[i + 1] + data.data[i + 2]) / 3
        data.data[i] = data.data[i + 1] = data.data[i + 2] = grey
      }
      // 将变成灰色的像素绘制上去
      this.ctx.putImageData(data, 0, 0)
      // 将彩色的裁剪框绘制上去
      this.ctx.putImageData(this.chooseRgb, this.rectLeft, this.rectTop)
    },
  }
}
</script>

<style scoped>
canvas{
  position: absolute;
  top:50%;
  left:50%;
  transform: translate(-50%,-50%);
  border:1px solid red
}
input{
  position: absolute;
  top:10%;
  left:50%;
  transform: translate(-50%,-50%);
}
</style>
3.5获取裁剪框的内容并显示出来
思路:需要创建一个新的canvas对象
,随后调用putImageData将裁剪的像素对象画上去即可
<template>
  <div id="app">
    <canvas width='500' height='500' class='canvas1'></canvas>
    <!-- 新增的canvas元素-->
    <canvas width='200' height='200' class='canvas2'></canvas>
     <input type="file"
           @change="handleChange"
           multiple='true'
           accept='image/*'
           >
          <button @click='caijian'>点击裁剪</button>
  </div>
</template>

<script>
/* eslint-disable */
export default{
  data(){
    return{
      ctx:'',
      img:'',
      rectLeft:150,
      rectTop:150,
      rectWidth:200,
      rectHeight:200,
      chooseRgb:[]
    }
  },
  mounted(){
    const that=this
    const canvas = document.querySelector('.canvas1')
    const ctx = canvas.getContext('2d')
    this.ctx=ctx
      this.down=canvas.addEventListener('mousedown',()=>{
        canvas.onmousemove=function(e){
        let x=e.offsetX
        let y=e.offsetY
         x <= 100 ? that.rectLeft=0: that.rectLeft = x - 100
         y <= 100 ? that.rectTop =0: that.rectTop = y - 100
        x >= 400 ? that.rectLeft = 300 : that.rectLeft = x - 100
        y >= 400 ? that.rectTop = 300 : that.rectTop = y - 100
        if(x<=100){
          that.rectLeft=0
        }
        if(y<=100){
           that.rectTop=0
        }
      }
    })
    canvas.addEventListener('mouseup',()=>{
    console.log('抬起了')
   canvas.onmousemove=null
  })
  },
  methods:{
    handleChange (e) {
      const that = this
      const reader = new FileReader()
      reader.readAsDataURL(e.target.files[0])
      reader.onload = function () {
        that.drawImg(this.result)
      }
    },
    drawImg (imgData) {
      const that = this
      const img = new Image()
      img.src = imgData
      this.img = img
      img.onload = function () {
        window.requestAnimationFrame(that.animate)
      }
    },
    animate(){
      this.ctx.clearRect(0,0,500,500)
      this.ctx.drawImage(this.img, 0, 0, this.img.width, this.img.height, 0, 0, 500, 500)
      this.drawChoose()
      this.drawHui()
      this.drawRect()
      window.requestAnimationFrame(this.animate)

    },
    drawRect(){
      this.ctx.beginPath()
      this.ctx.lineWidth = 2
      this.ctx.strokeStyle = 'rgba(0,0,0,0.6)'
      this.ctx.strokeRect(this.rectLeft, this.rectTop, this.rectWidth, this.rectHeight)
    },
    drawChoose () {
      const data = this.ctx.getImageData(this.rectLeft, this.rectTop, this.rectWidth, this.rectHeight)
      this.chooseRgb = data
    },
    drawHui () {
      const data = this.ctx.getImageData(0, 0, 500, 500)
      for (let i = 0; i < data.data.length; i += 4) {
        const grey = (data.data[i] + data.data[i + 1] + data.data[i + 2]) / 3
        data.data[i] = data.data[i + 1] = data.data[i + 2] = grey
      }
      this.ctx.putImageData(data, 0, 0)
      this.ctx.putImageData(this.chooseRgb, this.rectLeft, this.rectTop)
    },
    // 新增一个canvas元素 用来存储裁剪的部分,以及上传时需要创建这个元素。
    caijian(){
      const canvas=document.querySelector('.canvas2')
       const ctx = canvas.getContext("2d")
      canvas.width = 200
      canvas.height = 200
      ctx.putImageData(this.chooseRgb, 0, 0)
    }
  }
}
</script>

<style scoped>
.canvas1{
  position: absolute;
  top:50%;
  left:50%;
  transform: translate(-50%,-50%);
  border:1px solid red
}
.canvas2{
  position: absolute;
  top:50%;
  left:75%;
  transform: translate(-50%,-50%);
  border:1px solid red
}
input{
  position: absolute;
  top:10%;
  left:50%;
  transform: translate(-50%,-50%);
}
button{
   position: absolute;
  top:10%;
  left:70%;
  transform: translate(-50%,-50%);
}
</style>

3.6上传裁剪头像
思路:就是通过canvas.toBlob这个api实现的,
下面代码是我之前上传到服务器的时候写的,由于现在木有服务器,
就不能演示了。
// 需要接受canvas元素对象,上一部分创建的
uploadImg (canvas) {
// 异步获取blob对象
      canvas.toBlob(async (blob) => {
      // 实例化一个FormData
        let fd = new FormData()
        fd.append('file', blob)
        fd.name = new Date().getTime()
        // 传送数据
        const result = await this.$http({
          method: 'post',
          url: 'api/users/upload',
          headers: {
            'Content-Type': 'multipart/form-data'
          },
          data: fd
        })
        if (result.data.success) {
          this.isShow = false
          this.$bus.$emit('on1', result.data.url)
          this.$alert.success('更换头像成功', 1000)
        }
      }, 'image/png')
    }
  }
4.总结
整个裁剪过程已经讲完了,上传那一块还是有疑惑的同学,可以参考我的这篇文章
Vue前后端开发仿蘑菇街商城项目 这里面有上传头像的前后端代码,大家可以去参考一下。还是有疑惑的可以给我留言哈。
5.目标
这个月末之前,我争取开发一下裁剪的插件,共大家使用,毕竟造轮子还是很有趣的。希望大家都能来捧场~
