主要内容
1.  使用外部的Servlet容器和JSP支持
2.  外部Servlet容器启动SpringBoot应用原理。
1. 使用嵌入式Servlet容器的优缺点
    1.  优点:
        简单,便携。
        不用安装tomcat环境,默认直接打成jar包即可运行。

    2.  缺点:
        默认不支持JSP
        优化定制嵌入式tomcat复杂
        (写定制器,配置server.属性,适合实现简单的定制)
2. 使用外部的Servlet容器
外置的Servet容器:应用打成war包
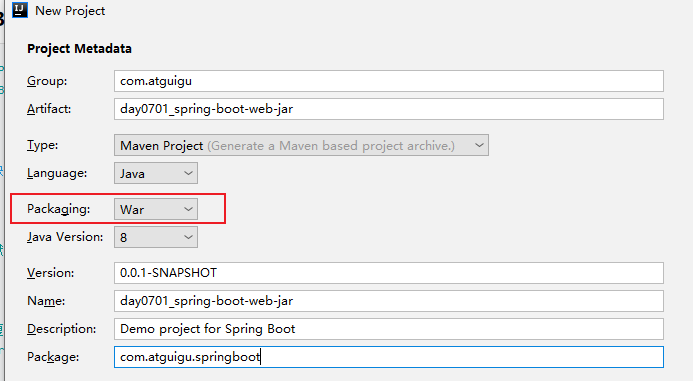
1. 创建一个SpringBoot,war项目:
打包方式是war:就可以使用JSP了。
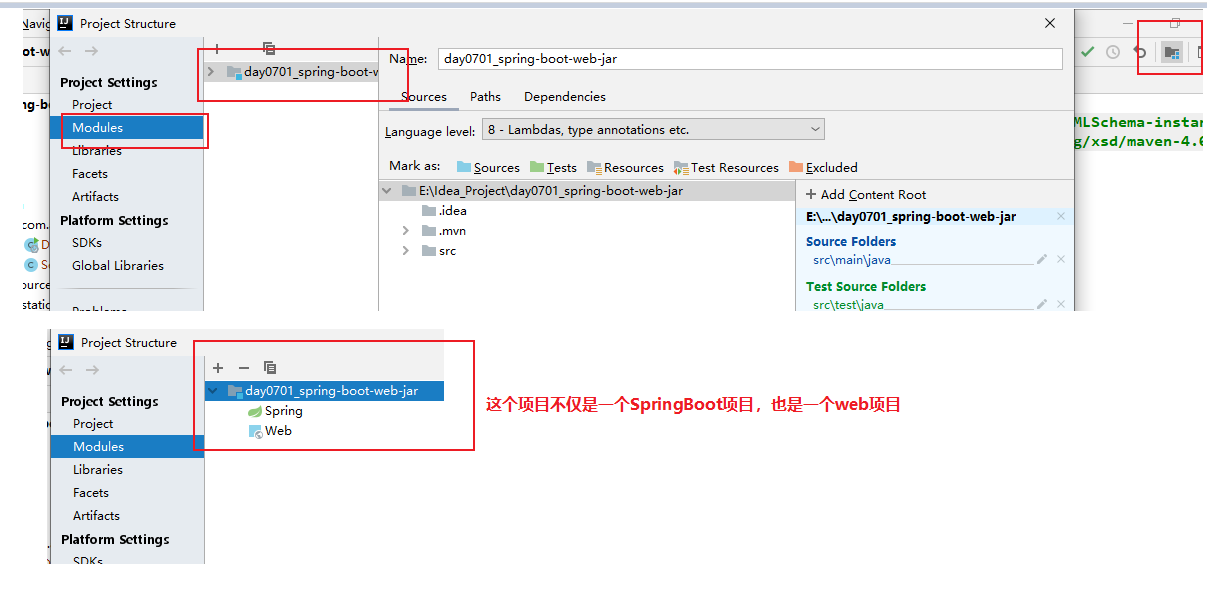
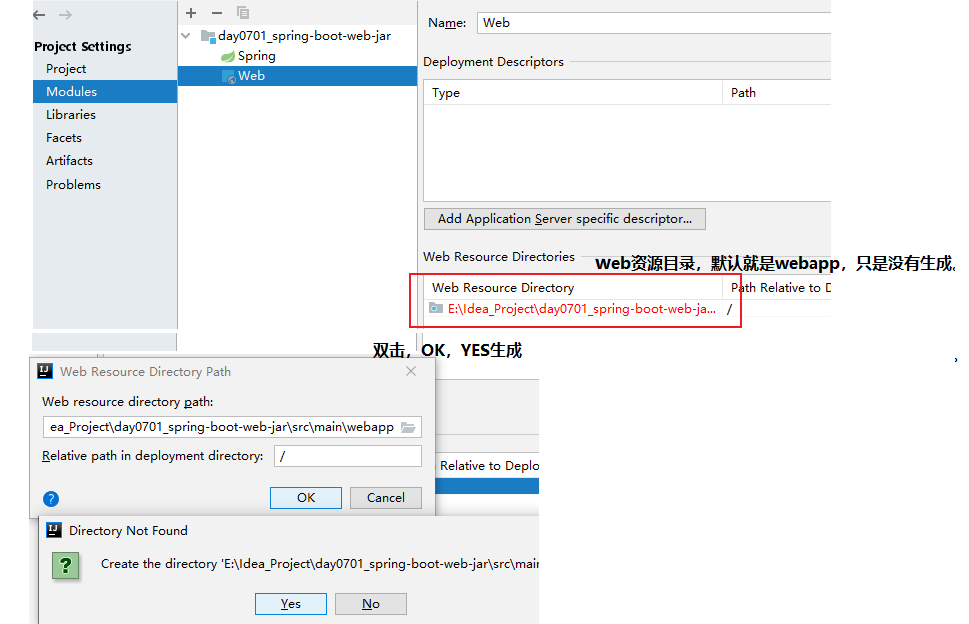
        2.  补全项目的目录结构

            这个项目既是一个SpringBoot项目,也是一个web项目
3. 生成web.xml文件
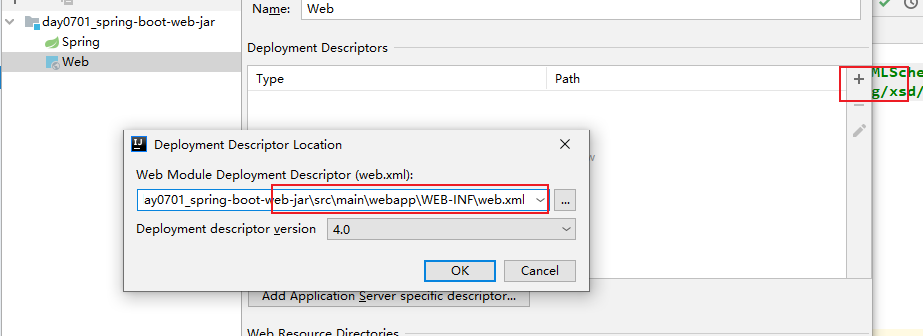
        4.  将服务器整合到IDEA中(另一种方式或者打成war包放到服务器上)

        5.  测试一下:

            1.  Controller映射请求,跳转到JSP页面
            @Controller
            public class HelloController {

                @GetMapping("/abc")
                public String hello(Model model){

                    model.addAttribute("msg","你好");

                    //没有引入Thymeleaf对应场景的starter
                    return "success";

                }
            }
2. 配置解析规则:前后缀
            # 配置解析规则
            spring.mvc.view.prefix=/WEB-INF/
            spring.mvc.view.suffix=.jsp
3. 写一个success.jsp
            <%@ page contentType="text/html;charset=UTF-8" language="java" %>
            <html>
            <head>
                <title>Title</title>
            </head>
            <body>

                <h1>success</h1>

                <h3>${msg}</h3>

            </body>
            </html>
2.1 使用外置的Servley容器的步骤
    1.  创建工程时指定war包(war包才能解析JSP)
        补全目录结构

    2.  将嵌入式的tomcat指定为provide
            <dependency>
                <groupId>org.springframework.boot</groupId>
                <artifactId>spring-boot-starter-tomcat</artifactId>
                <scope>provided</scope>
            </dependency>
        意思是目标环境已经有tomcat,打包时不需要带上tomcat。

    3.  必须写一个继承SpringBootServletInitializer的子类
        public class ServletInitializer extends SpringBootServletInitializer {

            @Override
            protected SpringApplicationBuilder configure(SpringApplicationBuilder application) {
                //SpringApplicationBuilder application:是Spring应用的构建器。
                //调用sources方法,传入项目的主程序类(主入口类)
                return application.sources(Day0701SpringBootWebJarApplication.class);
            }

        }
        目的就是调用configure()方法

    4.  启动服务器就可以使用了。
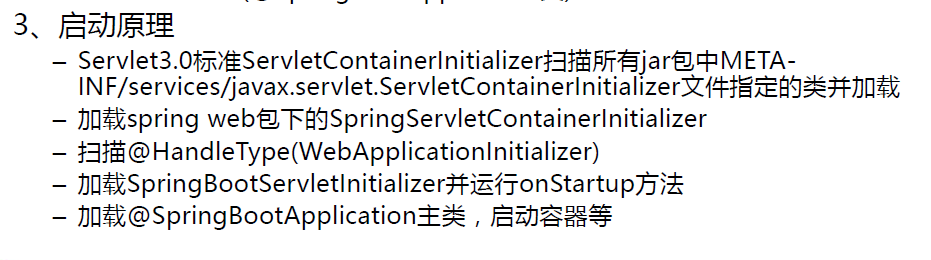
3. 使用外部的Servlet容器启动SpringBoot的原理
3.1 上一章回顾
    上一章的重点是:
        生成了一个继承SpringBootServletInitializer的子类
        public class ServletInitializer extends SpringBootServletInitializer {

            @Override
            protected SpringApplicationBuilder configure(SpringApplicationBuilder application) {
                //SpringApplicationBuilder application:是Spring应用的构建器。
                //调用sources方法,传入项目的主程序类(主入口类)
                return application.sources(Day0701SpringBootWebJarApplication.class);
            }

        }
        目的就是调用configure()方法
            SpringApplicationBuilder application:是Spring应用的构建器。
            调用sources方法,传入项目的主程序类(主入口类)
            return application.sources(Day0701SpringBootWebJarApplication.class);


        SpringBoot应用随着外部服务器的启动,也就启动起来了。
3.2 原理分析
        jar包:执行SpringBoot主类的main方法,启动IOC容器,创建嵌入式的Servlet容器

        war包:启动服务器,服务器启动SpringBoot应用,再启动IOC容器。

        为什么tomcat能启动SpringBoot应用?
        最核心的点就是SpringBootServletInitializer

    1.  背景:
        Servlet 3.0之后就有一项规范。

        8.2.4 Shared libraries / runtimes pluggability
        在8.2.4共享库和运行时插件章节,主要定义了一个规则。

        规则:
            1.  服务器启动(web应用启动)会创建当前web应用里面每一个jar包里面的
                ServletContainerInitializer接口实例。

            2.  创建这个实例,要到哪里去找?
                implementation of the ServletContainerInitializer MUST bundle in the
            META-INF/services directory of the jar file a file
            called javax.servlet.ServletContainerInitializer,

                ServletContainerInitializer的实现放在了jar包的META-INF/services文件夹下,而且
            必须有一个文件叫做javax.servlet.ServletContainerInitializer。
                这个文件的内容指向它的实现类。
3. 里面的内容
org.springframework.web.SpringServletContainerInitializer
3. 还可以使用HandlesTypes这个注解
在应用启动的时候,加载我们感兴趣的类。
2. 流程
1. 启动tomcat服务器
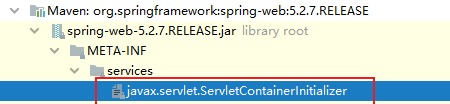
2. org/springframework/spring-web/5.2.7.RELEASE/spring-web-5.2.7.RELEASE.jar!/META-INF/services/javax.servlet.ServletContainerInitializer
Spring的web模块里面有这个文件,其内容:
org.springframework.web.SpringServletContainerInitializer

            相当于我们应用在启动的时候,就要创建这个模块的ServletContainerInitializer的实现
            SpringServletContainerInitializer对象。

        3.  进入SpringServletContainerInitializer对象看一下。
@HandlesTypes({WebApplicationInitializer.class})
public class SpringServletContainerInitializer implements ServletContainerInitializer {
    public SpringServletContainerInitializer() {
    }
            它有一个@HandlesTypes注解:在应用启动的时候,加载我们感兴趣的类。

            将 @HandlesTypes标注的所有类型的这个类都传入onStartup()方法中,然后判断如果不是
            接口的话就实例化。
    public void onStartup(@Nullable Set<Class<?>> webAppInitializerClasses, ServletContext servletContext) throws ServletException {
        List<WebApplicationInitializer> initializers = new LinkedList();
        Iterator var4;
        if (webAppInitializerClasses != null) {
            var4 = webAppInitializerClasses.iterator();

            while(var4.hasNext()) {
                Class<?> waiClass = (Class)var4.next();
                if (!waiClass.isInterface() && !Modifier.isAbstract(waiClass.getModifiers()) && WebApplicationInitializer.class.isAssignableFrom(waiClass)) {
                    try {
                        initializers.add((WebApplicationInitializer)ReflectionUtils.accessibleConstructor(waiClass, new Class[0]).newInstance());
                    } catch (Throwable var7) {
                        throw new ServletException("Failed to instantiate WebApplicationInitializer class", var7);
                    }
                }
            }
        }
4. 每一个WebApplicationInitializer都调用自己的onStartup方法
            while(var4.hasNext()) {
                WebApplicationInitializer initializer = (WebApplicationInitializer)var4.next();
                initializer.onStartup(servletContext);
            }
5. 我们看一下WebApplicationInitializer的实现:
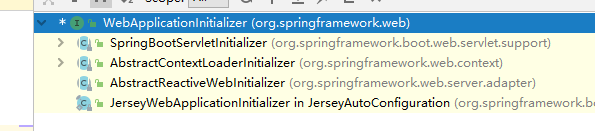
其中有一个ServletInitializer的子类
                public class ServletInitializer extends SpringBootServletInitializer {

                    @Override
                    protected SpringApplicationBuilder configure(SpringApplicationBuilder application) {
                        return application.sources(Day0701SpringBootWebJarApplication.class);
                    }

                }
6. 由于启动Tomcat时会执行
                public class ServletInitializer extends SpringBootServletInitializer {

                    @Override
                    protected SpringApplicationBuilder configure(SpringApplicationBuilder application) {
                        return application.sources(Day0701SpringBootWebJarApplication.class);
                    }

                }
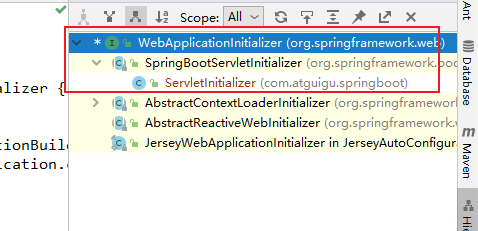
            相当于我们ServletInitializer这个类会被创建对象,并执行startUp方法。
            因为ServletInitializer继承了WebApplicationInitializer
7. SpringBootServletInitializer的实例,执行onStartup的时候会创建一个根容器。
    public void onStartup(ServletContext servletContext) throws ServletException {
        this.logger = LogFactory.getLog(this.getClass());
        //创建一个根容器
        WebApplicationContext rootApplicationContext = this.createRootApplicationContext(servletContext);
        if (rootApplicationContext != null) {
            servletContext.addListener(new SpringBootServletInitializer.SpringBootContextLoaderListener(rootApplicationContext, servletContext));
        } else {
            this.logger.debug("No ContextLoaderListener registered, as createRootApplicationContext() did not return an application context");
        }

    }

    //创建根容器的createRootApplicationContext(servletContext);的方法
    protected WebApplicationContext createRootApplicationContext(ServletContext servletContext) {
        //1. 创建SpringApplicationBuilder构建器
        SpringApplicationBuilder builder = this.createSpringApplicationBuilder();
        builder.main(this.getClass());
        ApplicationContext parent = this.getExistingRootWebApplicationContext(servletContext);
        if (parent != null) {
            this.logger.info("Root context already created (using as parent).");
            servletContext.setAttribute(WebApplicationContext.ROOT_WEB_APPLICATION_CONTEXT_ATTRIBUTE, (Object)null);
            builder.initializers(new ApplicationContextInitializer[]{new ParentContextApplicationContextInitializer(parent)});
        }

        builder.initializers(new ApplicationContextInitializer[]{new ServletContextApplicationContextInitializer(servletContext)});
        builder.contextClass(AnnotationConfigServletWebServerApplicationContext.class);

        //调用configure()方法:子类重写了该方法,并传入主入口程序类。
        builder = this.configure(builder);
        builder.listeners(new ApplicationListener[]{new SpringBootServletInitializer.WebEnvironmentPropertySourceInitializer(servletContext)});

        //使用builder创建一个Spring应用。
        SpringApplication application = builder.build();
        if (application.getAllSources().isEmpty() && MergedAnnotations.from(this.getClass(), SearchStrategy.TYPE_HIERARCHY).isPresent(Configuration.class)) {
            application.addPrimarySources(Collections.singleton(this.getClass()));
        }

        Assert.state(!application.getAllSources().isEmpty(), "No SpringApplication sources have been defined. Either override the configure method or add an @Configuration annotation");
        if (this.registerErrorPageFilter) {
            application.addPrimarySources(Collections.singleton(ErrorPageFilterConfiguration.class));
        }

        application.setRegisterShutdownHook(false);

        //启动Spring应用
        return this.run(application);
    }
        8. 回到SpringBoot应用中的代码

        SpringBootServletInitializer的子类重写的这个configure()方法,并传入主入口程序类。
            @Override
            protected SpringApplicationBuilder configure(SpringApplicationBuilder application) {
                return application.sources(Day0701SpringBootWebJarApplication.class);
            }
        SpringBootServletInitializer的子类重写的这个configure()方法,并传入主入口程序类。


        9.  Spring的应有就启动了,并且创建IOC容器

            启动Spring应用:
            return this.run(application);
    protected WebApplicationContext run(SpringApplication application) {
        return (WebApplicationContext)application.run(new String[0]);
    }
    public ConfigurableApplicationContext run(String... args) {
        StopWatch stopWatch = new StopWatch();
        stopWatch.start();
        ConfigurableApplicationContext context = null;
        Collection<SpringBootExceptionReporter> exceptionReporters = new ArrayList();
        this.configureHeadlessProperty();
        SpringApplicationRunListeners listeners = this.getRunListeners(args);
        listeners.starting();

        Collection exceptionReporters;
        try {
            ApplicationArguments applicationArguments = new DefaultApplicationArguments(args);
            ConfigurableEnvironment environment = this.prepareEnvironment(listeners, applicationArguments);
            this.configureIgnoreBeanInfo(environment);
            Banner printedBanner = this.printBanner(environment);

            //创建IOC容器
            context = this.createApplicationContext();
            exceptionReporters = this.getSpringFactoriesInstances(SpringBootExceptionReporter.class, new Class[]{ConfigurableApplicationContext.class}, context);
            this.prepareContext(context, environment, listeners, applicationArguments, printedBanner);

            //刷新IOC容器
            this.refreshContext(context);
            this.afterRefresh(context, applicationArguments);
            stopWatch.stop();
            if (this.logStartupInfo) {
                (new StartupInfoLogger(this.mainApplicationClass)).logStarted(this.getApplicationLog(), stopWatch);
            }

            listeners.started(context);
            this.callRunners(context, applicationArguments);
        } catch (Throwable var10) {
            this.handleRunFailure(context, var10, exceptionReporters, listeners);
            throw new IllegalStateException(var10);
        }

        try {
            listeners.running(context);
            return context;
        } catch (Throwable var9) {
            this.handleRunFailure(context, var9, exceptionReporters, (SpringApplicationRunListeners)null);
            throw new IllegalStateException(var9);
        }
    }
4 小结
        说白了根据Servlet3.0的规则标准,在服务启动的时候会加载SpringBootServletInitializer的实现
        类。

        这个实例主要重写了SpringBootServletInitializer的configure()方法。

        configure告诉了主程序入口所在的地方。
        protected SpringApplicationBuilder configure(SpringApplicationBuilder application) {
            return application.sources(Day0701SpringBootWebJarApplication.class);
        }
        然后应用一启动,就知道SpringBoot的主程序入口在哪了。

        然后知道了主程序,就可以启动Servlet容器,再来启动SpringBoot应用。


        是一个相反的过程,先启动Servlet容器,再启动SpringBoot应用。