

redux的基础使用
要了解redux首先需要对他有一个大体的概念,这里我们引用redux作者的自述文档中定义的redux 的三大原则开始介绍
1.单一数据源 整个应用的 state 被储存在一棵 object tree 中,并且这个 object tree 只存在于唯一一个 store 中。
2.State 是只读的 唯一改变 state 的方法就是触发 action,action 是一个用于描述已发生事件的普通对象。
3.使用纯函数来执行修改 为了描述 action 如何改变 state tree ,你需要编写 reducers。
从三个原则中我们大概可以提取这样几个关键词单一数据源state、改变state的action、reducer描述改变,所以我们可以简单得到以下的结构图:
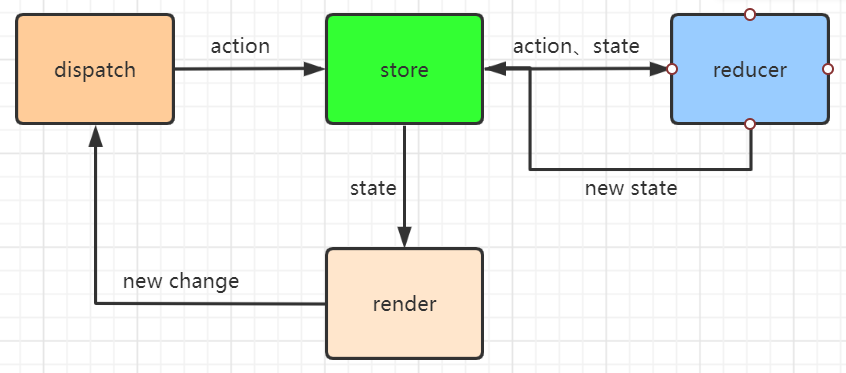
render通过store获取需要渲染的state,然后出现更新时,则通过dispatch对action进行分发,将action和之前的state传入reducer,根据reducer纯函数规定的修改描述,得到新的state返回给render进行渲染。
接下来我们结合todoList的例子来具体介绍一下redux是如何工作的,简单介绍一下todolist的功能:
- 可以input输入增加待办
- 点击完成删除事项
完整代码在这里,下边贴了一下reducer和todoList组件的大体代码并做了注释。
/* reducer */
import { createStore } from 'redux';

const reducer = (state = [],action)=>{
    switch(action.type){
        case 'addItem':
            return [ ...state, action.val];
        case 'deleteItem':
            state.splice(action.index,1);
            return state
        default:
            return state
    }
}

export const store = createStore(reducer);
// 通过createStore(reducer)创建store

/* todoList组件 */
import React, { Fragment } from 'react';
import ReactDOM from 'react-dom';
import { store } from './reducer/index'; // 获取store
import Item from './component/Item';  // Item组件,用于显示和删除标签
import AddItem from './component/AddItem'; // AddItem组件,用于增加list内容

function TodoList(){
    const addItem = (val)=>{
        store.dispatch({ // store的dispatch方法,触发增加list内容
            type: 'addItem',
            val: val
        })
    }
    const deleteItem = (index)=>{
        store.dispatch({ // store的dispatch方法,触发删除内容
            type: 'deleteItem',
            index: index
        })
    }
    const itemList = (()=>{
        const res = [];
        const state = store.getState();
        for(let i = 0; i < state.length; i++){
            res.push(
                <Item itemIndex={ i } content={ state[i] }
                key={ state[i] + i } deleteItem={ deleteItem }></Item>
            ) // 根据state将内容传入UI组件
        }
        return res
    })();
    return (
        <div >
            <AddItem addItem={ addItem }></AddItem>
            <div>
                { itemList }
            </div>
        </div>
    )
}
const render = ()=>{
    ReactDOM.render(
        <TodoList />,
        document.getElementById('root'))
}
render(); // 初次渲染
store.subscribe(render); // 订阅更新
redux源码部分(createStore)
createStore:
从使用上看我们需要向createStore传入reducer,initial,enhancer返回{ getState,dispatch,subscribe,replaceReducer },对照下边的源码,我们来分别解释一下:
- 比较简单的是
getState,只需要返回外层的CurrentState dispatch则是接收一个action,然后执行reducer更新CurrentState,再更新订阅的事件subscribe加入当前的事件,然后返回一个取消订阅的事件replaceReducer更新reducer,然后dispatch一下更新当前的状态
function createStore(reducer, preloadedState, enhancer) {
  if (typeof preloadedState === 'function' && typeof enhancer === 'undefined') {
    enhancer = preloadedState
    preloadedState = undefined
  }
  if (typeof enhancer !== 'undefined') {
    if (typeof enhancer !== 'function') {
      throw new Error('Expected the enhancer to be a function.')
    }
    return enhancer(createStore)(reducer, preloadedState)
  }
  let currentReducer = reducer // reducer函数
  let currentState = preloadedState // 初始化state
  let currentListeners = [] // 订阅函数数组
  let nextListeners = currentListeners // 订阅函数
  let isDispatching = false
  function getState() {
    return currentState // getState函数,返回当前的state
  }
 function subscribe(listener) {
    let isSubscribed = true
    nextListeners.push(listener) // 将当前的订阅函数压入数组
    return function unsubscribe() {
      if (!isSubscribed) {
        return
      }
      isSubscribed = false
      const index = nextListeners.indexOf(listener)
      nextListeners.splice(index, 1) // 找到当前的订阅函数,并删除
      currentListeners = null
    }
  }
  function dispatch(action) {
   try {
      isDispatching = true
      currentState = currentReducer(currentState, action)
      // 执行reducer,传入action
    } finally {
      isDispatching = false
    }
    const listeners = (currentListeners = nextListeners)
    for (let i = 0; i < listeners.length; i++) {
      const listener = listeners[i]
      listener()
    } // 更新订阅函数内容
    return action
  }
  function replaceReducer(nextReducer) {
    currentReducer = nextReducer // 更新reducer
    dispatch({ type: ActionTypes.REPLACE })
  }
  dispatch({ type: ActionTypes.INIT })
  return {
    dispatch,
    subscribe,
    getState,
    replaceReducer,
}
}
redux源码部分(applyMiddle、combineReducer)
combineReduce:
combineReduce主要是用来组合多个reducer的,当我们的项目逐渐庞大,使用单个reducer必然会导致维护上的困难,所以我们可以对reducer进行拆分,拆分后必然需要一定的组合,这时候就用到combineReducer了。
combineReducer({
    key1: reducer1
    key2: reducer2
})
combineReduce是通过传入一个对象 { reducerName: reducer }的形式,组合reducer,然后返回一个函数,这个函数即为组合后的reducer,通过这个函数创建store,然后之后的dispatch的action都会经由这个函数处理,贴一下代码(删去环境相关,只保留主要逻辑):
function combineReducers(reducers) {
  const reducerKeys = Object.keys(reducers)
  const finalReducers = {}
  for (let i = 0; i < reducerKeys.length; i++) {
    const key = reducerKeys[i]
    if (typeof reducers[key] === 'function') {
      finalReducers[key] = reducers[key]  // reducer合法即函数,则进入对象
    }
  }
  const finalReducerKeys = Object.keys(finalReducers)  // 避免key重复

  return function combination( state = {} , action  ) {
    let hasChanged = false
    const nextState = {}
    for (let i = 0; i < finalReducerKeys.length; i++) {
      const key = finalReducerKeys[i] // 获取key
      const reducer = finalReducers[key] // 获取key对应的reducer
      const previousStateForKey = state[key] // 获取key对应所需的state
      const nextStateForKey = reducer(previousStateForKey, action) // 更新
      nextState[key] = nextStateForKey //
      hasChanged = hasChanged || nextStateForKey !== previousStateForKey
      // 判断前后是否改变
    }
    hasChanged =
      hasChanged || finalReducerKeys.length !== Object.keys(state).length
    // 判断key的长度是否改变
    return hasChanged ? nextState : state // 返回state
  }
}
基本的逻辑就是通过key来执行不同的reducer
这里需要注意当一个函数存在默认参数时,如果向默认参数传undefined,则仍然使用默认参数的值,这点解决了一个困扰我很久的问题即:
当我们不在createStore中传入initState时,而是在单个reducer中使用默认参数传递初始值时,createStore好像没没有对state做处理,getState时却能获得 { key1: state1 , key2: state2 }这样状态的值
原因是:在createStore中调用了dispatch做初始化,然后此时返回的combination传入的值为{},所有key的值都是undefined,所以对应到每一个reducer时,是使用每个reducer对应的默认值,所以最后可以更新state为 { key1: state1 , key2: state2 }
applyMiddleware:
在理解applyMiddleware之前,我们需要先了解一下他用到的一个函数compose:
function compose(...funcs) {
  if (funcs.length === 0) {
    return arg => arg
  }

  if (funcs.length === 1) {
    return funcs[0]
  }

  return funcs.reduce((a, b) => (...args) => a(b(...args)))
}
从代码可知,他主要是对函数做了组合,总主要的一句是funcs.reduce,reduce传入的回调为function(total, currentValue, currentIndex, arr), initialValue), 所以这句返回的是如果funcs = [ f,g,h],则返回的函数为f(g(h(args))),举个栗子:
const add = (x)=>{ return x + 10; }
const minus = (x)=>{ return x - 5; }
const multi = (x)=>{ return x * 2; }
const funcs = [add,minus,multi]
const calc = funcs.reduce((a,b) => (...args) => a(b(...args)))
console.log(calc(5)) // 5 * 2 - 5 + 10 = 15 add(minus(multi(x)))
接下来贴一下applyMiddleware的源码
function applyMiddleware(...middlewares) {
  return createStore => (...args) => {
    const store = createStore(...args)
    let dispatch = () => {
      throw new Error(
        'Dispatching while constructing your middleware is not allowed. ' +
          'Other middleware would not be applied to this dispatch.'
      )
    }
    const middlewareAPI = {
      getState: store.getState, // 初始化的state
      dispatch: (...args) => dispatch(...args)  // 函数
    }
    const chain = middlewares.map(middleware => middleware(middlewareAPI))
    dispatch = compose(...chain)(store.dispatch)
    return {
      ...store,
      dispatch
    }
  }
}
applyMiddleware这个函数主要是传入一个createStore方法,然后再传入参数创建store,创建一个middlewareAPI,遍历middleware然后通过执行middleware的第一层注入dispatch和getState,然后compose组合上层return的第二层函数,所以最后返回的是store的其他内容 + enhance(dispatch)
其他的函数大家可以自己去翻看源码,相信理解了以上的内容其他的也就很好理解了
结合react-redux使用
单纯的使用redux确实解决了状态管理的问题,但是redux在react中使用也存在以下的问题:
- 需要自己订阅UI的变化
- 与业务组件耦合比较严重,对于多个组件依赖的共同逻辑,只能通过状态提升的方式实现
所以就要引出我们接下来要将的内容react-redux,它则基于react本身的性质,将context和redux结合,通过context使得下层组件都可以对state进行使用和更新,但是又通过redux的流程控制,使得对于state的更改是可控的,我们来改写一下todoList的代码,完整代码在这里,下边贴一下主要的内容
/* todoList组件 */
function TodoList(props){
    const { stateList,addItem,deleteItem } = props;
    // mapStateToProps和mapDispatchToProps 整体当前组件的props
    const itemList = (()=>{
        const res = [];
        for(let i = 0; i < stateList.length; i++){
            res.push(
                <Item itemIndex={ i } content={ stateList[i] }
                key={ stateList[i] + i } deleteItem={ deleteItem }></Item>
            )
        }
        return res
    })();
    return (
        <div >
            { test }
            <AddItem addItem={ addItem }></AddItem>
            <div>
                { itemList }
            </div>
        </div>
    )
}
const mapStateToProps = ( state ) => {
    return {
        stateList: state
    }
} // 映射函数,将所需state映射到props对象上
const mapDispatchToProps = ( dispatch ) => {
    return {
        addItem: function(val){
            dispatch({
                type: 'addItem',
                val: val
            })
        },
        deleteItem: function(index){
            console.log(index)
            dispatch({
                type: 'deleteItem',
                index: index
            })
        }
    }
} // 将所需的dispatch映射到props对象上

export default connect(
    mapStateToProps,
    mapDispatchToProps
)(TodoList); // 通过connect这个高阶函数对TodoList组件进行修饰


/* provider 注入*/

import { reducer } from './reducer/index';
const store = createStore(reducer);
// 根据reducer创建store
function App(){
    return(
        <Provider store={ store } > // 通过provider将store进行注入
            <TodoList></TodoList>
        </Provider>
    )
}
这部分的源码相对比较多,大家有兴趣的可以自己读一下,个人感觉主要是两个部分
connect这个对组件的包装provider做内容提供
下边大概写一下伪代码,有兴趣的同学可以看下这本册子具体了解一下这里就不多赘述了,动手实现react-redux
connect函数

const connect  = (mapStateToProps,mapDispatchToProps)=> (wrapComp) => {
    // 两层函数,第一层两个mapTo函数,第二层是要包装的函数
    function Connect(props){
        从context中获取store
        将state传入mapStateToProps 获取所需的state
        将dispatch传入mapDispatchToProps 获取所需的函数
        组合props
        订阅props更新函数
        return (
            <wrapComp {...initProps} ></wrapComp> // 将props传入wrapComp
        )
    }
    return Connect;
}


provider组件

function Provider(){
    将传入的store放在context上
    渲染传入的children内容
    return(
        <Fragment>
            { this.props.children }
        <Fragment>
    )
}
使用redux-thunk
redux-thunk的源码比较简单,主要的作用是将action从对象转为函数,这点主要是用在解决异步获取数据的问题上,由于redux是通过dispatch(action)的方式进行更新的,所以我们可以在业务组件中异步获取数据后,将数据传入action
但这样业务组件中如果存在多个这样的逻辑,一方面无法复用,另一方面对数据的更新耦合在业务组件中无法统一管理.
redux-thunk就是为了解决这样的问题,这个中间件判断传入的action是不是一个函数,如果是则执行然后返回执行结果,如果不是则直接作为action对象使用
function createThunkMiddleware(extraArgument) {
  return ({ dispatch, getState }) => next => action => {
    if (typeof action === 'function') {
      return action(dispatch, getState, extraArgument);
    }

    return next(action);
  };
}
总结
本篇文章通过介绍redux,react-redux,redux-thunk的基础用法,然后拓展到源码分析,整个过程都是自己阅读源码,然后参考其他资料做了总结,花费的时间还是蛮长的。如果大家有疑问或者觉得有文章哪里有问题,欢迎在下方留言讨论,一起进步。
