

一、简介
service也是Android四大组件之一,它的主要作用就是在后台运行,可以跨进程通信,并且没有提供用户界面的。service可以长期一直在后台运行,除非系统资源紧张被回收,否则不会被停止或者销毁。使用service有2种方式:startService、bindService。startService方式可以和service进行简单的通信,而bindService可以用来进行IPC通信。
另外需要区别于thread线程,thread是在一个单独的线程中执行,而service是运行在主线程中的,其中不能进行很耗时的操作,否则就会导致ANR,如果要进行耗时操作,还是需要使用thread来创建一个线程,所以它们两个没有什么关系。如果需要长时间的在后台运行,比如播放音乐等不需要控制UI也不耗时的话,就使用service;如果需要耗时操作,比如访问网络等就需要使用thread。
二、service的生命周期

startService、bindService,从上图中我们可以看出,通过这两种不同的方式启动service,他们的生命周期方法会有一些不同。通过startService启动,会回调onStartCommand方法;通过bindService启动,会回调onBind方法。
停止一个service也有两种方式:stopService、unbindService,但是这两种方式是需要根据启动service的方式来选择的:如果是通过startService方式来启动,就需要调用stopService方法来停止,此时会回调onDestroy方法;如果是通过bindService,需要调用unbindService来解绑,不仅会回调onDestroy方法,而且在onDestroy之前,还会回调onUnbind方法。另外,通过startService启动的service不能通过unbindService来停止,通过bindService启动的service不能通过stopService来停止服务。最后,可以在service的内部通过stopSelf方法来停止服务自身,同样的,调用此方法后,也会回调onDestroy方法,但此方法不会作用于通过bindService启动的服务。
另外,当定义好一个service类之后,需要在manifest中进行注册,不管是通过startService还是bindService启动的服务。
<manifest xmlns:android="http://schemas.android.com/apk/res/android"
    package="com.test.service.use">
    ...
    <service android:name=".service.ServiceOne" android:label="ServiceOne"/>
    <service android:name=".service.ServiceTwo" android:label="ServiceTwo"/>
    <service android:name=".service.ServiceThree" android:label="ServiceThree"/>
    ...
</manifest>
三、使用
1、启动startService
启动服务
val intent = Intent(this,ServiceOne::class.java)
startService(intent)
停止服务
val intent = Intent(this,ServiceOne::class.java)
stopService(intent)
具体的
ServiceOne类
class ServiceOne : Service(){

    override fun onCreate() {
        super.onCreate()
        println("ServiceOne-->onCreate")
    }

    override fun onStartCommand(intent: Intent?, flags: Int, startId: Int): Int {
        println("ServiceOne-->onStartCommand")
        return super.onStartCommand(intent, flags, startId)
    }

    override fun onBind(intent: Intent?): IBinder? {
        println("ServiceOne-->onBind")
        return null
    }

    override fun onUnbind(intent: Intent?): Boolean {
        println("ServiceOne-->onUnbind")
        return super.onUnbind(intent)
    }

    override fun onDestroy() {
        println("ServiceOne-->onDestroy")
        super.onDestroy()
    }
}
在Activity中调用startService(Intent)方法,即可启动一个service。
- 第一次点击start_service按钮后,我们会看到以下输出:


onCreate方法在service生命周期中只会回调一次,而onStartCommand会回调多次。注意,由于onStart方法已经不再推荐使用,推荐使用onStartCommand方法,所以本文中不再说明。onStartCommand方法的返回值必须是Service.START_STICKY_COMPATIBILITY、Service.START_STICKY、Service.START_NOT_STICKY、Service.START_REDELIVER_INTENT这4个中的其中1个,下面分别说明这几个返回值的含义。
| 返回值 | 说明 |
|---|---|
| Service.START_STICKY_COMPATIBILITY | 它是START_STICKY的兼容版本,不保证服务被kill后一定能重启 |
| Service.START_STICKY | 如果Service所在的进程,在执行了onStartCommand方法后被kill了,那么这个Service会被保留在已开始的状态,但是不保留传入的Intent,随后系统会尝试重新创建此Service,由于服务状态保留在已开始状态,所以创建服务后一定会调用onStartCommand方法。如果在此期间没有任何启动命令被传递到service,那么参数Intent将为null,需要我们小心处理。 |
| Service.START_NOT_STICKY | 如果Service所在的进程,在执行了onStartCommand方法后被kill了,则系统不会重新启动此Service |
| Service.START_REDELIVER_INTENT | 如果Service所在的进程,在执行了onStartCommand方法后被kill了,则结果和START_STICKY一样,也会重新创建此Service并调用onStartCommand方法。不同之处在于,如果是返回的是START_REDELIVER_INTENT ,则重新创建Service时onStartCommand方法会传入之前的intent |
- 点击stop_service按钮得到以下输出:

- 在service内部调用
stopSelf停止自身
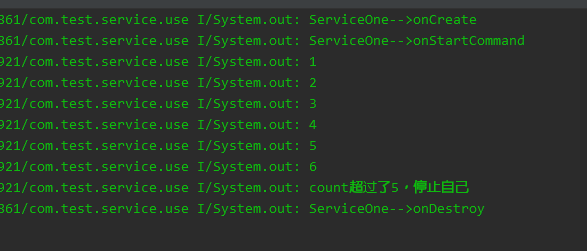
在ServiceOne类中修改如下代码,在onCreate中倒计时5s后停止服务。
class ServiceOne : Service(){

    private var timer:Timer = Timer()
    private var timerTask:TimerTask? = null
    private var count = 0

    override fun onCreate() {
        super.onCreate()
        println("ServiceOne-->onCreate")
        timerTask = timerTask {
            count++
            println(count)
            if(count > 5){
                println("count超过了5,停止自己")
                stopSelf()
            }
        }
        timer.schedule(timerTask,1000,1000)
    }

    override fun onStartCommand(intent: Intent?, flags: Int, startId: Int): Int {
        println("ServiceOne-->onStartCommand")
        return super.onStartCommand(intent, flags, startId)
    }

    override fun onBind(intent: Intent?): IBinder? {
        println("ServiceOne-->onBind")
        return null
    }

    override fun onUnbind(intent: Intent?): Boolean {
        println("ServiceOne-->onUnbind")
        return super.onUnbind(intent)
    }

    override fun onDestroy() {
        println("ServiceOne-->onDestroy")
        super.onDestroy()
        timer.cancel()
    }
}
运行程序后,得到以下输出:
- 其他
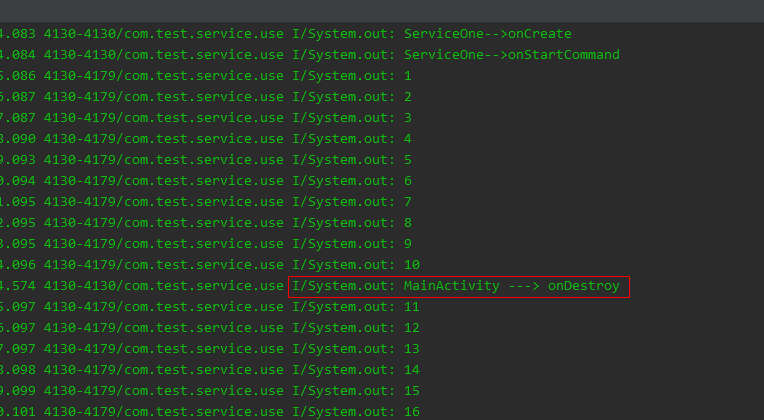
注释掉上面代码中onCreate的if判断,使得可以一直打印计数,当退回到桌面,或者按下返回键销毁Activity后,如果此时app没有被系统完全回收,可以看到后台服务任然会一直打印输出。这就说明以startService方式启动的服务,可以脱离当前Activity,甚至可以"脱离"当前应用,只要系统允许,可以在后台无限运行下去。
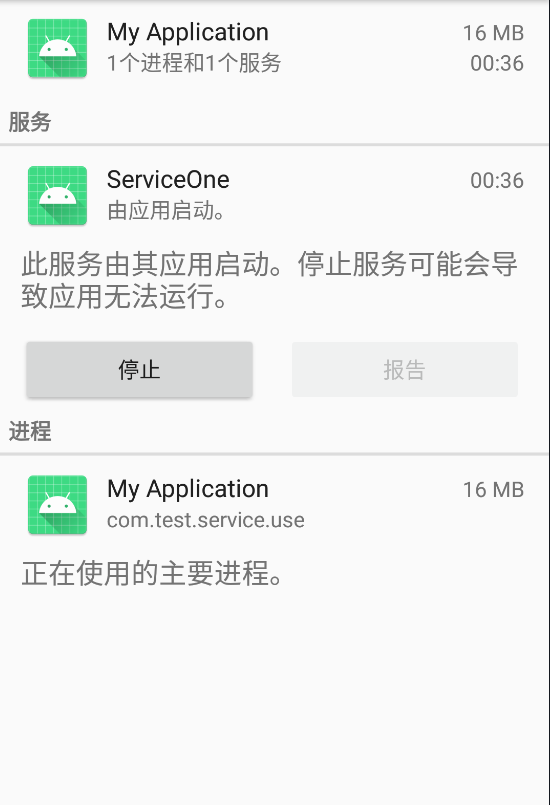
在开发者选项中查看正在运行的服务,就可以看到我们的ServiceOne服务还在后台运行着。
2、绑定bindService
绑定服务
var connect = object : ServiceConnection {
    override fun onServiceDisconnected(name: ComponentName?) {
        println("onServiceDisconnected")
    }

    override fun onServiceConnected(name: ComponentName?, service: IBinder?) {
        println("onServiceConnected")
    }
}
var intentTwo = Intent(this, ServiceTwo::class.java)
bindService(intentTwo, connect, Service.BIND_AUTO_CREATE)
解绑服务
unbindService(connect)
具体的
ServiceTwo类
class ServiceTwo : Service() {

    var myBinder = MyBinder()

    override fun onCreate() {
        super.onCreate()
        println("ServiceTwo-->onCreate")
    }

    override fun onStartCommand(intent: Intent?, flags: Int, startId: Int): Int {
        println("ServiceTwo-->onStartCommand")
        return super.onStartCommand(intent, flags, startId)
    }

    override fun onBind(intent: Intent?): IBinder? {
        println("ServiceTwo-->onBind")
        return myBinder
    }

    override fun onUnbind(intent: Intent?): Boolean {
        println("ServiceTwo-->onUnbind")
        return super.onUnbind(intent)
    }

    override fun onDestroy() {
        println("ServiceTwo-->onDestroy")
        super.onDestroy()
    }

    class MyBinder : Binder() {
        fun getMessage(msg: String) = println("输入的消息是:$msg")
        fun getAddition(a: Int, b: Int) = println("$a + $b 的值是${a + b}")
        fun getSubtraction(a: Int, b: Int) = println("$a - $b 的值是${a - b}")
    }
}
在Activity中调用bindService(Intent,ServiceConnection,int)方法,即可绑定一个service。
-
第一次点击bind_service按钮后,我们会看到以下输出。注意:如果在service 中的
onBind方法返回null的话,没有回调onServiceConnected方法。其实这也是正常的,绑定服务就是为了Activity能够和service进行相互通信,如果在onBind返回空,那么绑定服务也没有什么意义。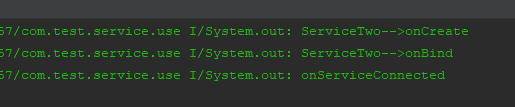
-
当再次点击bind_service按钮后,不会再次回调
onCreate和onBind方法,说明onCreate和onBind方法只会调用一次。 -
我们修改上面
connect对象中的onServiceConnected方法,使得我们可以调用service中的方法。
private var connect = object : ServiceConnection {
    override fun onServiceDisconnected(name: ComponentName?) {
        println("onServiceDisconnected")
    }

    override fun onServiceConnected(name: ComponentName?, binder: IBinder?) {
        println("onServiceConnected")
        binder as ServiceTwo.MyBinder
        binder.getMessage("hello world")
        binder.getAddition(3,2)
        binder.getSubtraction(3,2)
    }
}
运行程序,点击bind_service按钮,会得到以下输出:
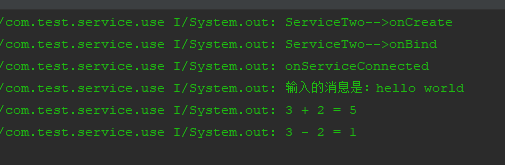
onServiceConnected方法中有一个IBinder?对象,这个就可以进行Binder通信,只不过Binder不是本文的重点,可以参考其他关于Binder的资料。
-
当点击返回按钮,或者销毁当前Activity时,会输出以下信息。可以看出,service是和当前Activity关联的,当Activity被销毁后,service也被解绑并销毁,不会脱离当前Activity单独在后台运行。

-
当点击unbind_service按钮后,会输出以下信息。可以看到,只是把service和Activity解绑,服务被销毁。但是并没有回调
onServiceDisconnected方法,其实当正常关闭service时,此方法并不会被调用,只有当service由于系统资源不足,被回收或者被异常kill掉,才会回调此方法。
3、启动和绑定
service可以同时被启动并且绑定的,即在调用startService方法启动服务后,也可以继续调用bindService绑定服务,此时就同时拥有了这两种方式的特性:既可以脱离当前Activity在后台独自运行,也可以和Activity进行通信。用ServiceThree类来对这种方式进行测试,代码其实和ServiceTwo大同小异的。需要注意的是,在onUnbind方法里返回了true,这个后面会说明。
class ServiceThree : Service() {

    private var binderThree = BinderThree()

    override fun onCreate() {
        super.onCreate()
        println("ServiceThree-->onCreate")
    }

    override fun onStartCommand(intent: Intent?, flags: Int, startId: Int): Int {
        println("ServiceThree-->onStartCommand")
        return super.onStartCommand(intent, flags, startId)
    }

    override fun onBind(intent: Intent?): IBinder? {
        println("ServiceThree-->onBind")
        return binderThree
    }

    override fun onRebind(intent: Intent?) {
        super.onRebind(intent)
        println("ServiceThree-->onRebind")
    }

    override fun onUnbind(intent: Intent?): Boolean {
        println("ServiceThree-->onUnbind")
        return true
    }

    override fun onDestroy() {
        super.onDestroy()
        println("ServiceThree-->onDestroy")
    }

    class BinderThree : Binder() {
        fun printMessage(msg: String) = println("输出:$msg")
        fun getMultiplication(a: Int, b: Int) = println("$a * $b = ${a * b}")
        fun getDivision(a: Int, b: Int) = println("$a / $b = ${a / b}")
    }
}
SecondActivity中的代码也很简单,定义了两个按钮,一个用于启动并绑定服务,一个用于停止并解绑服务,布局文件就不贴出来了。
class SecondActivity : Activity() {

    private var startAndBindServiceBtn: Button? = null
    private var stopAndUnBindServiceBtn: Button? = null

    private var intentThree: Intent? = null

    private var connectThree = object : ServiceConnection {
        override fun onServiceDisconnected(name: ComponentName?) {
            println("connectThree-->onServiceDisconnected")
        }

        override fun onServiceConnected(name: ComponentName?, binder: IBinder?) {
            println("connectThree-->onServiceConnected")
            binder as ServiceThree.BinderThree
            binder.printMessage("你好,service")
            binder.getMultiplication(6,2)
            binder.getDivision(6,2)
        }
    }

    override fun onCreate(savedInstanceState: Bundle?) {
        super.onCreate(savedInstanceState)
        setContentView(R.layout.activity_second)

        intentThree = Intent(this, ServiceThree::class.java)

        startAndBindServiceBtn = findViewById(R.id.start_and_bind_service_btn)
        stopAndUnBindServiceBtn = findViewById(R.id.stop_and_unbind_service_btn)
        startAndBindServiceBtn?.setOnClickListener {
            startService(intentThree)
            bindService(intentThree,connectThree, Service.BIND_AUTO_CREATE)
        }
        stopAndUnBindServiceBtn?.setOnClickListener {
            stopService(intentThree)
            unbindService(connectThree)
        }
    }

    override fun onDestroy() {
        super.onDestroy()
        println("SecondActivity-->onDestroy")
    }
}
-
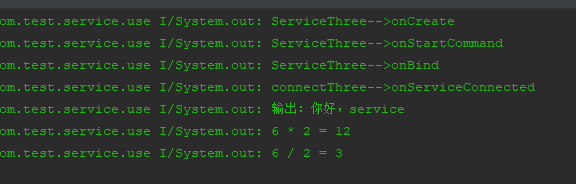
当我们点击start_and_bind_service按钮后,会得到以下输出。从中我们可以看到,其实就是和上面两种方式的合并。
-
当连续点击击start_and_bind_service按钮后,会得到以下输出。还是只会回调
onStartCommand,这也说明了onCreate、onBind、onServiceConnected方法只会调用一次。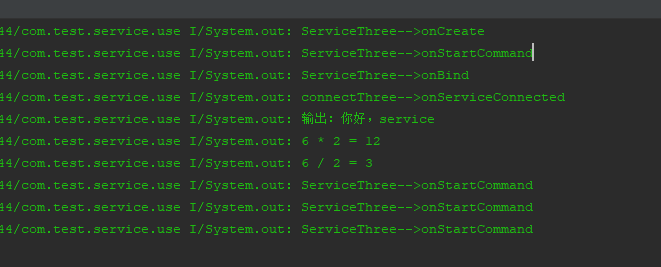
-
当我们点击stop_and_unbind_service按钮后,会得到以下输出。

-
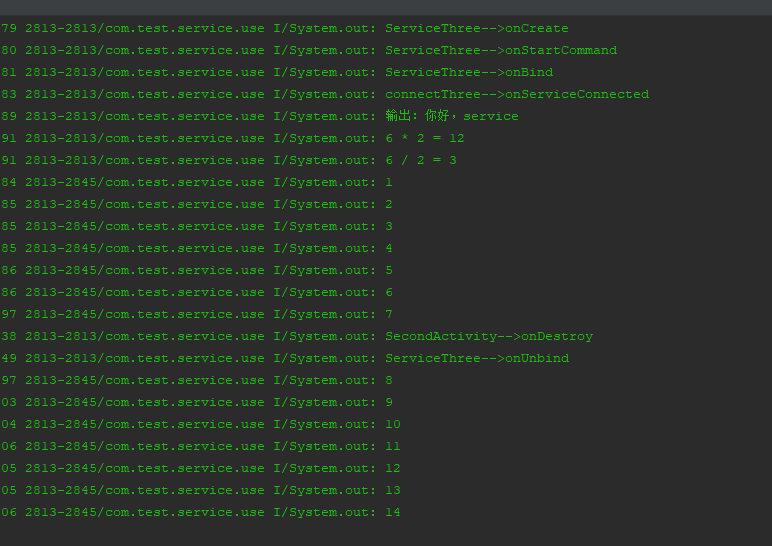
当按下返回按钮回到
MainActivity后,会得到以下输出。此时可以看到虽然SecondActivity调用了onDestroy方法,说明已经被销毁,但是并没有调用ServiceThree服务中的onDestroy方法,只是调用了onUnbind方法和当前SecondActivity解绑,这也就说明此时ServiceThree服务并没有被销毁,现在是独立的在后台运行。
ServiceThree服务onCreate方法中的代码,开启一个Timer使得1s打印一次计数,再次运行程序得到以下输出。从运行结果可以看出,确实是独立在后台运行。
private var myTimer: Timer = Timer()
private var myTimerTask: TimerTask? = null
private var count = 0

override fun onCreate() {
    super.onCreate()
    println("ServiceThree-->onCreate")
    myTimerTask = timerTask {
        count++
        println(count)
    }
    myTimer.schedule(myTimerTask,1000,1000)
}
打开开发者选项中,查看当前运行的服务,可以看到ServiceThree仍然在后台运行,并没有被销毁。
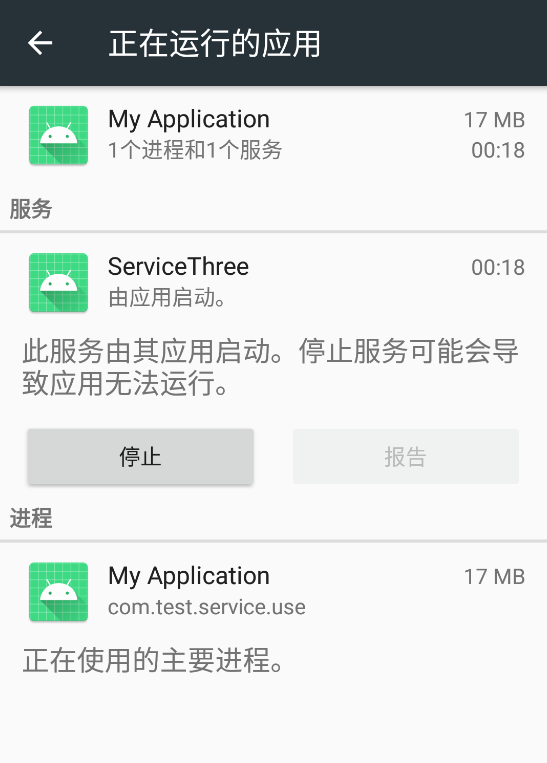
-
在第4点中按下返回键调用了
onUnbind,就等同于在Activity中调用了unbindService方法,和当前Activity解绑。所以说我们先验证的是调用unbindService,而没有调用stopService方法。经过测试如果只调用stopService方法而不调用unbindService方法,是不会有任何反应的。可以自己写个按钮然后在点击事件中只调用stopService方法试试。 -
回到第4点,当我们按下返回键回到MainActivity后,再次点击按钮跳转到SecondActivity,然后点击
start_and_bind_service按钮,会得到以下输出。可以看到回调了onStartCommand、onServiceConnected、onRebind方法,前两个我们应该知道会被回调的,onStartCommand方法就不多说,解绑了当前Activity,再次绑定肯定会回调onServiceConnected方法,但是为什么不调用onBind,而是调用了onRebind方法。这个就要和之前说过的,在onUnbind方法中返回true的原因,如果返回false或者调用父类的方法return super.onUnbind(intent),再次点击按钮后,不会调用onRebind方法。这个方法我一般用在Notification中,当需要重新绑定服务时,这个方法还是很好用的。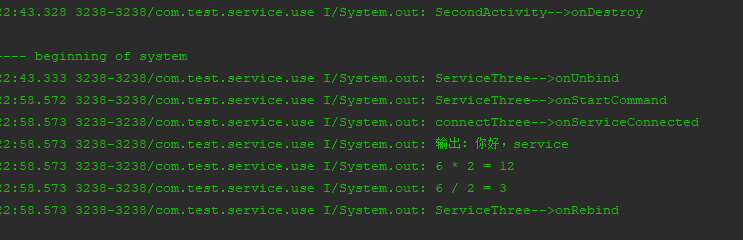
-
最后总结一下,当即开启和绑定service后,必须调用
stopService和unbindService方法,才能完全停止一个服务,否则还是会在后台一直运行下去(如果不被系统kill的话)。
四、Android 8.0的限制
从Android 8.0版本开始对service的后台启动做了很大的限制,当应用处于后台时调用startService方法,会抛出java.lang.IllegalStateException异常,当然8.0之前不受影响。
多个 Android 应用和 Service 可以同时运行。 例如,用户可以在一个窗口中玩游戏,同时在另一个窗口中浏览网页,并使用第三个应用播放音乐。 同时运行的应用越多,对系统造成的负担越大。 如果还有应用或 Service 在后台运行,则会对系统造成更大负担,进而可能导致用户体验下降;例如,音乐应用可能会突然关闭。
在后台中运行的 Service 会消耗设备资源,这可能会降低用户体验,对此Google对这些service施加了一些限制。
系统可以区分前台和后台应用。 (用于 Service 限制目的的后台定义与内存管理使用的定义不同;一个应用按照内存管理的定义可能处于后台,但按照能够启动 Service 的定义又处于前台。)如果满足以下任意条件,应用将被视为处于前台:
-
具有可见 Activity(不管该 Activity 已启动还是已暂停)。
-
具有前台 Service。
-
另一个前台应用已关联到该应用(不管是通过绑定到其中一个 Service,还是通过使用其中一个内容提供程序)。 例如,如果另一个应用绑定到该应用的 Service,那么该应用处于前台:
- IME
- 壁纸 service
- 通知侦听器
- 语音或文本 service
如果以上条件均不满足,应用将被视为处于后台。
请注意:这些应用不会对绑定 Service 产生任何影响。 如果您的应用定义了绑定 Service,则不管应用是否处于前台,其他组件都可以绑定到该 Service。
处于前台时,应用可以自由创建和运行前台与后台service。 进入后台时,在一个持续数分钟的时间窗内,应用仍可以创建和使用 service。 在该时间窗结束后,应用将被视为处于空闲状态。 此时,系统将停止应用的后台 service,就像应用已经调用 service 的 stopSelf() 方法一样。
val intent = Intent(this,ServiceOne::class.java)
startForegroundService(intent)
Android 8.0之前启动后台service是调用startService方法,8.0之后需要调用startForegroundService方法来启动前台service,在系统创建service后,应用有5s的时间来调用该service的startForeground方法以显示新Service的用户可见通知,如果应用在此时间限制内未调用startForeground,则系统将停止此service并声明此应用为ANR。创建通知的改动也比较大,本文就不再说明,后面会单独写篇文章关于Notification通知。
虽然限制了后台服务的启动,这也杜绝了某些无良app在后台疯狂占用内存资源,主要还是影响到大部分应用保活手段,对于做普通应用来说个人觉得还好,如果需要后台启动,发送一个通知让用户知晓也并不觉得有太大的影响。
五、 IntentService
IntentService它是一个抽象类,并且继承自service。由于service是运行在主线程中的,其中不能做耗时的操作,否则就会导致ANR,如果真的需要在其中做耗时操作的话,必须创建一个新的线程。因此IntentService就可以满足这种需求。IntentService内部维护了一个工作线程,来处理耗时的操作,任务执行完成后就会自动停止,这样就无需我们手动去停止服务。另外的。可以多次启动IntentService,每一个耗时操作会以工作队列的方式在IntentService的onHandleIntent方法中执行,并一次只会执行一个,执行完成之后才会继续执行下一个任务。
1、基本使用
接下来我们自定义一个类继承自IntentService,然后在MainActivity中新增一个按钮来启动服务,代码其实很简单,最主要就是在onHandleIntent方法中执行耗时操作,在其中让线程睡眠2s来模拟,我们只是简单的打印一下执行输出。
class MyIntentService(name: String) : IntentService(name) {

    constructor() : this("MyIntentService"){

    }

    override fun onCreate() {
        super.onCreate()
        println("MyIntentService ---> onCreate")
    }

    //将请求的Intent添加到工作队列里
    override fun onStartCommand(intent: Intent?, flags: Int, startId: Int): Int {
        println("MyIntentService ---> onStartCommand")
        return super.onStartCommand(intent, flags, startId)
    }

    override fun onHandleIntent(intent: Intent?) {
        println("MyIntentService ---> onHandleIntent")
        Thread.sleep(2000)
        val result = when (intent?.getStringExtra("name")) {
            "hello" -> "我执行的是hello这个任务"
            "world" -> "我执行的是world这个任务"
            else -> "我没有执行任何任务"
        }
        println("result:$result")
    }

    override fun onDestroy() {
        super.onDestroy()
        println("MyIntentService ---> onDestroy")
    }
}
在按钮中可以多次启动
MyIntentService
var intentService: Intent? = null
intentService = Intent(this, MyIntentService::class.java)

intentServiceUseBtn?.setOnClickListener {
    intentService?.putExtra("name","hello")
    startService(intentService)
    intentService?.putExtra("name","world")
    startService(intentService)
    intentService?.putExtra("name","xxx")
    startService(intentService)
}
点击按钮,然后得到以下输出。可以看到onCreate方法还是只会执行一次,onStartCommand、onHandleIntent方法会执行多次。也可以看出,任务的执行顺序也是一个接着一个的,当所有任务完成后,会自动调用onDestroy方法来销毁服务。
2、基本原理
public abstract class IntentService extends Service {
    private volatile Looper mServiceLooper;
    private volatile ServiceHandler mServiceHandler;
    private String mName;
    private boolean mRedelivery;

    private final class ServiceHandler extends Handler {
        public ServiceHandler(Looper looper) {
            super(looper);
        }

        @Override
        public void handleMessage(Message msg) {
            onHandleIntent((Intent)msg.obj);
            stopSelf(msg.arg1);
        }
    }

    public IntentService(String name) {
        super();
        mName = name;
    }

    public void setIntentRedelivery(boolean enabled) {
        mRedelivery = enabled;
    }

    @Override
    public void onCreate() {
        super.onCreate();
        HandlerThread thread = new HandlerThread("IntentService[" + mName + "]");
        thread.start();

        mServiceLooper = thread.getLooper();
        mServiceHandler = new ServiceHandler(mServiceLooper);
    }

    @Override
    public void onStart(@Nullable Intent intent, int startId) {
        Message msg = mServiceHandler.obtainMessage();
        msg.arg1 = startId;
        msg.obj = intent;
        mServiceHandler.sendMessage(msg);
    }

    @Override
    public int onStartCommand(@Nullable Intent intent, int flags, int startId) {
        onStart(intent, startId);
        return mRedelivery ? START_REDELIVER_INTENT : START_NOT_STICKY;
    }

    @Override
    public void onDestroy() {
        mServiceLooper.quit();
    }

    @Override
    @Nullable
    public IBinder onBind(Intent intent) {
        return null;
    }

    @WorkerThread
    protected abstract void onHandleIntent(@Nullable Intent intent);
}
上面就是IntentService的全部代码基于targetSdkVersion 27。首先看到的是它是一个抽象类,需要自己定义一个子类继承于它;再来看看构造方法,IntentService只提供了一个参数mName为String类型的构造方法,而这个mName就是后台线程的名称,我们在onCreate的方法中可以看到。
@Override
public void onCreate() {
    super.onCreate();
    HandlerThread thread = new HandlerThread("IntentService[" + mName + "]");
    thread.start();

    mServiceLooper = thread.getLooper();
    mServiceHandler = new ServiceHandler(mServiceLooper);
}
在onCreate方法中有一个HandlerThread对象,其实它就是我们能够在服务中进行耗时操作的关键对象,HandlerThread它是一个线程,继承于Thread,这个对象就是对Thread + Handler的封装。我们知道在子线程中使用Handler,必须先要创建一个Looper对象,所以Google给我们封装了一个HandlerThread,使得无需手动调用Looper.prepare(),这一点可以在其run方法中就可以看出。
@Override
public void run() {
    mTid = Process.myTid();
    Looper.prepare();
    synchronized (this) {
        mLooper = Looper.myLooper();
        notifyAll();
    }
    Process.setThreadPriority(mPriority);
    onLooperPrepared();
    Looper.loop();
    mTid = -1;
}
再回到onCreate方法,其中创建了一个ServiceHandler对象,并且获取到当前线程的Looper对象:mServiceLooper。
然后再看看onStartCommand方法,直接调用了onStart,然后在其中调用Handler的sendMessage方法,发送了一个Message消息,跟进sendMessage这个方法看看:
/**
  * Pushes a message onto the end of the message queue after all pending messages
  * before the current time. It will be received in {@link #handleMessage},
  * in the thread attached to this handler.
  *
  * @return Returns true if the message was successfully placed in to the
  *         message queue.  Returns false on failure, usually because the
  *         looper processing the message queue is exiting.
  */
public final boolean sendMessage(Message msg){
    return sendMessageDelayed(msg, 0);
}
从注释中我们可以看到一个关键信息,在这个Handler绑定的线程中,Handler中的handleMessage方法会收到消息。也就是说,handleMessage方法是在我们的当前子线程中执行,当然这个Handler就是我们IntentService中的ServiceHandler。那我们就直接看看ServiceHandler中的handleMessage方法。
@Override
public void handleMessage(Message msg) {
    onHandleIntent((Intent)msg.obj);
    stopSelf(msg.arg1);
}
方法中调用了onHandleIntent这个正是需要我们重写的抽象方法,这也就说明了可以在onHandleIntent方法中进行耗时操作,执行完之后会调用stopSelf方法停止自身,会回调service的onDestroy方法,这也就是service会自动停止的原因。
还剩下onBind方法,默认为我们返回了null,如果需要绑定当前Activity的话,需要自己重写此方法。用法就和之前一样,不再说明。
@Override
@Nullable
public IBinder onBind(Intent intent) {
    return null;
}
六、总结
Service是Android的四大组件之一
,是运行在主线程中,并且长期运行在后台,不能做很耗时的操作,否则就会导致ANR,如果非要做耗时操作的话,还是要创建一个线程;IntentService是继承自Service的,里面封装了HandlerThread对象,无需自己手动创建Thread和Handler,并且IntentService是可以多次被创建的,当任务执行完成后会自动停止服务,也无需手动停止,所以需要在Service中做耗时操作,任务完成后不再使用服务的话,推荐使用IntentService。
git代码: github.com/leewell5717…
