

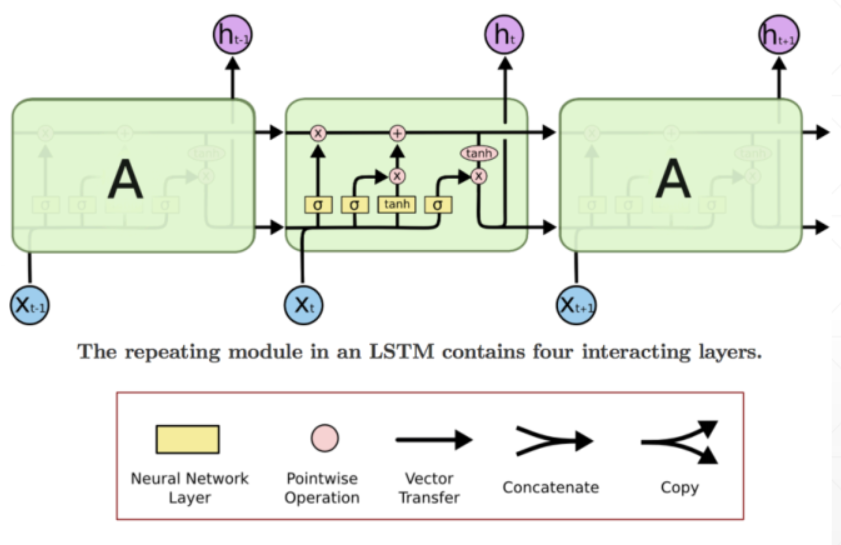
LSTM网络结构图:
- Long Short Term Memorynetworks(以下简称LSTM),是一种特殊的RNN网络,该网络设计出来是为了解决长依赖问题。该网络由 Hochreiter & Schmidhuber(1997)引入,并有许多人对其进行了改进和普及。
-
每一个LSTM单元由遗忘门,输入门,输出门三个门组成:
-
遗忘门的输入由当前输入xt和上一层的隐层状态ht-1组成。将xt和ht-1拼接起来,乘以矩阵Wf并加上一个偏置,然后加上激活函数得到遗忘门ft,表示有多少信息需要遗忘。

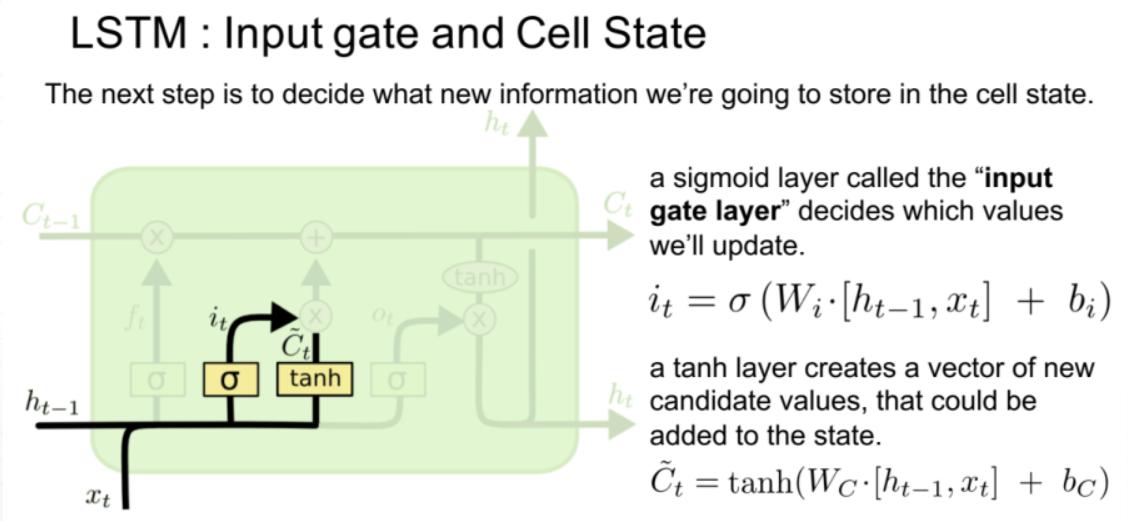
- 输入门里面包括it输入门和细胞状态Ct两个部分。其中输入门it公式与遗忘门ft相同,区别就是Wt参数矩阵不同。一般门都采用sigmoid激活函数,确保结果在(0,1)之间,表示当前输入信息或者遗忘信息的比例。而细胞状态Ct采取tanh激活函数,计算的是当前输入的影响。
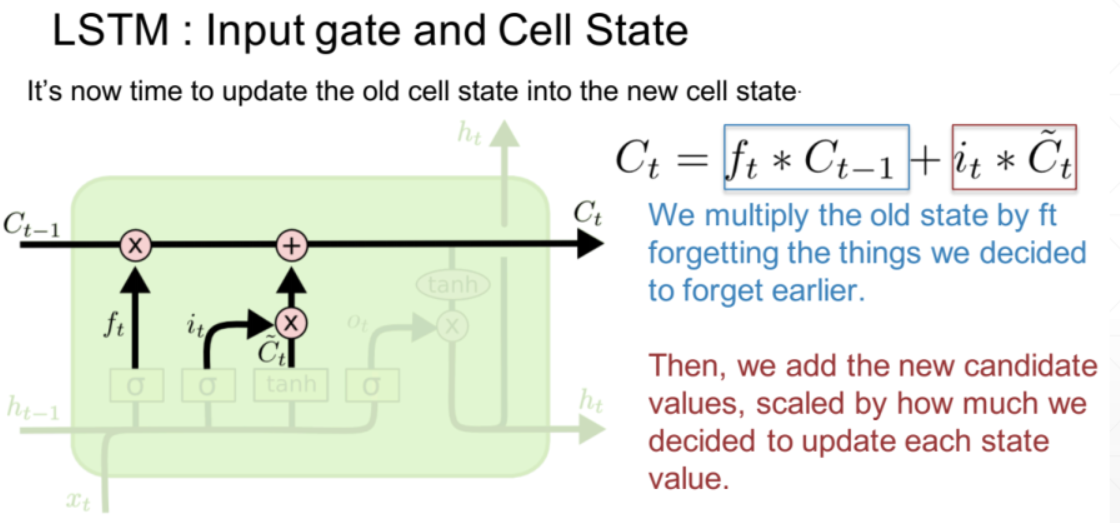
- 细胞状态更新:有了遗忘门和输入门后就要更新细胞Ct的状态,包括两部分内容:以前的输入需要忘记多少,当前的输入需要记住多少。并将两者乘上各自权重然后加起来,就表示当前的细胞状态。
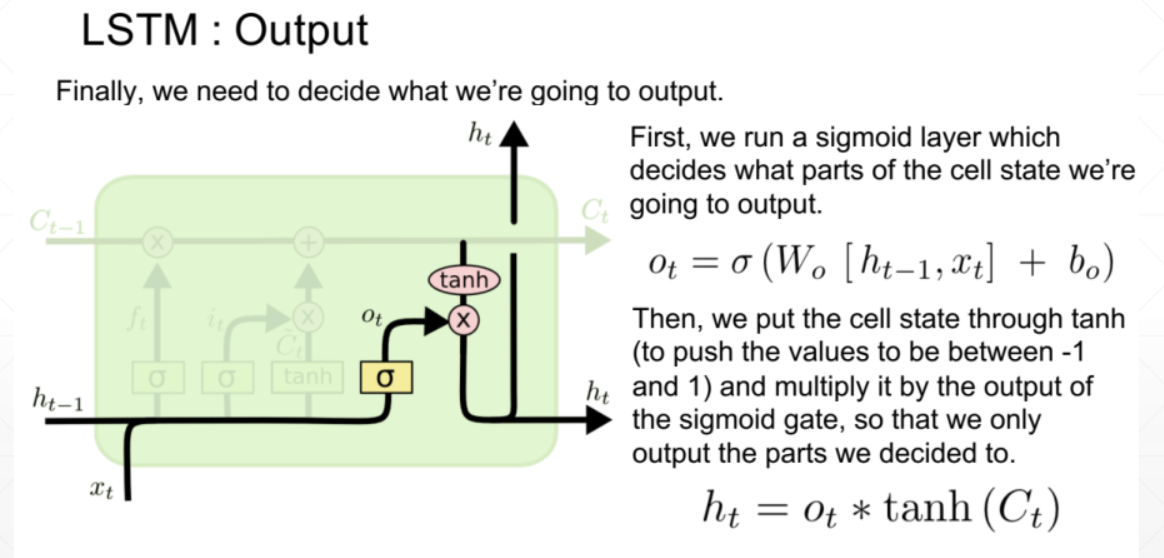
- 输出门: 因为细胞状态为内部状态,不能全部反应在输出上,所以就有了输出门的概念。输出门控制当前输出的信息的比例, 输出门的计算方法与输入门和遗忘门一样,都是矩阵变换加上激活函数,区别就是Wt参数矩阵不同。最终输出的ht由输出门(结果在0,1之间,相当于权重)乘以激活后的细胞状态的Ct。
LSTM的前向传播过程代码实现
import numpy as np

def sigmoid(x):#定义激活函数
    return 1/(1+np.exp(-x))
time_step=5
input_feature=6#输入特征数
out_feature=7#输出特征数
#输入数据
input_data=np.array([[1,0,0,0,0,0],
[0,1,0,0,0,0],
[0,0,1,0,0,0],
[0,0,0,1,0,0],
[0,0,0,0,1,0],
[0,0,0,0,0,1],]
)
result=[]
#创建初始状态矩阵
Ct=np.zeros((out_feature,))
#创建上一次输出矩阵
h_t_1=np.zeros((out_featrue,))
#创建权重矩阵
Wf=np.random.random((out_feature,out_feature+input_featur))
bf=np.random.randmom((out_feature,))
Wi=np.random.random((out_feature,out_feature+input_featur))
bi=np.random.randmom((out_feature,))
Wc=np.random.random((out_feature,out_feature+input_featur))
bc=np.random.randmom((out_feature,))
Wo=np.random.random((out_feature,out_feature+input_featur))
bo=np.random.randmom((out_feature,out_feature))

for x in input_data:
    #遗忘门
    t=np.dot(Wf,np.concatenate([h_t_1,x],axis=0))#根据公式将h_t和x进行拼接
    ft=sigmoid(t+bf)#经过激活函数sigmoid,使ft在(0,1)之间,表示遗忘多少的信息
    #输入门
    it=sigmoid(np.dot(Wi,np.concatenate([h_t_1,x],axis=0))+bi)
    Ct_=np.tanh(np.dot(Wc,np.concatenate([h_t_1,x],axis=0))+bc)
    #细胞状态
    Ct=ft*Ct+it*Ct_
    #输出门
    ot=sigmoid(np.dot(Wo,np.concatenate([h_t_1,x],axis=0))+b0)
    ht=np.dot(ot,np.tanh(Ct)
    result.append(ht)
    h_t_1=ht
result=np.array(result)
LSTM pytorch源码解析
- 新版的pytorch用是C语言,结构复杂,不利于分析。所以本文对pytorch 0.4.0版本进行分析。
架构图
- torch/nn/modules/rnn.py
- class LSTM
- class RNNBase
- init
- Forward
- torch/nn/backends/thnn.py#核心实现
- torch/nn/_functions/rnn.py#真正的函数实现
- RNN
- AutogradRNN
- StackedRNN+LSTMCell
#Pytorch0.4中LSTMCell的核心代码
def LSTMCell(input, hidden, w_ih, w_hh, b_ih=None, b_hh=None):
    if input.is_cuda:
        igates = F.linear(input, w_ih)
        hgates = F.linear(hidden[0], w_hh)
        state = fusedBackend.LSTMFused.apply
        return state(igates, hgates, hidden[1]) if b_ih is None else state(igates, hgates, hidden[1], b_ih, b_hh)

    hx, cx = hidden
    gates = F.linear(input, w_ih, b_ih) + F.linear(hx, w_hh, b_hh)

    ingate, forgetgate, cellgate, outgate = gates.chunk(4, 1)

    ingate = F.sigmoid(ingate)#输入门
    forgetgate = F.sigmoid(forgetgate)#遗忘门
    cellgate = F.tanh(cellgate)#准细胞状态
    outgate = F.sigmoid(outgate)#输出门

    cy = (forgetgate * cx) + (ingate * cellgate)
    hy = outgate * F.tanh(cy)

    return hy, cy  #最终返回隐层输出和细胞的状态
