

代码是基于io.flutter.embedding.android包下,看网上好多代码都是基于io.flutter.app目录下的。其实在flutter1.12之后就建议使用前者了。
下面讲的是纯Flutter项目,不是混合开发,混合的话是有区别的。以Android应用为例,启动还是先走Application和指定作为Launcher的Activity。而系统默认的会使用继承FlutterAppication的一个Application和继承FlutterActivity的MainActivity。所以app的启动可以先分析下FlutterApplication和FlutterActivity 。
FutterApplication
package io.flutter.app;

import android.app.Activity;
import android.app.Application;
import androidx.annotation.CallSuper;
import io.flutter.view.FlutterMain;

/**
 * Flutter implementation of {@link android.app.Application}, managing application-level global
 * initializations.
 *
 * <p>Using this {@link android.app.Application} is not required when using APIs in the package
 * {@code io.flutter.embedding.android} since they self-initialize on first use.
 */
public class FlutterApplication extends Application {
  @Override
  @CallSuper
  public void onCreate() {
    super.onCreate();
    FlutterMain.startInitialization(this);
  }

  private Activity mCurrentActivity = null;

  public Activity getCurrentActivity() {
    return mCurrentActivity;
  }

  public void setCurrentActivity(Activity mCurrentActivity) {
    this.mCurrentActivity = mCurrentActivity;
  }
}
FlutterApplication是继承于Application,主要是在onCreate()中调了FlutterMain.startInitialization(this)。
FlutterMain
/**
 * A legacy class to initialize the Flutter engine.
 *
 * <p>Replaced by {@link io.flutter.embedding.engine.loader.FlutterLoader}.
 */
public class FlutterMain {

 ...

}
看上面的注释,一个初始化FLutter引擎的旧类,现在被FlutterLoader给替换了。我们看里面代码,确实FlutterMain就是一个空壳,具体都是调用FLutterLoader实现的。 初始化:
  public static void startInitialization(
      @NonNull Context applicationContext, @NonNull Settings settings) {
    if (isRunningInRobolectricTest) {
      return;
    }
    FlutterLoader.Settings newSettings = new FlutterLoader.Settings();
    newSettings.setLogTag(settings.getLogTag());
    FlutterLoader.getInstance().startInitialization(applicationContext, newSettings);
  }
这方法将加载Flutter引擎的本机库以启用后续的JNI调用。也开始查找和解压缩应用程序APK中打包的Dart资源。
FlutterLoader
我们看下FlutterLoader的startInitialization方法,其实它主要做了以下几件事:
- 初始化配置
- 初始化资源
- 加载Flutter.so
- 注册VsyncWatcher
- 记录初始化的耗时
下面看下源码
  public void startInitialization(@NonNull Context applicationContext, @NonNull Settings settings) {
    // Do not run startInitialization more than once.
    if (this.settings != null) {
      return;
    }
    if (Looper.myLooper() != Looper.getMainLooper()) {
      throw new IllegalStateException("startInitialization must be called on the main thread");
    }

    // Ensure that the context is actually the application context.
    applicationContext = applicationContext.getApplicationContext();

    this.settings = settings;

    long initStartTimestampMillis = SystemClock.uptimeMillis();
    initConfig(applicationContext);
    initResources(applicationContext);

    System.loadLibrary("flutter");

    VsyncWaiter.getInstance(
            (WindowManager) applicationContext.getSystemService(Context.WINDOW_SERVICE))
        .init();

    // We record the initialization time using SystemClock because at the start of the
    // initialization we have not yet loaded the native library to call into dart_tools_api.h.
    // To get Timeline timestamp of the start of initialization we simply subtract the delta
    // from the Timeline timestamp at the current moment (the assumption is that the overhead
    // of the JNI call is negligible).
    long initTimeMillis = SystemClock.uptimeMillis() - initStartTimestampMillis;
    FlutterJNI.nativeRecordStartTimestamp(initTimeMillis);
  }
可以看到方法注解跟FlutterMain一毛一样。
	// Do not run startInitialization more than once.
    if (this.settings != null) {
      return;
    }
判断保证了FlutterMain.startInitialization无法多次调用。因为之前调用会设置settings。
 FlutterLoader.Settings newSettings = new FlutterLoader.Settings();
 newSettings.setLogTag(settings.getLogTag());
下面一行的代码要求Flutter引擎初始化必选在主线程
 if (Looper.myLooper() != Looper.getMainLooper()) {
      throw new IllegalStateException("startInitialization must be called on the main thread");
    }
初始化配置
从Manifest.xml中初始化一些参数
/**
   * Initialize our Flutter config values by obtaining them from the manifest XML file, falling back
   * to default values.
   */
  private void initConfig(@NonNull Context applicationContext) {
    Bundle metadata = getApplicationInfo(applicationContext).metaData;

    // There isn't a `<meta-data>` tag as a direct child of `<application>` in
    // `AndroidManifest.xml`.
    if (metadata == null) {
      return;
    }

    aotSharedLibraryName =
        metadata.getString(PUBLIC_AOT_SHARED_LIBRARY_NAME, DEFAULT_AOT_SHARED_LIBRARY_NAME);
    flutterAssetsDir =
        metadata.getString(PUBLIC_FLUTTER_ASSETS_DIR_KEY, DEFAULT_FLUTTER_ASSETS_DIR);

    vmSnapshotData = metadata.getString(PUBLIC_VM_SNAPSHOT_DATA_KEY, DEFAULT_VM_SNAPSHOT_DATA);
    isolateSnapshotData =
        metadata.getString(PUBLIC_ISOLATE_SNAPSHOT_DATA_KEY, DEFAULT_ISOLATE_SNAPSHOT_DATA);
  }
如果不设置的话都是默认参数
/** Finds Flutter resources in an application APK and also loads Flutter's native library. */
public class FlutterLoader {
  private static final String TAG = "FlutterLoader";

  // Must match values in flutter::switches
  private static final String AOT_SHARED_LIBRARY_NAME = "aot-shared-library-name";
  private static final String SNAPSHOT_ASSET_PATH_KEY = "snapshot-asset-path";
  private static final String VM_SNAPSHOT_DATA_KEY = "vm-snapshot-data";
  private static final String ISOLATE_SNAPSHOT_DATA_KEY = "isolate-snapshot-data";
  private static final String FLUTTER_ASSETS_DIR_KEY = "flutter-assets-dir";

  // XML Attribute keys supported in AndroidManifest.xml
  private static final String PUBLIC_AOT_SHARED_LIBRARY_NAME =
      FlutterLoader.class.getName() + '.' + AOT_SHARED_LIBRARY_NAME;
  private static final String PUBLIC_VM_SNAPSHOT_DATA_KEY =
      FlutterLoader.class.getName() + '.' + VM_SNAPSHOT_DATA_KEY;
  private static final String PUBLIC_ISOLATE_SNAPSHOT_DATA_KEY =
      FlutterLoader.class.getName() + '.' + ISOLATE_SNAPSHOT_DATA_KEY;
  private static final String PUBLIC_FLUTTER_ASSETS_DIR_KEY =
      FlutterLoader.class.getName() + '.' + FLUTTER_ASSETS_DIR_KEY;

  // 用于预编译快照组件的资源名称。
  private static final String DEFAULT_AOT_SHARED_LIBRARY_NAME = "libapp.so";
  private static final String DEFAULT_VM_SNAPSHOT_DATA = "vm_snapshot_data";
  private static final String DEFAULT_ISOLATE_SNAPSHOT_DATA = "isolate_snapshot_data";
  private static final String DEFAULT_LIBRARY = "libflutter.so";
  private static final String DEFAULT_KERNEL_BLOB = "kernel_blob.bin";
  private static final String DEFAULT_FLUTTER_ASSETS_DIR = "flutter_assets";

 // Mutable because default values can be overridden via config properties
  private String aotSharedLibraryName = DEFAULT_AOT_SHARED_LIBRARY_NAME;
  private String vmSnapshotData = DEFAULT_VM_SNAPSHOT_DATA;
  private String isolateSnapshotData = DEFAULT_ISOLATE_SNAPSHOT_DATA;
  private String flutterAssetsDir = DEFAULT_FLUTTER_ASSETS_DIR;
...

}
其实initConfig()就是给aotSharedLibraryName,vmSnapshotData,isolateSnapshotData,flutterAssetsDir这四个变量赋值,通过命名我们能大体猜出这四个变量代表了什么。 aotSharedLibraryName看意思就是通过aot打成的二级制包。默认名是libapp.so,其实里面就是Flutter项目中通过Dart实现的业务代码,现在被打成so库。 flutterAssetsDir应该是asset的路径,通过该路径可以找到asset中资源文件。 其他两个看名字就是和虚拟机还有Isolate相关。
初始化资源
下面看资源初始化的方法:initResources()
 /** Extract assets out of the APK that need to be cached as uncompressed files on disk. */
  private void initResources(@NonNull Context applicationContext) {
    new ResourceCleaner(applicationContext).start();

    if (BuildConfig.DEBUG || BuildConfig.JIT_RELEASE) {
      final String dataDirPath = PathUtils.getDataDirectory(applicationContext);
      final String packageName = applicationContext.getPackageName();
      final PackageManager packageManager = applicationContext.getPackageManager();
      final AssetManager assetManager = applicationContext.getResources().getAssets();
      resourceExtractor =
          new ResourceExtractor(dataDirPath, packageName, packageManager, assetManager);

      // In debug/JIT mode these assets will be written to disk and then
      // mapped into memory so they can be provided to the Dart VM.
      resourceExtractor
          .addResource(fullAssetPathFrom(vmSnapshotData))
          .addResource(fullAssetPathFrom(isolateSnapshotData))
          .addResource(fullAssetPathFrom(DEFAULT_KERNEL_BLOB));

      resourceExtractor.start();
    }
  }
先清了下资源,然后加载了Asset中的资源到内存这样Dart虚拟机才能使用。Flutter中的图片字体等资源在打包后都会被放置在asset目录下。vmSnapshotData,isolateSnapshotData初始化的变量在这用到了。但是,这个是DEBUG或者JIT模式下的方法,所以说release包加载资源的方式应该是不一样的
加载Flutter.so
System.loadLibrary("flutter");
这里是加载二进制的库,默认全名应该是libFlutter.so,主要是运行时环境。
注册VsyncWatcher
	VsyncWaiter.getInstance(
            (WindowManager) applicationContext.getSystemService(Context.WINDOW_SERVICE))
        .init();
这个还没细看,应该是注册后每次有脉冲就会接到通知,正常是每秒60次吧(这是猜测的哈)。
记录初始化的耗时
long initTimeMillis = SystemClock.uptimeMillis() - initStartTimestampMillis;
    FlutterJNI.nativeRecordStartTimestamp(initTimeMillis);
可以看到FlutterApplica基本上就是初始化一些配置,加载了资源和Flutter.so。
FlutterActivity
public class FlutterActivity extends Activity
    implements FlutterActivityAndFragmentDelegate.Host, LifecycleOwner {

	 ...

  // Delegate that runs all lifecycle and OS hook logic that is common between
  // FlutterActivity and FlutterFragment. See the FlutterActivityAndFragmentDelegate
  // implementation for details about why it exists.
  @VisibleForTesting protected FlutterActivityAndFragmentDelegate delegate;

  @NonNull private LifecycleRegistry lifecycle;

  public FlutterActivity() {
    lifecycle = new LifecycleRegistry(this);
  }


  @VisibleForTesting
  /* package */ void setDelegate(@NonNull FlutterActivityAndFragmentDelegate delegate) {
    this.delegate = delegate;
  }

  @Override
  protected void onCreate(@Nullable Bundle savedInstanceState) {
    switchLaunchThemeForNormalTheme();

    super.onCreate(savedInstanceState);

    lifecycle.handleLifecycleEvent(Lifecycle.Event.ON_CREATE);

    delegate = new FlutterActivityAndFragmentDelegate(this);
    delegate.onAttach(this);
    delegate.onActivityCreated(savedInstanceState);

    configureWindowForTransparency();
    setContentView(createFlutterView());
    configureStatusBarForFullscreenFlutterExperience();
  }

...

}
看下FlutterActivity的onCreate()中其实就两个比较重要的步骤。绑定Delegate和createFlutterView。
setContentView(createFlutterView());
FlutterActivityAndFragmentDelegate
FlutterActivity的onCreate()总共FlutterActivityAndFragmentDelegate总共做了三步:
- 创建Delegate,
- 绑定
- onActivityCreated。
    delegate = new FlutterActivityAndFragmentDelegate(this);
    delegate.onAttach(this);
    delegate.onActivityCreated(savedInstanceState);
构造Delegate
看下它的构造函数:
FlutterActivityAndFragmentDelegate(@NonNull Host host) {
    this.host = host;
  }
传入了一个Host,这个Host被FlutterActivity给实现:
public class FlutterActivity extends Activity
    implements FlutterActivityAndFragmentDelegate.Host, LifecycleOwner
从FlutterActivity的继承和实现可以看出,FlutterActivity除了Activity和getLifecycle等方法,其他的都是对Host的实现。也可以理解为针对Flutter相关的操作都定义在Host中了。
/**
* The {@link FlutterActivity} or {@link FlutterFragment} that owns this {@code
* FlutterActivityAndFragmentDelegate}.
*/
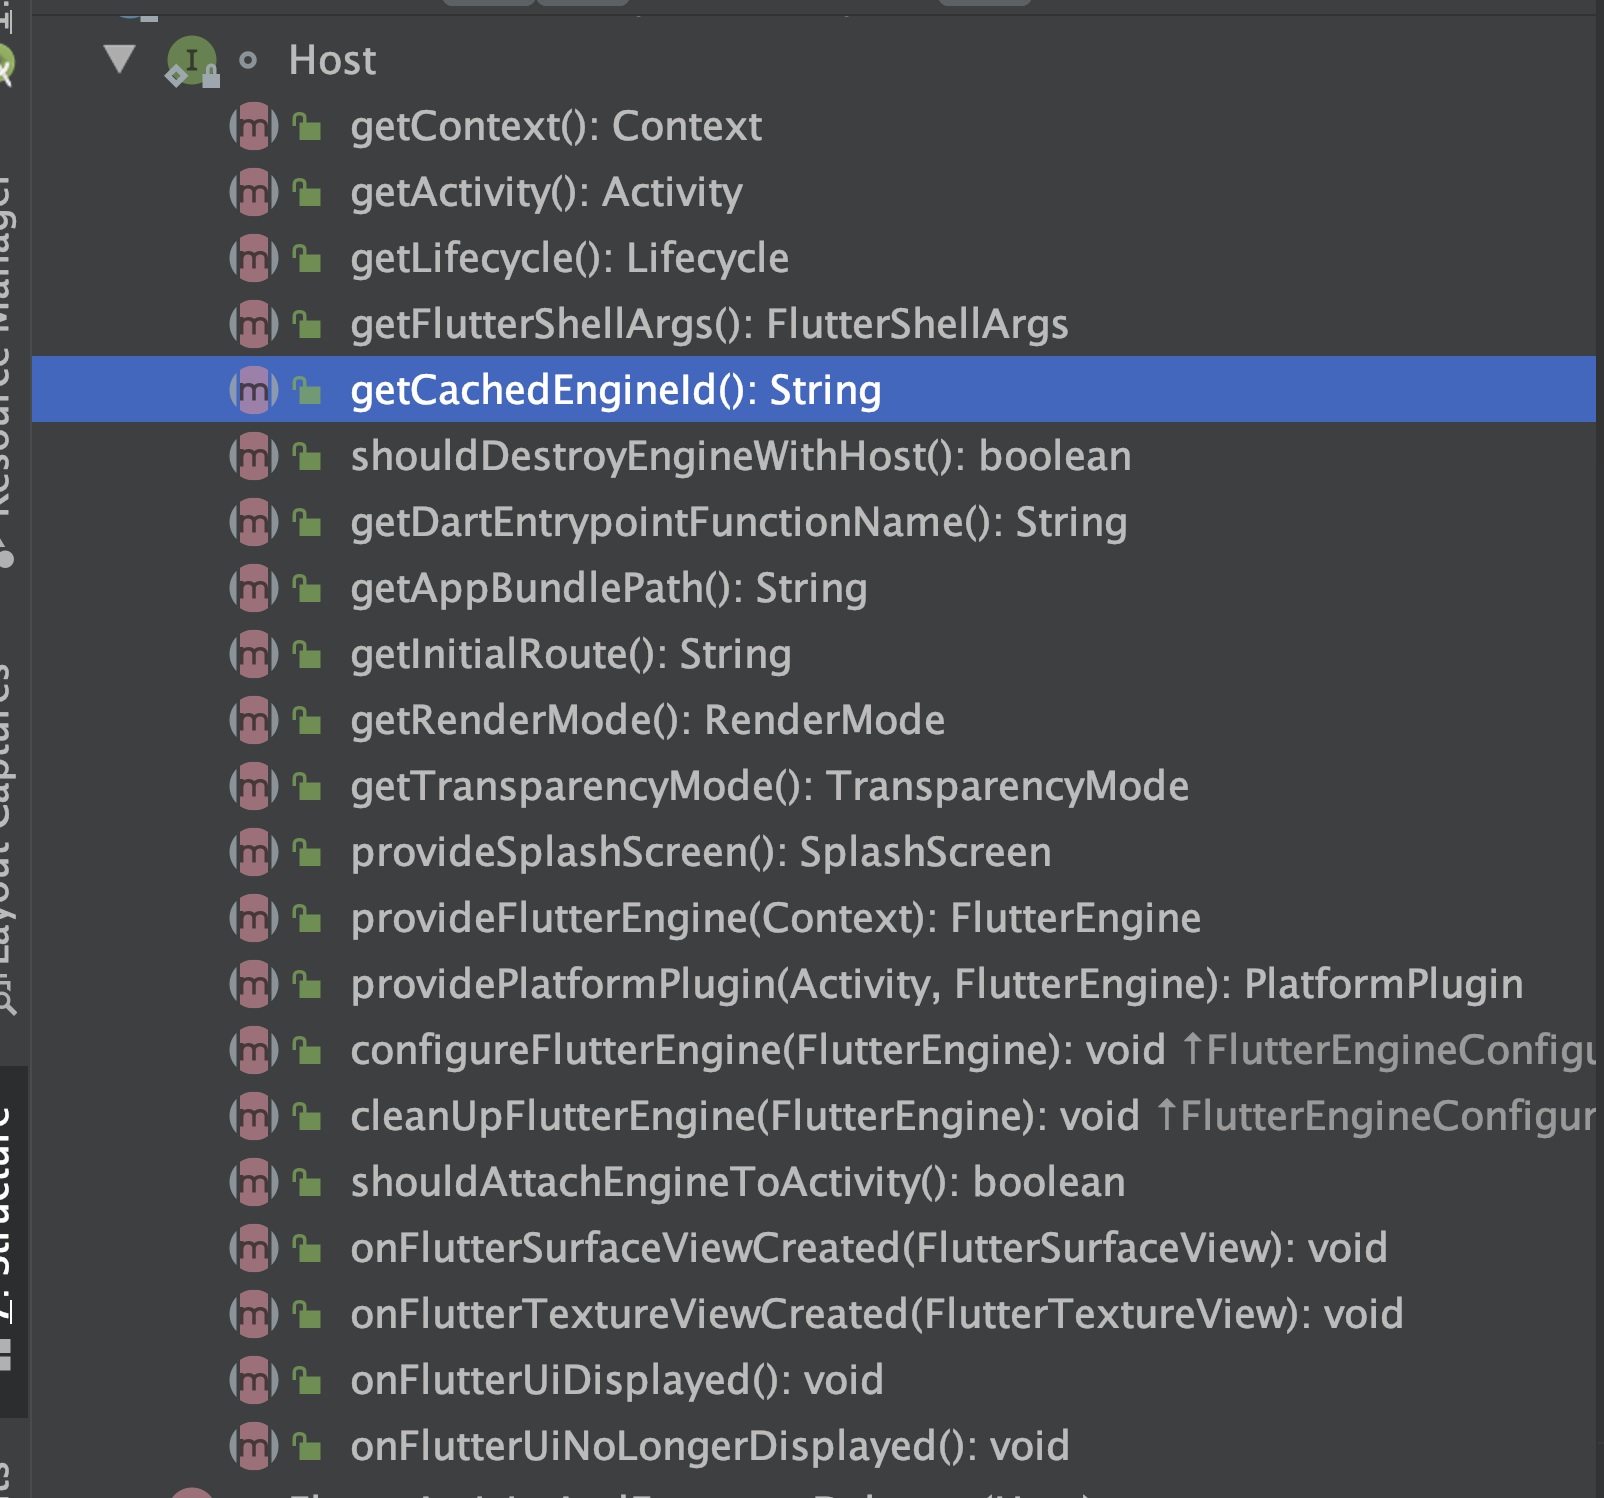
/* package */ interface Host
extends SplashScreenProvider, FlutterEngineProvider, FlutterEngineConfigurator {
大体有一下
onAttach
该方法源码如下:
/**
   * Invoke this method from {@code Activity#onCreate(Bundle)} or {@code
   * Fragment#onAttach(Context)}.
   *
   * <p>This method does the following:
   *
   * <p>
   *
   * <ol>
   *   <li>Initializes the Flutter system.
   *   <li>Obtains or creates a {@link FlutterEngine}.
   *   <li>Creates and configures a {@link PlatformPlugin}.
   *   <li>Attaches the {@link FlutterEngine} to the surrounding {@code Activity}, if desired.
   *   <li>Configures the {@link FlutterEngine} via {@link
   *       Host#configureFlutterEngine(FlutterEngine)}.
   * </ol>
   */
  void onAttach(@NonNull Context context) {
    ensureAlive();

    // When "retain instance" is true, the FlutterEngine will survive configuration
    // changes. Therefore, we create a new one only if one does not already exist.
    if (flutterEngine == null) {
      setupFlutterEngine();
    }

    // Regardless of whether or not a FlutterEngine already existed, the PlatformPlugin
    // is bound to a specific Activity. Therefore, it needs to be created and configured
    // every time this Fragment attaches to a new Activity.
    // TODO(mattcarroll): the PlatformPlugin needs to be reimagined because it implicitly takes
    //                    control of the entire window. This is unacceptable for non-fullscreen
    //                    use-cases.
    platformPlugin = host.providePlatformPlugin(host.getActivity(), flutterEngine);

    if (host.shouldAttachEngineToActivity()) {
      // Notify any plugins that are currently attached to our FlutterEngine that they
      // are now attached to an Activity.
      //
      // Passing this Fragment's Lifecycle should be sufficient because as long as this Fragment
      // is attached to its Activity, the lifecycles should be in sync. Once this Fragment is
      // detached from its Activity, that Activity will be detached from the FlutterEngine, too,
      // which means there shouldn't be any possibility for the Fragment Lifecycle to get out of
      // sync with the Activity. We use the Fragment's Lifecycle because it is possible that the
      // attached Activity is not a LifecycleOwner.
      Log.v(TAG, "Attaching FlutterEngine to the Activity that owns this Fragment.");
      flutterEngine
          .getActivityControlSurface()
          .attachToActivity(host.getActivity(), host.getLifecycle());
    }

    host.configureFlutterEngine(flutterEngine);
  }
该方法会在Activity的onCreate()和Fragment的onAttach()方法中调用。这个方法做了以下操作:
- 初始化了Flutter系统
- 获取或者创建了Flutter引擎
- 创建并配置了PlatformPlugin
- 如果需要,将Flutter引擎附加到周围的 Activity
- 通过configureFlutterEngine(FlutterEngine)来配置Flutter引擎
获取或者创建Flutter引擎
在确保当前delegate没有被释放并且当前delegate没有引擎的情况下,我们开发设定一个引擎。
	 ensureAlive();

    // When "retain instance" is true, the FlutterEngine will survive configuration
    // changes. Therefore, we create a new one only if one does not already exist.
    if (flutterEngine == null) {
      setupFlutterEngine();
    }
设定引擎主要是三步:
- 如果有缓存的引擎,使用缓存的引擎
- 使用FlutterActivity子类中的provideFlutterEngine()提供了引擎
- 如果上面两种都没有,就自己实例一个引擎
 @VisibleForTesting
  /* package */ void setupFlutterEngine() {

    // First, check if the host wants to use a cached FlutterEngine.
    String cachedEngineId = host.getCachedEngineId();
    if (cachedEngineId != null) {
      flutterEngine = FlutterEngineCache.getInstance().get(cachedEngineId);
      isFlutterEngineFromHost = true;
      if (flutterEngine == null) {
        throw new IllegalStateException(
            "The requested cached FlutterEngine did not exist in the FlutterEngineCache: '"
                + cachedEngineId
                + "'");
      }
      return;
    }

    // Second, defer to subclasses for a custom FlutterEngine.
    flutterEngine = host.provideFlutterEngine(host.getContext());
    if (flutterEngine != null) {
      isFlutterEngineFromHost = true;
      return;
    }
 // Our host did not provide a custom FlutterEngine. Create a FlutterEngine to back our
    // FlutterView.
    Log.v(
        TAG,
        "No preferred FlutterEngine was provided. Creating a new FlutterEngine for"
            + " this FlutterFragment.");
    flutterEngine =
        new FlutterEngine(
            host.getContext(),
            host.getFlutterShellArgs().toArray(),
            /*automaticallyRegisterPlugins=*/ false);
    isFlutterEngineFromHost = false;
注册常用原生插件到引擎
无论FlutterEngine是否已存在,PlatformPlugin都绑定到特定的Activity。因此,每次此Fragment附加到新的Activity时,都需要创建和配置它的一些平台插件。
platformPlugin = host.providePlatformPlugin(host.getActivity(), flutterEngine);
具体实现在FlutterActivity
 @Nullable
  @Override
  public PlatformPlugin providePlatformPlugin(
      @Nullable Activity activity, @NonNull FlutterEngine flutterEngine) {
    if (activity != null) {
      return new PlatformPlugin(getActivity(), flutterEngine.getPlatformChannel());
    } else {
      return null;
    }
  }
public PlatformPlugin(Activity activity, PlatformChannel platformChannel) {
    this.activity = activity;
    this.platformChannel = platformChannel;
    this.platformChannel.setPlatformMessageHandler(mPlatformMessageHandler);

    mEnabledOverlays = DEFAULT_SYSTEM_UI;
  }
然后主要就做了一件事,就是对当前引擎的PlatformChannel设置MessageHandler。具体设置哪些插件如下:
private final PlatformChannel.PlatformMessageHandler mPlatformMessageHandler =
      new PlatformChannel.PlatformMessageHandler() {
        @Override
        public void playSystemSound(@NonNull PlatformChannel.SoundType soundType) {
          PlatformPlugin.this.playSystemSound(soundType);
        }

        @Override
        public void vibrateHapticFeedback(
            @NonNull PlatformChannel.HapticFeedbackType feedbackType) {
          PlatformPlugin.this.vibrateHapticFeedback(feedbackType);
        }

        @Override
        public void setPreferredOrientations(int androidOrientation) {
          setSystemChromePreferredOrientations(androidOrientation);
        }

        @Override
        public void setApplicationSwitcherDescription(
            @NonNull PlatformChannel.AppSwitcherDescription description) {
          setSystemChromeApplicationSwitcherDescription(description);
        }

        @Override
        public void showSystemOverlays(@NonNull List<PlatformChannel.SystemUiOverlay> overlays) {
          setSystemChromeEnabledSystemUIOverlays(overlays);
        }

        @Override
        public void restoreSystemUiOverlays() {
          restoreSystemChromeSystemUIOverlays();
        }

        @Override
        public void setSystemUiOverlayStyle(
            @NonNull PlatformChannel.SystemChromeStyle systemUiOverlayStyle) {
          setSystemChromeSystemUIOverlayStyle(systemUiOverlayStyle);
        }

        @Override
        public void popSystemNavigator() {
          PlatformPlugin.this.popSystemNavigator();
        }

        @Override
        public CharSequence getClipboardData(
            @Nullable PlatformChannel.ClipboardContentFormat format) {
          return PlatformPlugin.this.getClipboardData(format);
        }

        @Override
        public void setClipboardData(@NonNull String text) {
          PlatformPlugin.this.setClipboardData(text);
        }

        @Override
        public List<Rect> getSystemGestureExclusionRects() {
          return PlatformPlugin.this.getSystemGestureExclusionRects();
        }

        @Override
        public void setSystemGestureExclusionRects(@NonNull ArrayList<Rect> rects) {
          PlatformPlugin.this.setSystemGestureExclusionRects(rects);
        }
      };
就是音量震动等需要调用系统原生功能的东西。
将引擎上的插件绑到Activity上
		flutterEngine
          .getActivityControlSurface()
          .attachToActivity(host.getActivity(), host.getLifecycle());
对外暴露配置当前引擎的方法
 host.configureFlutterEngine(flutterEngine);

 /** Hook for the host to configure the {@link FlutterEngine} as desired. */
  void configureFlutterEngine(@NonNull FlutterEngine flutterEngine);


  @Override
  public void configureFlutterEngine(@NonNull FlutterEngine flutterEngine) {
    registerPlugins(flutterEngine);
  }

private static void registerPlugins(@NonNull FlutterEngine flutterEngine) {
    try {
      Class<?> generatedPluginRegistrant =
          Class.forName("io.flutter.plugins.GeneratedPluginRegistrant");
      Method registrationMethod =
          generatedPluginRegistrant.getDeclaredMethod("registerWith", FlutterEngine.class);
      registrationMethod.invoke(null, flutterEngine);
    } catch (Exception e) {
      Log.w(
          TAG,
          "Tried to automatically register plugins with FlutterEngine ("
              + flutterEngine
              + ") but could not find and invoke the GeneratedPluginRegistrant.");
    }
  }
其实最后这一步就是调用了FlutterActivity中的registerPlugins()方法。
作用是将Flutter项目中 pubspec.yaml文件中依赖的三方插件全部注册上。 (note:其实在1.12之前这一步是需要开发者自己做的,但是1.1.2之后就自动帮你实现了)
onActivityCreated
给插件恢复状态的机会
  void onActivityCreated(@Nullable Bundle bundle) {
    Log.v(TAG, "onActivityCreated. Giving plugins an opportunity to restore state.");
    ensureAlive();

    if (host.shouldAttachEngineToActivity()) {
      flutterEngine.getActivityControlSurface().onRestoreInstanceState(bundle);
    }
  }
createFlutterView
上面的内容都是些关于引擎和插件的配置。但是具体如何显示Flutter的视图还没涉及。
@Override
  protected void onCreate(@Nullable Bundle savedInstanceState) {
	 ...
    setContentView(createFlutterView());
    ...
  }
从上面代码可以看到FlutterActivity具体显示的视图由createFlutterView()决定,而具体实现又在delegate中
  @NonNull
  private View createFlutterView() {
    return delegate.onCreateView(
        null /* inflater */, null /* container */, null /* savedInstanceState */);
  }


  @NonNull
  View onCreateView(
      LayoutInflater inflater, @Nullable ViewGroup container, @Nullable Bundle savedInstanceState) {
	...
    if (host.getRenderMode() == RenderMode.surface) {
      FlutterSurfaceView flutterSurfaceView =
          new FlutterSurfaceView(
              host.getActivity(), host.getTransparencyMode() == TransparencyMode.transparent);

      // Allow our host to customize FlutterSurfaceView, if desired.
      host.onFlutterSurfaceViewCreated(flutterSurfaceView);

      // Create the FlutterView that owns the FlutterSurfaceView.
      flutterView = new FlutterView(host.getActivity(), flutterSurfaceView);
    } else {
      FlutterTextureView flutterTextureView = new FlutterTextureView(host.getActivity());

      // Allow our host to customize FlutterSurfaceView, if desired.
      host.onFlutterTextureViewCreated(flutterTextureView);

      // Create the FlutterView that owns the FlutterTextureView.
      flutterView = new FlutterView(host.getActivity(), flutterTextureView);
    }

    // Add listener to be notified when Flutter renders its first frame.
    flutterView.addOnFirstFrameRenderedListener(flutterUiDisplayListener);

    flutterSplashView = new FlutterSplashView(host.getContext());
    if (Build.VERSION.SDK_INT >= Build.VERSION_CODES.JELLY_BEAN_MR1) {
      flutterSplashView.setId(View.generateViewId());
    } else {
      flutterSplashView.setId(486947586);
    }
    flutterSplashView.displayFlutterViewWithSplash(flutterView, host.provideSplashScreen());

    Log.v(TAG, "Attaching FlutterEngine to FlutterView.");
    flutterView.attachToFlutterEngine(flutterEngine);

    return flutterSplashView;
  }
我们通过上面的代码可以发现最后返回的不是FlutterView,而是FlutterSplashView。还有FlutterView的创建需要使用到FlutterSurfaceView或者FlutterTextureView。这还是很有意思。下面具体看下这个方法主要做了什么:
- 创建FlutterView。
- FlutterView添加第一帧绘制成功回调。
- 创建FlutterSplashView并挂载到View树中。
- 将FlutterView交给FlutterSplashView并挂载到引擎。
创建FlutterView
首先需要知道当前配置的RenderModel。如果RenderModel是surface则需要先创建FlutterSurfaceView,如果是texture则需要创建FlutterTexture。然后再通过FlutterSurfaceView和FlutterTextureView创建FlutterView。只是看名字我们可以猜测FlutterView的具体UI是通过SurfaceView或者TexutureView来显示的。而FlutterSurfaceView和FlutterTextureView也分别集成原生的SurfaceView和TextureView。
系统推荐使用RenderModel为surface。理由是这样性能更高。其实这个跟你再使用SurfaceView或者TextureView实现视频播放器是一样的。
FlutterSplashView
**
 * {@code View} that displays a {@link SplashScreen} until a given {@link FlutterView} renders its
 * first frame.
 */
/* package */ final class FlutterSplashView extends FrameLayout {
看类注解理解为:一个在FlutterView绘制完第一帧前用来显示SplashScreen的View。 如果在使用debug模式编写Flutter会发现FlutterView的显示是有点慢的,所以此时先显示一个之前设置的splashScreen当Flutter第一帧绘制完,再将splashScreen移除。
除了上述内容外,此处主要还把FlutterSplashView挂载到了当前的View树种。并将FlutterView添加到了FlutterSplashView中。最后还把当前的FlutterView关联到了当前Activity的引擎上,因为FlutterView是依赖于Flutter引擎绘制。
这些都完成后,FlutterActivity的onCreate()就执行完了,此时等待FlutterView第一帧绘制完就能显示Flutter的视图了。
