

背景介绍
前不久接手了一个涉及物联网的项目,项目的通信模式十分常见:Android设备与硬件交互,将数据传输给服务端;服务端推送消息给Android设备,间接控制硬件设备。
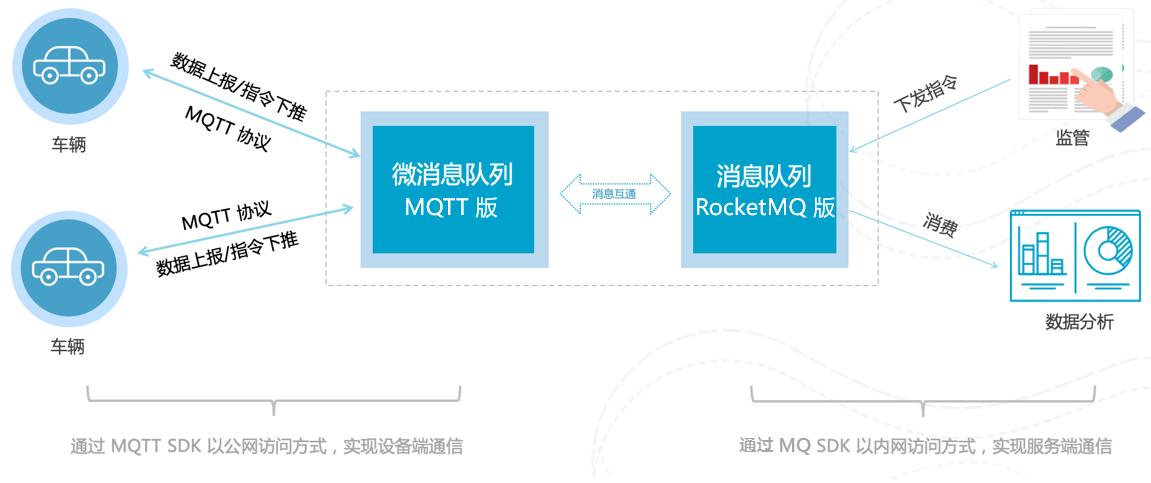
技术选型方面,贴张阿里文档上的图,图上对业务场景说的十分清晰。需要详细了解如何选型的小伙伴可以点击查看:帮助文档
MQTT是什么
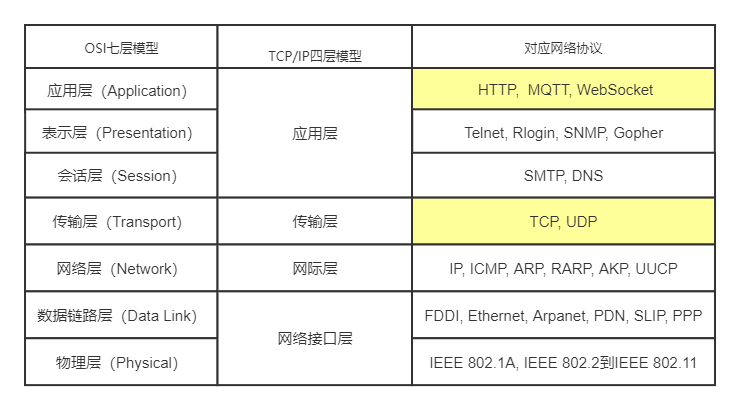
MQTT(Message Queuing Telemetry Transport,消息队列遥测传输协议),是一种基于发布/订阅(publish/subscribe)模式的轻量级通讯协议。该协议构建于TCP/IP协议上,如下图所示:
Android中使用MQTT
开始撸码。首先需要选择一款MQTT客户端。MQTT本身只是一个通信协议,开发中要使用的是封装了协议的客户端。根据 Github排名,最终选择了paho客户端。
- 添加依赖
    // Java实现
    implementation "org.eclipse.paho:org.eclipse.paho.client.mqttv3:1.1.1"
    // Android实现
    implementation "org.eclipse.paho:org.eclipse.paho.android.service:1.1.1"
注意:这里如果引用了service包,项目无法在AndroidX下通过编译,原因是MqttService的实现使用了v4包中的content.LocalBroadcastManager。如果坚持要在AndroidX中使用可以把源码修改后重新编译成jar包,也可以选择在AndroidX下不导入service包的方法实现。
- 别忘记添加权限,注册Service
 <uses-permission android:name="android.permission.WAKE_LOCK" />
 <uses-permission android:name="android.permission.WRITE_EXTERNAL_STORAGE" />
 <uses-permission android:name="android.permission.ACCESS_NETWORK_STATE" />
 <uses-permission android:name="android.permission.READ_EXTERNAL_STORAGE" />
 <uses-permission android:name="android.permission.INTERNET" />

 <service android:name="org.eclipse.paho.android.service.MqttService" />
- 使用paho.android实现
public class MyMqttService extends Service {

    public static final String TAG = MyMqttService.class.getSimpleName();

    private MyBinder mBinder = new MyBinder();

    /**
     * 1、BROKER_URL:MQ的URL
     * 2、CLIENT_ID:客户端ID
     * 3、TOPIC:订阅的主题
     * 4、USER_NAME:用户名
     * 5、PASSWORD:密码
     */
    private String BROKER_URL;
    private String CLIENT_ID;
    private String USER_NAME;
    private String PASSWORD;

    //订阅的主题名 --建议用final String的方式定义,谨慎使用通配符
    private static final String TOPIC_TEST1 = "test/topic/1";
    private static final String TOPIC_TEST2 = "test/topic/2";

    /**
     * mqtt客户端类 MqttAndroidClient
     * mqtt连接配置类 options
     */
    private MqttAndroidClient mqttAndroidClient;
    private MqttConnectOptions mqttConnectOptions;


    @Override
    public void onCreate() {
        super.onCreate();
        Random rd = new Random(System.currentTimeMillis());//以生成随机数为例

        CLIENT_ID = "ClientId_" + rd.nextInt(); //注意 --需要防止CLIENT_ID重复
        BROKER_URL = "tcp://xxx.xxx.xxx.xxx:xxxx";
        USER_NAME = "test";
        PASSWORD = "test";
    }

    //tips:bindService()不会走此方法,可根据具体需求修改
    @Override
    public int onStartCommand(Intent intent, int flags, int startId) {
        Log.e(TAG, "mqtt start command");
        //前台服务
        Notification.Builder builder = new Notification.Builder(this.getApplicationContext());
        Intent nfIntent = new Intent(this, MainActivity.class);
        builder.setContentIntent(PendingIntent.getActivity(this, 0, nfIntent, 0))
                .setLargeIcon(BitmapFactory.decodeResource(this.getResources(), R.mipmap.ic_launcher))
                .setContentTitle("MQTT服务")
                .setSmallIcon(R.mipmap.ic_launcher)
                .setContentText("服务正在运行")
                .setWhen(System.currentTimeMillis());
        Notification notification = null;
        if (android.os.Build.VERSION.SDK_INT >= android.os.Build.VERSION_CODES.JELLY_BEAN) {
            notification = builder.build();
        }
        startForeground(50, notification);

        mqttAndroidClient = new MqttAndroidClient(MyMqttService.this, BROKER_URL, CLIENT_ID);
        //接收消息回调
        mqttAndroidClient.setCallback(new PushCallback());
        mqttConnectOptions = new MqttConnectOptions();
        mqttConnectOptions.setUserName(USER_NAME);
        mqttConnectOptions.setPassword(PASSWORD.toCharArray());
        //自动重连
        mqttConnectOptions.setAutomaticReconnect(true);
        mqttConnectOptions.setCleanSession(true);
        // 设置超时时间 单位为秒
        mqttConnectOptions.setConnectionTimeout(30);
        //设置‘keep-alive’间隔,无法自动重连
        mqttConnectOptions.setKeepAliveInterval(20);
        try {
            //开始连接
            mqttAndroidClient.connect(mqttConnectOptions, null, new IMqttActionListener() {
                @Override
                public void onSuccess(IMqttToken asyncActionToken) {
                    Log.d(TAG, "onSuccess: Success to connect to " + BROKER_URL);
                    DisconnectedBufferOptions disconnectedBufferOptions = new DisconnectedBufferOptions();
                    disconnectedBufferOptions.setBufferEnabled(true);
                    //离线后缓存条数
                    disconnectedBufferOptions.setBufferSize(1);
                    disconnectedBufferOptions.setPersistBuffer(false);
                    disconnectedBufferOptions.setDeleteOldestMessages(false);
                    mqttAndroidClient.setBufferOpts(disconnectedBufferOptions);
                    //成功连接以后开始订阅
                    int[] Qos = {1, 1};
                    String[] topicArray = {TOPIC_TEST1, TOPIC_TEST2};
                    try {
                        mqttAndroidClient.subscribe(topicArray, Qos, null, new IMqttActionListener() {
                            @Override
                            public void onSuccess(IMqttToken asyncActionToken) {
                                Log.d(TAG, "onSuccess: Success to Subscribed!");
                            }

                            @Override
                            public void onFailure(IMqttToken asyncActionToken, Throwable exception) {
                                Log.d(TAG, "onFailure: Failed to subscribe, exception:" + exception);
                            }
                        });
                    } catch (MqttException e) {
                        e.printStackTrace();
                    }
                }

                @Override
                public void onFailure(IMqttToken asyncActionToken, Throwable exception) {
                    //连接失败
                    Log.d(TAG, "onFailure: Failed to connect to " + BROKER_URL + exception.toString());
                    reConnect();
                    exception.printStackTrace();
                }
            });
        } catch (MqttException ex) {
            ex.printStackTrace();
        }
        return START_STICKY;
    }

    @Override
    public IBinder onBind(Intent intent) {
        Log.e(TAG, "start IBinder");
        return mBinder;
    }

    @Override
    public boolean onUnbind(Intent intent) {
        Log.e(TAG, "start onUnbind");
        return super.onUnbind(intent);
    }

    public class MyBinder extends Binder {
        public MyMqttService getService() {
            return MyMqttService.this;
        }
    }


    @Override
    public void onDestroy() {
        Log.e(TAG, "start onDestroy");
        if (mqttAndroidClient != null) {
            try {
                mqttAndroidClient.unregisterResources();
                mqttAndroidClient.close();
                mqttAndroidClient.disconnect();

            } catch (MqttException e) {
                e.printStackTrace();
            }
        }
        super.onDestroy();
    }

    //重连具体方法
    public void reConnect() {
        if (null != mqttAndroidClient) {
            try {
                mqttAndroidClient.connect(mqttConnectOptions);
            } catch (MqttException e) {
                e.printStackTrace();
            }
        }
    }

    class PushCallback implements MqttCallbackExtended {
        @Override
        public void connectionLost(Throwable cause) {
            Log.e(TAG, "MQ连接丢失:" + cause);
            reConnect();
        }

        @Override
        public void deliveryComplete(IMqttDeliveryToken token) {
            Log.e(TAG, "发送消息成功后的回调");
        }

        @Override
        public void connectComplete(boolean reconnect, String serverURI) {
            //此方法是:连接成功的回调
            //重连成功后,reconncet值为true
        }

        @Override
        public void messageArrived(String topic, final MqttMessage message) throws Exception {
            String msg = new String(message.getPayload());
            Log.d(TAG, "消息到达,topic:" + topic + ",msg:" + msg);
        }
    }
}
- 使用paho.client实现(Java客户端也可以使用)
!!!强烈推荐使用此方式实现,原因最后再说
public class MyMqttService extends Service {

    public static final String TAG = MyMqttService.class.getSimpleName();

    private MyBinder mBinder = new MyBinder();

    /**
     * 1、BROKER_URL:MQ的URL
     * 2、CLIENT_ID:客户端ID
     * 3、TOPIC:订阅的主题
     * 4、USER_NAME:用户名
     * 5、PASSWORD:密码
     */
    private String BROKER_URL;
    private String CLIENT_ID;
    private String USER_NAME;
    private String PASSWORD;

    //订阅的主题名 --建议用final String的方式定义,谨慎使用通配符
    private static final String TOPIC_TEST1 = "test/topic/1";
    private static final String TOPIC_TEST2 = "test/topic/2";

    /**
     * mqtt客户端类 mqttClient
     * mqtt连接配置类 options
     */
    private MqttClient mqttClient;
    private MqttConnectOptions options;


    @Override
    public void onCreate() {
        super.onCreate();
        Random rd = new Random(System.currentTimeMillis());//以生成随机数为例

        CLIENT_ID = "ClientId_" + rd.nextInt(); //注意 --需要防止CLIENT_ID重复
        BROKER_URL = "tcp://xxx.xxx.xxx.xxx:xxxx";
        USER_NAME = "test";
        PASSWORD = "test";
    }


    @Override
    public int onStartCommand(Intent intent, int flags, int startId) {
        Log.e(TAG, "mqtt start command");

        Notification.Builder builder = new Notification.Builder(this.getApplicationContext());
        Intent nfIntent = new Intent(this, MainActivity.class);
        builder.setContentIntent(PendingIntent.getActivity(this, 0, nfIntent, 0))
                //设置通知栏大图标
                .setLargeIcon(BitmapFactory.decodeResource(this.getResources(), R.mipmap.ic_launcher))
                //设置服务标题
                .setContentTitle("MQTT服务")
                //设置状态栏小图标
                .setSmallIcon(R.mipmap.ic_launcher)
                //设置服务内容
                .setContentText("服务正在运行")
                //设置通知时间
                .setWhen(System.currentTimeMillis());
        Notification notification = null;
        if (android.os.Build.VERSION.SDK_INT >= android.os.Build.VERSION_CODES.JELLY_BEAN) {
            notification = builder.build();
        }

        startForeground(50, notification);
        //注意:mqttclient实现的是阻塞的接口IMqttClient,为了防止ANR,这里必须开启线程/线程池
        new Thread(new Runnable() {
            @Override
            public void run() {
                try {
                    //在服务开始时new一个mqttClient实例,客户端ID为clientId,第三个参数说明是持久化客户端,如果是null则是非持久化
                    mqttClient = new MqttClient(BROKER_URL, CLIENT_ID, new MemoryPersistence());
                    // MQTT的连接设置
                    options = new MqttConnectOptions();
                    // 设置是否清空session,这里如果设置为false表示服务器会保留客户端的连接记录,这里设置为true表示每次连接到服务器都以新的身份连接
                    options.setCleanSession(true);
                    // 设置连接的用户名
                    options.setUserName(USER_NAME);
                    // 设置连接的密码
                    options.setPassword(PASSWORD.toCharArray());
                    // 设置超时时间 单位为秒
                    options.setConnectionTimeout(10);
                    options.setKeepAliveInterval(20);
                    // 设置回调  回调类的说明在后面
                    mqttClient.setCallback(new PushCallback());
                    //setWill方法,如果项目中需要知道客户端是否掉线可以调用该方法。设置最终端口的通知消息
                    //options.setWill(topic, "close".getBytes(), 2, true);
                    //mqtt客户端连接服务器
                    mqttClient.connect(options);
                    //mqtt客户端订阅主题
                    //在mqtt中用QoS来标识服务质量
                    //QoS=0时,报文最多发送一次,有可能丢失
                    //QoS=1时,报文至少发送一次,有可能重复
                    //QoS=2时,报文只发送一次,并且确保消息只到达一次。
                    int[] Qos = {1, 1};
                    String[] topicArray = {TOPIC_TEST1, TOPIC_TEST2};
                    mqttClient.subscribe(topicArray, Qos);
                } catch (MqttException e) {
                    e.printStackTrace();
                }
            }
        }).start();
        return START_STICKY;
    }

    @Override
    public IBinder onBind(Intent intent) {
        Log.e(TAG, "start IBinder");
        return mBinder;
    }

    @Override
    public boolean onUnbind(Intent intent) {
        Log.e(TAG, "start onUnbind");
        return super.onUnbind(intent);
    }

    public class MyBinder extends Binder {
        public MyMqttService getService() {
            return MyMqttService.this;
        }
    }

    /**
     * 用于MQ重连
     *
     * @throws Exception
     */
    public void reConnect() throws Exception {
        if (null != mqttClient) {
            mqttClient.connect(options);
            Log.e(TAG, "MQ重连");
        }
    }

    @Override
    public void onDestroy() {
        Log.e(TAG, "start onDestroy");
        if (mqttClient != null) {
            try {
                mqttClient.disconnect(0);
            } catch (MqttException e) {
                e.printStackTrace();
            }
        }
        super.onDestroy();
    }


    class PushCallback implements MqttCallback {
        @Override
        public void connectionLost(Throwable cause) {
            Log.e(TAG, "MQ连接丢失:" + cause);
            try {
                reConnect();
            } catch (Exception e) {
                e.printStackTrace();
            }
        }

        @Override
        public void deliveryComplete(IMqttDeliveryToken token) {

        }

        @Override
        public void messageArrived(String topic, final MqttMessage message) throws Exception {
            String msg = new String(message.getPayload());
            Log.d(TAG, "消息到达,topic:" + topic + ",msg:" + msg);
        }
    }
}
结尾 && 预告
原本是不太愿意写MQTT相关内容的。作为一款轻量级协议,并且有eclipse这样的大厂为我们封装好了客户端,随手一搜相关的概念介绍、实现代码实在是太多了,也很难写出新意。
不过随着项目一路进行,确实遇到了很多奇怪的问题和麻烦,比如接收不到断线回调,重连失败,弱网环境消息丢失,黏性消息干扰等等等等。所以这篇文章也是分享也是交流,上面的代码可以直接扒走用,如果遇到问题大家也可以一起交流讨论。
最后填一下上面的坑,之所以推荐使用Java的实现方式,是因为MqttAndroidClient内部使用了Service的实现方式。在某些情况下很可能被系统杀死,导致功能失效,我在RK系列Android开发板上已经多次复现了该问题(手机环境上暂未出现)。
下一篇我将结合paho客户端的部分源码,讨论不同paho包下不同client的实现差异以及Android系统的老话题——Service保活。
