文章将会被同步至微信公众号:Android部落格
个人网站:chengang.plus/
1、概述
选定连接接口,并开始连接目标
流程图如下:
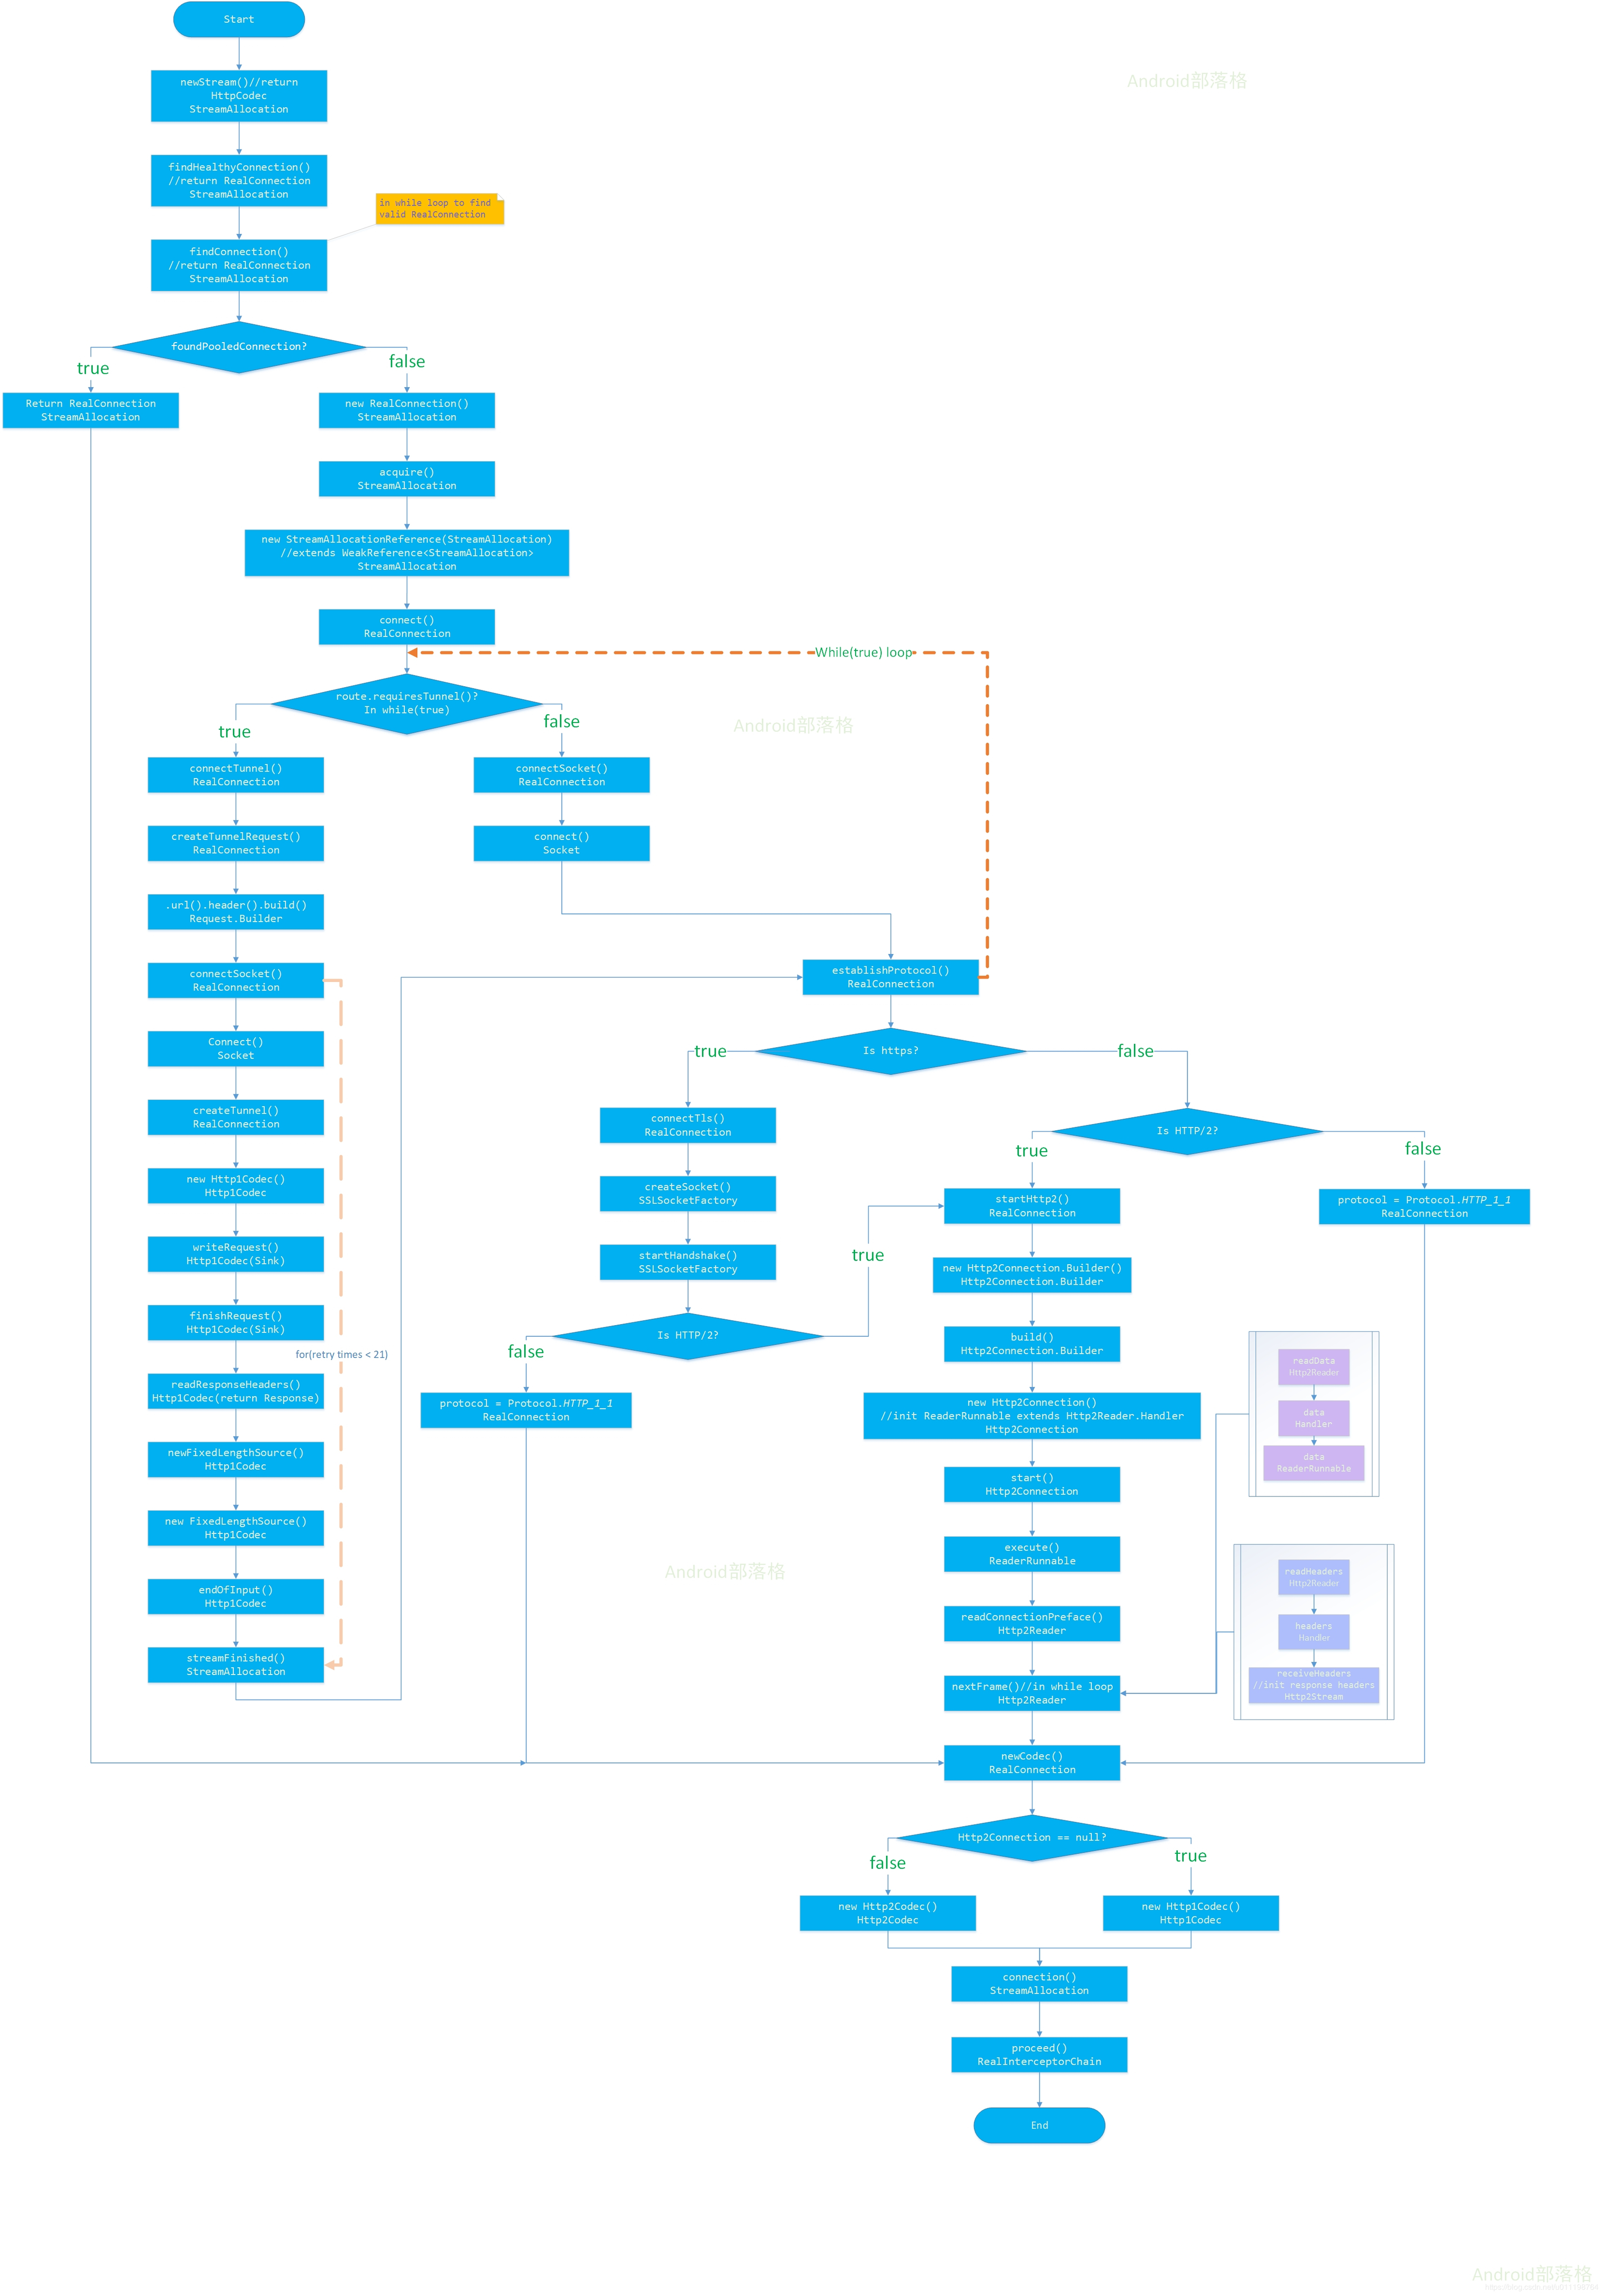
原图片地址:ftp.bmp.ovh/imgs/2020/0…
1.1 找RealConnection
选择合适的HttpCodec,为什么要选择呢?因为涉及到Http版本的问题,此处需要兼容,先看代码:
boolean doExtensiveHealthChecks = !request.method().equals("GET");
HttpCodec httpCodec = streamAllocation.newStream(client, chain, doExtensiveHealthChecks);
RealConnection connection = streamAllocation.connection();
第二行代码就是在选择HttpCodec,看看newStream方法做了什么:
RealConnection resultConnection = findHealthyConnection(connectTimeout, readTimeout,
          writeTimeout, pingIntervalMillis, connectionRetryEnabled, doExtensiveHealthChecks);
HttpCodec resultCodec = resultConnection.newCodec(client, chain, this);
仅仅两行代码牵涉了很多逻辑。
第一步选择一个健康的连接findHealthyConnection,或者叫根据前置条件,选择一个合适的连接。这个代码里面核心的代码就一行:
RealConnection candidate = findConnection(connectTimeout, readTimeout, writeTimeout,
          pingIntervalMillis, connectionRetryEnabled);
这个方法里面就干了一件事,找RealConnection对象,如果这个对象已经存在,就直接返回,否则的话,就new一个,并连接再返回。
创建这个对象很简单:
new RealConnection(connectionPool, selectedRoute);
然后开始连接connect,在RealConnection类中有初始化一个List,List的子类型是ConnectionSpec,代表传输协议:
List<ConnectionSpec> connectionSpecs = route.address().connectionSpecs();
需要注意以下几个问题:
- TLS协议
这个值请求的时候如果不设置的话,默认是:
static final List<ConnectionSpec> DEFAULT_CONNECTION_SPECS = Util.immutableList(
      ConnectionSpec.MODERN_TLS, ConnectionSpec.CLEARTEXT);
连接过程采用TLS协议还是明文传递呢?
TLS协议可以参考http://www.ruanyifeng.com/blog/2014/02/ssl_tls.html
- Https SSL认证
一般客户端验证SSL有两种方式,一种是通过SSLSocketFactory方式创建,需要设置域名及端口号(适应于HttpClient请求方式),一种是通过SSLContext方式创建(适用于HttpsURLConnection请求方式).
sdk里面采用SSLSocketFactory,如果用户不设置的话,默认在RetryAndFollowUpInterceptor类的createAddress方法中会初始化:
private Address createAddress(HttpUrl url) {
    SSLSocketFactory sslSocketFactory = null;
    HostnameVerifier hostnameVerifier = null;
    CertificatePinner certificatePinner = null;
    if (url.isHttps()) {
      sslSocketFactory = client.sslSocketFactory();
      hostnameVerifier = client.hostnameVerifier();
      certificatePinner = client.certificatePinner();
    }

    return new Address(url.host(), url.port(), client.dns(), client.socketFactory(),
        sslSocketFactory, hostnameVerifier, certificatePinner, client.proxyAuthenticator(),
        client.proxy(), client.protocols(), client.connectionSpecs(), client.proxySelector());
}
下面三个参数只在是https请求的时候才设置:
sslSocketFactory是SSL认证;
如果请求的时候不设置,sdk在OkHttpClient类中默认设置:
if (builder.sslSocketFactory != null || !isTLS) {
  this.sslSocketFactory = builder.sslSocketFactory;
  this.certificateChainCleaner = builder.certificateChainCleaner;
} else {
  X509TrustManager trustManager = systemDefaultTrustManager();
  this.sslSocketFactory = systemDefaultSslSocketFactory(trustManager);
  this.certificateChainCleaner = CertificateChainCleaner.get(trustManager);
}
hostnameVerifier是主机名称验证;
一、概述
位于javax.net.ssl包下。
声明:'public interface HostnameVerifier'
此类是用于主机名验证的基接口。 在握手期间,如果 URL 的主机名和服务器的标识主机名不匹配,则验证机制可以回调此接口的实现程序来确定是否应该允许此连接。 策略可以是基于证书的或依赖于其他验证方案。 当验证 URL 主机名使用的默认规则失败时使用这些回调。
二、方法
public boolean verify(String hostname,SSLSession session)
参数:
hostname-主机名
session - 到主机的连接上使用的 SSLSession
返回值:
如果主机名是可接受,则返回true;
请求的时候不设置的话,sdk在OKHttpClient的Builder中默认设置:
hostnameVerifier = OkHostnameVerifier.INSTANCE;
//对应OkHostnameVerifier类
private OkHostnameVerifier() {
}
certificatePinner来限制哪些证书和证书颁发机构可以被信任
请求的时候不设置的话,sdk在OKHttpClient的Builder中默认设置:
certificatePinner = CertificatePinner.DEFAULT;
//对应CertificatePinner类
CertificatePinner(Set<Pin> pins, @Nullable CertificateChainCleaner certificateChainCleaner) {
    this.pins = pins;
    this.certificateChainCleaner = certificateChainCleaner;
}
1.2 开始连接
可以认为是握手过程
核心代码是:
while (true) {
  try {
    if (route.requiresTunnel()) {
      connectTunnel(connectTimeout, readTimeout, writeTimeout, call, eventListener);
      if (rawSocket == null) {
        // We were unable to connect the tunnel but properly closed down our resources.
        break;
      }
    } else {
      connectSocket(connectTimeout, readTimeout, call, eventListener);
    }
    establishProtocol(connectionSpecSelector, pingIntervalMillis, call, eventListener);
    eventListener.connectEnd(call, route.socketAddress(), route.proxy(), protocol);
    break;
  } catch (IOException e) {
  }
}
- 是否需要隧道连接
对应的代码片段是route.requiresTunnel:
public boolean requiresTunnel() {
    return address.sslSocketFactory != null && proxy.type() == Proxy.Type.HTTP;
}
大概意思是:我虽然是http请求,但是我想通过SSL认证传输,这时就需要隧道连接了。
为什么需要隧道连接?
普通代理的局限,比如无法代理 HTTPS 的报文,此外普通代理也只能代理 HTTP 协议报文,无法支持其他协议的数据转发。对于这些问题 HTTP 可以通过隧道(tunnel)代理来解决。
隧道连接的过程是什么样的?
(a)客户端先发送 CONNECT 请求到隧道代理服务器,告诉它建立和服务器的 TCP 连接(因为是 TCP 连接,只需要 ip 和端口就行,不需要关注上层的协议类型)
(b,c)代理服务器成功和后端服务器建立 TCP 连接
(d)代理服务器返回 HTTP 200 Connection Established 报文,告诉客户端连接已经成功建立
(e)这个时候就建立起了连接,所有发给代理的 TCP 报文都会直接转发,从而实现服务器和客户端的通信
如果需要隧道连接的话运行connectTunnel方法:
Request tunnelRequest = createTunnelRequest();
HttpUrl url = tunnelRequest.url();
for (int i = 0; i < MAX_TUNNEL_ATTEMPTS; i++) {
  connectSocket(connectTimeout, readTimeout, call, eventListener);
  tunnelRequest = createTunnel(readTimeout, writeTimeout, tunnelRequest, url);
}
三个步骤,创建隧道请求对象,创建socket对象并连接(rowSocket),开始创建隧道。 如果不需要隧道连接就一步,创建socket对象并连接。
1.3 获取Http协议版本
核心是分条件创建两个实现HttpCodec接口的类,分别是Http1Codec(HTTP/1.1)和Http2Codec(HTTP/2)。
1.3.1 选择协议版本
- 是否包含
Protocol.H2_PRIOR_KNOWLEDGE
参考 http2.github.io/http2-spec/…
A client MUST send the connection preface (Section 3.5) and then MAY immediately send HTTP/2 frames to such a server; servers can identify these connections by the presence of the connection preface. This only affects the establishment of HTTP/2 connections over cleartext TCP; implementations that support HTTP/2 over TLS MUST use protocol negotiation in TLS [TLS-ALPN].
客户端必须发送一个连接前言,紧接着可能要迅速发送HTTP/2的帧数据到服务端,服务端可以通过前言识别出连接。这只对HTTP/2 下TCP明文连接的建立有效,如果需要通过TLS协议进行HTTP/2连接,则必须通过TLS握手。
可见这种情况下要使用HTTP/2协议。
- 没有初始化sslSocketFactory且没有
Protocol.H2_PRIOR_KNOWLEDGE
直接使用HTTP_1_1("http/1.1")
- 以上条件都不符合就采用https的连接(HTTP/2)
connectTls(connectionSpecSelector);
if (protocol == Protocol.HTTP_2) {
    startHttp2(pingIntervalMillis);
}
connectTls预示着开始握手验证吧。
总共有几个步骤:
- 1.通过sslSocketFactory创建sslSocket
sslSocket = (SSLSocket) sslSocketFactory.createSocket(
          rawSocket, address.url().host(), address.url().port(), true /* autoClose */);
- 2.获取验证协议
ConnectionSpec connectionSpec = connectionSpecSelector.configureSecureSocket(sslSocket);
- 3.开始握手
sslSocket.startHandshake();
- 4.验证主机名称
address.hostnameVerifier().verify(address.url().host(), sslSocketSession)
- 5.验证证书
address.certificatePinner().check(address.url().host(),
          unverifiedHandshake.peerCertificates());
- 6.上述都通过的话就可以获取到协议版本了
String maybeProtocol = connectionSpec.supportsTlsExtensions()
          ? Platform.get().getSelectedProtocol(sslSocket)
          : null;
顺带的,如果是HTTP_2协议的话,就开始连接并等待返回(Http2Connection),这个过程中如果需要填写前言,就填写preface数据:
private void startHttp2(int pingIntervalMillis) throws IOException {
    socket.setSoTimeout(0); // HTTP/2 connection timeouts are set per-stream.
    http2Connection = new Http2Connection.Builder(true)
        .socket(socket, route.address().url().host(), source, sink)
        .listener(this)
        .pingIntervalMillis(pingIntervalMillis)
        .build();
    http2Connection.start();
}
看看start方法:
void start(boolean sendConnectionPreface) throws IOException {
    if (sendConnectionPreface) {
      writer.connectionPreface();
      writer.settings(okHttpSettings);
      int windowSize = okHttpSettings.getInitialWindowSize();
      if (windowSize != Settings.DEFAULT_INITIAL_WINDOW_SIZE) {
        writer.windowUpdate(0, windowSize - Settings.DEFAULT_INITIAL_WINDOW_SIZE);
      }
    }
    new Thread(readerRunnable).start(); // Not a daemon thread.
}
先检查是否需要写前言数据,这个前言数据的定义是(Http2中):
static final ByteString CONNECTION_PREFACE
  = ByteString.encodeUtf8("PRI * HTTP/2.0\r\n\r\nSM\r\n\r\n");
这里开一个读线程开始等待读取服务端返回的数据:
@Override protected void execute() {
  try {
    reader.readConnectionPreface(this);
    while (reader.nextFrame(false, this)) {
    }
  } catch (IOException e) {
  } finally {
    try {
      close(connectionErrorCode, streamErrorCode);
    } catch (IOException ignored) {
    }
    Util.closeQuietly(reader);
  }
}
返回的数据还是回调在这个线程中处理。
1.4 创建HttpCodec对象
通过返回的协议版本可以创建对应的Http协议对象了:
public HttpCodec newCodec(OkHttpClient client, Interceptor.Chain chain,
  StreamAllocation streamAllocation) throws SocketException {
    if (http2Connection != null) {
      return new Http2Codec(client, chain, streamAllocation, http2Connection);
    } else {
      socket.setSoTimeout(chain.readTimeoutMillis());
      source.timeout().timeout(chain.readTimeoutMillis(), MILLISECONDS);
      sink.timeout().timeout(chain.writeTimeoutMillis(), MILLISECONDS);
      return new Http1Codec(client, streamAllocation, source, sink);
    }
}
创建好了HttpCodec对象之后,就可以调用realChain.proceed(request, streamAllocation, httpCodec, connection)方法,到CallServerInterceptor中开始请求服务器并返回数据了。
微信公众号二维码: