译自 swiftui-lab.com/communicati…
更多内容,欢迎关注公众号「Swift花园」
处理嵌套视图的偏好
在本系列的前一部分中,我们介绍了 SwiftUI 的锚点偏好。现在我们终于要走出迷雾森林了。在这最后一部分,我们将把所有的东西组合到一起。我们还将学习 SwiftUI 如何处理嵌套视图的偏好,以及 Anchor 的一些其他用法。如常,先例为敬:
我们的目标是创建一个迷你地图的视图,它会反映一个表单的状态:
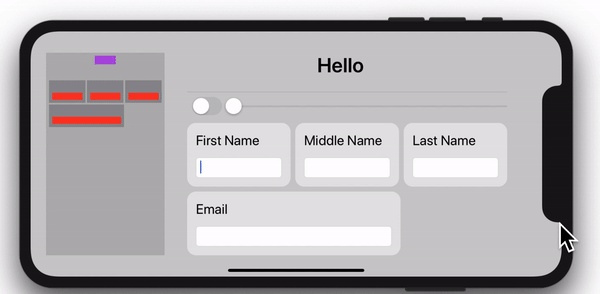
关于这个例子,有几点需要注意:
- 迷你地图显示了表单的微缩形式。不同的颜色代表了标题视图,文本框和文本框容器。
- 随着文本视图的增长,迷你地图会做出反应。
- 当我们添加一个新视图(比如,twitter field),迷你地图也会改变。
- 当表单中的各种 frame 变化时,迷你地图也会更新。
- 文本框的颜色以红色代表没有输入,以黄色代表输入少于 3 个字符,以绿色代表输入大于等于 3 个字符。
注意,迷你地图对表单一无所知。它只对视图层级的偏好的变化做出反应。
让我们开始编码
首先定义一些类型。既然视图树会包含多种视图,我们就需要某种东西对它们进行区分。出于这个目的,我们先定义一个枚举:
enum MyViewType: Equatable {
    case formContainer // main container
    case fieldContainer // contains a text label + text field
    case field(Int) // text field (with an associated value that indicates the character count in the field)
    case title // form title
    case miniMapArea // view placed behind the minimap elements
}然后定义我们要往偏好中设置的数据类型,并且添加一些之后会用到的方法。数据类型将包含两个属性(vtype 和 bounds):
struct MyPreferenceData: Identifiable {
    let id = UUID() // required when using ForEach later
    let vtype: MyViewType
    let bounds: Anchor<CGRect>

    // Calculate the color to use in the minimap, for each view type
    func getColor() -> Color {
        switch vtype {
        case .field(let length):
            return length == 0 ? .red : (length < 3 ? .yellow : .green)
        case .title:
            return .purple
        default:
            return .gray
        }
    }

    // Returns true, if this view type must be shown in the minimap.
    // Only fields, field containers and the title are shown in the minimap
    func show() -> Bool {
        switch vtype {
        case .field:
            return true
        case .title:
            return true
        case .fieldContainer:
            return true
        default:
            return false
        }
    }
}
像平常一样定义 PreferenceKey:
struct MyPreferenceKey: PreferenceKey {
    typealias Value = [MyPreferenceData]

    static var defaultValue: [MyPreferenceData] = []

    static func reduce(value: inout [MyPreferenceData], nextValue: () -> [MyPreferenceData]) {
        value.append(contentsOf: nextValue())
    }
}
接下来就有趣了!我们有许多字段,每个字段前面都冠以文本标签,由一个容器包围。让我们把这个重复的模式用一个叫 MyFormField 的视图来封装。另外,我们相应地设置偏好。因为文本框是 VStack 所包含的子视图,而我们同时需要这两层嵌套视图的边界,又不能调用 anchorPreference() 两次。在 VStack 上调用 anchorPreference() 就无法在 TextField上再调用了。所以,我们在 VStack 上使用 transformAnchorPreference()。这样一来我们是在添加数据,而不是替换数据:
// This view draws a rounded box, with a label and a textfield
struct MyFormField: View {
    @Binding var fieldValue: String
    let label: String

    var body: some View {
        VStack(alignment: .leading) {
            Text(label)
            TextField("", text: $fieldValue)
                .textFieldStyle(RoundedBorderTextFieldStyle())
                .anchorPreference(key: MyPreferenceKey.self, value: .bounds) {
                    return [MyPreferenceData(vtype: .field(self.fieldValue.count), bounds: $0)]
                }
        }
        .padding(15)
        .background(RoundedRectangle(cornerRadius: 15).fill(Color(white: 0.9)))
        .transformAnchorPreference(key: MyPreferenceKey.self, value: .bounds) {
            $0.append(MyPreferenceData(vtype: .fieldContainer, bounds: $1))
        }
    }
}
我们的 ContentView 把所有视图放在一起。你会看到,我们是如何设置稍后需要在迷你地图上用到的三个偏好。我们收集表单标题、表单区域和迷你地图区域的边界:
struct ContentView : View {
    @State private var fieldValues = Array<String>(repeating: "", count: 5)
    @State private var length: Float = 360
    @State private var twitterFieldPreset = false

    var body: some View {

        VStack {
            Spacer()

            HStack(alignment: .center) {

                // This view puts a gray rectangle where the minimap elements will be.
                // We will reference its size and position later, to make sure the mini map elements
                // are overlayed right on top of it.
                Color(white: 0.7)
                    .frame(width: 200)
                    .anchorPreference(key: MyPreferenceKey.self, value: .bounds) {
                        return [MyPreferenceData(vtype: .miniMapArea, bounds: $0)]
                    }
                    .padding(.horizontal, 30)

                // Form Container
                VStack(alignment: .leading) {
                    // Title
                    VStack {
                        Text("Hello \(fieldValues[0]) \(fieldValues[1]) \(fieldValues[2])")
                            .font(.title).fontWeight(.bold)
                            .anchorPreference(key: MyPreferenceKey.self, value: .bounds) {
                                return [MyPreferenceData.init(vtype: .title, bounds: $0)]
                        }
                        Divider()
                    }

                    // Switch + Slider
                    HStack {
                        Toggle(isOn: $twitterFieldPreset) { Text("") }

                        Slider(value: $length, in: 360...540).layoutPriority(1)
                    }.padding(.bottom, 5)

                    // First row of text fields
                    HStack {
                        MyFormField(fieldValue: $fieldValues[0], label: "First Name")
                        MyFormField(fieldValue: $fieldValues[1], label: "Middle Name")
                        MyFormField(fieldValue: $fieldValues[2], label: "Last Name")
                    }.frame(width: 540)

                    // Second row of text fields
                    HStack {
                        MyFormField(fieldValue: $fieldValues[3], label: "Email")

                        if twitterFieldPreset {
                            MyFormField(fieldValue: $fieldValues[4], label: "Twitter")
                        }


                    }.frame(width: CGFloat(length))

                }.transformAnchorPreference(key: MyPreferenceKey.self, value: .bounds) {
                    $0.append(MyPreferenceData(vtype: .formContainer, bounds: $1))
                }

                Spacer()

            }
            .overlayPreferenceValue(MyPreferenceKey.self) { preferences in
                GeometryReader { geometry in
                    MiniMap(geometry: geometry, preferences: preferences)
                }
            }

            Spacer()
        }.background(Color(white: 0.8)).edgesIgnoringSafeArea(.all)
    }
}
最后,迷你地图将遍历所有的偏好,以此来绘制每个迷你地图里的元素:
struct MiniMap: View {
    let geometry: GeometryProxy
    let preferences: [MyPreferenceData]

    var body: some View {
        // Get the form container preference
        guard let formContainerAnchor = preferences.first(where: { $0.vtype == .formContainer })?.bounds else { return AnyView(EmptyView()) }

        // Get the minimap area container
        guard let miniMapAreaAnchor = preferences.first(where: { $0.vtype == .miniMapArea })?.bounds else { return AnyView(EmptyView()) }

        // Calcualte a multiplier factor to scale the views from the form, into the minimap.
        let factor = geometry[formContainerAnchor].size.width / (geometry[miniMapAreaAnchor].size.width - 10.0)

        // Determine the position of the form
        let containerPosition = CGPoint(x: geometry[formContainerAnchor].minX, y: geometry[formContainerAnchor].minY)

        // Determine the position of the mini map area
        let miniMapPosition = CGPoint(x: geometry[miniMapAreaAnchor].minX, y: geometry[miniMapAreaAnchor].minY)

        // -------------------------------------------------------------------------------------------------
        // iOS 13 Beta 5 Release Notes. Known Issues:
        // Using a ForEach view with a complex expression in its closure can may result in compiler errors.
        // Workaround: Extract those expressions into their own View types. (53325810)
        // -------------------------------------------------------------------------------------------------
        // The following view had to be encapsulated in two separate functions (miniMapView & rectangleView),
        // because beta 5 has a bug that fails to compile expressions that are "too complex".
        return AnyView(miniMapView(factor, containerPosition, miniMapPosition))
    }

    func miniMapView(_ factor: CGFloat, _ containerPosition: CGPoint, _ miniMapPosition: CGPoint) -> some View {
        ZStack(alignment: .topLeading) {
            // Create a small representation of each of the form's views.
            // Preferences are traversed in reverse order, otherwise the branch views
            // would be covered by their ancestors
            ForEach(preferences.reversed()) { pref in
                if pref.show() { // some type of views, we don't want to show
                    self.rectangleView(pref, factor, containerPosition, miniMapPosition)
                }
            }
        }.padding(5)
    }

    func rectangleView(_ pref: MyPreferenceData, _ factor: CGFloat, _ containerPosition: CGPoint, _ miniMapPosition: CGPoint) -> some View {
        Rectangle()
        .fill(pref.getColor())
        .frame(width: self.geometry[pref.bounds].size.width / factor,
               height: self.geometry[pref.bounds].size.height / factor)
        .offset(x: (self.geometry[pref.bounds].minX - containerPosition.x) / factor + miniMapPosition.x,
                y: (self.geometry[pref.bounds].minY - containerPosition.y) / factor + miniMapPosition.y)
    }

}
关于视图树顺序的说明
到这里,值得暂停一下,思考嵌套视图中偏好闭包的执行顺序。例如,审视一下迷你地图的实现。你可能已经注意到,ForEach 以相反的顺序运行循环。否则,代表文本框容器的矩形应该会最后绘制,覆盖对应的迷你地图中的文本框。因为,搞懂偏好如何被设置是很重要的。
请注意,SwiftUI 如何遍历视图树并没有文档说明。PreferenceKey方法中的reduce方法声明中,确实提到了以视图树顺序提供的值。但是,它没有告诉我们这个顺序是什么。不过,我们可以确定它不是随机的,而且每次刷新都是一致的。
我接下来写的关于闭包运行顺序的每样东西,都是通过实验得出的。基本上,我到处都设置了断点!不过,既然它看起来很合理,我对它也相当有信息。
下图显示了一个视图层级的简化表达。为了使图标更易读,不必要的视图都被省略了。红色箭头表示 anchorPreference() 和 transformAnchorPreference() 闭包执行的顺序。注意,不一定所有的闭包都会被调用,只有那些 SwiftUI 认为必要的闭包才会被调用。举个例子,如果一个视图的边界没有改变,那么它的 .anchorPreference() 闭包可能不会运行。如果不确定,你可以放置断点或者打印语句进行调试:
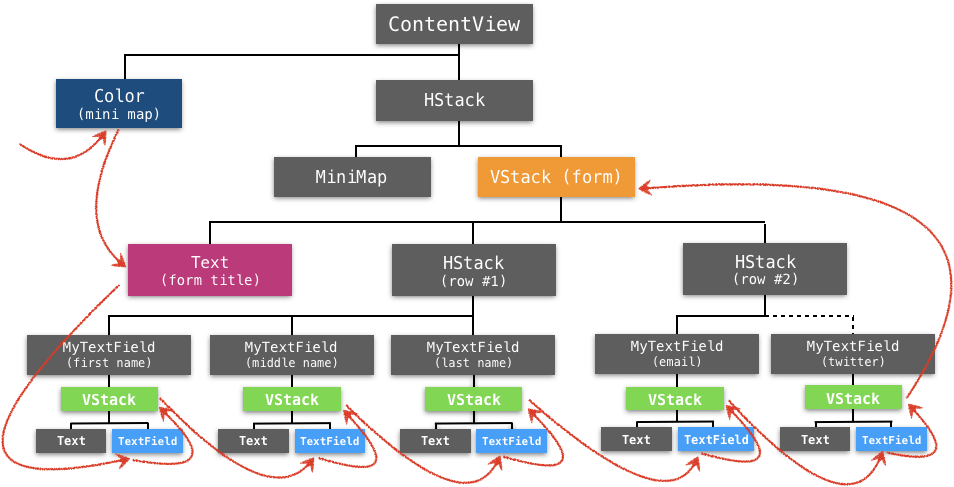
从图中可以观察到,SwiftUI 似乎遵循了两个简单的规则:
- 兄弟节点的遍历顺序与它们在代码中出现的顺序相同。
- 子视图的闭包先于父视图的闭包之前执行。
Anchor 的其他用途
正如我们看到的,一个 Anchor<T>.Source 可以通过一些静态变量获得,比如 .bounds,.topLeading,.bottom,等等。通常我们会把它们传入 anchorPreference()modifier 的参数。不过,你也可以用 Anchor<T>.Source 的静态方法创建自己的 Anchor<CGRect>.Source 和 Anchor<CGPoint>.Source,例如,你可以这样写:
let a1 = Anchor<CGRect>.Source.rect(CGRect(x: 0, y: 0, width: 100, height: 50))
let a2 = Anchor<CGPoint>.Source.point(CGPoint(x: 10, y: 30))
let a3 = Anchor<CGPoint>.Source.unitPoint(UnitPoint(x: 10, y: 30))
我听到你在疑惑:“但是什么时候这些能派上用场呢”?是这样的,你可以把它们传给偏好,如果已有的静态变量都不适用,比如在处理 popover 时它们就特别方便:
.popover(isPresented: $showPopOver,
         attachmentAnchor: .rect(Anchor<CGRect>.Source.rect(CGRect(x: 0, y: 0, width: 100, height: 50))),
         arrowEdge: .leading) { ... }
我的公众号 这里有Swift及计算机编程的相关文章,以及优秀国外文章翻译,欢迎关注~