

vuex
1、introduction
Vuex 是一个专门为 Vue.js 应用程序开发的状态管理模式。
它采用集中式存储管理应用的所有组件的状态,并以相应的规则保证状态以一种可预测的方式发生变化
什么是“状态管理模式”?
- 1、state, 驱动应用的数据源
- 2、view, 以声明方式将state映射到视图
- 3、actions, 响应在view上的用户输入导致的状态变化
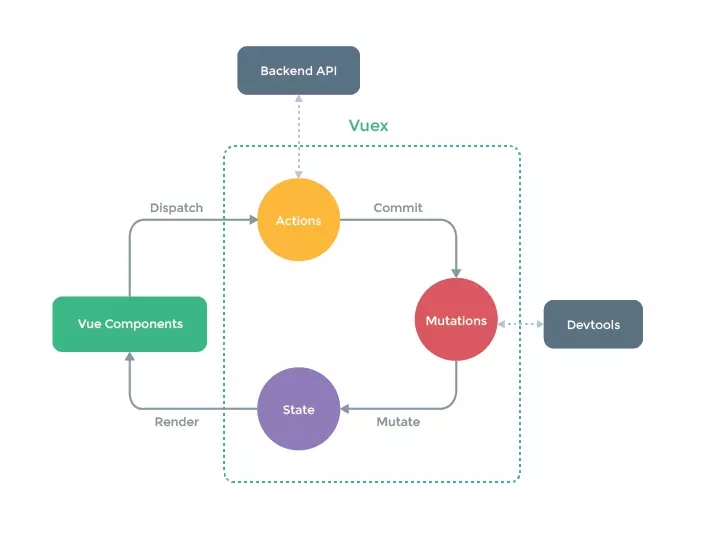
Vuex 核心思想
- 1、Vuex应用的核心就是store(仓库)。“store”基本上就是一个容器,它包含这应用中大部分的状态(state)
- 2、Vuex 的状态存储是响应式的。当Vue组件从store中读取状态的时候,若store中的状态发生变化,那么相应的组件也会相应的得到高效的更新。
- 3、不能直接改变store中的状态,改变store中的状态的唯一途径就是显式的提交(commit)mutation。 这样使得我们可以方便的跟踪每一个状态的变化。从而让我们能够实现一些工具帮助我们更好的了解我们的应用
2、Vuex初始化
1、安装
-
1、当我们在代码中通过
import Vuex from 'vuex'的时候,实际上引入的是一个对象, 定义在src/index.js中:export default { Store, install, version: '__VERSION__', mapState, mapMutations, mapGetters, mapActions, createNamespacedHelpers } -
2、Vuex 存在一个静态的install 方法,定义在 src/store.js中
export function install (_Vue) { if (Vue && _Vue === Vue) { // 先判断Vue是否已经被赋值,避免二次安装 if (process.env.NODE_ENV !== 'production') { console.error( '[vuex] already installed. Vue.use(Vuex) should be called only once.' ) } return } Vue = _Vue applyMixin(Vue) } -
3、install 的逻辑很简单,把传入的_Vue 赋值给Vue 并执行了 applyMixin(Vue) 方法,执行
Vue.mixin({beforeCreate: vuexInit})其实就是给Vue 全局混入了一个beforeCreate 钩子函数,它的实现非常简单,就是把options.store 保存在所有组件的this.$store 中。这个options.store 就是我们在实例化Store 对象的实例。
2、Store 实例化
-
1、用法
export default new Vuex.Store({
  modules: {
    modulesA,
    mouduleB
  },
  state: {
    count: 0
  },
  getters: { //...},
  actions: { //...},
  mutations: { //...}
  }
})
Store 对象的构造函数也是一个Class, 接收一个对象参数,它包含 modules\state\getters\actions\mutations等Vuex 的核心概念
-
2、初始化模块
-
1、Vuex 允许我们将store 分割成模块(module)每个模块拥有自己的state\mutation\getter\action 甚至是嵌套子模块——从上至下进行同样的方式分割
const modulesA = {
  state: {
    count: 'A'
  }
}
const mouduleB = {
  state: {
    count: 'B'
  }
}

export default new Vuex.Store({
  modules: {
    modulesA,
    mouduleB
  }
})
从数据结构上来看,模块的设计就是一个树形结构,store本身可以理解为一个root module, 它下面的modules就是子模块,Vuex 需要完成这颗树的构建
-
2、构建的入口
this._modules = new ModuleCollection(options)调用register方法,通过const newModule = new Module(rawModule, runtime)创建了一个Module实例。Module是用来描述单个模块的类
 export default class ModuleCollection {
   constructor (rawRootModule) {
     // 注册 root module (Vuex.Store options)
     this.register([], rawRootModule, false)
   }
   // ...
    register (path, rawModule, runtime = true) {
     if (process.env.NODE_ENV !== 'production') {
       // 断言 rawModule中的getters、actions、mutations必须为指定的类型
       assertRawModule(path, rawModule)
     }

     // 实例化一个module
     const newModule = new Module(rawModule, runtime)
     if (path.length === 0) {
       // 如果path为0,就把当前module 作为根module 绑定到root属性上
       this.root = newModule
     } else {
       // 子module 添加其父module的_children属性上
       const parent = this.get(path.slice(0, -1))
       parent.addChild(path[path.length - 1], newModule)
     }

     // 如果当前模块存在子模块(modules字段)
     // 遍历子模块,逐个注册,最终形成一个树
     if (rawModule.modules) {  // 判断是否定义了module ,然后遍历,递归执行register
       forEachValue(rawModule.modules, (rawChildModule, key) => {
         this.register(path.concat(key), rawChildModule, runtime)
       })
     }
   }
 }
1、 register 首先根据路径获取到父模块,然后再调用父模块的addchild方法建立父子关系
2、 register的最后一步,就是遍历当前模块定义中的所有modules, 根据key 作为 path, 递归调用 register 方法,这样就建立了父子关系
-
-
3、安装模块
对模块中的state、getters、actions、mutations 做初始化工作
-
入口:
const state = this._modules.root.state installModule(this, state, [], this._modules.root)-
1、默认情况下,模块内部的action、mutation、getter 是注册在全局命名空间的——这样多个模块能够对同一mutation 或 action作出响应。如果我们希望模块具有更高的封装度和复用性,可以通过添加 namespaced:true 的方式使其成为带有命名空间的模块。当模块被注册后,它的所有 action、mutation、getter 都会自动根据模块注册的路径调整命名
-
2、构造了一个本地上下文环境
const local = module.context = makeLocalContext(store, namespace, path) -
3、registerMutation
-
4、registerAction
-
5、registerGetter
-
总结
installModule 实际上就是完成了模块下的state、getters、actions、mutations 的初始化工作,并且通过递归遍历的方式,完成了所有子模块的安装工作
-
-
-
4、初始化 store._vm
-
Store 实例化的最后一步,就是执行初始化 store._vm 的逻辑 入口代码:
resetStoreVM(this, state)-
resetStoreVm的作用 实际上是想建立 getters 和state 的联系,因为从设计上 getters 的获取就依赖了state, 并且希望它的依赖能够被缓存起来,且只有当它的依赖值发生了改变才会被重新计算,因此这里就利用了 Vue中用computed计算属性来实现
-
strict mode
-
当严格模式下,store._vm 会添加一个watcher 来观测this._data.?state 的改变,也就是当 store.state 被修改的时候,store._committing 必须为true ,否则在开发阶段会报警告
     if (store.strict) {
        enableStrictMode(store)
      }
    function enableStrictMode (store) {
      store._vm.$watch(function () { return this._data.$$state }, () => {
        if (process.env.NODE_ENV !== 'production') {
          // 不允许在mutation之外修改state
          assert(store._committing, `Do not mutate vuex store state outside mutation handlers.`)
        }
      }, { deep: true, sync: true })
    }
-
-
-
3、总结
- 我们要把store想象成一个数据仓库,为了更方便的管理,我们把一个大的store 拆分成一些modules, 整个modules 是一个树形结构,每个module 有分别定义了state\getters\mutations\actions, 我们也通过递归遍历模块的方式都完成了他们的初始化,为了module 具有更高的封装度和复用性,还定义了namespace 的概念,最后我们还定义了一个内部的Vue实例,用来建立state 到getters 的联系,并且可以在严格模式下监测state的变化是不是来自外部,确保改变state 的唯一途径就是显式的提交mutation
3、API
1、数据获取
-
Vuex 最终 存储的数据是在state上的,我们之前分析过 在 store.state 存储的是root state, 那么对于模块上的state, 假设我们有2个嵌套的modules, 他们的key 分别为a 和 b, 我们可以通过store.state.a/b.XXX 的方式获取
- 在递归执行installModule 的过程中,就完成了整个state的建设,这样我们就可以通过module 名的path 去访问到一个深层module的state
-
获取
-
state
-
当我们使用store.state获取数据
get state() {
 return this._vm._data.$$state
}
// 安装
resetStoreVm(this, state)
做了什么?:
 store._vm = new Vue({
           data: {
                  $$state: state
             },
           computed
       })
实例化一个Vue, 然后绑定到store._vm上
-
-
getters
  store.getters = {}
  const wrappedGetters = store._wrappedGetters
  const computed = {}
  forEachValue(wrappedGetters, (fn, key) => {
          computed[key] = () => fn(store)
          Object.defineProperty(store.getters, key, {
                 get: () => store._vm[key],
                  enumerable: true
            })
  })
-
2、数据存储
-
1、Vuex 对数据存储的本质上就是对state的修改并且只允许我们通过提交mutation的形式去修改state。
-
2、mutation 必须是同步函数
-
3、action
-
action 类似于mutaion, 不同在于action提交的是mutation 而不是直接操作 state, 并且它可以包含任意的异步操作
- action 比我们自己写一个异步操作然后提交mutation 的好处: 它可以在参数中获取到当前模块的一些方法和状态,Vuex帮我们做好了这些
-
3、语法糖
-
1、mapState
-
mapState 支持传入 namespace, 因为我们可以这样写:
computed:{ ...mapState['some/name/module',{ a:state => state.a b:state => state.b }] } -
在mapState 的实现中,如果有namespace, 则去尝试去通过 getModuleByNamespace(this.$store, 'mapState', namespace) 对应的module, 然后把state和getters 修改为module对应的state和getters
-
主要原因是在Vuex 初始化执行 installModule的过程中,初始化了这个映射表:
      ```
      function installModule (store, rootState, path, module, hot) {
        const isRoot = !path.length
        const namespace = store._modules.getNamespace(path)

        // register in namespace map
        if (module.namespaced) {
          // // 保存namespaced模块
          store._modulesNamespaceMap[namespace] = module
        }
      }
      ```
-
-
2、mapGetters
-
mapGetters 的用法:
import {mapGetters} from 'vuex' export default { computed:{ ...mapGetters[{ someGetter // ... }] } } -
和mapState类似,mapGetters 是将 store 中的getter 映射到局部计算属性
-
mapGetters 也同样支持 namespace, 如果不写namespace, 访问一个子module 的属性需要写很长key,一旦我们使用了namespace, 就可以方便我们的书写,每个mappedGetter 的实现,实际上就是取 this.$store.getters[val]
-
-
3、mapMutations
-
我们可以在组件中使用 this.$store.commit['xxx'] 提交mutation, 或者使用mapMutations 辅助函数将组件中的methods 映射为store.commit 的调用。 mapMutations 支持传入一个数组或者一个对象,目标都是组件中对应的methods 映射为store.commit的调用。
-
用法:
import { mapMutations } from 'vuex'

export default {
  // ...
  methods: {
    ...mapMutations([
      'increment', // map `this.increment()` to `this.$store.commit('increment')`

      // `mapMutations` also supports payloads:
      'incrementBy' // map `this.incrementBy(amount)` to `this.$store.commit('incrementBy', amount)`
    ]),
    ...mapMutations({
      add: 'increment' // map `this.add()` to `this.$store.commit('increment')`
    })
  }
}
-
-
mappedMutation 同样支持了namespace, 并且支持了传入额外的参数args, 作为提交mutation的payload, 最终就是执行了store.commit方法,并且这个 commit 会根据传入namespace 映射到对应 module的commit上。
-
-
4、mapActions
-
在组件中使用 this.$store.dispatch['xxx'] 提交action, 或者使用mapActions 辅助函数将组件中的methods 映射为 store.dispatch的调用
-
mapActions 在用法上和mapMutations 几乎一样,实现也很类似。和mapMutations 实现几乎一样,不同的就是把commit 方法换成了dispatch
-
4、动态更新模块
-
1、模块动态注册 registerModule
-
在有一些场景下,我们需要动态取注入一些新的模块,Vuex 提供了模块动态注册的功能,在store 上提供了一个registerModule 的Api
registerModule (path, rawModule, options = {}) { if (typeof path === 'string') path = [path] if (process.env.NODE_ENV !== 'production') { assert(Array.isArray(path), `module path must be a string or an Array.`) assert(path.length > 0, 'cannot register the root module by using registerModule.') } this._modules.register(path, rawModule) installModule(this, this.state, path, this._modules.get(path), options.preserveState) // reset store to update getters... resetStoreVM(this, this.state) } -
registerModule 支持传入一个path模块路径和rawModule 模块定义,首先执行 register 方法扩展我们的模块树,接着执行installModule 去安装模块,最后执行 resetStoreVM重新实例化 store._vm, 并销毁旧的store._vm
-
-
2、动态卸载模块 unregisterModule
-
相对的,Vuex 提供了公开动态卸载功能,在store 上提供了一个unregisterModule 的Api
unregisterModule (path) { if (typeof path === 'string') path = [path] if (process.env.NODE_ENV !== 'production') { assert(Array.isArray(path), `module path must be a string or an Array.`) } this._modules.unregister(path) this._withCommit(() => { const parentState = getNestedState(this.state, path.slice(0, -1)) Vue.delete(parentState, path[path.length - 1]) }) resetStore(this) } -
1、unregisterModule 支持传入一个path模块路径,首先执行unregister 方法去修减我们的模块树。注意,这里只会移除我们运行时动态创建的模块
-
2、 接着 会删除 state 在该路径下的引用,最后执行 resetStore方法。
-
3、 该方法就是把 store 下的对应存储的_actions、_mutations、_wrappedGetters 和 _modulesNamespaceMap 都清空,然后重新执行 installModule 安装所有模块以及 resetStoreVM 重置 store._vm
-
4、插件
Vuex 除了提供的存取能力,还提供了一种插件能力,让我们可以监控 store的变化过程来做一些事情
-
1、 Vuex 的store接受 plugins 选项, 我们在实例化Store 的时候可以传入插件,它是一个数组,然后在执行Store 构造函数的时候,会执行这些插件
const { plugins = [], strict = false } = options plugins.forEach(plugin => plugin(this)) -
2、Logger 插件
-
1、 Logger 函数,它相当于订阅了mutation的提交, 它的 prevState 表示之前的 state, nextState 表示提交 mutation 后的state, 这两个 state 都需要执行 deepCopy 方法拷贝一份对象的副本,这样对他们的修改就不会影响原始的store.state
-
2、 接下来就是构造一些格式化的消息,打印出一些时间 消息 message, 之前的状态 prevState, 对应的 mutation 操作 formattedMutation 以及下一个状态 nextState
-
3、 最后跟新 prevState = nextState, 为下一次提交 mutation 输出日志做准备
-
4、总结
Vuex 从设计上支持了插件,让我们很好的从外部追踪 store 内部的变化, Logger 插件在我们的开发阶段也提供了很好的指引作用。
-
