

AQS是实现同步的基础框架,它是支撑JUC包内组件的基础,它的实现主要依赖于state变量来表示同步状态和一个FIFO队列构成等待队列。
state变量 - 同步状态
一个被volatile修饰的int类型变量,当state>0时表示获取锁,state=0时表示释放了锁,AQS提供了三个方法 getState()、setState(int newState)、compareAndSetState(int expect,int update) 用于操作state变量。
Node子类 - 同步队列
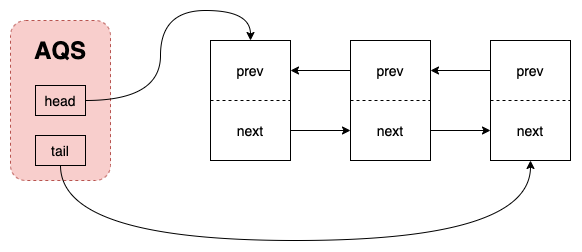
node的数据结构是一个带有头结点的双向链表存储结构,用于实现FIFO队列来完成线程获取资源的排队工作,如果当前线程获取同步状态失败时,AQS则会将当前线程以及等待状态等信息构造成一个Node对象并将其加入同步队列。
NOTE: 同步队列的头结点不用来存储线程,也就说thread变量其实是null,真正的线程node实际是head.next(),这么做仅是用作便于操作队列。
- thread变量: 用于存储当前线程,所以一个Node就是一个线程。
- waitStatus变量: 用于标记当前线程的等待状态。
- CANCELLED:1,代表当前线程已经被取消了。
- SIGNAL: -1,代表当前的线程等待被唤醒,即unparking。
- CONDITION:-2,代表当前线程在条件队列上等待。
- PROPAGATE:-3,当前线程节点的后续节点的acquireShare方法能够被无条件执行。
- nextWaiter变量: 指向Condition条件队列中的节点。
独占锁
独占锁,即同一时刻只能有一个线程持有同步状态。
获取独占锁主要方法:
- void acquire(int arg):获取同步状态,如果获取失败会进入同步队列,在队列中不会响应中断。
- void acquireInterruptibly(int arg):获取同步状态,但是会响应中断。
- boolean tryAcquireNanos(int arg, long nanosTimeout):超时等待式获取同步状态。
- boolean release(int arg):释放同步状态。
acquire方法
public final void acquire(int arg) {
    // 先调用具体同步实现类的获取同步方法
    // 如果获取失败,先调用addWaiter()方法加到同步队列队尾
    // 然后调用acquireQueued()方法,这个方法逻辑继续看下面
    if (!tryAcquire(arg) &&
        acquireQueued(addWaiter(Node.EXCLUSIVE), arg))
        selfInterrupt();
}
final boolean acquireQueued(final Node node, int arg) {
    boolean failed = true;
    try {
        boolean interrupted = false;
        // 当前线程进入死循环(自旋)
        for (;;) {
            // 获取当前结点的前一个结点
            final Node p = node.predecessor();
            // 判断前一个结点是否是头结点
            // 如果是头结点,当前结点的线程实际是在队头的,所以可以尝试获取一次同步状态
            if (p == head && tryAcquire(arg)) {
                // 将当前结点设置为头结点
                setHead(node);
                p.next = null; // help GC
                failed = false;
                return interrupted;
            }
            // shouldParkAfterFailedAcquire()首先会判断当前节点状态是否为SIGNAL
            // 如果是直接返回,否则会CAS尝试将当前节点设置为SIGNAL,另外还会处理状态为CANCELLED的节点
            if (shouldParkAfterFailedAcquire(p, node) &&
                // SIGNAL状态的节点会调用LockSupport.park()方法使线程阻塞
                // 然后检查中断,中断返回true
                parkAndCheckInterrupt())
                interrupted = true;
        }
    } finally {
        if (failed)
            cancelAcquire(node);
    }
}
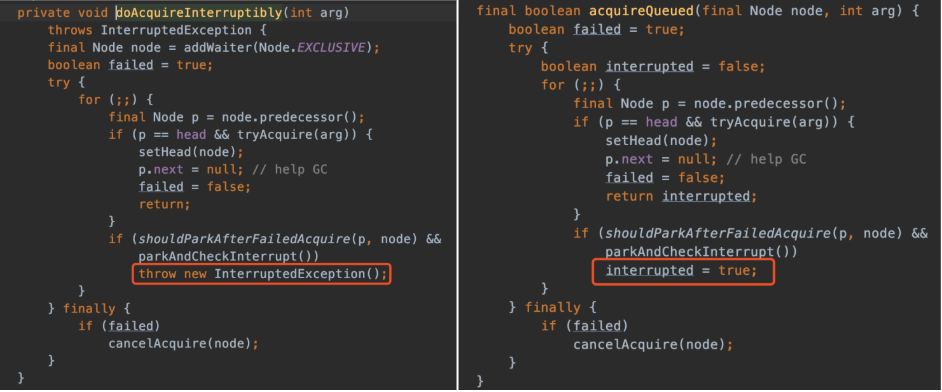
acquireInterruptibly方法
这个方法的逻辑和 acquire() 方法差不多,最大的不同就是 acquire() 方法仅是对中断做了标志,而acquireInterruptibly() 方法在发生中断时会抛出异常,如下:
tryAcquireNanos方法
public final boolean tryAcquireNanos(int arg, long nanosTimeout)
        throws InterruptedException {
    if (Thread.interrupted())
        throw new InterruptedException();
    // 先调用实现类tryAcquire方法获取同步状态
    // 如果没获取到进入doAcquireNanos方法,该方法实现了超时等待效果
    return tryAcquire(arg) ||
        doAcquireNanos(arg, nanosTimeout);
}
private boolean doAcquireNanos(int arg, long nanosTimeout)
        throws InterruptedException {
    if (nanosTimeout <= 0L)
        return false;
    // 先计算出超时等待的截止时间
    final long deadline = System.nanoTime() + nanosTimeout;
    // 添加到同步队列
    final Node node = addWaiter(Node.EXCLUSIVE);
    boolean failed = true;
    try {
        for (;;) {
            final Node p = node.predecessor();
            // 尝试获取同步状态
            if (p == head && tryAcquire(arg)) {
                setHead(node);
                p.next = null; // help GC
                failed = false;
                return true;
            }
            // 在自旋过程中重新计算截止时间
            nanosTimeout = deadline - System.nanoTime();
            if (nanosTimeout <= 0L)
                return false;
            // spinForTimeoutThreshold是一个时间阈值1000L,
            // 用于在判定是否需要阻塞线程时,如果时间小于spinForTimeoutThreshold,
            // 则不会被阻塞,用于快速响应一些等待时间很短的获取锁操作
            if (shouldParkAfterFailedAcquire(p, node) &&
                nanosTimeout > spinForTimeoutThreshold)
                // 阻塞当前线程,最长不超过nanosTimeout(纳秒)
                LockSupport.parkNanos(this, nanosTimeout);
            if (Thread.interrupted())
                throw new InterruptedException();
        }
    } finally {
        if (failed)
            cancelAcquire(node);
    }
}
release方法
public final boolean release(int arg) {
    // 执行子类tryRelease释放同步状态
    if (tryRelease(arg)) {
        Node h = head;
        if (h != null && h.waitStatus != 0)
            // 唤醒头结点的后继节点
            unparkSuccessor(h);
        return true;
    }
    return false;
}
关于 unparkSuccessor() 方法,jdk的注释已经解释的很清楚了
private void unparkSuccessor(Node node) {
    /*
     * If status is negative (i.e., possibly needing signal) try
     * to clear in anticipation of signalling.  It is OK if this
     * fails or if status is changed by waiting thread.
     */
    int ws = node.waitStatus;
    if (ws < 0)
        compareAndSetWaitStatus(node, ws, 0);

    /*
     * Thread to unpark is held in successor, which is normally
     * just the next node.  But if cancelled or apparently null,
     * traverse backwards from tail to find the actual
     * non-cancelled successor.
     */
    // 通常来说是会唤醒当前release节点的next节点
    // 但是如果next节点是null或者状态为CANCELLED
    // 那么就会从队列尾开始向前找一个状态不是CANCELLED的节点唤醒
    Node s = node.next;
    if (s == null || s.waitStatus > 0) {
        s = null;
        for (Node t = tail; t != null && t != node; t = t.prev)
            if (t.waitStatus <= 0)
                s = t;
    }
    if (s != null)
        LockSupport.unpark(s.thread);
}
小结
看完源码,我们可以大概对独占锁从获取到释放,做一个小结:
- 线程获取锁失败,线程被封装成Node进行入队操作,核心方法在于addWaiter()和enq(),同时enq()完成对同步队列的头结点初始化工作以及CAS操作失败的重试;
- 线程获取锁是一个自旋的过程,当且仅当 当前节点的前驱节点是头结点并且成功获得同步状态时,节点出队即该节点引用的线程获得锁,否则,当不满足条件时就会调用LookSupport.park()方法使得线程阻塞;
- 释放锁的时候会唤醒后继节点;
共享锁
所谓共享锁就是允许多个线程同时获取同步状态,获取共享锁的主要方法:
- void acquireShared(int arg):获取共享锁
- void acquireSharedInterruptibly(int arg):可中断获取
- boolean tryAcquireSharedNanos(int arg, long nanosTimeout):超时获取
- boolean releaseShared(int arg):释放共享锁
acquireShared方法
public final void acquireShared(int arg) {
    // 首先调用子类实现方法tryAcquireShared,如果大于或等于0获取成功直接返回
    // 获取失败执行doAcquireShared方法
    if (tryAcquireShared(arg) < 0)
        doAcquireShared(arg);
}
private void doAcquireShared(int arg) {
    // 添加节点到同步队列,注意,这里节点mode是SHARED
    final Node node = addWaiter(Node.SHARED);
    boolean failed = true;
    try {
        boolean interrupted = false;
        // 自旋
        for (;;) {
            // 当前节点的前一个
            final Node p = node.predecessor();
            if (p == head) {
                int r = tryAcquireShared(arg);
                if (r >= 0) {
                    // 当前节点置为head节点,并且在r大于0时将后继节点唤醒
                    setHeadAndPropagate(node, r);
                    p.next = null; // help GC
                    if (interrupted)
                        selfInterrupt();
                    failed = false;
                    return;
                }
            }
            // 同独占锁一样,阻塞线程等待
            if (shouldParkAfterFailedAcquire(p, node) &&
                parkAndCheckInterrupt())
                interrupted = true;
        }
    } finally {
        if (failed)
            cancelAcquire(node);
    }
}
releaseShared方法
同上,也是会先调用子类实现方法tryReleaseShared,失败调用doReleaseShared
private void doReleaseShared() {
    /*
     * Ensure that a release propagates, even if there are other
     * in-progress acquires/releases.  This proceeds in the usual
     * way of trying to unparkSuccessor of head if it needs
     * signal. But if it does not, status is set to PROPAGATE to
     * ensure that upon release, propagation continues.
     * Additionally, we must loop in case a new node is added
     * while we are doing this. Also, unlike other uses of
     * unparkSuccessor, we need to know if CAS to reset status
     * fails, if so rechecking.
     */
    for (;;) {
        Node h = head;
        // 只处理头节点和尾节点都存在,且队列内的节点总数超过1个的情况
        if (h != null && h != tail) {
            int ws = h.waitStatus;
            if (ws == Node.SIGNAL) {
                // CAS设置状态为0,如果CAS操作失败了就继续循环处理
                if (!compareAndSetWaitStatus(h, Node.SIGNAL, 0))
                    continue;            // loop to recheck cases
                // 唤醒头结点
                unparkSuccessor(h);
            }
            // 当节点是PROPAGATE的时候,就可以结束循环了
            else if (ws == 0 && !compareAndSetWaitStatus(h, 0, Node.PROPAGATE))
                continue;                // loop on failed CAS
        }
        if (h == head)                   // loop if head changed
            break;
    }
}
剩余还有 acquireSharedInterruptibly方法 和 tryAcquireSharedNanos方法 逻辑基本上一样,前面看懂了这两个也不在话下,这里就不赘述了。
ConditionObject子类
主要提供了Object对象的 wait()、notify()、notifyAll()等方法的java代码实现,具有更高的可控制性和扩展性。
主要方法:
- void await() throws InterruptedException: 当前线程进入等待状态,直到被signal() 或 signalAll() 方法唤醒。在调用时当前线程会释放其占用的锁。如果在等待状态中被中断会抛出被中断异常。
- long awaitNanos(long nanosTimeout): 当前线程进入等待状态直到被通知、中断或者超时。
- boolean await(long time, TimeUnit unit)throws InterruptedException: 同第二种,支持自定义时间单位。
- boolean awaitUntil(Date deadline) throws InterruptedException: 当前线程进入等待状态直到被通知,中断或者到了某个时间。
- void awaitUninterruptibly(): 当前线程进入等待状态,不响应中断和超时,只能被signal()或signalAll()唤醒。
- void signal(): 唤醒一个等待在condition上的线程,将该线程从条件队列中转移到同步队列中,如果在同步队列中能够竞争到 Lock 则可以从等待方法中返回。
- void signalAll(): 唤醒 condition 上所有等待中线程。
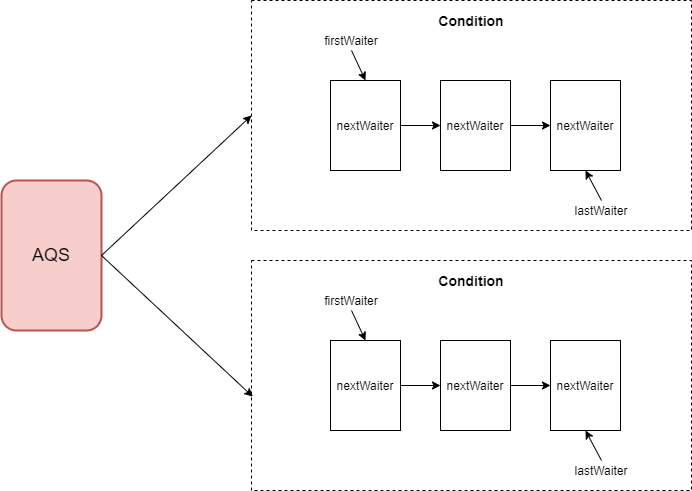
### 条件队列 在ConditionObject子类中也维护了一个队列,和AQS同步队列不同的是,这是一个单向队列。所有调用了await方法的线程都会进入到这个队列中等待,调用signal/signalAll方法又会把当前节点/所有节点移回到同步队列。
关于Condition可以参考:详解Condition的await和signal等待/通知机制
