前言:
- 使用SpringBoot很久了,自动装配到底是咋回事?
- 我能不能自己撸一个自动装配配置类出来?
自动装配底层技术
其实SpringBoot也不是什么新框架,只是站在Spring的基础上进一步进行了封装,让我们更专注于业务开发。先来说下SpringBoot中自动装配使用到了SpringFramework那些的技术模块:
-
Spring 模式注解装配 : 比如
@Configuration、@Component这一类的注解 -
Spring @Enable 模块装配 : 比如
@EnableWebMvc、@EnableEurekaServer这一类的注解 -
Spring 条件装配: 可以基于
@Conditional注解来实现,demo中会有案例 -
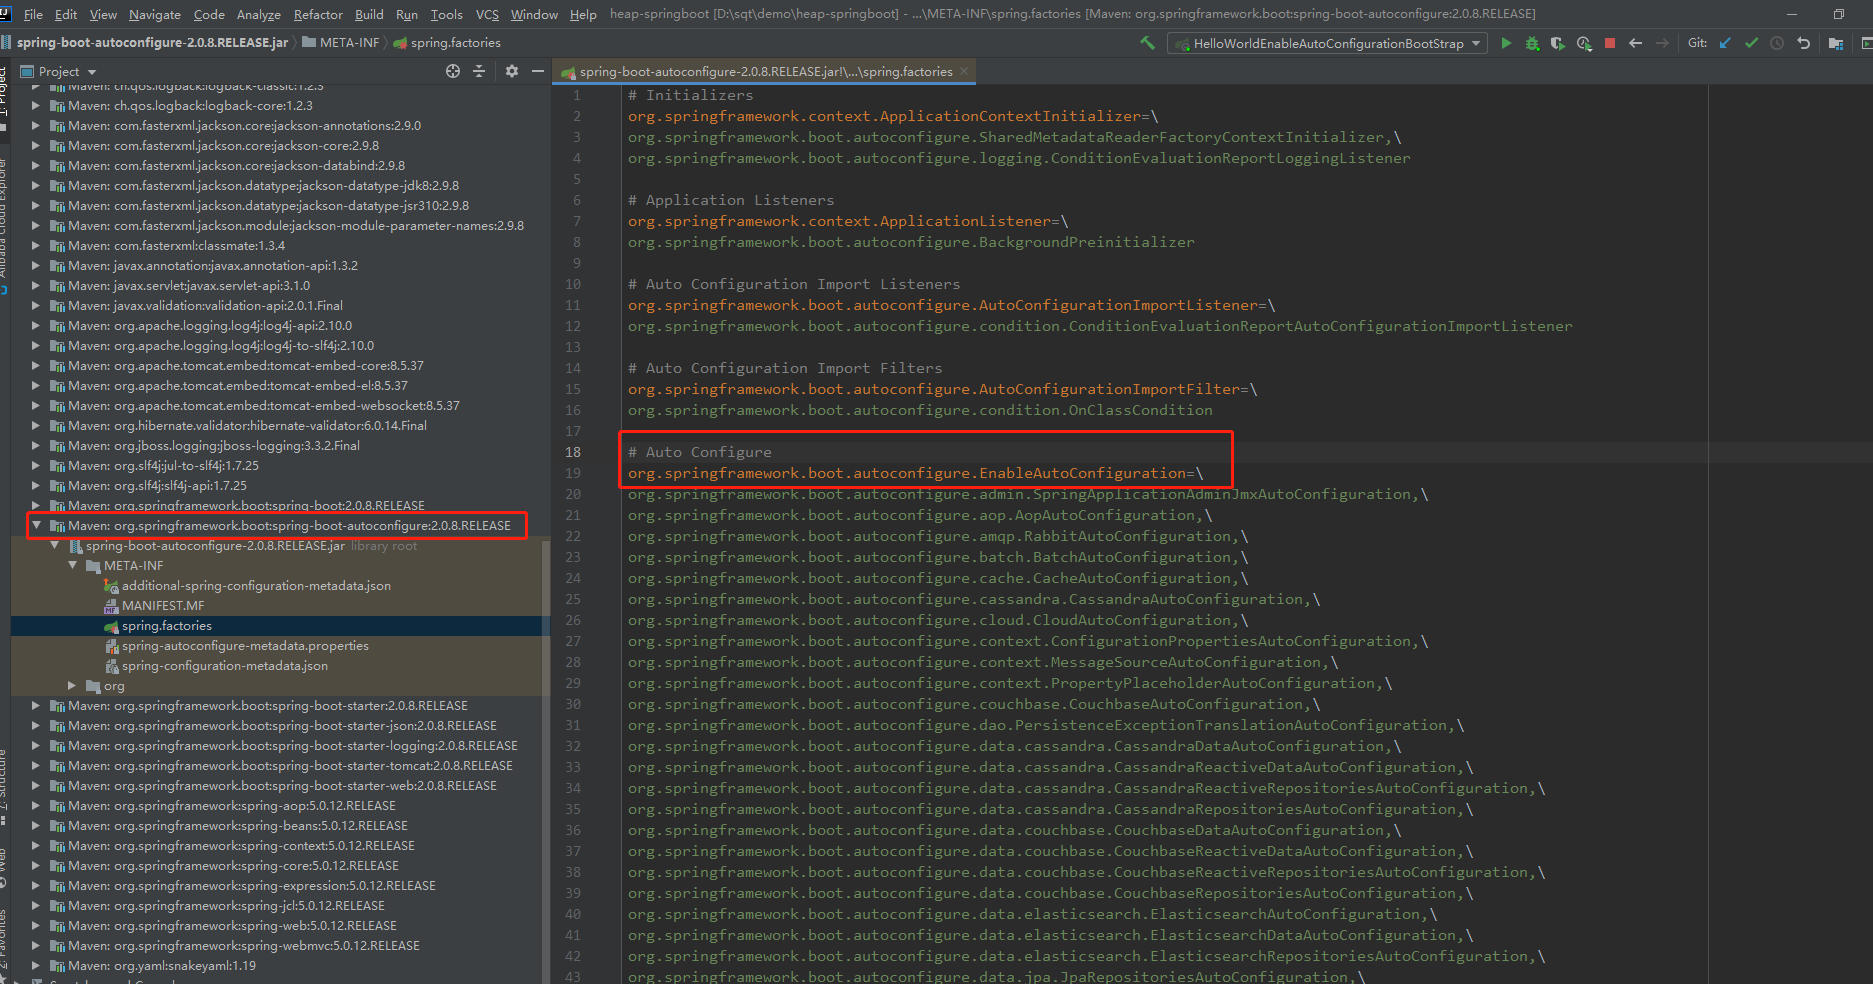
Spring 工厂加载机制
-
实现类:
SpringFactoriesLoader,用来加载spring.factories文件 -
配置资源:
META-INF/spring.factories,SpringBoot所有默认自动配置的类都在这个文件中,如下图:
-
自己编写一个HelloWorldAutofiguration
前边介绍了实现一个自动装配配置类用到了哪些技术。那下面我就可以自己写一个HelloWorldAutoConfiguration了。
项目结构:
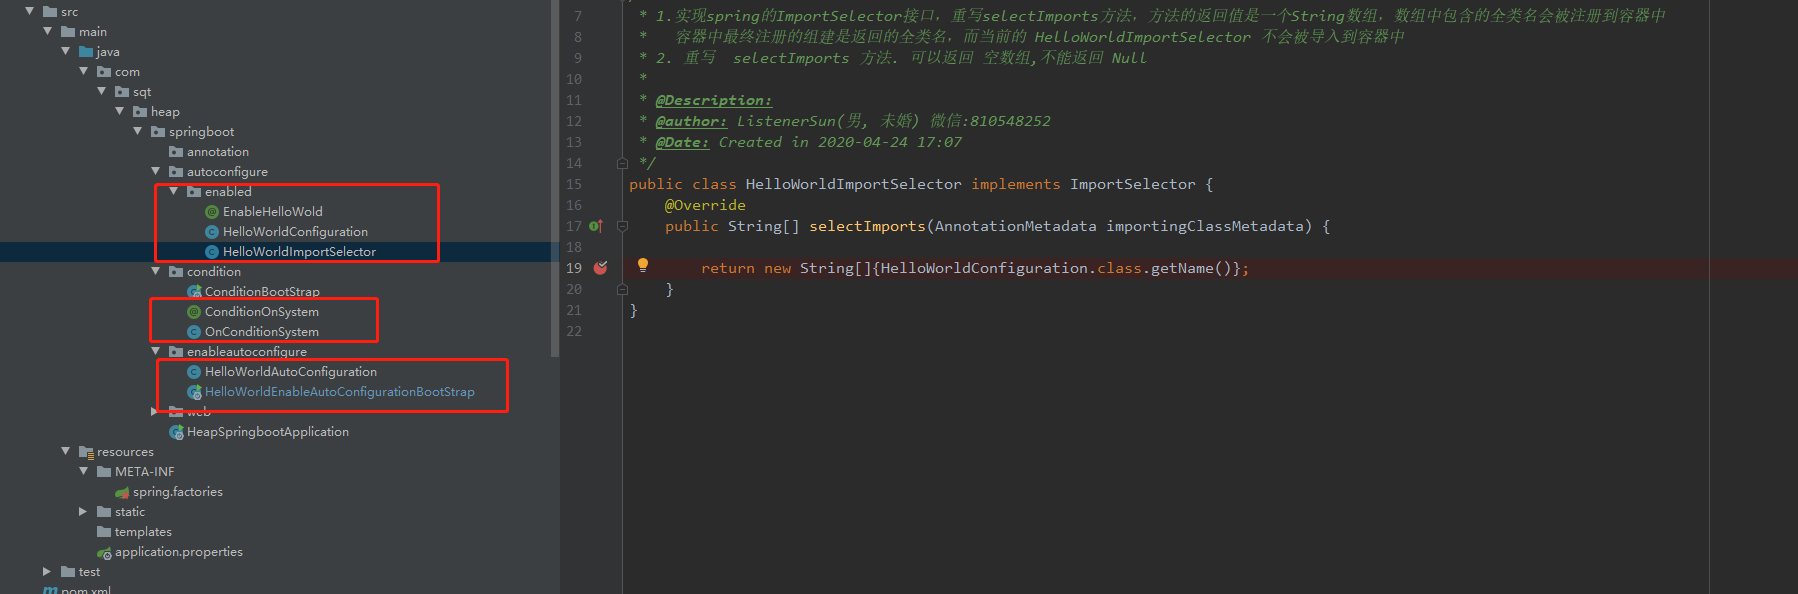
主要就是HelloWorldAutoConfiguration、OnConditionSystem、HelloWorldImportSelector、HelloWorldConfiguration、@EnableHelloWold、@ConditionOnSystem、spring.factories四个类两个注解和一个文件。下面一个一个的介绍。
HelloWorldConfiguration:
public class HelloWorldConfiguration {
    @Bean
    public String hellWorld() {
        return " ListenerSun hello world !";
    }
}
这个类就是要被自动装配的类。该类并没有使用@Configuration注解,并且在该类里配置了一个HelloWorld的bean
OnConditionSystem、@ConditionOnSystem:
/** 自定义  条件属性注解 满足该条件才 进行
 * @Description: java系统属性 条件判断
 * @Date: Created in 2020-04-26 11:48
 */
@Retention(RetentionPolicy.RUNTIME)
@Target({ ElementType.TYPE, ElementType.METHOD })
@Documented
@Conditional(OnConditionSystem.class)
public @interface ConditionOnSystem {

    /** java 系统属性名称
     * @return
     */
    String name();

    /**java 系统属性值
     * @return
     */
    String value();
}

/**
 * @Description: 判断实际类
 * @Date: Created in 2020-04-26 11:45
 */
public class OnConditionSystem implements Condition {
    @Override
    public boolean matches(ConditionContext context, AnnotatedTypeMetadata metadata) {
        Map<String, Object> annotationAttributes = metadata.getAnnotationAttributes(ConditionOnSystem.class.getName());
        //获取注解中 name 的值
        String propertyName = String.valueOf(annotationAttributes.get("name"));
         //获取注解中 value 的值
        String propertyValue = String.valueOf(annotationAttributes.get("value"));
        //获取系统属性为 name 的 值
        String systemPropertyValue = System.getProperty(propertyName);
        return propertyValue.equalsIgnoreCase(systemPropertyValue);
    }
}
这一组相当于是自定义的条件注解,其中判断条件就是我们配置的value是否和系统属性的value值是否相等。
HelloWorldImportSelector、@EnableHelloWold:
@Target(ElementType.TYPE)
@Retention(RetentionPolicy.RUNTIME)
@Documented
@Import(HelloWorldImportSelector.class)
public @interface EnableHelloWold {
}
public class HelloWorldImportSelector implements ImportSelector {
    @Override
    public String[] selectImports(AnnotationMetadata importingClassMetadata) {
        return new String[]{HelloWorldConfiguration.class.getName()};
    }
}
@EnableHelloWold注解就是我们添加到启动类上的注解,开启自动适配,类似@EnableEurekaServer、@EnableFeignClients这种注解。其中使用了@Import注解,其中实现逻辑在HelloWorldImportSelector中。这里简单说一下@Import:
@Import支持 三种方式
- 带有
@Configuration的配置类(4.2 版本之前只可以导入配置类,4.2版本之后 也可以导入 普通类) ImportSelector的实现。案例:@ EnableAsyncImportBeanDefinitionRegistrar的实现。案例:@EnableFeignClients
我们使用的是第二种方式,使用方法就是:
- 实现spring的ImportSelector接口,重写selectImports方法,方法的返回值是一个String数组,数组中包含的全类名会被注册到容器中容器中最终注册的组建是返回的全类名,而当前的
HelloWorldImportSelector不会被导入到容器中 - 重写 selectImports 方法. 可以返回 空数组,不能返回 Null
spring.factories:
# Auto Configure
org.springframework.boot.autoconfigure.EnableAutoConfiguration=\
com.sqt.heap.springboot.enableautoconfigure.HelloWorldAutoConfiguration
自己新建一个META-INF文件夹,然后新建一个spring.factories文件,模仿SpringBoot中的spring.factories文件,把自己的HelloWorldAutoConfiguration类配进去。然后在项目启动的时候SpringFactoriesLoader 这个实现类会自动帮我们解析加载我们自定义的文件,详情可点进源码去看。
HelloWorldAutoConfiguration:
/**
 * @Description:
 * @author: ListenerSun(男, 未婚) 微信:810548252
 * @Date: Created in 2020-04-29 14:09
 */
@Configuration  // spring 模式注解装配
@EnableHelloWold // enable 模块装配
@ConditionOnSystem(name = "user.name", value = "Administrator")
public class HelloWorldAutoConfiguration {
}
这就是我们HelloWorld的自动配置类,跟MybatisAutoConfiguration、FeignAutoConfiguration这些类的命名保持一致。如果条件注解符合,就会为我们自动装配HelloWorldConfiguration中的HelloWorld的bean。因为我电脑属性值是Administrator,所以我条件注解中的value是Administrator。
测试:
/**
 * @Description:
 * @author: ListenerSun(男, 未婚) 微信:810548252
 * @Date: Created in 2020-04-29 14:23
 */
@SpringBootApplication
public class HelloWorldEnableAutoConfigurationBootStrap {
    public static void main(String[] args) {
        ConfigurableApplicationContext context = new SpringApplicationBuilder(HelloWorldEnableAutoConfigurationBootStrap.class)
                .web(WebApplicationType.NONE)
                .run(args);
        String bean = context.getBean("hellWorld", String.class);
        System.out.println("获取到的 hello world bean 是:" + bean);
    }

}
输出结果:
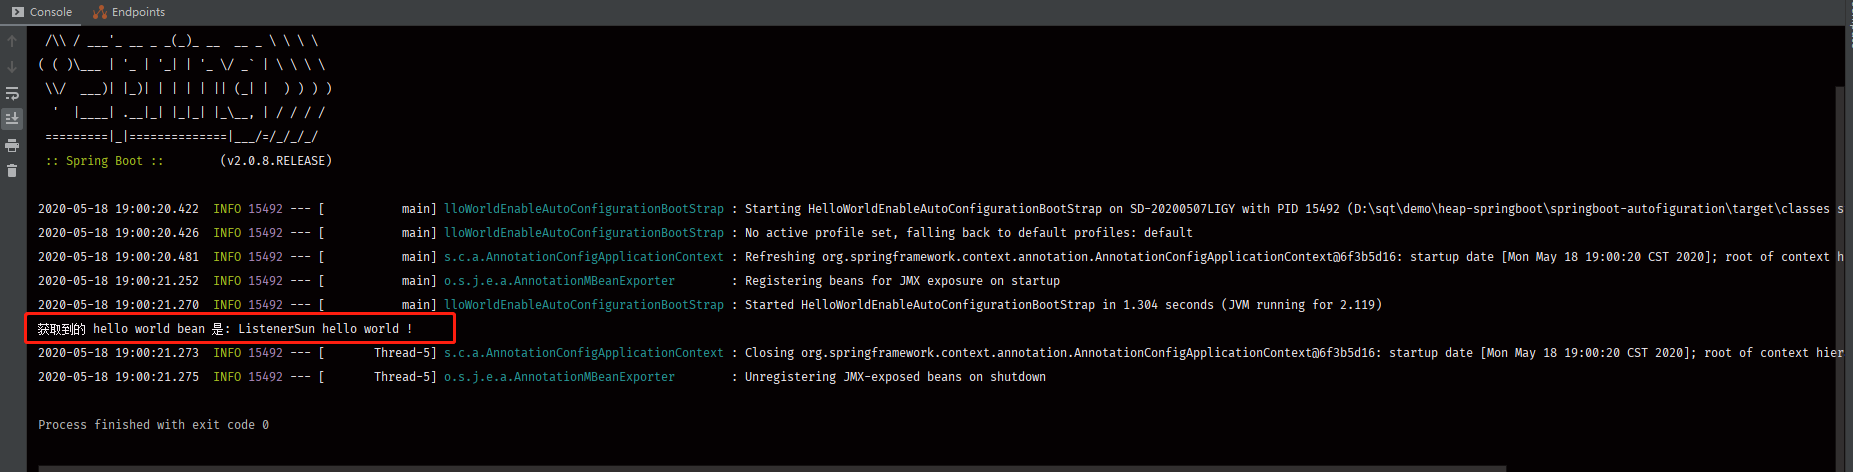
可以看到 HelloWorld bean自动配置成功了。到此一个自动装配类就完成了
总结
概括一个自动装配类的实现顺序:
- 实现一个自己的
xxxAutoConfiguration - 将自己实现的
xxxAutoConfiguration配置到spring.factories - 激活自动装配。 就是在在启动类上开启自动配置注解
@EnableAutoConfiguration HelloWorldAutoConfiguration例子详解:- 启动类开启了自动装配会扫描spring.factories文件,然后扫描到自己实现的配置类
- 自己实现的配置类又导入了
@EnableHelloWold和@ConditionOnSystem - 在
@EnableHelloWorld中使用了@Import注解导入了HelloWorldImportSelector类 - 在
HelloWorldImportSelector中返回类HelloWorldConfiguration类其中在HelloWorldConfiguration中配置了HellworldBean - 在
@ConditionOnSystem中实现了条件校验的逻辑
欢迎扫码关注
如果喜欢请关注我公众号【程序倾听者】,说出你的故事!我在这里倾听!
文章原文地址