

最近要写一些脚本工具,为了方便做一些简单的交互,突然想起 Vue-Cli 里的那种交互不错,然后看了一下,是用了inquirer.js,那么就简单地聊聊诸如Vue-Cli等工具用到的Inquirer.js如何工作的吧。
这里先把inquirer.js的github链接奉上:
github.com/SBoudrias/I…
然后开始分析分析之旅
1. 先从用法和效果看起
这里先贴一些 Vue-Cli 的截图吧:
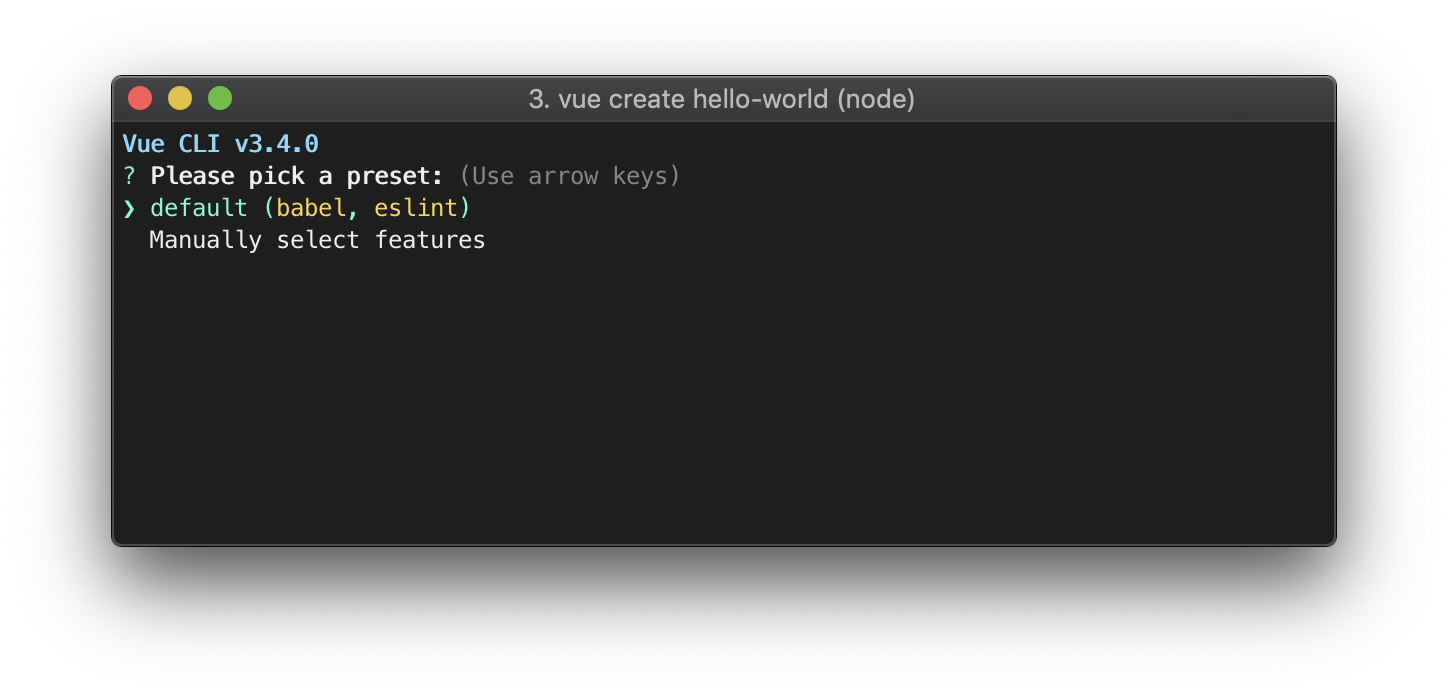
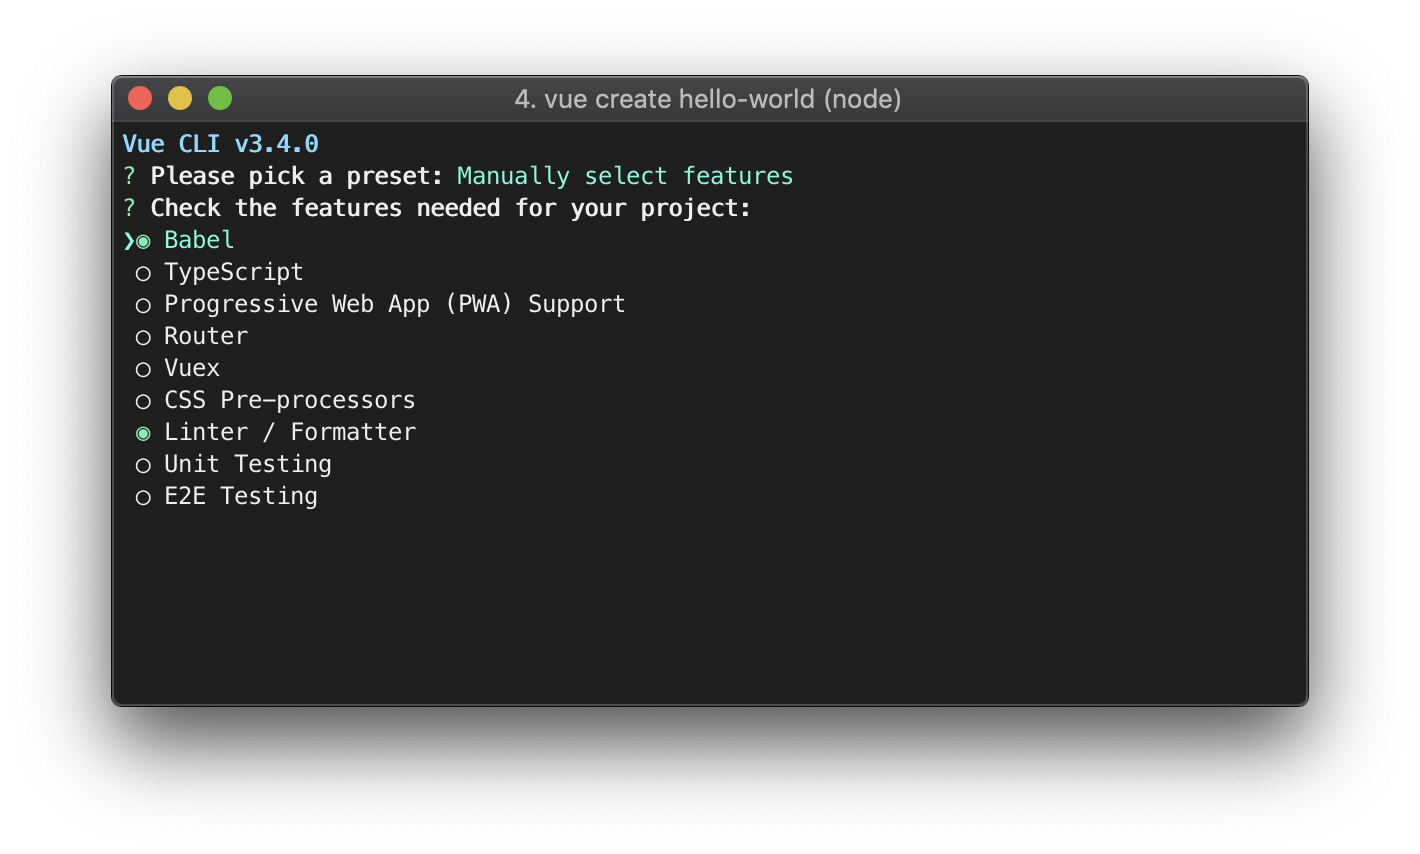
好,再来看看实际代码样例:
以列表作例子 list.js
'use strict';
let inquirer = require('inquirer');

inquirer
  .prompt([
    {
      type: 'list',
      name: 'action',
      message: '你现在想干嘛',
      choices: [
        '打代码',
        new inquirer.Separator(),
        {
          name: '叫个小姐姐上门',
          disabled: '不可以!'
        },
        '上厕所',
      ]
    },
    {
      type: 'list',
      name: 'os',
      message: '你打代码的系统是啥',
      choices: ['macOS', 'Windows', 'Centos', 'Ubuntu', 'FreeBSD', 'Others'],
      filter: function(val) {
        return val.toLowerCase();
      }
    }
  ])
  .then(answers => {
    console.log(JSON.stringify(answers, null, '  '));
  });
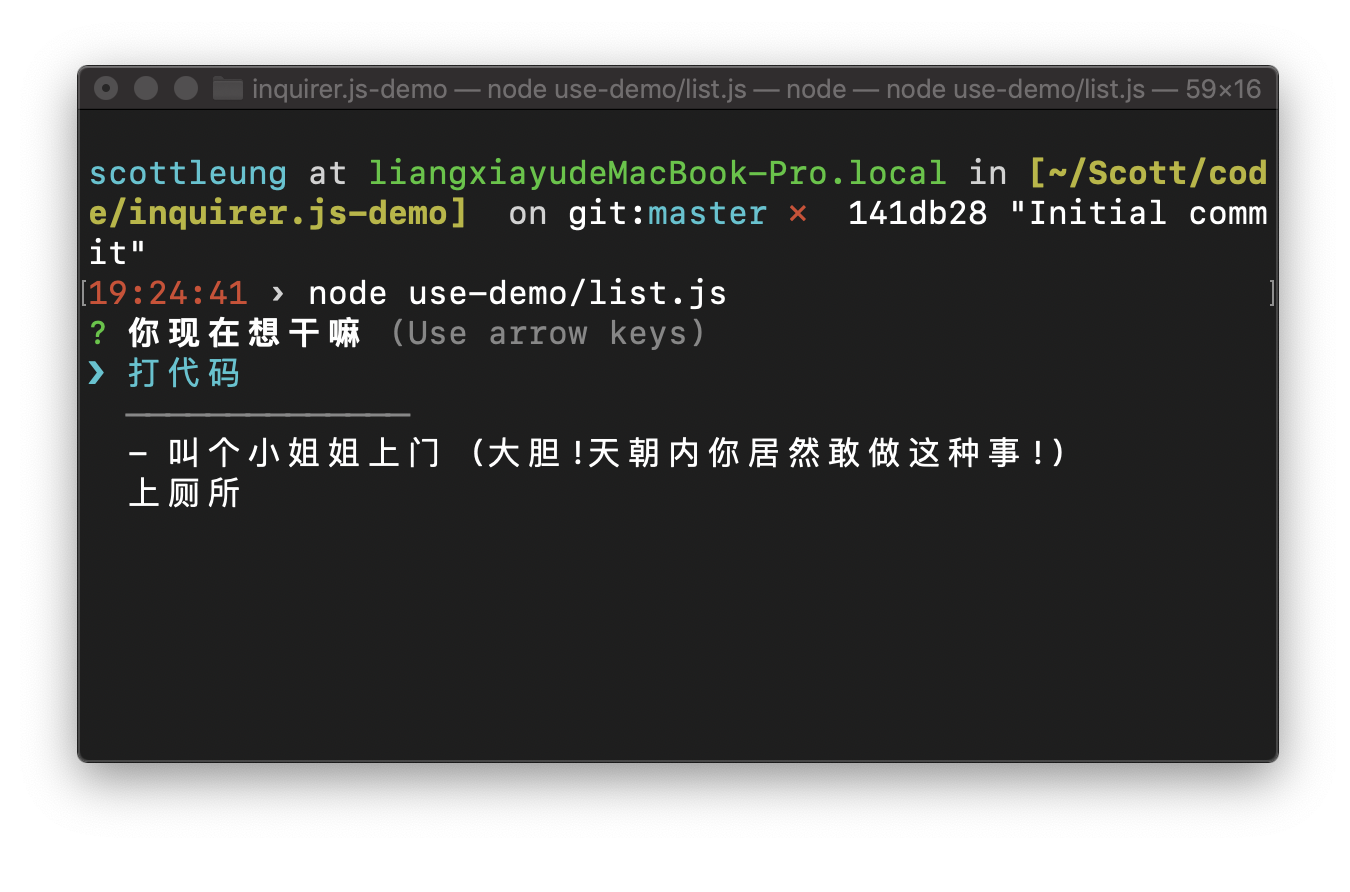
效果如下
2. 再来看看如何实现的
先从哪里看起
先看看项目中的 package.json 看看它有没有依赖什么库。
{
  "private": true,
  "devDependencies": {
    "@babel/core": "^7.4.5",
    "@babel/preset-env": "^7.4.5",
    "babel-jest": "^24.8.0",
    "codecov": "^3.5.0",
    "eslint": "^5.16.0",
    "eslint-config-prettier": "^5.0.0",
    "eslint-config-xo": "^0.26.0",
    "eslint-plugin-prettier": "^3.1.0",
    "husky": "^2.4.1",
    "jest": "^24.8.0",
    "lerna": "^3.15.0",
    "lint-staged": "^8.2.1",
    "prettier": "^1.18.2"
  },
  "workspaces": [
    "packages/*"
  ],
  "scripts": {
    "bootstrap": "lerna bootstrap --no-ci",
    "pretest": "eslint .",
    "test": "jest --coverage && lerna exec npm test --scope inquirer"
  },
  "husky": {
    "hooks": {
      "pre-commit": "lint-staged"
    }
  },
  "lint-staged": {
    "*.json": [
      "prettier --write",
      "git add"
    ],
    "*.js": [
      "eslint --fix",
      "git add"
    ]
  },
  "jest": {
    "coverageDirectory": "./coverage/",
    "collectCoverage": true
  },
  "dependencies": {}
}
看了之后发现这里的 package.json 并不是我们npm安装时的json,直接进 packages/inquirer/ 里看到的才是真的。
{
  "name": "inquirer",
  "version": "6.4.1",
  "description": "A collection of common interactive command line user interfaces.",
  "author": "Simon Boudrias <admin@simonboudrias.com>",
  "files": [
    "lib",
    "README.md"
  ],
  "main": "lib/inquirer.js",
  "keywords": [
    "command",
    "prompt",
    "stdin",
    "cli",
    "tty",
    "menu"
  ],
  "engines": {
    "node": ">=6.0.0"
  },
  "devDependencies": {
    "chai": "^4.2.0",
    "chalk-pipe": "^2.0.0",
    "cmdify": "^0.0.4",
    "mocha": "^5.0.0",
    "mockery": "^2.1.0",
    "nyc": "^13.1.0",
    "sinon": "^7.1.1"
  },
  "scripts": {
    "test": "nyc mocha test/**/* -r ./test/before",
    "posttest": "nyc report --reporter=text-lcov > ../../coverage/nyc-report.lcov",
    "prepublishOnly": "cp ../../README.md .",
    "postpublish": "rm -f README.md"
  },
  "repository": "SBoudrias/Inquirer.js",
  "license": "MIT",
  "dependencies": {
    "ansi-escapes": "^3.2.0",
    "chalk": "^2.4.2",
    "cli-cursor": "^2.1.0",
    "cli-width": "^2.0.0",
    "external-editor": "^3.0.3",
    "figures": "^2.0.0",
    "lodash": "^4.17.11",
    "mute-stream": "0.0.7",
    "run-async": "^2.2.0",
    "rxjs": "^6.4.0",
    "string-width": "^2.1.0",
    "strip-ansi": "^5.1.0",
    "through": "^2.3.6"
  }
}
看主文件
接着看到 "main": "lib/inquirer.js" ,那么我们就从这里看起。
// lib/inquirer.js
'use strict';
/**
 * Inquirer.js
 * A collection of common interactive command line user interfaces.
 */

var inquirer = module.exports;

/**
 * Client interfaces
 */

inquirer.prompts = {};

inquirer.Separator = require('./objects/separator');

inquirer.ui = {
  BottomBar: require('./ui/bottom-bar'),
  Prompt: require('./ui/prompt')
};

/**
 * Create a new self-contained prompt module.
 */
inquirer.createPromptModule = function(opt) {
  var promptModule = function(questions) {
    var ui = new inquirer.ui.Prompt(promptModule.prompts, opt);
    var promise = ui.run(questions);

    // Monkey patch the UI on the promise object so
    // that it remains publicly accessible.
    promise.ui = ui;

    return promise;
  };

  promptModule.prompts = {};

  /**
   * Register a prompt type
   * @param {String} name     Prompt type name
   * @param {Function} prompt Prompt constructor
   * @return {inquirer}
   */

  promptModule.registerPrompt = function(name, prompt) {
    promptModule.prompts[name] = prompt;
    return this;
  };

  /**
   * Register the defaults provider prompts
   */

  promptModule.restoreDefaultPrompts = function() {
    this.registerPrompt('list', require('./prompts/list'));
    this.registerPrompt('input', require('./prompts/input'));
    this.registerPrompt('number', require('./prompts/number'));
    this.registerPrompt('confirm', require('./prompts/confirm'));
    this.registerPrompt('rawlist', require('./prompts/rawlist'));
    this.registerPrompt('expand', require('./prompts/expand'));
    this.registerPrompt('checkbox', require('./prompts/checkbox'));
    this.registerPrompt('password', require('./prompts/password'));
    this.registerPrompt('editor', require('./prompts/editor'));
  };

  promptModule.restoreDefaultPrompts();

  return promptModule;
};

/**
 * Public CLI helper interface
 * @param  {Array|Object|Rx.Observable} questions - Questions settings array
 * @param  {Function} cb - Callback being passed the user answers
 * @return {inquirer.ui.Prompt}
 */

inquirer.prompt = inquirer.createPromptModule();

// Expose helper functions on the top level for easiest usage by common users
inquirer.registerPrompt = function(name, prompt) {
  inquirer.prompt.registerPrompt(name, prompt);
};

inquirer.restoreDefaultPrompts = function() {
  inquirer.prompt.restoreDefaultPrompts();
};
然后我们从用法上 inquirer.prompt(questions) 去看,一步步往下,找到 inquirer.prompt = inquirer.createPromptModule();
往里面看 promptModule 知道实际调用等于 promptModule(questions) 。
追prompt.js
接着应该往下研究 inquirer.ui.Prompt 即 ./ui/prompt.js 了。
// lib/ui/prompt.js
'use strict';
var _ = require('lodash');
var { defer, empty, from, of } = require('rxjs');
var { concatMap, filter, publish, reduce } = require('rxjs/operators');
var runAsync = require('run-async');
var utils = require('../utils/utils');
var Base = require('./baseUI');

/**
 * Base interface class other can inherits from
 */

class PromptUI extends Base {
  constructor(prompts, opt) {
    super(opt);
    this.prompts = prompts;
  }

  run(questions) {
    // Keep global reference to the answers
    this.answers = {};

    // Make sure questions is an array.
    if (_.isPlainObject(questions)) {
      questions = [questions];
    }

    // Create an observable, unless we received one as parameter.
    // Note: As this is a public interface, we cannot do an instanceof check as we won't
    // be using the exact same object in memory.
    var obs = _.isArray(questions) ? from(questions) : questions;

    this.process = obs.pipe(
      concatMap(this.processQuestion.bind(this)),
      publish() // Creates a hot Observable. It prevents duplicating prompts.
    );

    this.process.connect();

    return this.process
      .pipe(
        reduce((answers, answer) => {
          _.set(this.answers, answer.name, answer.answer);
          return this.answers;
        }, {})
      )
      .toPromise(Promise)
      .then(this.onCompletion.bind(this));
  }

  /**
   * Once all prompt are over
   */

  onCompletion() {
    this.close();

    return this.answers;
  }

  processQuestion(question) {
    question = _.clone(question);
    return defer(() => {
      var obs = of(question);

      return obs.pipe(
        concatMap(this.setDefaultType.bind(this)),
        concatMap(this.filterIfRunnable.bind(this)),
        concatMap(() =>
          utils.fetchAsyncQuestionProperty(question, 'message', this.answers)
        ),
        concatMap(() =>
          utils.fetchAsyncQuestionProperty(question, 'default', this.answers)
        ),
        concatMap(() =>
          utils.fetchAsyncQuestionProperty(question, 'choices', this.answers)
        ),
        concatMap(this.fetchAnswer.bind(this))
      );
    });
  }

  fetchAnswer(question) {
    var Prompt = this.prompts[question.type];
    this.activePrompt = new Prompt(question, this.rl, this.answers);
    return defer(() =>
      from(
        this.activePrompt.run().then(answer => ({ name: question.name, answer: answer }))
      )
    );
  }

  setDefaultType(question) {
    // Default type to input
    if (!this.prompts[question.type]) {
      question.type = 'input';
    }

    return defer(() => of(question));
  }

  filterIfRunnable(question) {
    if (question.when === false) {
      return empty();
    }

    if (!_.isFunction(question.when)) {
      return of(question);
    }

    var answers = this.answers;
    return defer(() =>
      from(
        runAsync(question.when)(answers).then(shouldRun => {
          if (shouldRun) {
            return question;
          }
        })
      ).pipe(filter(val => val != null))
    );
  }
}

module.exports = PromptUI;
没看出来有操作标准输入输出的代码,大胆猜测都是在父类 Base 中完成基本 stdin 和 stdout 的操作(一般来说确实要这样😉)。
UI操作基类
// lib/ui/baseUI.js
'use strict';
var _ = require('lodash');
var MuteStream = require('mute-stream');
var readline = require('readline');

/**
 * Base interface class other can inherits from
 */

class UI {
  constructor(opt) {
    // Instantiate the Readline interface
    // @Note: Don't reassign if already present (allow test to override the Stream)
    if (!this.rl) {
      this.rl = readline.createInterface(setupReadlineOptions(opt));
    }

    this.rl.resume();

    this.onForceClose = this.onForceClose.bind(this);

    // Make sure new prompt start on a newline when closing
    process.on('exit', this.onForceClose);

    // Terminate process on SIGINT (which will call process.on('exit') in return)
    this.rl.on('SIGINT', this.onForceClose);
  }

  /**
   * Handle the ^C exit
   * @return {null}
   */

  onForceClose() {
    this.close();
    process.kill(process.pid, 'SIGINT');
    console.log('');
  }

  /**
   * Close the interface and cleanup listeners
   */

  close() {
    // Remove events listeners
    this.rl.removeListener('SIGINT', this.onForceClose);
    process.removeListener('exit', this.onForceClose);

    this.rl.output.unmute();

    if (this.activePrompt && typeof this.activePrompt.close === 'function') {
      this.activePrompt.close();
    }

    // Close the readline
    this.rl.output.end();
    this.rl.pause();
    this.rl.close();
  }
}

function setupReadlineOptions(opt) {
  opt = opt || {};

  // Default `input` to stdin
  var input = opt.input || process.stdin;

  // Add mute capabilities to the output
  var ms = new MuteStream();
  ms.pipe(opt.output || process.stdout);
  var output = ms;

  return _.extend(
    {
      terminal: true,
      input: input,
      output: output
    },
    _.omit(opt, ['input', 'output'])
  );
}

module.exports = UI;
这里可以看到用了两个库,一个是第三方的 mute-stream ,一个是 node 官方的 readline 。readline 文档安排一下先:英文文档 中文文档
简单来说, readline 就是做可读流可写流的操作库, mute-stream 就是做可写流的静默写操作库。
从 baseUI.js 代码来看,它主要做了以下几件事情:
constructor创建readline的实例,恢复input流,监听进程退出事件;- 触发
onForceClose时,先调用了close函数,最终关闭进程关闭; close函数,先把事件的监听移除(防止内存泄漏等),再把output流解除静默输出状态;然后对活跃的prompt进行关闭,再对readline结束并关闭;
回头再看
我们这里先不管控制台中的交互如何做,先把上面的 baseUI.js 做的事情有个大概的认识先。
回过头来,看看 inquirer.js 里关于 prompt 的关键代码 var promise = ui.run(questions); ,整个问答交互的核心应该就是在这个 run 函数里面,我们来看看。
但是这里又涉及到另一个库 rxjs 。
这里引用一句话描述 rxjs :
RxJS 是一套处理异步编程的 API 库。
由于篇幅有限,这里就先不展开说了。有兴趣的可以先查查这个库的一些资料。
注意下这行代码: var obs = _.isArray(questions) ? from(questions) : questions;
这里的意思其实是,如果 questions 是一个数组的话,就把它们转换成 observable 。
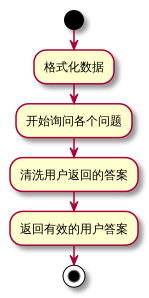
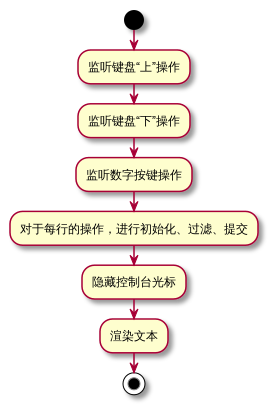
run 函数处理过程如下流程图:
fetchAnswer 这个函数,发现有点意思的是:对于每种不同询问类型,都是直接 new 出不同的插件,然后全部全部交给插件内部完成,然后只接受返回结果。
这样做的好处就是能够非常容易地扩展不同的类型,甚至是做定制化等,都非常的方便。
接下来我们要继续分析的话就要到插件内部去看了。
3. 插件分析
接下来我们来分析里面的插件,就以一个举例即可。这里以 list.js 做例子。
老规矩,上代码。
// lib/prompts/list.js
'use strict';
/**
 * `list` type prompt
 */

var _ = require('lodash');
var chalk = require('chalk');
var figures = require('figures');
var cliCursor = require('cli-cursor');
var runAsync = require('run-async');
var { flatMap, map, take, takeUntil } = require('rxjs/operators');
var Base = require('./base');
var observe = require('../utils/events');
var Paginator = require('../utils/paginator');

class ListPrompt extends Base {
  constructor(questions, rl, answers) {
    super(questions, rl, answers);

    if (!this.opt.choices) {
      this.throwParamError('choices');
    }

    this.firstRender = true;
    this.selected = 0;

    var def = this.opt.default;

    // If def is a Number, then use as index. Otherwise, check for value.
    if (_.isNumber(def) && def >= 0 && def < this.opt.choices.realLength) {
      this.selected = def;
    } else if (!_.isNumber(def) && def != null) {
      let index = _.findIndex(this.opt.choices.realChoices, ({ value }) => value === def);
      this.selected = Math.max(index, 0);
    }

    // Make sure no default is set (so it won't be printed)
    this.opt.default = null;

    this.paginator = new Paginator(this.screen);
  }

  /**
   * Start the Inquiry session
   * @param  {Function} cb      Callback when prompt is done
   * @return {this}
   */

  _run(cb) {
    this.done = cb;

    var self = this;

    var events = observe(this.rl);
    events.normalizedUpKey.pipe(takeUntil(events.line)).forEach(this.onUpKey.bind(this));
    events.normalizedDownKey
      .pipe(takeUntil(events.line))
      .forEach(this.onDownKey.bind(this));
    events.numberKey.pipe(takeUntil(events.line)).forEach(this.onNumberKey.bind(this));
    events.line
      .pipe(
        take(1),
        map(this.getCurrentValue.bind(this)),
        flatMap(value => runAsync(self.opt.filter)(value).catch(err => err))
      )
      .forEach(this.onSubmit.bind(this));

    // Init the prompt
    cliCursor.hide();
    this.render();

    return this;
  }

  /**
   * Render the prompt to screen
   * @return {ListPrompt} self
   */

  render() {
    // Render question
    var message = this.getQuestion();

    if (this.firstRender) {
      message += chalk.dim('(Use arrow keys)');
    }

    // Render choices or answer depending on the state
    if (this.status === 'answered') {
      message += chalk.cyan(this.opt.choices.getChoice(this.selected).short);
    } else {
      var choicesStr = listRender(this.opt.choices, this.selected);
      var indexPosition = this.opt.choices.indexOf(
        this.opt.choices.getChoice(this.selected)
      );
      message +=
        '\n' + this.paginator.paginate(choicesStr, indexPosition, this.opt.pageSize);
    }

    this.firstRender = false;

    this.screen.render(message);
  }

  /**
   * When user press `enter` key
   */

  onSubmit(value) {
    this.status = 'answered';

    // Rerender prompt
    this.render();

    this.screen.done();
    cliCursor.show();
    this.done(value);
  }

  getCurrentValue() {
    return this.opt.choices.getChoice(this.selected).value;
  }

  /**
   * When user press a key
   */
  onUpKey() {
    var len = this.opt.choices.realLength;
    this.selected = this.selected > 0 ? this.selected - 1 : len - 1;
    this.render();
  }

  onDownKey() {
    var len = this.opt.choices.realLength;
    this.selected = this.selected < len - 1 ? this.selected + 1 : 0;
    this.render();
  }

  onNumberKey(input) {
    if (input <= this.opt.choices.realLength) {
      this.selected = input - 1;
    }

    this.render();
  }
}

/**
 * Function for rendering list choices
 * @param  {Number} pointer Position of the pointer
 * @return {String}         Rendered content
 */
function listRender(choices, pointer) {
  var output = '';
  var separatorOffset = 0;

  choices.forEach((choice, i) => {
    if (choice.type === 'separator') {
      separatorOffset++;
      output += '  ' + choice + '\n';
      return;
    }

    if (choice.disabled) {
      separatorOffset++;
      output += '  - ' + choice.name;
      output += ' (' + (_.isString(choice.disabled) ? choice.disabled : 'Disabled') + ')';
      output += '\n';
      return;
    }

    var isSelected = i - separatorOffset === pointer;
    var line = (isSelected ? figures.pointer + ' ' : '  ') + choice.name;
    if (isSelected) {
      line = chalk.cyan(line);
    }

    output += line + ' \n';
  });

  return output.replace(/\n$/, '');
}

module.exports = ListPrompt;
留意一下 lib/ui/prompt.js 里的 this.activePrompt.run() ,在 ListPrompt 并没有声明,应该是来自父类方法,上代码看看。
// lib/prompts/base.js
'use strict';
/**
 * Base prompt implementation
 * Should be extended by prompt types.
 */

var _ = require('lodash');
var chalk = require('chalk');
var runAsync = require('run-async');
var { filter, flatMap, share, take, takeUntil } = require('rxjs/operators');
var Choices = require('../objects/choices');
var ScreenManager = require('../utils/screen-manager');

class Prompt {
  constructor(question, rl, answers) {
    // Setup instance defaults property
    _.assign(this, {
      answers: answers,
      status: 'pending'
    });

    // Set defaults prompt options
    this.opt = _.defaults(_.clone(question), {
      validate: () => true,
      filter: val => val,
      when: () => true,
      suffix: '',
      prefix: chalk.green('?')
    });

    // Make sure name is present
    if (!this.opt.name) {
      this.throwParamError('name');
    }

    // Set default message if no message defined
    if (!this.opt.message) {
      this.opt.message = this.opt.name + ':';
    }

    // Normalize choices
    if (Array.isArray(this.opt.choices)) {
      this.opt.choices = new Choices(this.opt.choices, answers);
    }

    this.rl = rl;
    this.screen = new ScreenManager(this.rl);
  }

  /**
   * Start the Inquiry session and manage output value filtering
   * @return {Promise}
   */

  run() {
    return new Promise(resolve => {
      this._run(value => resolve(value));
    });
  }

  // Default noop (this one should be overwritten in prompts)
  _run(cb) {
    cb();
  }

  /**
   * Throw an error telling a required parameter is missing
   * @param  {String} name Name of the missing param
   * @return {Throw Error}
   */

  throwParamError(name) {
    throw new Error('You must provide a `' + name + '` parameter');
  }

  /**
   * Called when the UI closes. Override to do any specific cleanup necessary
   */
  close() {
    this.screen.releaseCursor();
  }

  /**
   * Run the provided validation method each time a submit event occur.
   * @param  {Rx.Observable} submit - submit event flow
   * @return {Object}        Object containing two observables: `success` and `error`
   */
  handleSubmitEvents(submit) {
    var self = this;
    var validate = runAsync(this.opt.validate);
    var asyncFilter = runAsync(this.opt.filter);
    var validation = submit.pipe(
      flatMap(value =>
        asyncFilter(value, self.answers).then(
          filteredValue =>
            validate(filteredValue, self.answers).then(
              isValid => ({ isValid: isValid, value: filteredValue }),
              err => ({ isValid: err })
            ),
          err => ({ isValid: err })
        )
      ),
      share()
    );

    var success = validation.pipe(
      filter(state => state.isValid === true),
      take(1)
    );
    var error = validation.pipe(
      filter(state => state.isValid !== true),
      takeUntil(success)
    );

    return {
      success: success,
      error: error
    };
  }

  /**
   * Generate the prompt question string
   * @return {String} prompt question string
   */

  getQuestion() {
    var message =
      this.opt.prefix +
      ' ' +
      chalk.bold(this.opt.message) +
      this.opt.suffix +
      chalk.reset(' ');

    // Append the default if available, and if question isn't answered
    if (this.opt.default != null && this.status !== 'answered') {
      // If default password is supplied, hide it
      if (this.opt.type === 'password') {
        message += chalk.italic.dim('[hidden] ');
      } else {
        message += chalk.dim('(' + this.opt.default + ') ');
      }
    }

    return message;
  }
}

module.exports = Prompt;
原来 run() 是调用了子类方法 _run() ,那么我们接着分析吧。
流程图
run() 函数
划重点!!! render() 函数

当我们选择好答案按回车之后,会自动把选项收起来,进行下一个问题,它是如何实现重绘的呢?难道它还能把已经输出的流数据收回去?🤔
我想,大家都看出来了,奥妙肯定在 this.screen.render(message); 的 screen 里面。
screen分析
list.js 里的 screen 并没有在该类中进行初始化,那么必然是在其父类当中。
父类 base 代码已经在上面贴过了,其中里面大量用到的 chalk ,简单地说就是控制台输出带颜色的库,贴个图你们马上就懂了。

父类的构造函数中,找到关键代码 this.screen = new ScreenManager(this.rl); 而 ScreenManager 来自 ../utils/screen-manager 。老规矩走起。
// lib/utils/screen-manage.js
'use strict';
var _ = require('lodash');
var util = require('./readline');
var cliWidth = require('cli-width');
var stripAnsi = require('strip-ansi');
var stringWidth = require('string-width');

function height(content) {
  return content.split('\n').length;
}

function lastLine(content) {
  return _.last(content.split('\n'));
}

class ScreenManager {
  constructor(rl) {
    // These variables are keeping information to allow correct prompt re-rendering
    this.height = 0;
    this.extraLinesUnderPrompt = 0;

    this.rl = rl;
  }

  render(content, bottomContent) {
    this.rl.output.unmute();
    this.clean(this.extraLinesUnderPrompt);

    /**
     * Write message to screen and setPrompt to control backspace
     */

    var promptLine = lastLine(content);
    var rawPromptLine = stripAnsi(promptLine);

    // Remove the rl.line from our prompt. We can't rely on the content of
    // rl.line (mainly because of the password prompt), so just rely on it's
    // length.
    var prompt = rawPromptLine;
    if (this.rl.line.length) {
      prompt = prompt.slice(0, -this.rl.line.length);
    }

    this.rl.setPrompt(prompt);

    // SetPrompt will change cursor position, now we can get correct value
    var cursorPos = this.rl._getCursorPos();
    var width = this.normalizedCliWidth();

    content = this.forceLineReturn(content, width);
    if (bottomContent) {
      bottomContent = this.forceLineReturn(bottomContent, width);
    }

    // Manually insert an extra line if we're at the end of the line.
    // This prevent the cursor from appearing at the beginning of the
    // current line.
    if (rawPromptLine.length % width === 0) {
      content += '\n';
    }

    var fullContent = content + (bottomContent ? '\n' + bottomContent : '');
    this.rl.output.write(fullContent);

    /**
     * Re-adjust the cursor at the correct position.
     */

    // We need to consider parts of the prompt under the cursor as part of the bottom
    // content in order to correctly cleanup and re-render.
    var promptLineUpDiff = Math.floor(rawPromptLine.length / width) - cursorPos.rows;
    var bottomContentHeight =
      promptLineUpDiff + (bottomContent ? height(bottomContent) : 0);
    if (bottomContentHeight > 0) {
      util.up(this.rl, bottomContentHeight);
    }

    // Reset cursor at the beginning of the line
    util.left(this.rl, stringWidth(lastLine(fullContent)));

    // Adjust cursor on the right
    if (cursorPos.cols > 0) {
      util.right(this.rl, cursorPos.cols);
    }

    /**
     * Set up state for next re-rendering
     */
    this.extraLinesUnderPrompt = bottomContentHeight;
    this.height = height(fullContent);

    this.rl.output.mute();
  }

  clean(extraLines) {
    if (extraLines > 0) {
      util.down(this.rl, extraLines);
    }

    util.clearLine(this.rl, this.height);
  }

  done() {
    this.rl.setPrompt('');
    this.rl.output.unmute();
    this.rl.output.write('\n');
  }

  releaseCursor() {
    if (this.extraLinesUnderPrompt > 0) {
      util.down(this.rl, this.extraLinesUnderPrompt);
    }
  }

  normalizedCliWidth() {
    var width = cliWidth({
      defaultWidth: 80,
      output: this.rl.output
    });
    return width;
  }

  breakLines(lines, width) {
    // Break lines who're longer than the cli width so we can normalize the natural line
    // returns behavior across terminals.
    width = width || this.normalizedCliWidth();
    var regex = new RegExp('(?:(?:\\033[[0-9;]*m)*.?){1,' + width + '}', 'g');
    return lines.map(line => {
      var chunk = line.match(regex);
      // Last match is always empty
      chunk.pop();
      return chunk || '';
    });
  }

  forceLineReturn(content, width) {
    width = width || this.normalizedCliWidth();
    return _.flatten(this.breakLines(content.split('\n'), width)).join('\n');
  }
}

module.exports = ScreenManager;
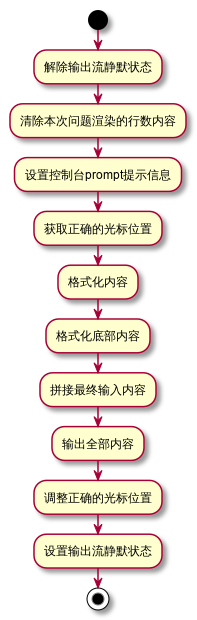
render 流程图走一个。
clean() 函数。追到 lib/utils/readline.js 发现这行代码:rl.output.write(ansiEscapes.eraseLines(len)); 使用了 ansi-escapes 库。
4. 最终答案
发现这个库的代码好短,感觉要解开了!
'use strict';
const x = module.exports;
const ESC = '\u001B[';
const OSC = '\u001B]';
const BEL = '\u0007';
const SEP = ';';
const isTerminalApp = process.env.TERM_PROGRAM === 'Apple_Terminal';
const fs = require('fs');

x.cursorTo = (x, y) => {
	if (typeof x !== 'number') {
		throw new TypeError('The `x` argument is required');
	}

	if (typeof y !== 'number') {
		return ESC + (x + 1) + 'G';
	}

	return ESC + (y + 1) + ';' + (x + 1) + 'H';
};

x.cursorMove = (x, y) => {
	if (typeof x !== 'number') {
		throw new TypeError('The `x` argument is required');
	}

	let ret = '';

	if (x < 0) {
		ret += ESC + (-x) + 'D';
	} else if (x > 0) {
		ret += ESC + x + 'C';
	}

	if (y < 0) {
		ret += ESC + (-y) + 'A';
	} else if (y > 0) {
		ret += ESC + y + 'B';
	}

	return ret;
};

x.cursorUp = count => ESC + (typeof count === 'number' ? count : 1) + 'A';
x.cursorDown = count => ESC + (typeof count === 'number' ? count : 1) + 'B';
x.cursorForward = count => ESC + (typeof count === 'number' ? count : 1) + 'C';
x.cursorBackward = count => ESC + (typeof count === 'number' ? count : 1) + 'D';

x.cursorLeft = ESC + 'G';
x.cursorSavePosition = ESC + (isTerminalApp ? '7' : 's');
x.cursorRestorePosition = ESC + (isTerminalApp ? '8' : 'u');
x.cursorGetPosition = ESC + '6n';
x.cursorNextLine = ESC + 'E';
x.cursorPrevLine = ESC + 'F';
x.cursorHide = ESC + '?25l';
x.cursorShow = ESC + '?25h';

x.eraseLines = count => {
	let clear = '';

	for (let i = 0; i < count; i++) {
		clear += x.eraseLine + (i < count - 1 ? x.cursorUp() : '');
	}

	if (count) {
		clear += x.cursorLeft;
	}

	// fs.writeFileSync('log.txt', JSON.stringify(clear), {flag: 'a'});
	return clear;
};

x.eraseEndLine = ESC + 'K';
x.eraseStartLine = ESC + '1K';
x.eraseLine = ESC + '2K';
x.eraseDown = ESC + 'J';
x.eraseUp = ESC + '1J';
x.eraseScreen = ESC + '2J';
x.scrollUp = ESC + 'S';
x.scrollDown = ESC + 'T';

x.clearScreen = '\u001Bc';

x.clearTerminal = process.platform === 'win32' ?
	`${x.eraseScreen}${ESC}0f` :
	// 1. Erases the screen (Only done in case `2` is not supported)
	// 2. Erases the whole screen including scrollback buffer
	// 3. Moves cursor to the top-left position
	// More info: https://www.real-world-systems.com/docs/ANSIcode.html
	`${x.eraseScreen}${ESC}3J${ESC}H`;

x.beep = BEL;

x.link = (text, url) => {
	return [
		OSC,
		'8',
		SEP,
		SEP,
		url,
		BEL,
		text,
		OSC,
		'8',
		SEP,
		SEP,
		BEL
	].join('');
};

x.image = (buf, opts) => {
	opts = opts || {};

	let ret = OSC + '1337;File=inline=1';

	if (opts.width) {
		ret += `;width=${opts.width}`;
	}

	if (opts.height) {
		ret += `;height=${opts.height}`;
	}

	if (opts.preserveAspectRatio === false) {
		ret += ';preserveAspectRatio=0';
	}

	return ret + ':' + buf.toString('base64') + BEL;
};

x.iTerm = {};

x.iTerm.setCwd = cwd => OSC + '50;CurrentDir=' + (cwd || process.cwd()) + BEL;
其实有经验的同学一眼就看出来是怎么回事了:
就是利用ANSI控制码控制终端操作。可以看看常用ANSI控制码。
比如说:
我先输出内容: abc\n123\n666\nXXX
然后我在一秒后再输出:\u001B[2K\u001B[1A\u001B[2K\u001B[1A\u001B[2K\u001B[1A\u001B[2Kcontent
最终输出结果就是:
(一开始)
abc
123
666
XXX
(一秒后)
abc
content
简单地描述这两个控制码:\u001B[2K :清除整行,光标不动;\u001B[nA :光标上移n行;
经过控制码的组合和逻辑的控制,即可实现 inquirer.js 的交互功能。
草草结束,文章太长写起来有点卡了。
Github 仓库地址:github.com/scott-leung…
本来想自己实现一个简单的 inquirer.js 的,但是时间原因,后面有时间再说吧☺️。
参考文章:
[1] RxJS v6 学习指南
[2] 常用ANSI控制码表
欢迎转载,转载时请标注来源出处。
Scott Leung(响萤)
