


AnnotationConfigApplicationContext
1.应用
1.1 使用方式
使用方式一:这种方式也是现在项目中经常用到的方式,从这篇文章开始,就正式进入到 Spring IOC 源码解析。。。
public class MyTestStart {
 public static void main(String[] args) {
  ApplicationContext ann = new AnnotationConfigApplicationContext(MyConfig.class);
  MyService myService = ann.getBean(MyService.class);
  myService.test();
 }
}
使用方式二:以编程的方式构建 AnnotationConfigApplicationContext,通过无参构造器初始化,然后通过 Register 方法
注册。
public class MyTestStart {
     public static void main(String[] args) {
         AnnotationConfigApplicationContext ctx = new AnnotationConfigApplicationContext();
         ctx.register(MyConfig.classs);
         ctx.refresh();
         MyService myService = ctx.getBean(MyService.class);
         myService.test();
     }
}
当然也可以通过使用包扫描的方式,来使用 AnnotationConfigApplicationContext。
public class MyTestStart {
     public static void main(String[] args) {
         AnnotationConfigApplicationContext ctx = new AnnotationConfigApplicationContext();
         ctx.scan("com.fchen");
         ctx.refresh();
         MyService myService = ctx.getBean(MyService.class);
         myService.test();
     }
}
1.2 配置类
@Configuration
@ComponentScan("com.fchen")
public class MyConfig {

}
1.3 Service类
@Service
public class MyService {

 private Logger log = LoggerFactory.getLogger(MyService.class);
 public void test(){
  System.out.println("Hello,MyService");
 }
}
2.源码解析
2.1 类关系图
还是熟悉的套路,在看源码之前,先看类关系图,先整体后细节。类关系图如下:
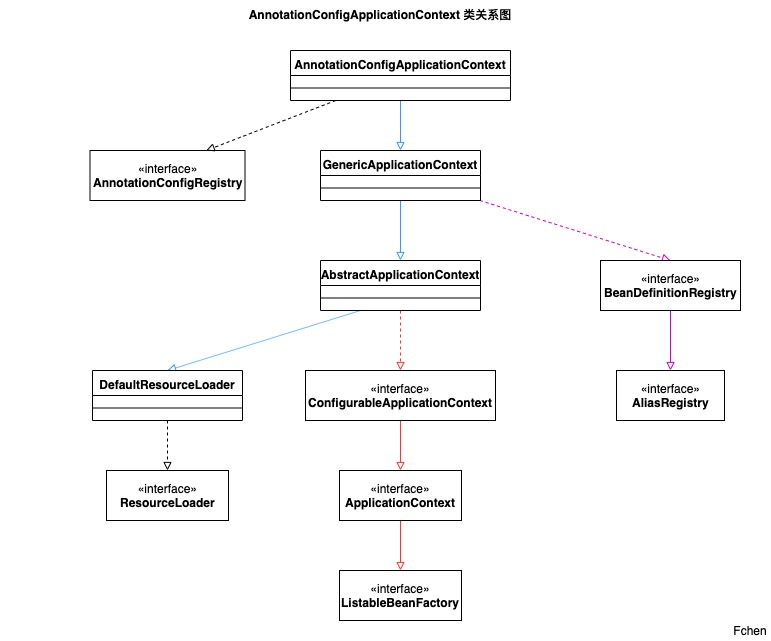
- 1.从红色的线可以看出,这个 IOC 容器是属于
ApplicationContext这一条设计路线,这就意味着他的功能更加的丰富。 - 2.从蓝色的这条线可以看出,该类同样是
Resource的子类实现。关于Spring 中资源与资源加载的文章,上一篇文章中有详细介绍。 - 3.紫色这条线,还没有学习到,但是这一路劲也是极为重要,实现完成BeanDefinition向容器中注册。
- 4.最后上述的 使用方式二 之所以可以这样使用是应为 实现了
AnnotationConfigRegistry这个接口。通过register ()完成编程式使用AnnotationConfigApplicationContext。
2.2 源码实现
从容器的使用来看,都是通过 ApplicationContext ann = new AnnotationConfigApplicationContext("XXX"); 来完成容器的初始化。
就从这里入手,来一点点揭开 AnnotationConfigApplicationContext 的神秘面纱...
有参构造方法
public AnnotationConfigApplicationContext(Class<?>... componentClasses) {
    /**
     * 调用默认的构造方法,由于该类有父类,
     * 故而先调用父类的构造方法,在调用自己的构造方法
     * 在自己的构造方法中初始一个读取器和一个扫描器,
     * 第①部分!!!
     */
    this();
    /**
     * 向spring 的容器中注册bean
     * 第②部分!!!
     */
    register(componentClasses);
    /**
     * 初始化spring的环境
     * 第③部分!!!
     */
    refresh();
}
有参构造方法
public AnnotationConfigApplicationContext() {
    /**
     * 实例化 读取器
     * 将spring中加了注解的类转化为 一个 spring当中bean的描述文件
     */
    this.reader = new AnnotatedBeanDefinitionReader(this);
    /**
     * 实例化 扫描器
     * 能够扫描一个类,并转换为 spring当中bean的描述文件
     * 不通过显示的调用scanner的方法的情况下,spring中的包不是由该scanner扫描
     * 而是由Spring 在实例化 AnnotatedBeanDefinitionReader时
     *   自己new的一个 ClasspathBeanDefinitionScanner 对象扫描完成的
     * 即:这里初始化的扫描器通过程序员显示的调用才会生效。
     */
    this.scanner = new ClassPathBeanDefinitionScanner(this);
}
在有惨的构造方法中,方法的调用逻辑分为三个部分,在后面的文章中都会有详细的介绍。在无参数的构造方法中主要是完成了
读取器 与 扫描器 的初始化。他们在类中的定义如下:
 /**
 * 定义一个读取被加了注解的 bean的读取器
 */
private final AnnotatedBeanDefinitionReader reader;

/**
 * 定义一个包的扫描器
 */
private final ClassPathBeanDefinitionScanner scanner;
AnnotatedBeanDefinitionReader 为通过编程的方式注册 Bean 提供适配,将spring中加了注解的类转化为一个 spring 当中 Bean
的描述文件。当然最终的注册都是通过 BeanDefinitionRegistry 来完成的。
ClassPathBeanDefinitionScanner 将定义在类路径上的 Bean 转化为一个spring 当中 Bean 的描述文件,同样最终的注册都是
通过BeanDefinitionRegistry 来完成的。
以AnnotationConfigApplicationContext 为IoC容器的实现,容器初始化图:
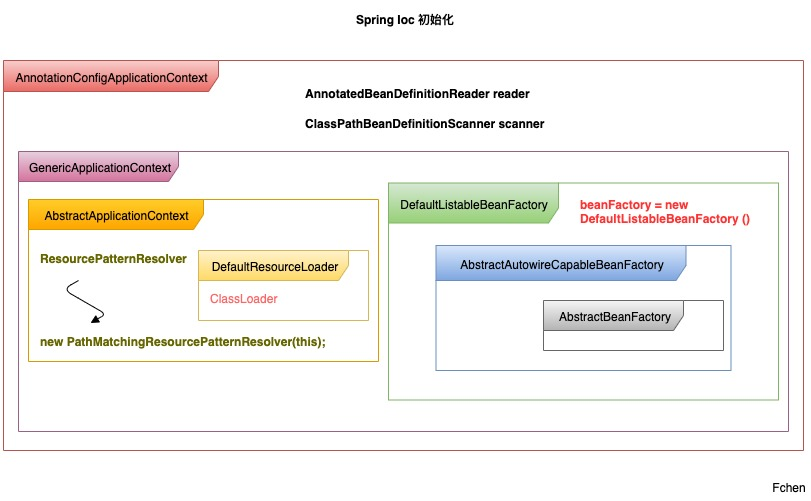
本文使用 mdnice 排版
