


Netty 给Java开发者编写客户端或者服务器端提供了很好的API编程方式,用户只需要关注两个对象, 一个是事件一个是数据包, 所以开发起来还是相当轻松的, 他已经将事件封装好了 , 对于数据包提供了很多的编解码器 ,值得我们深度学习
像主流的Dubbo这种RPC框架也是基于Netty做的CS端, 像WebFlux也是Netty做的Http服务器 ,所以学习还是很有必要的,
其中快速入门可以看一下官网: netty.io/wiki/user-g… ,所以流程编写自己看文档吧
1. 前期准备
就是依赖 ,和日志配置
<!-- netty jar 包-->
<dependency>
    <groupId>io.netty</groupId>
    <artifactId>netty-all</artifactId>
    <version>4.1.36.Final</version>
</dependency>


<!--log4j 日志 , 记得加入 log4j.properties-->
<dependency>
    <groupId>org.slf4j</groupId>
    <artifactId>slf4j-log4j12</artifactId>
    <version>1.7.21</version>
</dependency>
<dependency>
    <groupId>org.slf4j</groupId>
    <artifactId>slf4j-api</artifactId>
    <version>1.7.21</version>
</dependency>
log4j.properties 放到 classPath 目录下面 , maven的话就是 resources 目录下面
# 可以设置level INFO ERROR DEBUG 之类
log4j.rootCategory=INFO,CONSOLE,LOGFILE

log4j.logger.org.apache.axis.enterprise=FATAL,CONSOLE
log4j.appender.CONSOLE=org.apache.log4j.ConsoleAppender
log4j.appender.CONSOLE.layout=org.apache.log4j.PatternLayout
log4j.appender.CONSOLE.layout.ConversionPattern=%d{ISO8601} %-6r [%6.6t] %-5p %30.30c %x - %m\n


##输出到文件(这里默认为追加方式)
log4j.appender.LOGFILE=org.apache.log4j.FileAppender
## 设置文件输出路径 ,文本文件 , 注意是 usr.dir , 不是user.dir
log4j.appender.LOGFILE.File=${usr.dir}\log4J.log
log4j.appender.LOGFILE.Append=true
log4j.appender.LOGFILE.layout=org.apache.log4j.PatternLayout
log4j.appender.LOGFILE.layout.ConversionPattern=%d{ISO8601} %-6r [%6.6t] %-5p %30.30c %x - %m\n
2. Netty 服务端实现

实现代码 , 这是最基本的实现流程, 细节化后续讨论
public class NettyServer {
    private static final Logger logger = LoggerFactory.getLogger(NettyServer.class);

    public static void ruu() throws Exception {

        // 这个只需要一个线程
        final NioEventLoopGroup master = new NioEventLoopGroup(1);

        // 一般根据系统有core来设置
        final NioEventLoopGroup worker = new NioEventLoopGroup(Runtime.getRuntime().availableProcessors());

        // ServerBootstrap
        final ServerBootstrap serverBootstrap = new ServerBootstrap();
		// handler
        final ServerHandler serverHandler = new ServerHandler();

        // configuration
        serverBootstrap.group(master, worker)
                .channel(NioServerSocketChannel.class)
                .childHandler(new ChannelInitializer<Channel>() {
                    @Override
                    protected void initChannel(Channel ch) throws Exception {
                        //注意 :  这个会在每一次客户端连接都会初始化一次 , 后续我会讲Sharable的作用
                        ChannelPipeline pipeline = ch.pipeline();
                        pipeline.addLast("serverHandler", serverHandler);
                    }
                })
                .childOption(ChannelOption.TCP_NODELAY, true)
                .childOption(ChannelOption.SO_KEEPALIVE, true);

        final String host = "127.0.0.1";
        final int port = 8888;

        try {
            // bind  and connect
            ChannelFuture channelFuture = serverBootstrap.bind(host, port).addListener(future -> {
                if (future.isSuccess()) {
                    logger.info("[服务器] 启动成功 host: {} port :{} ", host, port);
                } else {
                    logger.error("[服务器] 启动失败 exception : {} ", future.cause().getMessage());
                }
            });
            // Wait until the server socket is closed.
            channelFuture.channel().closeFuture().sync();
        } finally {
            // shut down your server.
            master.shutdownGracefully();
            worker.shutdownGracefully();
            logger.info("[服务器] 成功关闭");
        }
    }
    @ChannelHandler.Sharable
    private static class ServerHandler extends ChannelInboundHandlerAdapter {

        // 计数器
        private AtomicInteger counter = new AtomicInteger();

        @Override
        public void channelRegistered(ChannelHandlerContext ctx) throws Exception {
            logger.info("[服务器] 客户端注册成功 : {}", ctx.channel().remoteAddress().toString());
            ctx.writeAndFlush(Unpooled.copiedBuffer("欢迎你 , 注册成功", CharsetUtil.UTF_8));
        }

        @Override
        public void handlerRemoved(ChannelHandlerContext ctx) throws Exception {
            // 客户端,服务器端正常关闭会执行这个
            ctx.close();
            logger.info("[服务器] 客户端移除成功 : {}", ctx.channel().remoteAddress().toString());
        }

        @Override
        public void exceptionCaught(ChannelHandlerContext ctx, Throwable cause) throws Exception {
            if (cause instanceof IOException) {
                // 客户端异常关闭
                ctx.close();
            } else {
                ctx.fireExceptionCaught(cause);
            }
        }

        @Override
        public void channelRead(ChannelHandlerContext ctx, Object msg) throws Exception {
            if (msg instanceof ByteBuf) {
                ByteBuf buf = (ByteBuf) msg;
                String info = Util.byteBufToString(buf);
                logger.info("[服务器] 接收到信息 : {} ,  count : {} .", info, counter.incrementAndGet());
            }
        }
    }
}
3. Netty 客户端流程

这个是最基本的实现代码 ,
public class NettyClient {
    private static final Logger logger = LoggerFactory.getLogger(NettyClient.class);

    public static void run() throws Exception {

        final NioEventLoopGroup worker = new NioEventLoopGroup(1);

        final Bootstrap bootstrap = new Bootstrap();

        final ClientHandler clientHandler = new ClientHandler();

        bootstrap.group(worker)
                .channel(NioSocketChannel.class)
                .handler(new ChannelInitializer<Channel>() {
                    @Override
                    protected void initChannel(Channel ch) throws Exception {
                        ch.pipeline().addLast("clientHandler", clientHandler);
                    }
                });


        final String host = "127.0.0.1";
        final int port = 8888;


        try {
            // 这个 ChannelFuture 对象可以像服务器端传输数据
            final ChannelFuture channelFuture = bootstrap.connect(host, port).addListener(new GenericFutureListener<Future<? super Void>>() {
                @Override
                public void operationComplete(Future<? super Void> future) throws Exception {
                    if (future.isSuccess()) {
                        logger.info("[客户端] 启动成功  host : {} port : {}. ", host, port);
                    } else {
                        logger.info("[客户端] 启动失败 exception : {}", future.cause().getMessage());
                    }
                }
            });
            // 阻塞的下面
            channelFuture.channel().closeFuture().sync();
        } finally {
            worker.shutdownGracefully();
            logger.info("[客户端] 关闭成功");
        }

    }


    private static class ClientHandler extends ChannelInboundHandlerAdapter {

        // 无所谓其实, 因为他只能是一个人用一个
        @Override
        public boolean isSharable() {
            return true;
        }

        @Override
        public void channelRegistered(ChannelHandlerContext ctx) throws Exception {
            logger.info("[客户端] 开始注册");
        }

        @Override
        public void channelActive(ChannelHandlerContext ctx) throws Exception {
            logger.info("[客户端] 注册成功 IP : {}", ctx.channel().remoteAddress().toString());
        }

        @Override
        public void exceptionCaught(ChannelHandlerContext ctx, Throwable cause) throws Exception {
            if (cause instanceof IOException) {
                ctx.close();
            }
        }

        @Override
        public void handlerRemoved(ChannelHandlerContext ctx) throws Exception {
            if (ctx.channel().remoteAddress() != null) {
                logger.info("[客户端] 关闭连接  IP : {}", ctx.channel().remoteAddress().toString());
            }
        }


        @Override
        public void channelRead(ChannelHandlerContext ctx, Object msg) throws Exception {
            if (msg instanceof ByteBuf) {
                ByteBuf buf = (ByteBuf) msg;
                String info = Util.byteBufToString(buf);
                logger.info("[客户端] 接收到服务器信息 : {}.", info);
            } else {
                super.channelRead(ctx, msg);
            }
        }
    }
}
4. 测试启动
1. 工具类
就是将ByteBuf 反序列化成 String , 注意需要release , 同时最好将bytes数组释放 , 细节
public class Util {
    // ByteBuf -> String
    public static String byteBufToString(@NotNull ByteBuf buf) {
        byte[] bytes = new byte[buf.readableBytes()];
        buf.readBytes(bytes);
        String info = new String(bytes, CharsetUtil.UTF_8);
        // 这里需要释放
        buf.release();
        bytes = null;
        return info;
    }
}
2. 启动类
public class ServerBoot {
    public static void main(String[] args) {
        NettyServer.ruu();
    }
}

public class ClientBoot {
    public static void main(String[] args) {
        NettyClient.run();
    }
}
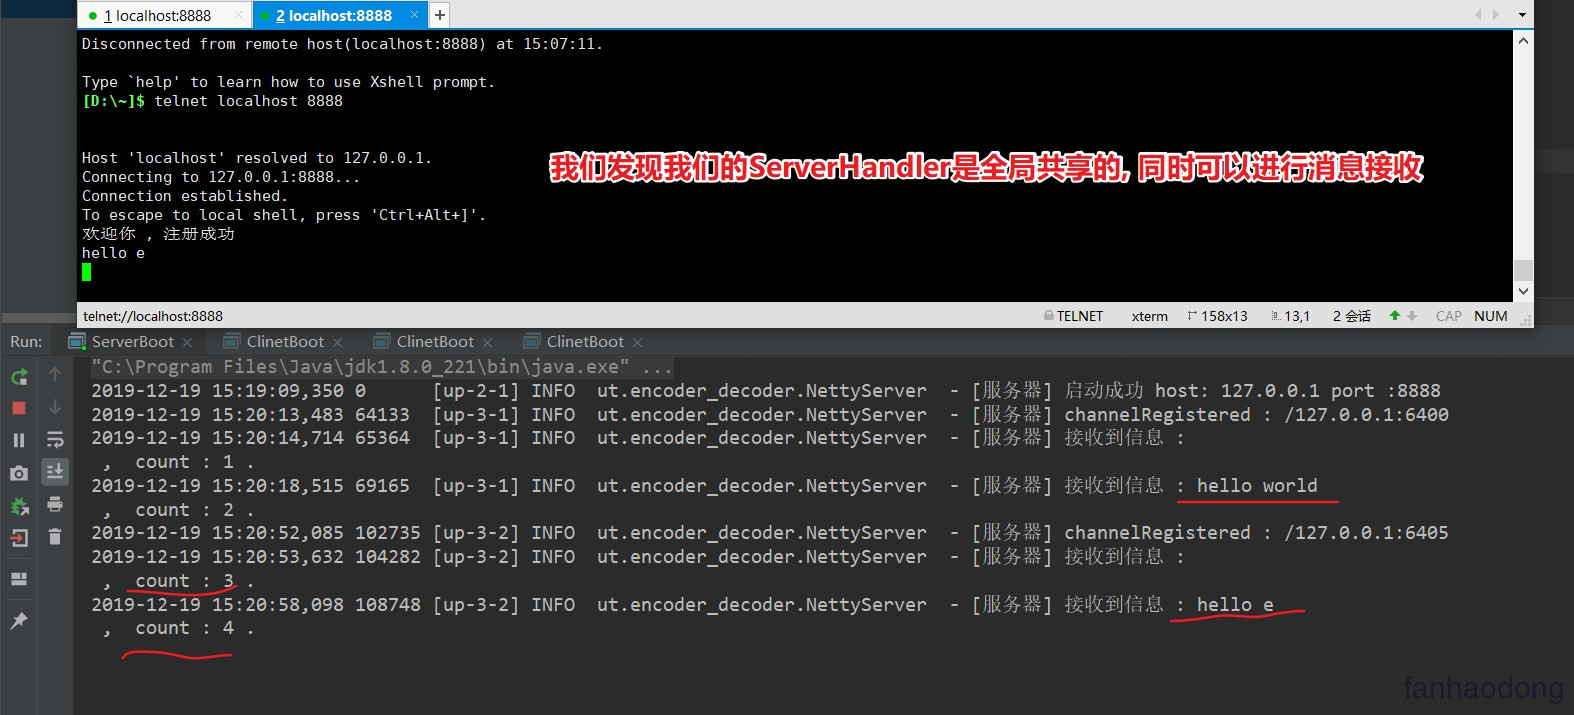
3. telnet 测试
启动 服务器端 , 然后 telnet测试 , 我们这里连接了两个
4. 客户端测试
客户端启动
2019-12-19 15:23:41,990 0      [up-2-1] INFO  ut.encoder_decoder.NettyClient  - [客户端] 开始注册
2019-12-19 15:23:41,997 7      [up-2-1] INFO  ut.encoder_decoder.NettyClient  - [客户端] 启动成功  host : 127.0.0.1 port : 8888.
2019-12-19 15:23:41,997 7      [up-2-1] INFO  ut.encoder_decoder.NettyClient  - [客户端] 注册成功 IP : /127.0.0.1:8888
2019-12-19 15:23:42,020 30     [up-2-1] INFO  ut.encoder_decoder.NettyClient  - [客户端] 接收到服务器信息 : 欢迎你 , 注册成功.
发现OK ,这就是一个简单的Java程序 , 是不是很简单
5. NioEventLoopGroup
事件循环组, 其实就是一个线程, 去监听端口, 其中注意 worker线程数一般设置为 当前计算机CPU的1倍数量或者两倍
6. ServerBootstrap / Bootstrap
启动器 , Netty对外暴露的接口 , 需要启动器中配置各种参数
7. ChannelFuture
其实基本拿到这个对象就可以进行写操作了 , 可以通过
ChannelFuture.channel()方法获取管道对象进行读写操作 , 一般客户端使用
下面是几个回调状态
The result of an asynchronous operation. 异步操作的返回结果. 就是一个线程操作的回调结果 future链接
public interface Future extends java.util.concurrent.Future {}
- 我们发现他是继承 juc中的future 的 , juc的future 可以看我的这个 文章 连接
- 同时 future 也拓展了一些方法 (这里我就大致的去描述,因为源码文档真的很详细)
- boolean isSuccess(); 返回trur,只有当io操作成功时
- boolean isCancellable(); 取消
- Future addListener(GenericFutureListener<? extends Future<? super V>> listener); 添加监听器,这个很重要的,当这个io操作完成时,会立刻通知,
- Future sync() throws InterruptedException; Waits for this future until it is done, 等待这个结果知道这个结果已经完成
- Future await() 等待future完成 .线程阻塞,可能发生死锁 ,不建议使用
我们看看 他的接口 ChannelFuture
下面这个文档描述的是 future已经完成状态返回结果 和 未完成的结果,很详细
 *                                      +---------------------------+
 *                                      | Completed successfully    |
 *                                      +---------------------------+
 *                                 +---->      isDone() = true      |
 * +--------------------------+    |    |   isSuccess() = true      |
 * |        Uncompleted       |    |    +===========================+
 * +--------------------------+    |    | Completed with failure    |
 * |      isDone() = false    |    |    +---------------------------+
 * |   isSuccess() = false    |----+---->      isDone() = true      |
 * | isCancelled() = false    |    |    |       cause() = non-null  |
 * |       cause() = null     |    |    +===========================+
 * +--------------------------+    |    | Completed by cancellation |
 *                                 |    +---------------------------+
 *                                 +---->      isDone() = true      |
 *                                      | isCancelled() = true      |
 *                                      +---------------------------+
8. Bytebuf
数据传输对象, 默认的是 , 我们需要对他进行加工修饰 , 可以认为他是一个底层的数据包
后期我会详细解释
9. ChannelHandler
可以认为是ByteBuf的处理器, 对数据包的处理器 , 后续会详细介绍
主要分为两个大的实现类
ChannelInboundHandler
ChannelOutboundHandler
10. Netty 中常规Option配置总结
1. 官方配置 :  一个是请求连接数 一个是心跳检测
.option(ChannelOption.SO_BACKLOG, 128)   // (5)
.childOption(ChannelOption.SO_KEEPALIVE, true) // (6)

ServerBootstrap serverBootstrap = new ServerBootstrap();
1.配置一
serverBootstrap.option(ChannelOption.SO_BACKLOG, 1024);

2. 配置二
 serverBootstrap.option(ChannelOption.SO_REUSEADDR, true);

3. 配置三
 serverBootstrap.option(ChannelOption.TCP_NODELAY, true);

4. 配置四
  serverBootstrap.option(ChannelOption.SO_KEEPALIVE, false);

5. 配置五
  serverBootstrap.option(ChannelOption.SO_RCVBUF,1024*8);
  serverBootstrap.option(ChannelOption.SO_SNDBUF,1024*8);
-
配置一(ChannelOption.SO_BACKLOG) 就是三次握手
服务器端TCP内核模块维护有2个队列,我们称之为A,B吧,客户端向服务端connect的时候,发送带有SYN标志的包(第一次握手),服务端收到客户端发来的SYN时,向客户端发送SYN ACK 确认(第二次握手),此时TCP内核模块把客户端连接加入到A队列中,然后服务器收到客户端发来的ACK时(第三次握手)TCP把客户端连接从A队列移到B队列,连接完成,应用程序的accept会返回,也就是说accept从B队列中取出完成三次握手的连接,A队列和B队列的长度之和是backlog,当A,B队列的长之和大于backlog时,新连接将会被TCP内核拒绝,所以,如果backlog过小,可能会出现accept速度跟不上,A.B 队列满了,导致新客户端无法连接,要注意的是,backlog对程序支持的连接数并无影响,backlog影响的只是还没有被accept 取出的连接
-
配置二(ChannelOption.SO_REUSEADDR) reused address 重复使用地址
参数表示允许重复使用本地地址和端口, 比如,某个服务器进程占用了TCP的80端口进行监听,此时再次监听该端口就会返回错误, 使用该参数就可以解决问题,该参数允许共用该端口,这个在服务器程序中比较常使用,比如某个进程非正常退出,该程序占用的端口可能要被占用一段时间才能允许其他进程使用,而且程序死掉以后,内核一需要一定的时间才能够释放此端口,不设置SO_REUSEADDR 就无法正常使用该端口
-
配置三(ChannelOption.TCP_NODELAY)
解释:是否启用Nagle算法,该算法将小的碎片数据连接成更大的报文来最小化所发送的报文的数量。
使用建议:如果需要发送一些较小的报文,则需要禁用该算法,从而最小化报文传输延时。只有在网络通信非常大时(通常指已经到100k+/秒了),设置为false会有些许优势,因此建议大部分情况下均应设置为true。
-
配置四(SO_KEEPALIVE)
**解释:**是否使用TCP的心跳机制; 使用建议: 心跳机制由应用层自己实现;
-
配置五 (SO_SNDBUF) 同 (SO_RCVBUF)
解释: Socket参数,TCP数据发送缓冲区大小,即TCP发送滑动窗口,linux操作系统可使用命令:cat /proc/sys/net/ipv4/tcp_smem查询其大小。缓冲区的大小决定了网络通信的吞吐量(网络吞吐量=缓冲区大小/网络时延)。
使用建议: 缓冲区大小设为网络吞吐量达到带宽上限时的值,即缓冲区大小=网络带宽*网络时延。以千兆网卡为例进行计算,假设网络时延为1ms,缓冲区大小=1000Mb/s * 1ms = 128KB。
-
还有很多, 不过多解释了
