

1、哈希表概述
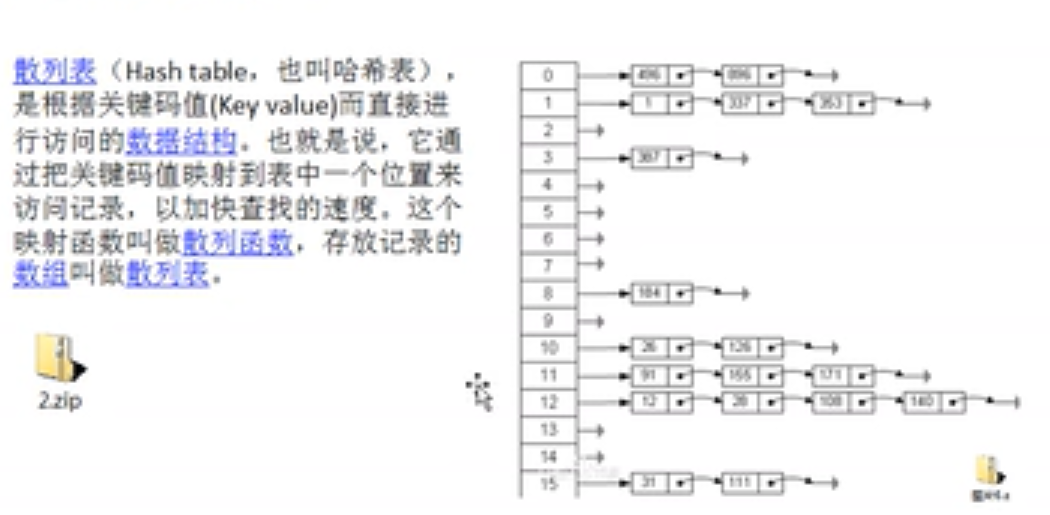
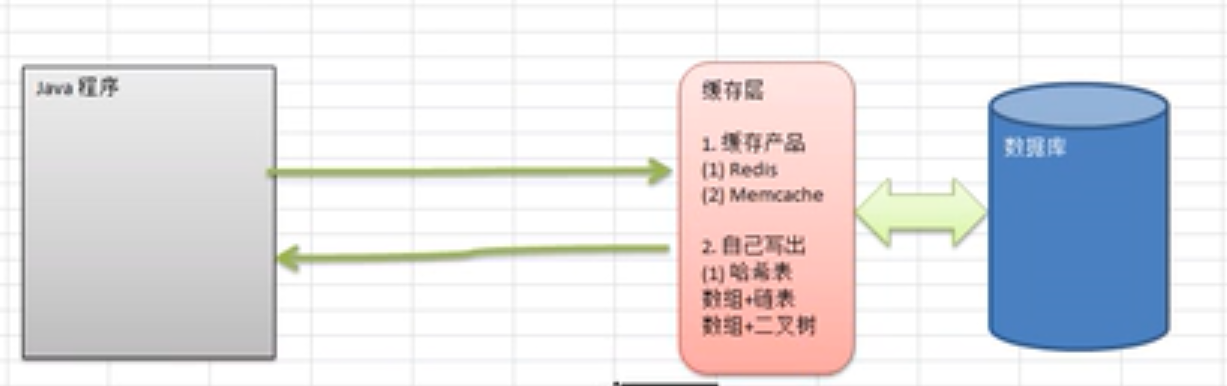
2、哈希表用途
哈希表作为轻量级的缓存产品使用,本片博客使用数组+链表方式构造hashtable
3、谷歌面试题

4、代码实现
第一步:编写雇员类
Emp.java
//雇员类
class Emp {
	public Integer id;
	public String name;
	// 指向下一个雇员的节点
	public Emp next; // 默认为null

	public Emp(Integer id, String name) {
		super();
		this.id = id;
		this.name = name;
	}
}
第二步:编写单个链表类
部分方法如下
添加雇员 (链表尾插法)
	// 添加雇员,id是自增的,依次向后添加
	public void addEmp(Emp emp) {
		// 判断是否为第一个雇员
		if (head == null) {
			head = emp;
			return;
		}
		// 不是第一个雇员,需要一个辅助指针,帮助定位到最后
		Emp curEmp = head;
		while (true) {
			if (curEmp.next == null) {
				break; // 说明到链表的最后
			}
			curEmp = curEmp.next; // 后移
		}
		curEmp.next = emp;// 退出时直接将emp加入到链表
	}
删除雇员
// 根据id删除雇员
	public void delEmp(int id) {
		// 判断链表是否为null
		if (head == null) {
			System.out.println("链表为空");
			return;
		}
		// 定义临时指针
		Emp curEmp = head;
		// 设置变量
		boolean flag = false;
		while (true) {
			if (curEmp.id == id) {
				System.out.println("由于是单向链表,您不能删除自己,只能删除下一个节点!");
				return;
			}
			if (curEmp.next.id == id) {
				flag = true;
				break;
			}
			// 查找到最后,没有找到
			if (curEmp.next == null) {
				break;
			}
			// 后移
			curEmp = curEmp.next;
		}
		if (flag) {
			System.out.printf("编号为%d的员工已经删除\n", id);
			curEmp.next = curEmp.next.next;
		} else {
			System.out.printf("编号为%d的员工不存在\n", id);
		}
	}
修改雇员
// 修改员工信息
	public void updateEmp(Emp emp) {
		// 判断链表是否为null
		if (head == null) {
			System.out.println("链表为空");
			return;
		}
		// 定义临时节点
		Emp curEmp = head;
		// 定义找到标记
		boolean flag = false;
		while (true) {
			if (curEmp.id == emp.id) {
				flag = true;
				break;
			}
			// 找到最后没有找到
			if (curEmp.next == null) {
				break;
			}
			curEmp = curEmp.next;
		}
		if (flag) {
			curEmp.name = emp.name;
			System.out.println("修改成功!");
		} else {
			System.out.printf("编号为%d的员工不存在,不能修改\n", emp.id);
		}
	}
查找雇员
// 根据id查找雇员
	public Emp findById(int id) {
		// 判断链表是否为null
		if (head == null) {
			System.out.println("链表为空");
			return null;
		}
		// 定义临时指针
		Emp curEmp = head;
		while (true) {
			// 找到雇员
			if (curEmp.id == id) {
				break;
			}
			// 查找到最后,没有找到该员工
			if (curEmp.next == null) {
				curEmp = null;
				break;
			}
			// 后移
			curEmp = curEmp.next;
		}
		return curEmp;
	}
遍历雇员
// 遍历
	public void list(int no) {
		// 判断链表是否为null
		if (head == null) {
			System.out.println("第" + (no + 1) + "链表为null");
			return;
		}
		System.out.println("第" + (no + 1) + "雇员的信息:\n");
		// 定义辅助指针
		Emp curEmp = head;
		while (true) {
			System.out.printf("=> id=%d name=%s\t", curEmp.id, curEmp.name);
			if (curEmp.next == null) { // 说明curEmp.next已经到最后节点
				break;
			}
			// 后移遍历
			curEmp = curEmp.next;
		}
		System.out.println();
	}
单个链表全部代码如下:
EmpLinkListed.java
//表示链表
class EmpLinkListed {
	// 头指针,指向第一个emp,因此我们第一个头是指向第一个emp
	private Emp head;

	// 添加雇员,id是自增的,依次向后添加
	public void addEmp(Emp emp) {
		// 判断是否为第一个雇员
		if (head == null) {
			head = emp;
			return;
		}
		// 不是第一个雇员,需要一个辅助指针,帮助定位到最后
		Emp curEmp = head;
		while (true) {
			if (curEmp.next == null) {
				break; // 说明到链表的最后
			}
			curEmp = curEmp.next; // 后移
		}
		curEmp.next = emp;// 退出时直接将emp加入到链表
	}

	// 遍历
	public void list(int no) {
		// 判断链表是否为null
		if (head == null) {
			System.out.println("第" + (no + 1) + "链表为null");
			return;
		}
		System.out.println("第" + (no + 1) + "雇员的信息:\n");
		// 定义辅助指针
		Emp curEmp = head;
		while (true) {
			System.out.printf("=> id=%d name=%s\t", curEmp.id, curEmp.name);
			if (curEmp.next == null) { // 说明curEmp.next已经到最后节点
				break;
			}
			// 后移遍历
			curEmp = curEmp.next;
		}
		System.out.println();
	}

	// 根据id查找雇员
	public Emp findById(int id) {
		// 判断链表是否为null
		if (head == null) {
			System.out.println("链表为空");
			return null;
		}
		// 定义临时指针
		Emp curEmp = head;
		while (true) {
			// 找到雇员
			if (curEmp.id == id) {
				break;
			}
			// 查找到最后,没有找到该员工
			if (curEmp.next == null) {
				curEmp = null;
				break;
			}
			// 后移
			curEmp = curEmp.next;
		}
		return curEmp;
	}

	// 根据id删除雇员
	public void delEmp(int id) {
		// 判断链表是否为null
		if (head == null) {
			System.out.println("链表为空");
			return;
		}
		// 定义临时指针
		Emp curEmp = head;
		// 设置变量
		boolean flag = false;
		while (true) {
			if (curEmp.id == id) {
				System.out.println("由于是单向链表,您不能删除自己,只能删除下一个节点!");
				return;
			}
			if (curEmp.next.id == id) {
				flag = true;
				break;
			}
			// 查找到最后,没有找到
			if (curEmp.next == null) {
				break;
			}
			// 后移
			curEmp = curEmp.next;
		}
		if (flag) {
			System.out.printf("编号为%d的员工已经删除\n", id);
			curEmp.next = curEmp.next.next;
		} else {
			System.out.printf("编号为%d的员工不存在\n", id);
		}
	}

	// 修改员工信息
	public void updateEmp(Emp emp) {
		// 判断链表是否为null
		if (head == null) {
			System.out.println("链表为空");
			return;
		}
		// 定义临时节点
		Emp curEmp = head;
		// 定义找到标记
		boolean flag = false;
		while (true) {
			if (curEmp.id == emp.id) {
				flag = true;
				break;
			}
			// 找到最后没有找到
			if (curEmp.next == null) {
				break;
			}
			curEmp = curEmp.next;
		}
		if (flag) {
			curEmp.name = emp.name;
			System.out.println("修改成功!");
		} else {
			System.out.printf("编号为%d的员工不存在,不能修改\n", emp.id);
		}
	}
}
第三步:hashtable类,管理多条链表
本次hashtable使用数组+链表方式,使用hash函数(取模运算),分布存储id在多个链表上
//创建HashTab,管理多条链表
class HashTab {
	private EmpLinkListed[] empLinkListeds;
	private int size;// 每个链表的大小

	public HashTab(int size) {
		this.size = size;
		// 构造hash表
		empLinkListeds = new EmpLinkListed[size];
		// 不要忘记给每个链表进行构造
		for (int i = 0; i < size; i++) {
			empLinkListeds[i] = new EmpLinkListed();
		}
	}

	// 添加员工
	public void add(Emp emp) {
		int empLinkListNo = hashfun(emp.id);
		empLinkListeds[empLinkListNo].addEmp(emp);
	}

	// 遍历链表
	public void list() {
		for (int i = 0; i < empLinkListeds.length; i++) {
			empLinkListeds[i].list(i);
		}
	}

	// 根据id查找雇员信息
	public void findById(int id) {
		// 根据散列函数查找当前链表
		int EmpLinkListNo = hashfun(id);
		// 查找员工信息
		Emp emp = empLinkListeds[EmpLinkListNo].findById(id);
		if (emp != null) {
			System.out.printf("在第%d条链表中找到 编号id=%d\n", (EmpLinkListNo + 1), id);
		} else {
			System.out.println("在哈希表中没有找到该雇员!");
		}
	}

	// 根据id删除雇员信息
	public void delEmp(int id) {
		// 根据散列函数查找当前链表
		int EmpLinkListNo = hashfun(id);
		// 删除员工
		empLinkListeds[EmpLinkListNo].delEmp(id);
	}

	// 修改雇员信息
	public void updateEmp(Emp emp) {
		// 根据散列函数查找当前链表
		int EmpLinkListNo = hashfun(emp.id);
		// 修改员工
		empLinkListeds[EmpLinkListNo].updateEmp(emp);
	}

	// hash函数
	public int hashfun(int id) {
		return id % size;
	}
}
第四步:整体代码如下:
package com.baoji.hashtab;

import java.util.Scanner;

/**
 * 哈希表: 存放员工的信息: 要求:不能使用数据库,使用哈希表存放数据,当作缓存使用
 *
 * @author LinChi
 *
 */
public class HashTabDemo {

	public static void main(String[] args) {
		// 创建HashTab
		HashTab hashTab = new HashTab(7);
		String key = "";
		Scanner sc = new Scanner(System.in);
		while (true) {
			System.out.println("请输入以下选择:");
			System.out.println("add: 添加员工");
			System.out.println("delete: 删除员工");
			System.out.println("update: 修改员工");
			System.out.println("search: 查找员工");
			System.out.println("list: 显示员工");
			System.out.println("exit: 退出系统");
			key = sc.next();
			switch (key) {
			case "add":
				System.out.println("请输入员工编号:");
				int id = sc.nextInt();
				System.out.println("请输入员工姓名:");
				String name = sc.next();
				Emp emp = new Emp(id, name);
				hashTab.add(emp);
				break;
			case "list":
				hashTab.list();
				break;
			case "search":
				System.out.println("请输入要查找员工的编号:");
				id = sc.nextInt();
				hashTab.findById(id);
				break;
			case "delete":
				System.out.println("请输入要删除员工的编号:");
				id = sc.nextInt();
				hashTab.delEmp(id);
				break;
			case "update":
				System.out.println("请输入要修改员工的编号:");
				id = sc.nextInt();
				System.out.println("请输入将修改员工的姓名:");
				String newName = sc.next();
				Emp newEmp = new Emp(id, newName);
				hashTab.updateEmp(newEmp);
				break;
			case "exit":
				sc.close();
				System.out.println("good by!");
				System.exit(0);
			default:
				break;
			}
		}
	}

}

//创建HashTab,管理多条链表
class HashTab {
	private EmpLinkListed[] empLinkListeds;
	private int size;// 每个链表的大小

	public HashTab(int size) {
		this.size = size;
		// 构造hash表
		empLinkListeds = new EmpLinkListed[size];
		// 不要忘记给每个链表进行构造
		for (int i = 0; i < size; i++) {
			empLinkListeds[i] = new EmpLinkListed();
		}
	}

	// 添加员工
	public void add(Emp emp) {
		int empLinkListNo = hashfun(emp.id);
		empLinkListeds[empLinkListNo].addEmp(emp);
	}

	// 遍历链表
	public void list() {
		for (int i = 0; i < empLinkListeds.length; i++) {
			empLinkListeds[i].list(i);
		}
	}

	// 根据id查找雇员信息
	public void findById(int id) {
		// 根据散列函数查找当前链表
		int EmpLinkListNo = hashfun(id);
		// 查找员工信息
		Emp emp = empLinkListeds[EmpLinkListNo].findById(id);
		if (emp != null) {
			System.out.printf("在第%d条链表中找到 编号id=%d\n", (EmpLinkListNo + 1), id);
		} else {
			System.out.println("在哈希表中没有找到该雇员!");
		}
	}

	// 根据id删除雇员信息
	public void delEmp(int id) {
		// 根据散列函数查找当前链表
		int EmpLinkListNo = hashfun(id);
		// 删除员工
		empLinkListeds[EmpLinkListNo].delEmp(id);
	}

	// 修改雇员信息
	public void updateEmp(Emp emp) {
		// 根据散列函数查找当前链表
		int EmpLinkListNo = hashfun(emp.id);
		// 修改员工
		empLinkListeds[EmpLinkListNo].updateEmp(emp);
	}

	// hash函数
	public int hashfun(int id) {
		return id % size;
	}
}

//雇员类
class Emp {
	public Integer id;
	public String name;
	// 指向下一个雇员的节点
	public Emp next; // 默认为null

	public Emp(Integer id, String name) {
		super();
		this.id = id;
		this.name = name;
	}
}

//表示链表
class EmpLinkListed {
	// 头指针,指向第一个emp,因此我们第一个头是指向第一个emp
	private Emp head;

	// 添加雇员,id是自增的,依次向后添加
	public void addEmp(Emp emp) {
		// 判断是否为第一个雇员
		if (head == null) {
			head = emp;
			return;
		}
		// 不是第一个雇员,需要一个辅助指针,帮助定位到最后
		Emp curEmp = head;
		while (true) {
			if (curEmp.next == null) {
				break; // 说明到链表的最后
			}
			curEmp = curEmp.next; // 后移
		}
		curEmp.next = emp;// 退出时直接将emp加入到链表
	}

	// 遍历
	public void list(int no) {
		// 判断链表是否为null
		if (head == null) {
			System.out.println("第" + (no + 1) + "链表为null");
			return;
		}
		System.out.println("第" + (no + 1) + "雇员的信息:\n");
		// 定义辅助指针
		Emp curEmp = head;
		while (true) {
			System.out.printf("=> id=%d name=%s\t", curEmp.id, curEmp.name);
			if (curEmp.next == null) { // 说明curEmp.next已经到最后节点
				break;
			}
			// 后移遍历
			curEmp = curEmp.next;
		}
		System.out.println();
	}

	// 根据id查找雇员
	public Emp findById(int id) {
		// 判断链表是否为null
		if (head == null) {
			System.out.println("链表为空");
			return null;
		}
		// 定义临时指针
		Emp curEmp = head;
		while (true) {
			// 找到雇员
			if (curEmp.id == id) {
				break;
			}
			// 查找到最后,没有找到该员工
			if (curEmp.next == null) {
				curEmp = null;
				break;
			}
			// 后移
			curEmp = curEmp.next;
		}
		return curEmp;
	}

	// 根据id删除雇员
	public void delEmp(int id) {
		// 判断链表是否为null
		if (head == null) {
			System.out.println("链表为空");
			return;
		}
		// 定义临时指针
		Emp curEmp = head;
		// 设置变量
		boolean flag = false;
		while (true) {
			if (curEmp.id == id) {
				System.out.println("由于是单向链表,您不能删除自己,只能删除下一个节点!");
				return;
			}
			if (curEmp.next.id == id) {
				flag = true;
				break;
			}
			// 查找到最后,没有找到
			if (curEmp.next == null) {
				break;
			}
			// 后移
			curEmp = curEmp.next;
		}
		if (flag) {
			System.out.printf("编号为%d的员工已经删除\n", id);
			curEmp.next = curEmp.next.next;
		} else {
			System.out.printf("编号为%d的员工不存在\n", id);
		}
	}

	// 修改员工信息
	public void updateEmp(Emp emp) {
		// 判断链表是否为null
		if (head == null) {
			System.out.println("链表为空");
			return;
		}
		// 定义临时节点
		Emp curEmp = head;
		// 定义找到标记
		boolean flag = false;
		while (true) {
			if (curEmp.id == emp.id) {
				flag = true;
				break;
			}
			// 找到最后没有找到
			if (curEmp.next == null) {
				break;
			}
			curEmp = curEmp.next;
		}
		if (flag) {
			curEmp.name = emp.name;
			System.out.println("修改成功!");
		} else {
			System.out.printf("编号为%d的员工不存在,不能修改\n", emp.id);
		}
	}
}
成果截图如下:
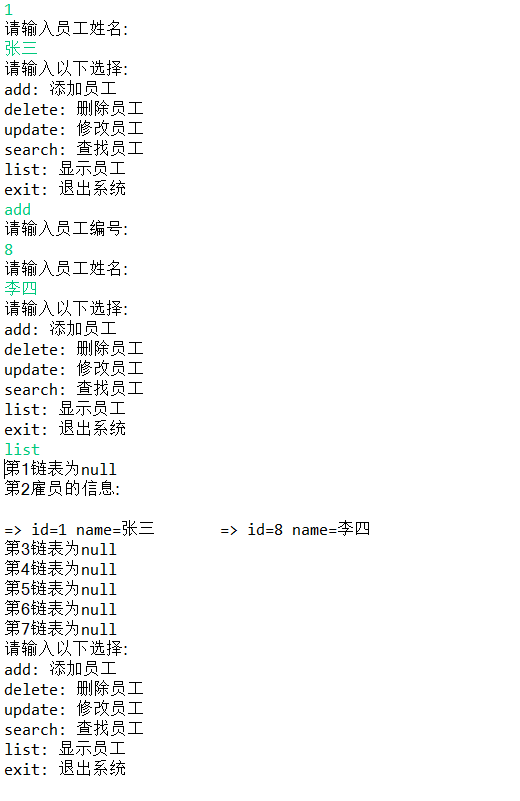
今天分享的内容就到此了,觉得对自己有帮助的,给个双击666+点赞👍走起来!!!
