

上一篇说了linx的网络模型,recv、select、epoll的原理,这次说一下java是怎么应对多连接的。其实根本的一点是,在服务端实现的所谓的BIO,NIO这些,其实是java对操作系统处理的封装,java也是直接调用native方法,通过c语言调用操作系统内核,来实现请求的接收发送的。
BIO
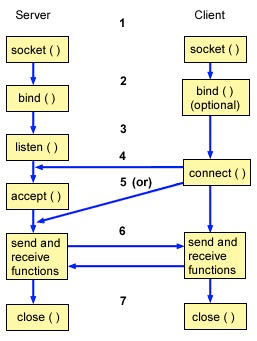
Java中的Socket的封装类其实是直接调用了操作系统的recv方法来实现接收的。先来看一下从java代码到Linux Socket Api的调用链。详细的调用链信息可以参考这篇文章 Java Socket与Linux Socket底层调用分析
//服务端
ServerSocket server = new ServerSocket(8000);
Socket client = server.accept();
InputStream in = client.getInputStream();
byte[] bytes = new byte[1024];
int len = in.read(bytes);
String data = new String(bytes, 0 , len);
System.out.println("接收客户端消息:" + data);

OutputStream out = client.getOutputStream();
out.write("Hi".getBytes());
client.close();
其实重要的就是读的逻辑,java socket通过输入inputStream流,调用read方法读取,rede调用socketRead,在调用native方法socketRead()。native的方法中,其实就是调用了操作系统内核提供的recv方法来进行数据读取。对比前一篇文章的recv的模型,就会知道Java的读取线程,一直到内核,都会阻塞在这里,recv的逻辑就是知道数据接收完成,网卡才会给cpu发中断,recv方法返回,进行处理。
再来看BIO的java实现,其实就是通过不停的开线程处理请求。这里参考了《Netty权威指南》中的例子。
public class TimeServerBio {
    public static void main(String[] args) throws IOException {
        int port = 9888;
        ServerSocket serverSocket = new ServerSocket(port);
        Socket socket = null;
        while (true) {
            socket = serverSocket.accept();
            new Thread(new TimeHandler(socket)).start();
        }
    }
}

class TimeHandler implements Runnable{
    private Socket socket;

    public TimeHandler(Socket socket) {
        this.socket = socket;
    }

    public void run() {
        InputStreamReader is = null;
        BufferedReader bufferedReader = null;
        PrintWriter os = null;
        String cinfo = null;
        try {
            is = new InputStreamReader(socket.getInputStream());
            bufferedReader = new BufferedReader(is);
            while ((cinfo = bufferedReader.readLine()) != null) {
                System.out.println(cinfo);
            }
            socket.shutdownInput();
            os = new PrintWriter(socket.getOutputStream());
            os.write("accepted!!");
            os.flush();
            socket.shutdownOutput();
        } catch (IOException e) {
            e.printStackTrace();
        } finally {
            try {
                is.close();
                os.close();
                bufferedReader.close();
                socket.close();
            } catch (IOException e) {
                e.printStackTrace();
            }
        }
    }
}
可以看到很简单的就是通过new tread()去处理,并且通过流来接收数据。很明显的缺点就是,不停的开线程,过多的线程会导致不停的切换上下文,并不能支撑大量的并发。
伪异步IO
伪异步io其实就是加了个线程池,避免了无限创建线程。代码没有太大变化。
public class TimeServerExcutor {

    public static void main(String[] args) throws IOException {
        int port = 9888;
        ServerSocket serverSocket = new ServerSocket(port);
        Socket socket = null;
        ThreadPoolExecutor threadPoolExecutor = new ThreadPoolExecutor(10, 100, 0, TimeUnit.SECONDS, new LinkedBlockingQueue<Runnable>(100));
        while (true) {
            socket = serverSocket.accept();
            threadPoolExecutor.execute(new TimeHandler(socket));
        }
    }
}
其实没哟解决实际问题,如果请求过多的话,其实会直接阻塞在线程池的阻塞队列里,导致应答消息过慢,而且数据包太大的化正在执行的线程等待数据包的传输完成,也不会执行消息队列里的任务。
Java NIO
java的NIO的包实际是调用了操作系统的多路复用的api,比如linux里面多路复用的实现就是epoll,因为Java是跨平台的,jdk内部会根据不同的操作系统选择不同的内核api,macos就是kqueue等等。
下面的分析参考于这篇文章Java NIO分析(8): 高并发核心Selector详解
这里先来给出一下server端的代码。
public class TimeServerNIO {
    public static void main(String[] args) {
        int port = 9888;
        MultiplexerTimeServer timeServer = new MultiplexerTimeServer(port);
        new Thread(timeServer, "Nio-multipleTimeServer-001").start();
    }
}

public class MultiplexerTimeServer implements Runnable{
    private Selector selector;
    private ServerSocketChannel serverSocketChannel;
    private volatile boolean stop;

    public MultiplexerTimeServer(int port) {
        try {
            selector = Selector.open();
            serverSocketChannel = ServerSocketChannel.open();
            serverSocketChannel.configureBlocking(false);
            serverSocketChannel.socket().bind(new InetSocketAddress("127.0.0.1", port));
            serverSocketChannel.register(selector, SelectionKey.OP_ACCEPT);
            stop = false;
        } catch (IOException e) {
            e.printStackTrace();
        }
    }

    public void run() {
        while (!stop) {
            try {
                selector.select(1000);
                Set<SelectionKey> selectionKeySet =  selector.selectedKeys();
                for (Iterator<SelectionKey> iterator = selectionKeySet.iterator();iterator.hasNext();){
                    SelectionKey key = iterator.next();
                    this.handleInput(key);
                }
            } catch (IOException e) {
                e.printStackTrace();
            }
        }
    }

    private void handleInput(SelectionKey key) throws IOException {
        if (key.isValid()) {
            if (key.isAcceptable()) {
                ServerSocketChannel serverSocketChannel = (ServerSocketChannel) key.channel();
                SocketChannel socketChannel = serverSocketChannel.accept();
                socketChannel.configureBlocking(false);
                socketChannel.register(selector, SelectionKey.OP_READ);
            }
            if (key.isReadable()) {
                SocketChannel socketChannel = (SocketChannel) key.channel();
                ByteBuffer readBuffer = ByteBuffer.allocate(1024);
                int readBytes = socketChannel.read(readBuffer);
                if (readBytes > 0) {
                    readBuffer.flip();
                    byte[] bytes = new byte[readBuffer.remaining()];
                    readBuffer.get(bytes);
                    String body = new String(bytes, "UTF-8");
                    System.out.println(body);
                    this.doWrite(socketChannel);
                }
            }
        }
    }

    private void doWrite(SocketChannel socketChannel) throws IOException {
        byte[] bytes = "accepted!!".getBytes("UTF-8");
        ByteBuffer byteBuffer = ByteBuffer.allocate(bytes.length);
        byteBuffer.put(bytes);
        byteBuffer.flip();
        socketChannel.write(byteBuffer);
    }
}
其实这么多代码主要的就几个东西,一个是selector,一个是serversocketchannel,在MultipolexerTimeServer的构造方法中,创建了一个selector选择器,其实他的主要功能就是根据不同的时间类型,去匹配到不同的channel。构造器里还创建了一个serversocketchannel,这个channel只关注accept也就是socket的连接事件。
selector的open()方法中,调用到了操作系统内核的epoll_create,也就是上一篇文章中说的eventpoll的对象。然后在MultiplexerTimeServer的run()方法中,又调用了selector.select()方法,这个方法里面调用了epoll_waite方法。
selector创建过程
来看一下详细过程。
// Selector.java
public static Selector open() throws IOException {
    // 首先找到provider,然后再打开Selector
    return SelectorProvider.provider().openSelector();
}

// java.nio.channels.spi.SelectorProvider
    public static SelectorProvider provider() {
    synchronized (lock) {
        if (provider != null)
            return provider;
        return AccessController.doPrivileged(
            new PrivilegedAction<SelectorProvider>() {
                public SelectorProvider run() {
                        if (loadProviderFromProperty())
                            return provider;
                        if (loadProviderAsService())
                            return provider;
                            // 这里就是打开Selector的真正方法
                        provider = sun.nio.ch.DefaultSelectorProvider.create();
                        return provider;
                    }
                });
    }
}
这里调用到了jdk中的create方法,jdk会根据不同的操作系统来进行选择。
/**
 * Returns the default SelectorProvider.
 */
public static SelectorProvider create() {
    // 获取OS名称
    String osname = AccessController
        .doPrivileged(new GetPropertyAction("os.name"));
    // 根据名称来创建不同的Selctor
    if (osname.equals("SunOS"))
        return createProvider("sun.nio.ch.DevPollSelectorProvider");
    if (osname.equals("Linux"))
        return createProvider("sun.nio.ch.EPollSelectorProvider");
    return new sun.nio.ch.PollSelectorProvider();
}
看一下linux的实现,直接可以看到使用了epoll。
public AbstractSelector openSelector() throws IOException {
    return new EPollSelectorImpl(this);
}
看一下jdk中epoll的实现。
EPollSelectorImpl(SelectorProvider sp) throws IOException {
    super(sp);
    // makePipe返回管道的2个文件描述符,编码在一个long类型的变量中
    // 高32位代表读 低32位代表写
    // 使用pipe为了实现Selector的wakeup逻辑
    long pipeFds = IOUtil.makePipe(false);
    fd0 = (int) (pipeFds >>> 32);
    fd1 = (int) pipeFds;
    // 新建一个EPollArrayWrapper
    pollWrapper = new EPollArrayWrapper();
    pollWrapper.initInterrupt(fd0, fd1);
    fdToKey = new HashMap<>();
}
这里创建了一个epollWrapper,他其实就是操作系统eventpoll的封装,直接会调用native方法再调用内核api创建eventpoll的对象。
EPollArrayWrapper() throws IOException {
    // creates the epoll file descriptor
    // 创建epoll fd
    epfd = epollCreate();

    // the epoll_event array passed to epoll_wait
    int allocationSize = NUM_EPOLLEVENTS * SIZE_EPOLLEVENT;
    pollArray = new AllocatedNativeObject(allocationSize, true);
    pollArrayAddress = pollArray.address();

    // eventHigh needed when using file descriptors > 64k
    if (OPEN_MAX > MAX_UPDATE_ARRAY_SIZE)
        eventsHigh = new HashMap<>();
}
到这里这个过程就已经创建了eventpoll的对象,eventpoll里面包含了一个用双向链表实现的就绪队列,一个红黑树装载所有监听的socket,还有一个等待队列用来阻塞调用了selector.select方法的线程。
那下面就说下调用了selector.select()方法之后会发生什么。
selector select过程
在MultiplexerTimeServer类中调用了Selector.select()之后,会一路调用到``EpollSelectorImpl.doSelect()`方法中。
protected int doSelect(long timeout) throws IOException {
    if (closed)
        throw new ClosedSelectorException();
    processDeregisterQueue();
    try {
        begin();
        // 真正的实现是这行
        pollWrapper.poll(timeout);
    } finally {
        end();
    }
    processDeregisterQueue();
    int numKeysUpdated = updateSelectedKeys();

    // 以下基本都是异常处理
    if (pollWrapper.interrupted()) {
        // Clear the wakeup pipe
        pollWrapper.putEventOps(pollWrapper.interruptedIndex(), 0);
        synchronized (interruptLock) {
            pollWrapper.clearInterrupted();
            IOUtil.drain(fd0);
            interruptTriggered = false;
        }
    }
    return numKeysUpdated;
}
在这里能看到,直接调用之前封装eventpoll对象的pollWrapper,调用对象中的poll(),看下这个方法。
int poll(long timeout) throws IOException {
    updateRegistrations();
    // 这个epollWait是不是有点熟悉呢?
    updated = epollWait(pollArrayAddress, NUM_EPOLLEVENTS, timeout, epfd);
    for (int i=0; i<updated; i++) {
        if (getDescriptor(i) == incomingInterruptFD) {
            interruptedIndex = i;
            interrupted = true;
            break;
        }
    }
    return updated;
}

private native int epollWait(long pollAddress, int numfds, long timeout,
                             int epfd) throws IOException;
调用到了epoll_wait(),这个方法会调用到操作系统内核的epoll_waite,阻塞当前调用的线程到等待队列,等待有socket到来,有了数据之后,会将socket引用到就绪队列里面,然后唤醒阻塞的线程并且返回到这个epoll_wait()方法。
在这个poll方法调用之前,会添加需要event_poll监听的socket,也就是在poll()调用之前调用的updateRegistrations方法,因为我们之前注册了一个ServerSocketChannel(其实这个channel里封装了一个socket),updateRegistrations方法会把这个socket通过epoll_ctl将socket放到监听的红黑树里面,监听连接事件。
/**
 * Returns the pending update events for the given file descriptor.
 */
private byte getUpdateEvents(int fd) {
    if (fd < MAX_UPDATE_ARRAY_SIZE) {
        return eventsLow[fd];
    } else {
        Byte result = eventsHigh.get(Integer.valueOf(fd));
        // result should never be null
        return result.byteValue();
    }
}

/**
 * Update the pending registrations.
 */
private void updateRegistrations() {
    synchronized (updateLock) {
        int j = 0;
        while (j < updateCount) {
            int fd = updateDescriptors[j];
            // 从保存的eventsLow和eventsHigh里取出事件
            short events = getUpdateEvents(fd);
            boolean isRegistered = registered.get(fd);
            int opcode = 0;

            if (events != KILLED) {
                // 判断操作类型以传给epoll_ctl
                // 没有指定EPOLLET事件类型
                if (isRegistered) {
                    opcode = (events != 0) ? EPOLL_CTL_MOD : EPOLL_CTL_DEL;
                } else {
                    opcode = (events != 0) ? EPOLL_CTL_ADD : 0;
                }
                if (opcode != 0) {
                    // 熟悉的epoll_ctl
                    epollCtl(epfd, opcode, fd, events);
                    if (opcode == EPOLL_CTL_ADD) {
                        registered.set(fd);
                    } else if (opcode == EPOLL_CTL_DEL) {
                        registered.clear(fd);
                    }
                }
            }
            j++;
        }
        updateCount = 0;
    }
}
private native void epollCtl(int epfd, int opcode, int fd, int events);
selector里面有三个set用来保存socket的fd,其实也就是指针信息,用来告诉java哪些socket是被监听的,哪些socket是可读可写的,哪些socket是要被取消的。
// Public views of the key sets
// 注册的所有事件
private Set<SelectionKey> publicKeys;             // Immutable
// 内核返回的IO事件封装,表示哪些fd有数据可读可写
private Set<SelectionKey> publicSelectedKeys;     // Removal allowed, but not addition

// 取消的事件
private final Set<SelectionKey> cancelledKeys = new HashSet<SelectionKey>();
当调用完EpollArrayWrapper.poll之后,也就是有socket接收到了读写或者连接,操作系统会从epoll_wait返回,会调用poll方法后面的EpollArrayWrapper.updateSelectedKeys()方法。
    private int updateSelectedKeys() {
        //获取可以就绪队列的数量
        int entries = pollWrapper.updated;
        int numKeysUpdated = 0;
        for (int i=0; i<entries; i++) {
            //获取就绪队列的socket的文件描述符
            int nextFD = pollWrapper.getDescriptor(i);
            SelectionKeyImpl ski = fdToKey.get(Integer.valueOf(nextFD));
            // ski is null in the case of an interrupt
            //把文件描述符和key也就是注册的channel进行比对,如果是注册的channel关注的时间的话就把可用的SelectionKey数量加一,
            //最终返回就绪的key的数量
            if (ski != null) {
                int rOps = pollWrapper.getEventOps(i);
                if (selectedKeys.contains(ski)) {
                    if (ski.channel.translateAndSetReadyOps(rOps, ski)) {
                        numKeysUpdated++;
                    }
                } else {
                    ski.channel.translateAndSetReadyOps(rOps, ski);
                    if ((ski.nioReadyOps() & ski.nioInterestOps()) != 0) {
                        selectedKeys.add(ski);
                        numKeysUpdated++;
                    }
                }
            }
        }
        return numKeysUpdated;
    }
最终,Selector会把就绪的可以读写的socket对应到注册的channel上,并且返回可用channel对应的key的列表。
上面说的第一个循环可以处理accept的时间,accept处理的时候优惠注册一个关注read事件的socketchannel,之后在下一次第二个循环调用selector.select()的时候,等待可读的数据的到来,然后再次调用handler处理读数据的处理,从channel中读取数据。
Channel原理
先来说一下socket使用流读取的问题。
- 通过socket()函数创建一个socket fd, 代表通信端点
- 绑定端口,协议栈,Socket类型(TCP就是流式Socket)
- 监听, 完了就可以接口客户端的TCP链接了,这个时候建立的TCP链接和accept的不一样,会存在内核的某个队列里,长度由你们都熟悉的SO_BACKLOG指定
- 接收链接
- 通信, 愉快的交换数据
- 关闭链接
关于上面accept的过程我们已经用Epoll来解决掉了,可以监听多个socket,但是还有一个问题就是交换数据这里,socket的读取数据是通过流,流是阻塞的。
假如你需要读取10bytes的数据,但是现在socket的缓冲区里面只有1bytes,这时候调用socket的线程就会等待,知道等到10bytes到来或者异常。这个就是阻塞掉了。
再来看一下channel是怎么实现的,其实channel里面也封装了一个socket可以创建java中socket的实例,但是一般默认情况下是不生成的。
socket()方法的时候才回去生成对象,因为channel里面直接持有了操作系统socket对象的句柄,所以操作都是直接对操作系统调用的。
1. 创建SocketChannel
// sun.nio.ch.SelectorProvider
public SocketChannel openSocketChannel() throws IOException {
    // 调用SocketChannelImpl的构造器
    return new SocketChannelImpl(this);
}

// sun.nio.ch.SocketChannelImpl
SocketChannelImpl(SelectorProvider sp) throws IOException {
    super(sp);
    // 创建socket fd
    this.fd = Net.socket(true);
    // 获取socket fd的值
    this.fdVal = IOUtil.fdVal(fd);
    // 初始化SocketChannel状态, 状态不多,总共就6个
    // 未初始化,未连接,正在连接,已连接,断开连接中,已断开
    this.state = ST_UNCONNECTED;
}

// sun.nio.ch.Net
static FileDescriptor socket(ProtocolFamily family, boolean stream)
    throws IOException {
    boolean preferIPv6 = isIPv6Available() &&
        (family != StandardProtocolFamily.INET);
    // 最后调用的是socket0
    return IOUtil.newFD(socket0(preferIPv6, stream, false));
}

// Due to oddities SO_REUSEADDR on windows reuse is ignored
private static native int socket0(boolean preferIPv6, boolean stream, boolean reuse);
这里可以看到,最后调用了native方法socket0来创建了socket的fd,返回了一个socket的文件句柄。这里调用操作系统其实内核做了很多的事情,判断很多东西,需要创建和初始化读写缓冲区等。
2. 读写非阻塞
其实channel中的读写是以ByteBuffer的长度为准的,从socket的缓冲区中读取放到Bytebuffer中,比如,socket缓冲区中有1byte,buffer的大小为10byte,读取1byte就返回,如果缓冲区中有20bytes,那就读取10byte就返回,不会阻塞住。
看一下SocketChannelImpl在openjdk中的实现。
public int read(ByteBuffer buf) throws IOException {
  ...
  // n表示读到的数据长度
  int n = 0;
  for (;;) {
      // 从socket fd里读数据,长度由buf决定
      n = IOUtil.read(fd, buf, -1, nd);
      if ((n == IOStatus.INTERRUPTED) && isOpen()) {
          // The system call was interrupted but the channel
          // is still open, so retry
          continue;
      }
      return IOStatus.normalize(n);
  }
  ...
}
IOUtil.read()
static int read(FileDescriptor fd, ByteBuffer dst, long position,
                NativeDispatcher nd)
    throws IOException
{
    if (dst.isReadOnly())
        throw new IllegalArgumentException("Read-only buffer");
    // 判断是不是DirectBuffer,是直接读进去
    // DirectBuffer是有名的冰山对象,其后可能关联着一堆直接内存
    if (dst instanceof DirectBuffer)
        return readIntoNativeBuffer(fd, dst, position, nd);

    // 如果传入的不是DirectBuffer,那么使用临时的DirectBuffer
    // Substitute a native buffer
    ByteBuffer bb = Util.getTemporaryDirectBuffer(dst.remaining());
    try {
        int n = readIntoNativeBuffer(fd, bb, position, nd);
        bb.flip();
        if (n > 0)
            dst.put(bb);
        return n;
    } finally {
        Util.offerFirstTemporaryDirectBuffer(bb);
    }
}

private static int readIntoNativeBuffer(FileDescriptor fd, ByteBuffer bb,
                                        long position, NativeDispatcher nd)
    throws IOException
{
    int pos = bb.position();
    int lim = bb.limit();
    assert (pos <= lim);
    int rem = (pos <= lim ? lim - pos : 0);

    if (rem == 0)
        return 0;
    int n = 0;

    // 调用本地方法去读
    // 要读socket fd一定要知道起始地址
    // 感兴趣可以看看https://stackoverflow.com/questions/11981474/pread-and-lseek-not-working-on-socket-file-descriptor
    // 调用完毕bb的那个DirectBuffer的直接内存里就有数据了
    if (position != -1) {
        n = nd.pread(fd, ((DirectBuffer)bb).address() + pos,
                     rem, position);
    } else {
        n = nd.read(fd, ((DirectBuffer)bb).address() + pos, rem);
    }
    if (n > 0)
        bb.position(pos + n);
    return n;
}

static native int pread0(FileDescriptor fd, long address, int len,
                         long position) throws IOException;
这里可以看到读取完数据就直接返回了。之所以需要使用直接内存directbuffer,是因为jvm中会有GC的活动,比如标记整理的gc算法,是会改变对象的内存地址的,调用socketapi的时候需要传入一个固定的内存地址,如果gc后对象地址变了,那么socket读写就会崩溃。
所以这里可以看到,channel只是对操作系统socket句柄对象的另一种封装,而java的socket对象,是对操作系统socket句柄的另一种封装,两者从实现方式上决定是读取写入是不是会阻塞。而这个不会阻塞的实现,其实是通过操作系统的函数fcntl去实现的,当配置channel的方法configureBlocking(false)的时候,其实会去调用fcntl,然后设置操作系统socket句柄的缓冲区为非阻塞的,如果读取超过buffer大小或者不到buffer大小就会直接返回不会阻塞。
//IOUtil.c

static int
configureBlocking(int fd, jboolean blocking)
{
    int flags = fcntl(fd, F_GETFL);
    int newflags = blocking ? (flags & ~O_NONBLOCK) : (flags | O_NONBLOCK);

    return (flags == newflags) ? 0 : fcntl(fd, F_SETFL, newflags);
}
