

前言
关于android绘制流程的分析林林总总,虽然看过很多博客,但记住的东西却屈指可数。阅读别人写的文章远没有自己去捋一遍思路来的记忆深刻。写文章的过程是帮助自己思考的过程,在思考的过程中就会形成沉淀,从而达到技能的提升。
一.见见森林
学习应该是从整体到局部的,一头扎到代码中去往往会只见树木不见森林,所以咱们今天就来先见见深林,噢 我不是说半z深林 ,首先看一下window整体结构,如下图所示:
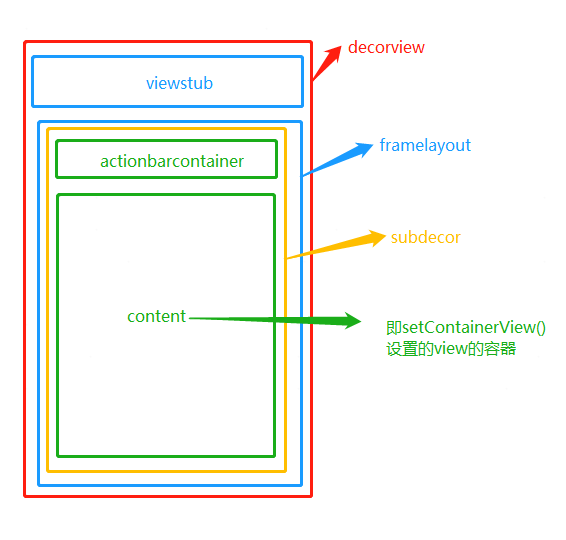
布局最外层是decorview,decorview和window的关系是:window有一个decorview。PhoneWindow是window的唯一实现类。decorview中是一个LinearLayout,其中包括一个viewstub和framlayout;framelayout中添加了subdecor, subdecor是一个viewgroup;subdecor中添加了一个linerlayout,包括一个actionbarcontainer和一个framlayout即上图的content,在activity oncreate中设置的布局将添加到content中。
二.见见树木
对总体有过认识之后,就可以看一下具体的实现过程。我们将从外到内逐层分析其实现程,

(1)首先是PhoneWindow的实例化过程
在ActivityThread的performLaunchActivity调用activity的attach方法,在attach方法中创建了PhoneWindow,如下所示
private Activity performLaunchActivity(ActivityClientRecord r, Intent customIntent) {
    ...
    Activity activity = null;
    java.lang.ClassLoader cl = appContext.getClassLoader();
    activity = mInstrumentation.newActivity(
            cl, component.getClassName(), r.intent);
    ...
   activity.attach(appContext, this, getInstrumentation(), r.token,
        r.ident, app, r.intent, r.activityInfo, title, r.parent,
        r.embeddedID, r.lastNonConfigurationInstances, config,
        r.referrer, r.voiceInteractor, window, r.configCallback);
  ...
}
//在Activity中 新建phonewindow 一个activity对应一个phonewindow
final void attach(Context context, ActivityThread aThread,
        Instrumentation instr, IBinder token, int ident,
        Application application, Intent intent, ActivityInfo info,
        CharSequence title, Activity parent, String id,
        NonConfigurationInstances lastNonConfigurationInstances,
        Configuration config, String referrer, IVoiceInteractor voiceInteractor,
        Window window, ActivityConfigCallback activityConfigCallback) {
            ...
            mWindow = new PhoneWindow(this, window, activityConfigCallback);
            mWindow.setWindowControllerCallback(this);
            mWindow.setCallback(this);
            mWindow.setOnWindowDismissedCallback(this);
            mWindow.getLayoutInflater().setPrivateFactory(this);
            ...
        }
(2) 实例化DecorView 并使PhoneWindow中的mDecor引用指向实例化的DecorView
decorview的添加发生在![]() activity oncreate中调用setContentView()的时候,最终走到 AppCompatDelegateImpl的方法中如下:
activity oncreate中调用setContentView()的时候,最终走到 AppCompatDelegateImpl的方法中如下:
public void setContentView(int resId){
    //添加subdecor
    ensureSubDecor();
    ViewGroup contentParent = (ViewGroup) mSubDecor.findViewById(android.R.id.content);
    contentParent.removeAllViews();
     //添加自己写的布局
    LayoutInflater.from(mContext).inflate(resId, contentParent);//在subdecor的content添加我们的布局
    mOriginalWindowCallback.onContentChanged();
}private void ensureSubDecor() {
if (!mSubDecorInstalled) {
//如果未添加过subdecor则实例化一个
mSubDecor = createSubDecor();
...
}
}
private ViewGroup createSubDecor() {
TypedArray a = mContext.obtainStyledAttributes(R.styleable.AppCompatTheme);
...
// Now let's make sure that the Window has installed its decor by retrieving it
mWindow.getDecorView();
final LayoutInflater inflater = LayoutInflater.from(mContext);
ViewGroup subDecor = null;
//更具设置的不同feature,inflate subdecor
if (!mWindowNoTitle) {
if (mIsFloating) {
// If we're floating, inflate the dialog title decor
subDecor = (ViewGroup) inflater.inflate(
R.layout.abc_dialog_title_material, null);
// Floating windows can never have an action bar, reset the flags
mHasActionBar = mOverlayActionBar = false;
} else if
.....
} else {
subDecor = (ViewGroup) inflater.inflate(R.layout.abc_screen_simple, null);
}
}
final ContentFrameLayout contentView = (ContentFrameLayout) subDecor.findViewById(
R.id.action_bar_activity_content);//subdecor的content
final ViewGroup windowContentView = (ViewGroup) mWindow.findViewById(android.R.id.content);
if (windowContentView != null) {
// There might be Views already added to the Window's content view so we need to
// migrate them to our content view
while (windowContentView.getChildCount() > 0) {
final View child = windowContentView.getChildAt(0);
windowContentView.removeViewAt(0);
contentView.addView(child);
}
// Change our content FrameLayout to use the android.R.id.content id.
// Useful for fragments.
windowContentView.setId(View.NO_ID);
contentView.setId(android.R.id.content);
}
// Now set the Window's content view with the decor
mWindow.setContentView(subDecor);
return subDecor;
}
public class PhoneWindow extends Window -> public final View getDecorView() {
    if (mDecor == null || mForceDecorInstall) {
        installDecor();
    }
    return mDecor;
}

private void installDecor() {
    mForceDecorInstall = false;
    if (mDecor == null) {
        mDecor = generateDecor(-1);
    } else {
        mDecor.setWindow(this);
    }
    if (mContentParent == null) {
        mContentParent = generateLayout(mDecor);

        // Set up decor part of UI to ignore fitsSystemWindows if appropriate.
        mDecor.makeOptionalFitsSystemWindows();

        final DecorContentParent decorContentParent = (DecorContentParent) mDecor.findViewById(
                R.id.decor_content_parent);
   }
}

protected DecorView generateDecor(int featureId) {
    ....
    return new DecorView(context, featureId, this, getAttributes()); //public class DecorView extends FrameLayout
}

protected ViewGroup generateLayout(DecorView decor) {
    // Apply data from current theme.
      ....
    WindowManager.LayoutParams params = getAttributes();

    // Inflate the window decor.
    int layoutResource;
    int features = getLocalFeatures();
    // System.out.println("Features: 0x" + Integer.toHexString(features));
    if ((features & (1 << FEATURE_SWIPE_TO_DISMISS)) != 0) {
        ....
        // Embedded, so no decoration is needed.
        layoutResource = R.layout.screen_simple;
        // System.out.println("Simple!");
    }

    mDecor.startChanging();
    mDecor.onResourcesLoaded(mLayoutInflater, layoutResource);
 //decorview布局中的framelayout 即为subdecor的容器
ViewGroup contentParent = (ViewGroup)findViewById(ID_ANDROID_CONTENT);
if (contentParent == null) {
throw new RuntimeException("Window couldn't find content container view"); }
mDecor.finishChanging();
return contentParent;
}
(3) subdecor的添加过程
在第二步的createSubDecor() 方法中,添加了subdecor,具体如下
private ViewGroup createSubDecor() {
    TypedArray a = mContext.obtainStyledAttributes(R.styleable.AppCompatTheme);
    ...
    // Now let's make sure that the Window has installed its decor by retrieving it
    mWindow.getDecorView();

    final LayoutInflater inflater = LayoutInflater.from(mContext);
    ViewGroup subDecor = null;

    1.//更具设置的不同feature,inflate subdecor
    if (!mWindowNoTitle) {
        if (mIsFloating) {
            // If we're floating, inflate the dialog title decor
            subDecor = (ViewGroup) inflater.inflate(
                    R.layout.abc_dialog_title_material, null);

            // Floating windows can never have an action bar, reset the flags
            mHasActionBar = mOverlayActionBar = false;
        } else if
         .....
        } else {
            subDecor = (ViewGroup) inflater.inflate(R.layout.abc_screen_simple, null);
        }
    }
 2.//subdecor的content
final ContentFrameLayout contentView = (ContentFrameLayout) subDecor.findViewById(            R.id.action_bar_activity_content);

    final ViewGroup windowContentView = (ViewGroup) mWindow.findViewById(android.R.id.content);
    if (windowContentView != null) {
        // There might be Views already added to the Window's content view so we need to
        // migrate them to our content view
        while (windowContentView.getChildCount() > 0) {
            final View child = windowContentView.getChildAt(0);
            windowContentView.removeViewAt(0);
            contentView.addView(child);
        }
        // Change our content FrameLayout to use the android.R.id.content id.
        // Useful for fragments.
        windowContentView.setId(View.NO_ID);
        //将subdecor中的framelayout id设置为content
        contentView.setId(android.R.id.content);
    }

    3.// Now set the Window's content view with the decor
    mWindow.setContentView(subDecor);
    return subDecor;
} @Override
public void setContentView(View view, ViewGroup.LayoutParams params) {
if (mContentParent == null) {
installDecor();
} else if (!hasFeature(FEATURE_CONTENT_TRANSITIONS)) {
mContentParent.removeAllViews();
}
mContentParent.addView(view, params);
}(4) activity oncreate 中setContentView布局的添加,见第二步中的方法
public void setContentView(int resId){
    //添加subdecor
    ensureSubDecor();
   //找到content容器
    ViewGroup contentParent = (ViewGroup) mSubDecor.findViewById(android.R.id.content);
    contentParent.removeAllViews();
     //添加自己写的布局
    LayoutInflater.from(mContext).inflate(resId, contentParent);//在subdecor的content添加我们的布局
    mOriginalWindowCallback.onContentChanged();
}
至此,整个window 布局添加完成,之后便是将布局绘制到屏幕上。
