

本文分为六个部分:
-
异步请求
-
同步请求
-
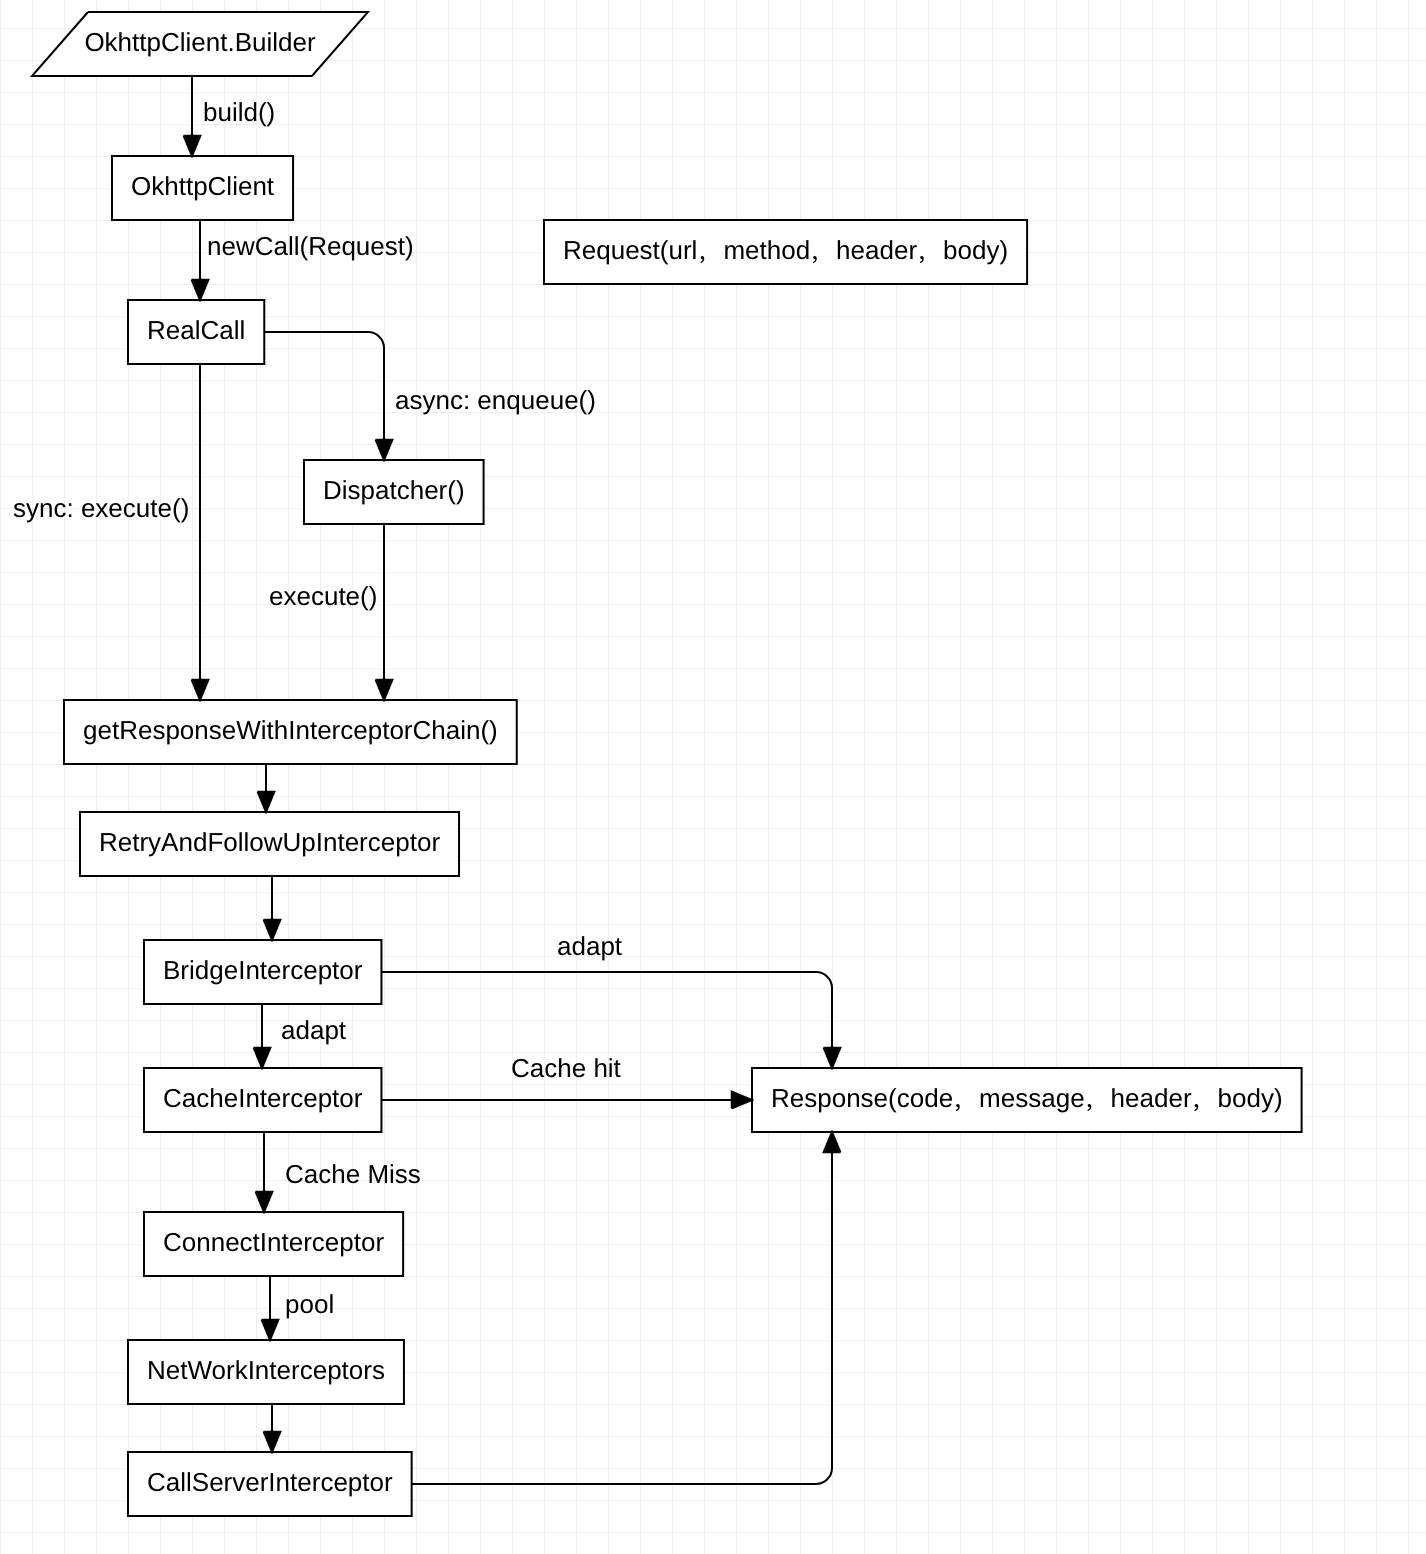
Okhttp请求流程图
-
ArrayQueue
-
各种过滤器
-
自定义过滤器
异步请求
OkHttpClient okHttpClient = new OkHttpClient();
Request request = new Request.Builder().url("www.google.com").build();
okHttpClient.newCall(request).enqueue(new Callback() { //异步
  @Override
  public void onFailure(Call call, IOException e) {

  }

  @Override
  public void onResponse(Call call, Response response) throws IOException {

  }
});
我们构建为Request之后,就需要构建一个Call,一般都是
Call call = okHttpClient.newCall(request)
返回OkhttpClient可以看到
@Override public Call newCall(Request request) {
  return RealCall.newRealCall(this, request, false /* for web socket */);
}

//Okhttp实现Call.Factory接口
public class OkHttpClient implements Cloneable, Call.Factory, WebSocket.Factory {

//Call接口之中
interface Factory {
  Call newCall(Request request);
}
从接口的源码我们可以看到,只是定义一个newCall用于创建Call的方法,这里其实用到了工厂模式的思想,将构建的细节交给具体实现,顶层只需要拿到Call对象即可。
下面是RealCall的实现细节:
RealCall:

  static RealCall newRealCall(OkHttpClient client, Request originalRequest, boolean forWebSocket) {
    // Safely publish the Call instance to the EventListener.
    RealCall call = new RealCall(client, originalRequest, forWebSocket);
    call.eventListener = client.eventListenerFactory().create(call);
    return call;
  }

RealCall构造方法:

  private RealCall(OkHttpClient client, Request originalRequest, boolean forWebSocket) {
    this.client = client;
    this.originalRequest = originalRequest;
    this.forWebSocket = forWebSocket;
    this.retryAndFollowUpInterceptor = new RetryAndFollowUpInterceptor(client, forWebSocket);
    this.timeout = new AsyncTimeout() {
      @Override protected void timedOut() {
        cancel();
      }
    };
    this.timeout.timeout(client.callTimeoutMillis(), MILLISECONDS);
  }
Call创建完之后,一般就到最后一个步骤了,将请求加入调度。
call.enqueue(new Callback() { //异步
  @Override
  public void onFailure(Call call, IOException e) {

  }

  @Override
  public void onResponse(Call call, Response response) throws IOException {

  }
});
这里的call的真正实现是RealCall方法,我们来看下RealCall里面的enqueue方法。
@Override public void enqueue(Callback responseCallback) {
  synchronized (this) {
    if (executed) throw new IllegalStateException("Already Executed");
    executed = true;
  }
  captureCallStackTrace();
  eventListener.callStart(this);
  client.dispatcher().enqueue(new AsyncCall(responseCallback));
}
- 首先利用synchroized加入的对象锁,同一对象下,保证在同一时间只有一个线程可以访问,使用代码块可以保证锁的粒度更细一些。
- captureCallStackTrace(),为retryAndFollowUpInterceptor加入一个用于追踪堆栈信息的callStackTrace
private void captureCallStackTrace() {
  Object callStackTrace = Platform.get().getStackTraceForCloseable("response.body().close()");
  retryAndFollowUpInterceptor.setCallStackTrace(callStackTrace);
}
- eventListener.callStart(this) 可以看到前面构建的eventListener起作用了,这里先回callStart方法,通过这些回调方法我们可以添加一个监听器(实现EventListener),监听整个网络流程各个阶段的时间调用,流量等等。
- client.dispatcher().enqueue(new AsyncCall(responseCallback)) 我们需要回归OkhttpClient源码中
//OkhttpClient
public Dispatcher dispatcher() {
  return dispatcher;
}

//Dispatcher
void enqueue(AsyncCall call) {
	synchronized (this) {
		readyAsyncCalls.add(call);
	}
	promoteAndExecute();
}
这里先对Dispatcher的成员变量做个初步的认识
  private int maxRequests = 64;
  private int maxRequestsPerHost = 5;
  private @Nullable Runnable idleCallback;

  /** Executes calls. Created lazily. */
  private @Nullable ExecutorService executorService;

  /** Ready async calls in the order they'll be run. */
  private final Deque<AsyncCall> readyAsyncCalls = new ArrayDeque<>();

  /** Running asynchronous calls. Includes canceled calls that haven't finished yet. */
  private final Deque<AsyncCall> runningAsyncCalls = new ArrayDeque<>();

  /** Running synchronous calls. Includes canceled calls that haven't finished yet. */
  private final Deque<RealCall> runningSyncCalls = new ArrayDeque<>();
可以看到这里用了三个队列ArrayDeque用于保存Call对象,分为三种状态:
- 异步等待
- 同步running
- 异步running
关于ArrayDeque的介绍见文章末尾。
下面来看Dispather的enqueue()方法,先是加入到异步等待队列,然后执行promoteAndExecute()方法
  private boolean promoteAndExecute() {
    assert (!Thread.holdsLock(this));

    List<AsyncCall> executableCalls = new ArrayList<>();
    boolean isRunning;
    synchronized (this) {
      for (Iterator<AsyncCall> i = readyAsyncCalls.iterator(); i.hasNext(); ) {
        AsyncCall asyncCall = i.next();

        if (runningAsyncCalls.size() >= maxRequests) break; // Max capacity.
        if (runningCallsForHost(asyncCall) >= maxRequestsPerHost) continue; // Host max capacity.

        i.remove();
        executableCalls.add(asyncCall);
        runningAsyncCalls.add(asyncCall);
      }
      isRunning = runningCallsCount() > 0;
    }

    for (int i = 0, size = executableCalls.size(); i < size; i++) {
      AsyncCall asyncCall = executableCalls.get(i);
      asyncCall.executeOn(executorService());
    }

    return isRunning;
  }
该方法中遍历异步等待队列readyAsyncCalls,如果当前正在执行的同步running队列个数大于maxRequest(64),跳出该循环,如果取出某一个的请求(AsyncCall)请求同一个主机的个数大于maxRequestsPerHost(5)时,跳过本地循环,继续下一次循环。最后再加入线程池执行。
public synchronized ExecutorService executorService() {
  if (executorService == null) {
    executorService = new ThreadPoolExecutor(0, Integer.MAX_VALUE, 60, TimeUnit.SECONDS,
        new SynchronousQueue<Runnable>(), Util.threadFactory("OkHttp Dispatcher", false));
  }
  return executorService;
}
该线程池没有核心线程,线程个数最大为Integer.MAX_VALUE,空闲时线程存活时间为60s。
下面来分析一下AsyncCall的源码:
final class AsyncCall extends NamedRunnable {
···
}

public abstract class NamedRunnable implements Runnable {
  protected final String name;

  public NamedRunnable(String format, Object... args) {
    this.name = Util.format(format, args);
  }

  @Override public final void run() {
    String oldName = Thread.currentThread().getName();
    Thread.currentThread().setName(name);
    try {
      execute();
    } finally {
      Thread.currentThread().setName(oldName);
    }
  }

  protected abstract void execute();
}
实现了一个Runnable接口,线程名字为我们在构造器中传入的名字,最后执行execute()方法,具体实现在AsyncCall中
//异步最终走的方法,RealCall类中的内部类AsyncCall
@Override protected void execute() {
  boolean signalledCallback = false;
  timeout.enter();
  try {
    Response response = getResponseWithInterceptorChain();
    if (retryAndFollowUpInterceptor.isCanceled()) {
      signalledCallback = true;
      responseCallback.onFailure(RealCall.this, new IOException("Canceled"));
    } else {
      signalledCallback = true;
      responseCallback.onResponse(RealCall.this, response);
    }
  } catch (IOException e) {
    e = timeoutExit(e);
    if (signalledCallback) {
      // Do not signal the callback twice!
      Platform.get().log(INFO, "Callback failure for " + toLoggableString(), e);
    } else {
      eventListener.callFailed(RealCall.this, e);
      responseCallback.onFailure(RealCall.this, e);
    }
  } finally {
    client.dispatcher().finished(this);
  }
}

//同步走的方法,在RealCall中
@Override public Response execute() throws IOException {
    synchronized (this) {
      if (executed) throw new IllegalStateException("Already Executed");
      executed = true;
    }
    captureCallStackTrace();
    timeout.enter();
    eventListener.callStart(this);
    try {
      client.dispatcher().executed(this);
      Response result = getResponseWithInterceptorChain();
      if (result == null) throw new IOException("Canceled");
      return result;
    } catch (IOException e) {
      e = timeoutExit(e);
      eventListener.callFailed(this, e);
      throw e;
    } finally {
      client.dispatcher().finished(this);
    }
  }
上面为异步和同步最终走的方法,可以看到同样的代码,终于看到了我们关注的Response了
Response result = getResponseWithInterceptorChain();
方法具体实现为:
Response getResponseWithInterceptorChain() throws IOException {
  // Build a full stack of interceptors.
  List<Interceptor> interceptors = new ArrayList<>();
  interceptors.addAll(client.interceptors());
  //失败和重定向过滤器
  interceptors.add(retryAndFollowUpInterceptor);
  //封装request和response过滤器
  interceptors.add(new BridgeInterceptor(client.cookieJar()));
  //缓存相关的过滤器,负责读取缓存直接返回,更新缓存
  interceptors.add(new CacheInterceptor(client.internalCache()));
  //负责和服务器建立连接
  interceptors.add(new ConnectInterceptor(client));
  if (!forWebSocket) {
    //配置 OkHttpClient 时设置的 networkInterceptors
    interceptors.addAll(client.networkInterceptors());
  }
  //负责向服务器发送网络请求数据,从服务器读取响应数据(实际网络请求)
  interceptors.add(new CallServerInterceptor(forWebSocket));

  Interceptor.Chain chain = new RealInterceptorChain(interceptors, null, null, null, 0,
      originalRequest, this, eventListener, client.connectTimeoutMillis(),
      client.readTimeoutMillis(), client.writeTimeoutMillis());

  return chain.proceed(originalRequest);
}
Okhttp默认会给我们实现这些过滤器,也可以添加自己想要实现的过滤器。
这里可以对比一下Volley源码中的思想,Volley的处理是将缓存,网络请求等一系列操作揉在一起写,导致用户对于Volley的修改只能通过修改源码方式,而修改就必须要充分阅读理解volley整个的流程,可能一部分的修改会影响全局的流程,而这里,将不同的职责的过滤器分别单独出来,用户只需要对关注的某一个功能项进行理解,并可以进行扩充修改,一对比,okHttp在这方面的优势立马体现出来了。这里大概先描述一下几个过滤器的功能:
retryAndFollowUpInterceptor——失败和重定向过滤器
BridgeInterceptor——封装request和response过滤器
CacheInterceptor——缓存相关的过滤器,负责读取缓存直接返回、更新缓存
ConnectInterceptor——负责和服务器建立连接,连接池等
networkInterceptors——配置 OkHttpClient 时设置的 networkInterceptors
CallServerInterceptor——负责向服务器发送请求数据、从服务器读取响应数据(实际网络请求)
添加完过滤器,就是执行过滤器了
Interceptor.Chain chain = new RealInterceptorChain(interceptors, null, null, null, 0,
        originalRequest, this, eventListener, client.connectTimeoutMillis(),
        client.readTimeoutMillis(), client.writeTimeoutMillis());

    return chain.proceed(originalRequest);
进入proceed方法
  public Response proceed(Request request, StreamAllocation streamAllocation, HttpCodec httpCodec,
      RealConnection connection) throws IOException {
    if (index >= interceptors.size()) throw new AssertionError();

    calls++;
		···
		···

    // Call the next interceptor in the chain.
    RealInterceptorChain next = new RealInterceptorChain(interceptors, streamAllocation, httpCodec,
        connection, index + 1, request, call, eventListener, connectTimeout, readTimeout,
        writeTimeout);
    Interceptor interceptor = interceptors.get(index);
    Response response = interceptor.intercept(next);
		···
		···
    return response;
  }
index传入的时候为0,后面new一个RealInterceptorChain并且将参数传递,index+1,接着获取index的interceptor,并调用intercept方法,传入新new的next对象,这里采用递归的思想来完成遍历,完成一个个interceptor的变量,随便找个interceptor来看看:
/** Opens a connection to the target server and proceeds to the next interceptor. */
public final class ConnectInterceptor implements Interceptor {
  public final OkHttpClient client;

  public ConnectInterceptor(OkHttpClient client) {
    this.client = client;
  }

  @Override public Response intercept(Chain chain) throws IOException {
    RealInterceptorChain realChain = (RealInterceptorChain) chain;
    Request request = realChain.request();
    StreamAllocation streamAllocation = realChain.streamAllocation();

    // We need the network to satisfy this request. Possibly for validating a conditional GET.
    boolean doExtensiveHealthChecks = !request.method().equals("GET");
    HttpCodec httpCodec = streamAllocation.newStream(client, chain, doExtensiveHealthChecks);
    RealConnection connection = streamAllocation.connection();

    return realChain.proceed(request, streamAllocation, httpCodec, connection);
  }
}
在ConnectInterceptor中可以看到,得到chain后,进行相应的处理后,继续调用proceed方法,接着刚才的逻辑,index+1,获取下一个interceptor,重复操作,利用递归循环,也就是Okhttp最经典的责任链模式。
同步请求
//同步走的方法,在RealCall中
@Override public Response execute() throws IOException {
    synchronized (this) { //检查是否运行过
      if (executed) throw new IllegalStateException("Already Executed");
      executed = true;
    }
    captureCallStackTrace();
    timeout.enter();
    eventListener.callStart(this);
    try {
      //加入到同步队列中
      client.dispatcher().executed(this);
      //创建过滤责任链,得到response
      Response result = getResponseWithInterceptorChain();
      if (result == null) throw new IOException("Canceled");
      return result;
    } catch (IOException e) {
      e = timeoutExit(e);
      eventListener.callFailed(this, e);
      throw e;
    } finally {
      client.dispatcher().finished(this);
    }
  }
Okttp请求流程图
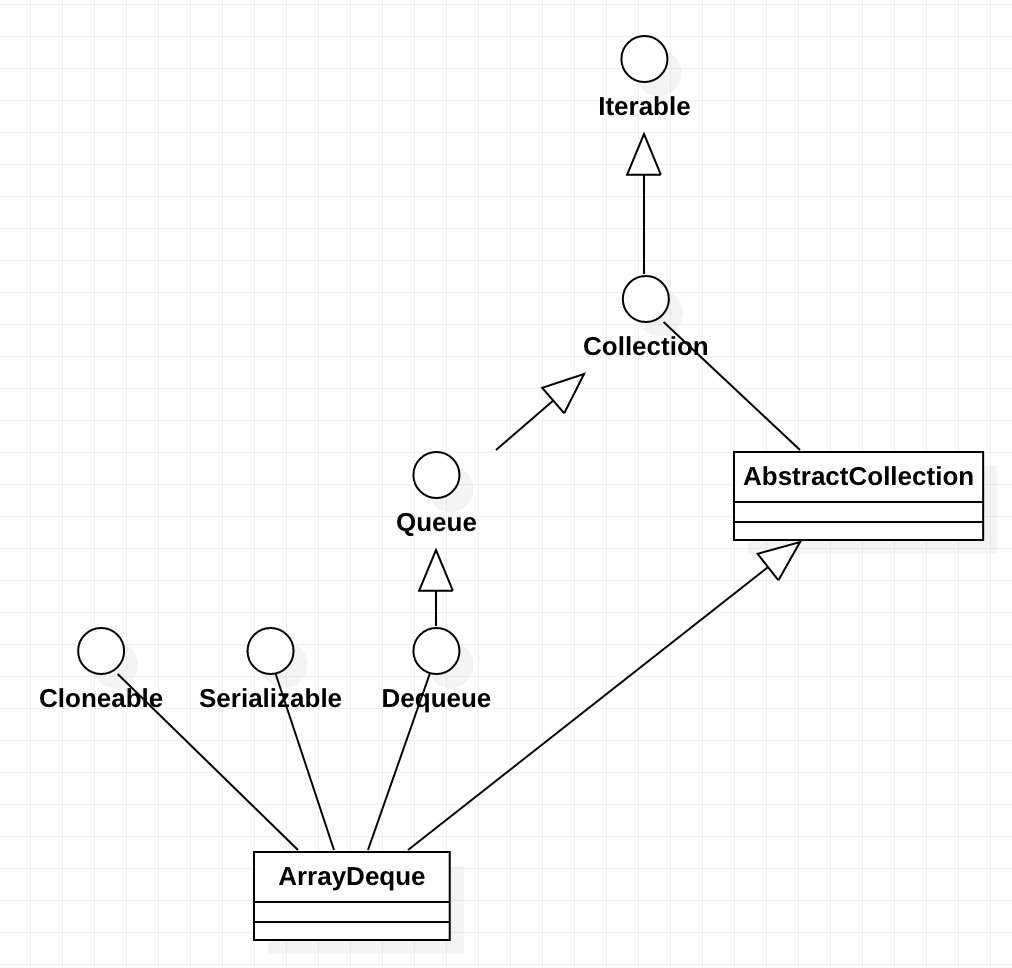
ArrayDeque
Deque 接口继承自 Queue接口,但 Deque 支持同时从两端添加或移除元素,因此又被成为双端队列。鉴于此,Deque 接口的实现可以被当作 FIFO队列使用,也可以当作LIFO队列(栈)来使用。官方也是推荐使用 Deque 的实现来替代 Stack。
ArrayDeque 可以作为栈来使用,效率要高于 Stack;ArrayDeque 也可以作为队列来使用,效率相较于基于双向链表的 LinkedList 也要更好一些。
ArrayDeque 是 Deque 接口的一种具体实现,是依赖于可变数组来实现的。ArrayDeque 没有容量限制,可根据需求自动进行扩容。ArrayDeque不支持值为 null 的元素。
各种过滤器
-
RetryAndFollowUpInterceptor 重试和重定向
看看该过滤器中的intercept方法,简单处理一下:
@Override public Response intercept(Chain chain) throws IOException {
	···
  while (true) {
		···
    Response response;
    boolean releaseConnection = true;
    try {
      response = realChain.proceed(request, streamAllocation, null, null);
      releaseConnection = false;
    }
    ···
    ···

    if (followUp == null) {  //满足条件,返回response
      streamAllocation.release();
      return response;
    }
    ···
		//不满足条件,重来
    request = followUp;
    priorResponse = response;
  }
}
先梳理一下大致流程,在while(true)中执行的是proceed(),执行这个方法后,就会交给下一个过滤器执行,所以可以简单的理解为这个过滤器其实没做什么。
但是当出现一些异常导致条件不满足的时候,就要重新进行一系列操作,重新复制request,重新请求,也就是while的功能,对应也就是这个过滤器的主要功能:重试和重定向。
@Override public Response intercept(Chain chain) throws IOException {
    Request request = chain.request();
    RealInterceptorChain realChain = (RealInterceptorChain) chain;
    Call call = realChain.call();
    EventListener eventListener = realChain.eventListener();
    //streamAllocation的创建位置
    streamAllocation = new StreamAllocation(client.connectionPool(), createAddress(request.url()),
        call, eventListener, callStackTrace);

    int followUpCount = 0;
    Response priorResponse = null;
    while (true) {
      //取消
      if (canceled) {
        streamAllocation.release();
        throw new IOException("Canceled");
      }

      Response response;
      boolean releaseConnection = true;
      try {
        response = realChain.proceed(request, streamAllocation, null, null);
        releaseConnection = false;
      } catch (RouteException e) {
        // The attempt to connect via a route failed. The request will not have been sent.
        //尝试连接一个路由失败,这个请求还没有发出
        if (!recover(e.getLastConnectException(), false, request)) {
          throw e.getLastConnectException();
        }
        releaseConnection = false;
        //重试。。。
        continue;
      } catch (IOException e) {
        // An attempt to communicate with a server failed. The request may have been sent.
        //先判断当前请求是否已经发送了
        boolean requestSendStarted = !(e instanceof ConnectionShutdownException);
        //同样的重试判断
        if (!recover(e, requestSendStarted, request)) throw e;
        releaseConnection = false;
        //重试。。。
        continue;
      } finally {
        // We're throwing an unchecked exception. Release any resources.
        //没有捕获到的异常,最终要释放
        if (releaseConnection) {
          streamAllocation.streamFailed(null);
          streamAllocation.release();
        }
      }

      // Attach the prior response if it exists. Such responses never have a body.
      //这里基本上都没有讲,priorResponse是用来保存前一个Resposne的,这里可以看到将前一个Response和当前的Resposne
      //结合在一起了,对应的场景是,当获得Resposne后,发现需要重定向,则将当前Resposne设置给priorResponse,再执行一遍流程,
      //直到不需要重定向了,则将priorResponse和Resposne结合起来。
      if (priorResponse != null) {
        response = response.newBuilder()
            .priorResponse(priorResponse.newBuilder()
                    .body(null)
                    .build())
            .build();
      }
      //判断是否需要重定向,如果需要重定向则返回一个重定向的Request,没有则为null
      Request followUp = followUpRequest(response);

      if (followUp == null) {
        //不需要重定向
        if (!forWebSocket) {
          //是WebSocket,释放
          streamAllocation.release();
        }
        //返回response
        return response;
      }
      //需要重定向,关闭响应流
      closeQuietly(response.body());
      //重定向次数++,并且小于最大重定向次数MAX_FOLLOW_UPS(20)
      if (++followUpCount > MAX_FOLLOW_UPS) {
        streamAllocation.release();
        throw new ProtocolException("Too many follow-up requests: " + followUpCount);
      }
      //是UnrepeatableRequestBody, 刚才看过也就是是流类型,没有被缓存,不能重定向
      if (followUp.body() instanceof UnrepeatableRequestBody) {
        streamAllocation.release();
        throw new HttpRetryException("Cannot retry streamed HTTP body", response.code());
      }
      //判断是否相同,不然重新创建一个streamConnection
      if (!sameConnection(response, followUp.url())) {
        streamAllocation.release();
        streamAllocation = new StreamAllocation(client.connectionPool(),
            createAddress(followUp.url()), call, eventListener, callStackTrace);
      } else if (streamAllocation.codec() != null) {
        throw new IllegalStateException("Closing the body of " + response
            + " didn't close its backing stream. Bad interceptor?");
      }
      //赋值再来!
      request = followUp;
      priorResponse = response;
    }
  }
默认的Okhttp是配置失败重连的 retryOnConnectionFailure = true
小结:
1.如果我们在配置OkHttpClient中配置retryOnConnectionFailure属性为false,表明拒绝失败重连,那么这 里返回false
2.如果请求已经发送,并且这个请求体是一个UnrepeatableRequestBody类型,则不能重试
3.如果是一些严重的问题(协议,安全...),拒绝重试
4.没有更多的可以使用的路由,则不要重试了
-
BridgeInterceptor:主要处理请求头,Gzip,以及cookie的处理
-
CacheInterceptor
1.通过Request尝试到Cache中拿缓存(里面非常多流程),当然前提是OkHttpClient中配置了缓存,默认是不支持的。 2.根据response,time,request创建一个缓存策略,用于判断怎样使用缓存。 3.如果缓存策略中设置禁止使用网络,并且缓存又为空,则构建一个Resposne直接返回,注意返回码=504 4.缓存策略中设置不使用网络,但是又缓存,直接返回缓存 5.接着走后续过滤器的流程,chain.proceed(networkRequest) 6.当缓存存在的时候,如果网络返回的Resposne为304,则使用缓存的Resposne。 7.构建网络请求的Resposne 8.当在OKHttpClient中配置了缓存,则将这个Resposne缓存起来。 9.缓存起来的步骤也是先缓存header,再缓存body。 10.返回Resposne。
Okhttp只能缓存Get请求,作者觉得技术上讲可以缓存head,post请求,但是这样做复杂度高而且收益低。
-
ConnectInterceptor(与服务器建立连接的过滤器)
-
CallServerInterceptor 数据交换(实际网络请求)
自定义过滤器
- 如果想统一处理服务端的某个状态码,比如401
class NetworkErrorCodeInterceptor : Interceptor {

    override fun intercept(chain: Interceptor.Chain): Response {
        val request = chain.request()
        val response = chain.proceed(request)

        if (response.code() == 401) {
            //do something
        }

        return response
    }
}
- 如果想给请求统一添加请求头
class RequestHeaderInterceptor : Interceptor {
    override fun intercept(chain: Interceptor.Chain): Response {

        val original = chain.request()
        val hmacBefore = getHMACString(original)
//        LogUtil.e("hmac=before=$hmacBefore")
        val hmacAfter = AlgorithmUtil.hmacSHA256(hmacBefore)
//        LogUtil.e("hmac=after=$hmacAfter")

        val request = original.newBuilder()
            .header("accept", "application/json")
            .header("content-type", "application/json")
            .header("clientVersion", BuildConfig.VERSION_NAME)
            .header("x-client-id", BuildConfig.CLIENT_ID)
            .header("x-session-token", SessionManager.getSessionToken())
            .header("x-hmac", hmacAfter)
            .header("x-anonymous", false.toString())
            .header("platform", APP_PLATFORM)
            .build()

        LogUtil.d("header=${request.headers()}")
        return chain.proceed(request)
    }
-
添加日志拦截器:HttpLoggingInterceptor
-
添加浏览器查看请求:StethoInterceptor
-
不算是拦截器OkHttpEventListener(继承于EventListener),是用于记录网络请求各个流程的时间,流量等等。
写在最后:
Okhttp在返回码大于等于200并且小于300的时候,才视为获取成功,否则会将返回的body放到错误的返回结果中,如下所示:
//Response
public boolean isSuccessful() {
  return code >= 200 && code < 300;
}

/** Create an error response from {@code rawResponse} with {@code body} as the error body. */
public static <T> Response<T> error(ResponseBody body, okhttp3.Response rawResponse) {
    checkNotNull(body, "body == null");
    checkNotNull(rawResponse, "rawResponse == null");
    if (rawResponse.isSuccessful()) {
      throw new IllegalArgumentException("rawResponse should not be successful response");
    }
    return new Response<>(rawResponse, null, body);
}
参考文章:
