

Paging 适用于分页加载的情况,文档简介:逐步从数据源按需加载信息。使用时需要与RecyclerView结合,让开发者无需关心数据的分页逻辑,将数据的获取逻辑完全与UI隔离,让开发者可以很简单的实现一个效果不错的分页加载。
使用需添加依赖,
implementation "androidx.paging:paging-runtime:2.1.2"
一、Paging 的组件
简单介绍Paging 的各个组件,知道各个组件是干什么的,才能好好运行。
1、PagedList
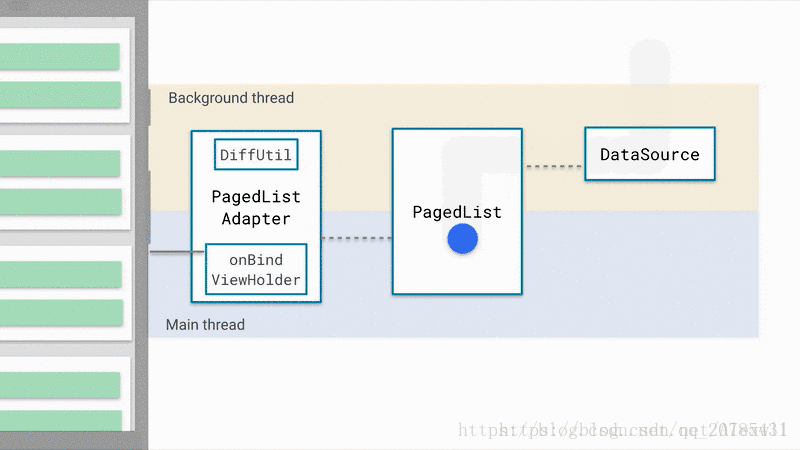
Google设计了一个新的数据结构PagedList,就是分页列表数据的容器。
PagedList 是Paging Library的关键组件,它是一个异步加载应用程序数据块或页面的集合。
在使用时可以与LiveData 配合,使用LiveData 观察者的特性,在获得数据后回调onChanged 方法,如下,
LiveData<PagedList<Title>> titlesLivePaged = mViewModel.getStudentsLivePaged();
titlesLivePaged.observe(this, new Observer<PagedList<Title>>() {
            @Override
            public void onChanged(PagedList<Title> titles) {
                mAdapter.submitList(titles);
            }
        });
通过PagedListAdapter 的submitList 方法,提交PagedList 。
2、DataSource.Factory
由其名字是数据源工厂,我们可以将获取数据的逻辑写在DataSource ,让然后通过DataSource.Factory 创建DataSource。
如果是从Room 获取数据,那写法会很简单,Room 会自动帮我们完成很多事情,
@Query("SELECT * FROM title_table ORDER BY id")
DataSource.Factory<Integer, Title> getAll();
我们通过查询语句查询表里的数据,然后返回值类型写成DataSource.Factory ,DataSource.Factory 的create 方法会创建DataSource 。
如果你要自己创建一个DataSource ,例如你想直接从网络获取数据,然后展示到界面上,那就需要自定义DataSource 了,这块放在下面描述。
3、LivePagedListBuilder
由上面可知,我们有了创建数据源的工厂(DataSource.Factory),新的数据结构(PagedList),那么是如何将两者配合使用的呢?就需要用到LivePagedListBuilder 了。
LivePagedListBuilder 的构造方法,
    public LivePagedListBuilder(@NonNull DataSource.Factory<Key, Value> dataSourceFactory,
            @NonNull PagedList.Config config) {
        ...
    }

    public LivePagedListBuilder(@NonNull DataSource.Factory<Key, Value> dataSourceFactory,
            int pageSize) {
        this(dataSourceFactory, new PagedList.Config.Builder().setPageSize(pageSize).build());
    }
可以传递DataSource.Factory 与int ,那么会为我们构建一个以int 值为pageSize 的默认的PagedList.Config ,
也可以传递DataSource.Factory 与PagedList.Config ,更加灵活的对分页进行配置。
看一下LivePagedListBuilder 的build 方法,
    @NonNull
    @SuppressLint("RestrictedApi")
    public LiveData<PagedList<Value>> build() {
        return create(mInitialLoadKey, mConfig, mBoundaryCallback, mDataSourceFactory,
                ArchTaskExecutor.getMainThreadExecutor(), mFetchExecutor);
    }
可以看到该方法,返回值类型就是LiveData<PagedList<Value>> ,所以我们可以右如下写法,
    return new LivePagedListBuilder<Integer, Title>(
                TitleRepository.getInstance().getAll(), // 得到DataSource.Factory<Integer, Title>
                new PagedList.Config.Builder()
                        .setPageSize(6)
                        .setPrefetchDistance(1)
                        .setEnablePlaceholders(false)
                        .setInitialLoadSizeHint(6)
                        .build()
        ).build();
获得了DataSource.Factory,工厂创建数据源DataSource,通过LivePagedListBuilder 的build 方法获得LiveData<PagedList<Value>>,还对分页加载进行了相关配置,例如指定pageSize 。
4、更多可选配置 PagedList.Config
    PagedList.Config config = new PagedList.Config.Builder()
                    .setPageSize(15)              // 分页加载的数量
                    .setInitialLoadSizeHint(30)   // 初次加载的数量
                    .setPrefetchDistance(10)      // 预取数据的距离
                    .setEnablePlaceholders(false) // 是否启用占位符
                    .build();
分页数量 PageSize ,每页加载数据的数量,
初始加载数量,InitialLoadSizeHint ,首次加载时要加载的Item数量,
此值通常大于PageSize,因此在初始化列表时,该配置可以使得加载的数据保证屏幕可以小范围的滚动。如果未设置,则默认为PageSize的三倍。
预取距离,PrefetchDistance , 该参数配置定义了列表当距离加载边缘多远时进行分页的请求,
是否启用占位符,PlaceholderEnabled ,该配置项需要传入一个boolean值以决定列表是否开启placeholder(占位符),
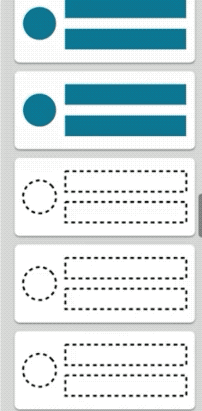
根据数据加载的情况,可能会看到还未渲染的条目,先展示占位符,随着PagedList下一页数据的异步加载完毕,伴随着RecyclerView的原生动画,新的数据会被重新覆盖渲染到placeholder对应的条目上。
5、PagedListAdapter
基于RecyclerView.Adapter 封装,PagedListAdapter 这个类还是很小的,因为相关的数据处理逻辑委托给了AsyncPagedListDiffer ,
当数据源发生改变时,实际上会通知 AsyncPagedListDiffer 的 submitList 方法,
AsyncPagedListDiffer 持有一个ListUpdateCallback ,通过其构造函数可知是AdapterListUpdateCallback,
    @SuppressWarnings("WeakerAccess")
    public AsyncPagedListDiffer(@NonNull RecyclerView.Adapter adapter,
            @NonNull DiffUtil.ItemCallback<T> diffCallback) {
        mUpdateCallback = new AdapterListUpdateCallback(adapter);
        mConfig = new AsyncDifferConfig.Builder<>(diffCallback).build();
    }
看一下AdapterListUpdateCallback 类,
/**
 * ListUpdateCallback that dispatches update events to the given adapter.
 *
 * @see DiffUtil.DiffResult#dispatchUpdatesTo(RecyclerView.Adapter)
 */
public final class AdapterListUpdateCallback implements ListUpdateCallback {
    @NonNull
    private final RecyclerView.Adapter mAdapter;

    /**
     * Creates an AdapterListUpdateCallback that will dispatch update events to the given adapter.
     *
     * @param adapter The Adapter to send updates to.
     */
    public AdapterListUpdateCallback(@NonNull RecyclerView.Adapter adapter) {
        mAdapter = adapter;
    }

    /** {@inheritDoc} */
    @Override
    public void onInserted(int position, int count) {
        mAdapter.notifyItemRangeInserted(position, count);
    }

    /** {@inheritDoc} */
    @Override
    public void onRemoved(int position, int count) {
        mAdapter.notifyItemRangeRemoved(position, count);
    }

    /** {@inheritDoc} */
    @Override
    public void onMoved(int fromPosition, int toPosition) {
        mAdapter.notifyItemMoved(fromPosition, toPosition);
    }

    /** {@inheritDoc} */
    @Override
    public void onChanged(int position, int count, Object payload) {
        mAdapter.notifyItemRangeChanged(position, count, payload);
    }
}
可见还是调用了RecyclerView.Adapter 的相应更新方法。
二、Paging 使用案例
先从简单的入手,然后扩展。
结合Room 实现一个简单的案例
“最小应用”,一个最基本的使用Paging 分页加载,从Room 获取数据的案例。
1、设置好我们的RecyclerView ,Paging 是要结合RecyclerView 的。
recyclerView = findViewById(R.id.paging_rv);
recyclerView.setLayoutManager(new LinearLayoutManager(this, RecyclerView.VERTICAL, false));
mAdapter = new MyPagedAdapter();
recyclerView.setAdapter(mAdapter);
2、PagedListAdapter
public class MyPagedAdapter extends PagedListAdapter<Title, MyPagedAdapter.MyViewHolder> {

    protected MyPagedAdapter() {
        super(new DiffUtil.ItemCallback<Title>() {
            @Override
            public boolean areItemsTheSame(@NonNull Title oldItem, @NonNull Title newItem) {
                return oldItem.getId() == newItem.getId();
            }

            @Override
            public boolean areContentsTheSame(@NonNull Title oldItem, @NonNull Title newItem) {
                return oldItem.getNum() == newItem.getNum();
            }
        });
    }

    @NonNull
    @Override
    public MyViewHolder onCreateViewHolder(@NonNull ViewGroup parent, int viewType) {
        LayoutInflater inflater = LayoutInflater.from(parent.getContext());
        View view = inflater.inflate(R.layout.paged_item, parent, false);
        return new MyViewHolder(view);
    }

    @Override
    public void onBindViewHolder(@NonNull MyViewHolder holder, int position) {
        Title student = getItem(position);
        if (student != null) {
            holder.textView.setText(String.valueOf(student.getNum()));
        }
    }

    static class MyViewHolder extends RecyclerView.ViewHolder {
        TextView textView;
        public MyViewHolder(@NonNull View itemView) {
            super(itemView);
            textView = itemView.findViewById(R.id.text_paged);
        }
    }
}
实现onCreateViewHolder 与onBindViewHolder ,写法与之前的差不多,不同的是需要在构造函数中,向父类传入,DiffUtil.ItemCallback<T> ,用来比较是否相同,这里比较的id 与num ,都相同则代表数据是没有变的,这个比较标准需要你来指定。
3、构建PagedList ,
@Dao
public interface TitleDao {
    @Query("SELECT * FROM title_table ORDER BY id")
    DataSource.Factory<Integer, Title> getAll();
    ...
}

public class TitleRepository {
    ...

    public DataSource.Factory<Integer, Title> getAll() {
        return titleDao.getAll();
    }
}
用上面提到的LivePagedListBuilder 把数据源的数据,构建成LiveData<PagedList<Title>> 类型。
    public LiveData<PagedList<Title>> getStudentsLivePaged() {
        return new LivePagedListBuilder<Integer, Title>(
                TitleRepository.getInstance().getAll(), // 得到DataSource.Factory<Integer, Title>
                new PagedList.Config.Builder()
                        .setPageSize(6)
                        .setPrefetchDistance(1)
                        .setEnablePlaceholders(false)
                        .setInitialLoadSizeHint(12)
                        .build()
        ).setBoundaryCallback(boundaryCallback)
                .build();
    }
4、通过PagedListAdapter 的submitList 方法对PagedList 进行提交。
    titlesLivePaged = mViewModel.getStudentsLivePaged();
    titlesLivePaged.observe(this, new Observer<PagedList<Title>>() {
            @Override
            public void onChanged(PagedList<Title> titles) {
                mAdapter.submitList(titles);
            }
        });
这样就可以将数据库里的数据分页展示出来,根据我们的设置,开始先加载12 项,之后一页6 项的加载。
自定义DataSource
之前是用了Room 的便捷性自动为我们创建了相关DataSource ,但学会了自定义DataSource 才能更好的理解Paging 。
Paging库里提供了DataSource 的三个子类,根据不同场景选择使用,
PageKeyedDataSource<Key, Value> ,适用于目标数据根据页信息请求数据的场景,
即Key 字段是页相关的信息。比如请求的数据的参数包含类似next/previous页数的信息。

ItemKeyedDataSource<Key, Value> ,适用于目标数据的加载依赖特定item 的信息,
即Key字段包含的是Item 里的信息,比如需要根据第N项的信息加载第N+1项的数据,
传参需要传入第N项的ID 。

PositionalDataSource<T> ,适用于目标数据总数固定,通过特定的位置加载数据,
这里Key是Integer类型的位置信息,T即Value。比如从数据库中的1200条开始加在20条数据。
理论上,任选其一大多数情况下都能实现出来的,只是在某些情况更适合哪个的问题了。
这里选用了PositionalDataSource ,
public class CustomDataSource extends PositionalDataSource<Blog> {
    @Override
    public void loadInitial(@NonNull LoadInitialParams params, @NonNull LoadInitialCallback<Blog> callback) {
        int pageSize = params.requestedLoadSize; //首次加载的数据条数
        int offset = 0; // 请求的数据的偏移位置

        int position = computeInitialLoadPosition(params, pageSize);

        callback.onResult(DataUtil.httpRequest(pageSize, offset), position);
    }

    @Override
    public void loadRange(@NonNull LoadRangeParams params, @NonNull LoadRangeCallback<Blog> callback) {
        int pageSize = params.loadSize;
        int offset = params.startPosition;

        callback.onResult(DataUtil.httpRequest(pageSize, offset));
    }
}
这里继承PositionalDataSource ,需要实现两个方法loadInitial 与loadRange ,由名字可知,一个是首次加载,一个是滑动加载下一页,根据具体情况,自行计算,每一页的大小pageSize 与初始偏移位置offset ,当然这些需要视接口情况而定啦。
loadInitial 方法里的position 是将获得的数据插入到列表的什么位置。
前面我们知道DataSource.Factory 创建DataSource ,那么来实现一下,这个还是相当简单的,
public class CustomDataSourceFactory extends DataSource.Factory<Integer, Blog> {
    @NonNull
    @Override
    public DataSource<Integer, Blog> create() {
        return new CustomDataSource();
    }
}
继承DataSource.Factory 实现create 方法,返回自定义的DataSource 实例即可。
    return new LivePagedListBuilder<Integer, Blog>(
                new CustomDataSourceFactory(),
                new PagedList.Config.Builder()
                        .setPageSize(6)
                        .setPrefetchDistance(1)
                        .setEnablePlaceholders(false)
                        .setInitialLoadSizeHint(6)
                        .build()
        ).build();
这样使用就可以啦。
Paging 数据加载与展示
跟进Paging 源码,走了一下流程,感受一下Paging 的工作流程,这样还是有助于理解Paging 的,这里做一下笔记。
LiveData 的observe 方法
    titlesLivePaged.observe(this, new Observer<PagedList<Title>>() {
            @Override
            public void onChanged(PagedList<Title> titles) {
                mAdapter.submitList(titles);
            }
        });
我们这样设置观察者,来看看做了哪些事情吧,
@MainThread
    public void observe(@NonNull LifecycleOwner owner, @NonNull Observer<? super T> observer) {
        ...
        LifecycleBoundObserver wrapper = new LifecycleBoundObserver(owner, observer);
        ...
        owner.getLifecycle().addObserver(wrapper);
    }
getLifecycle得到的是什么呢?不妨看一下LifecycleOwner 的一个实现类ComponentActivity ,看看它的getLifecycle 方法,发现是LifecycleRegistry类,跟进它的addObserver 方法,
    @Override
    public void addObserver(@NonNull LifecycleObserver observer) {
        ...
        ObserverWithState statefulObserver = new ObserverWithState(observer, initialState);
        ...
            statefulObserver.dispatchEvent(lifecycleOwner, upEvent(statefulObserver.mState));
        ...
    }
添加观察者的时候,这个dispatchEvent 方法会调用一次,
    void dispatchEvent(LifecycleOwner owner, Event event) {
            State newState = getStateAfter(event);
            mState = min(mState, newState);
            mLifecycleObserver.onStateChanged(owner, event);
            mState = newState;
        }
最终会调用LifecycleBoundObserver的的onStateChanged方法,
@Override
        public void onStateChanged(@NonNull LifecycleOwner source,
                @NonNull Lifecycle.Event event) {
            if (mOwner.getLifecycle().getCurrentState() == DESTROYED) {
                removeObserver(mObserver);
                return;
            }
            activeStateChanged(shouldBeActive());
        }
跟进activeStateChanged 方法,
void activeStateChanged(boolean newActive) {
            ...
            if (wasInactive && mActive) {
                onActive();
            }
            if (LiveData.this.mActiveCount == 0 && !mActive) {
                onInactive();
            }
            if (mActive) {
                dispatchingValue(this);
            }
        }
第一次调用的时候会满足条件,然后就调用到LiveData 的onActive 方法,
所以,在调用observe 为LiveData 设置观察者,会调用到LiveData 的onActive 方法。
创建LiveData<PagedList<Value>>
    public LiveData<PagedList<Value>> build() {
        return create(mInitialLoadKey, mConfig, mBoundaryCallback, mDataSourceFactory,
                ArchTaskExecutor.getMainThreadExecutor(), mFetchExecutor);
    }
LivePagedListBuilder 的create() ,
    @AnyThread
    @NonNull
    @SuppressLint("RestrictedApi")
    private static <Key, Value> LiveData<PagedList<Value>> create(
            @Nullable final Key initialLoadKey,
            @NonNull final PagedList.Config config,
            @Nullable final PagedList.BoundaryCallback boundaryCallback,
            @NonNull final DataSource.Factory<Key, Value> dataSourceFactory,
            @NonNull final Executor notifyExecutor,
            @NonNull final Executor fetchExecutor) {
        return new ComputableLiveData<PagedList<Value>>(fetchExecutor) {
            @Nullable
            private PagedList<Value> mList;
            @Nullable
            private DataSource<Key, Value> mDataSource;

            private final DataSource.InvalidatedCallback mCallback =
                    new DataSource.InvalidatedCallback() {
                        @Override
                        public void onInvalidated() {
                            invalidate();
                        }
                    };

            @SuppressWarnings("unchecked") // for casting getLastKey to Key
            @Override
            protected PagedList<Value> compute() {
                @Nullable Key initializeKey = initialLoadKey;
                if (mList != null) {
                    initializeKey = (Key) mList.getLastKey();
                }

                do {
                    if (mDataSource != null) {
                        mDataSource.removeInvalidatedCallback(mCallback);
                    }

                    mDataSource = dataSourceFactory.create();
                    mDataSource.addInvalidatedCallback(mCallback);

                    mList = new PagedList.Builder<>(mDataSource, config)
                            .setNotifyExecutor(notifyExecutor)
                            .setFetchExecutor(fetchExecutor)
                            .setBoundaryCallback(boundaryCallback)
                            .setInitialKey(initializeKey)
                            .build();
                } while (mList.isDetached());
                return mList;
            }
        }.getLiveData();
    }
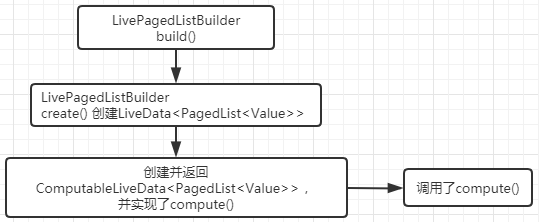
从这个create 方法可见,该方法是先创建了一个ComputableLiveData 对象,实现了其compute 方法,在compute 方法创建了PagedList<Value> ,最后调用其getLiveData() 返回LiveData 对象。
ComputableLiveData 的compute 方法创建了PagedList ,那么这个compute 方法什么时候调用的呢?
ComputableLiveData 构造函数,
public ComputableLiveData(@NonNull Executor executor) {
        mExecutor = executor;
        mLiveData = new LiveData<T>() {
            @Override
            protected void onActive() {
                mExecutor.execute(mRefreshRunnable);
            }
        };
    }
创建了LiveData ,在我们调用observe 方法,会执行onActive 方法,那么便会执行这个mRefreshRunnable ,而且还是在子线程(executor 是fetchExecutor),看一下mRefreshRunnable ,
@VisibleForTesting
    final Runnable mRefreshRunnable = new Runnable() {
        @WorkerThread
        @Override
        public void run() {
            ...
            T value = null;
            while (mInvalid.compareAndSet(true, false)) {
                computed = true;
                value = compute();
            }
            if (computed) {
                mLiveData.postValue(value);
            }
            ...
        }
    };
这里主要看一下,在mRefreshRunnable 的run 方法,调用了compute() ,而这个value 自然就是生成的PagedList<Value> ,执行mLiveData.postValue(value); 这样会在主线程回调LiveData 的onChanged 方法,我们也就可以获得PagedList ,提交给PagedListAdapter 了。
DataSource 的数据填充到PagedList
@NonNull
@SuppressWarnings("WeakerAccess") /* synthetic access */
static <K, T> PagedList<T> create(@NonNull DataSource<K, T> dataSource,
@NonNull Executor notifyExecutor,
@NonNull Executor fetchExecutor,
@Nullable BoundaryCallback<T> boundaryCallback,
@NonNull Config config,
@Nullable K key) {
if (dataSource.isContiguous() || !config.enablePlaceholders) {
int lastLoad = ContiguousPagedList.LAST_LOAD_UNSPECIFIED;
if (!dataSource.isContiguous()) {
//noinspection unchecked
dataSource = (DataSource<K, T>) ((PositionalDataSource<T>) dataSource)
.wrapAsContiguousWithoutPlaceholders();
if (key != null) {
lastLoad = (Integer) key;
}
}
ContiguousDataSource<K, T> contigDataSource = (ContiguousDataSource<K, T>) dataSource;
return new ContiguousPagedList<>(contigDataSource,
notifyExecutor,
fetchExecutor,
boundaryCallback,
config,
key,
lastLoad);
} else {
return new TiledPagedList<>((PositionalDataSource<T>) dataSource,
notifyExecutor,
fetchExecutor,
boundaryCallback,
config,
(key != null) ? (Integer) key : 0);
}
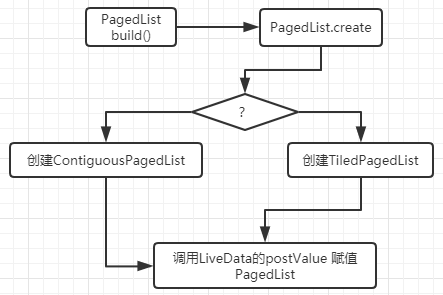
}
根据DataSource 的连续性与config.enablePlaceholders ,决定去创建ContiguousPagedList ,还是 TiledPagedList ,这里如果是使用的PageKeyedDataSource 的话,那么将会创建的是ContiguousPagedList ,看一下使用PageKeyedDataSource 的情况,
    ContiguousPagedList(
                @NonNull ContiguousDataSource<K, V> dataSource,
                @NonNull Executor mainThreadExecutor,
                @NonNull Executor backgroundThreadExecutor,
                @Nullable BoundaryCallback<V> boundaryCallback,
                @NonNull Config config,
                final @Nullable K key,
                int lastLoad) {
            super(new PagedStorage<V>(), mainThreadExecutor, backgroundThreadExecutor,
                    boundaryCallback, config);
            mDataSource = dataSource;
            mLastLoad = lastLoad;
            ...
            mDataSource.dispatchLoadInitial(key,
                    mConfig.initialLoadSizeHint,
                    mConfig.pageSize,
                    mConfig.enablePlaceholders,
                    mMainThreadExecutor,
                    mReceiver);
        }
跟进一下dispatchLoadInitial 方法,我们看的是使用的PageKeyedDataSource 的情况,
@Override
    final void dispatchLoadInitial(@Nullable Key key, int initialLoadSize, int pageSize,
            boolean enablePlaceholders, @NonNull Executor mainThreadExecutor,
            @NonNull PageResult.Receiver<Value> receiver) {
        LoadInitialCallbackImpl<Key, Value> callback =
                new LoadInitialCallbackImpl<>(this, enablePlaceholders, receiver);
        loadInitial(new LoadInitialParams<Key>(initialLoadSize, enablePlaceholders), callback);

        // If initialLoad's callback is not called within the body, we force any following calls
        // to post to the UI thread. This constructor may be run on a background thread, but
        // after constructor, mutation must happen on UI thread.
        callback.mCallbackHelper.setPostExecutor(mainThreadExecutor);
    }
这里的loadInitial 方法,就是我们在自定义PageKeyedDataSource 的时候,实现的初次加载的方法,将首次加载数据的逻辑写在了该方法,
    @Override
    public void loadInitial(@NonNull LoadInitialParams<Integer> params, @NonNull LoadInitialCallback<Integer, Shoe> callback) {
        ...
        List<Shoe> shoes = mShoeRepository.getPageShoes(startIndex, endIndex);
        callback.onResult(shoes, null, nextKey);
    }
而且还会调用到callback 的 onResult 方法,这个callback 就是LoadInitialCallbackImpl ,
        @Override
        public void onResult(@NonNull List<Value> data, @Nullable Key previousPageKey,
                @Nullable Key nextPageKey) {
            ...
                mCallbackHelper.dispatchResultToReceiver(new PageResult<>(data, 0, 0, 0));
        }
跟进,
    void dispatchResultToReceiver(final @NonNull PageResult<T> result) {
            ...
                mReceiver.onPageResult(mResultType, result);
        }
这个mReceiver 是ContiguousPagedList 的 mReceiver (我们看的是PageKeyedDataSource 这种情况)
@SuppressWarnings("WeakerAccess") /* synthetic access */
            PageResult.Receiver<V> mReceiver = new PageResult.Receiver<V>() {
        // Creation thread for initial synchronous load, otherwise main thread
        // Safe to access main thread only state - no other thread has reference during construction
        @AnyThread
        @Override
        public void onPageResult(@PageResult.ResultType int resultType,
                                 @NonNull PageResult<V> pageResult) {
            ...
            List<V> page = pageResult.page;
            if (resultType == PageResult.INIT) {
                mStorage.init(pageResult.leadingNulls, page, pageResult.trailingNulls,
                        pageResult.positionOffset, ContiguousPagedList.this);
                if (mLastLoad == LAST_LOAD_UNSPECIFIED) {
                    // Because the ContiguousPagedList wasn't initialized with a last load position,
                    // initialize it to the middle of the initial load
                    mLastLoad =
                            pageResult.leadingNulls + pageResult.positionOffset + page.size() / 2;
                }
            } else {
                ...
            }
            ...
        }
    };
显然第一次是PageResult.INIT ,将数据保存到PagedList 的一个PagedStorage 类型的的成员变量mStorage 里,这样DataSource 得到的数据就填充到了PagedList ,
PagedList 创建完在ComputableLiveData 的compute 方法返回,有调用了mLiveData.postValue(value); ,所以会回调到Observer 的onChanged 方法。
加载更多
PagedListAdapter 的getItem 方法,
    @Nullable
    protected T getItem(int position) {
        return mDiffer.getItem(position);
    }
跟进,
@SuppressWarnings("WeakerAccess")
    @Nullable
    public T getItem(int index) {
        if (mPagedList == null) {
            if (mSnapshot == null) {
                throw new IndexOutOfBoundsException(
                        "Item count is zero, getItem() call is invalid");
            } else {
                return mSnapshot.get(index);
            }
        }

        mPagedList.loadAround(index);
        return mPagedList.get(index);
    }
在返回数据之前调用了PagedList 的 loadAround 方法,
public void loadAround(int index) {
        ...
        mLastLoad = index + getPositionOffset();
        loadAroundInternal(index);
        ...
    }
考虑使用PageKeyedDataSource 的话,最终会调用到,
    @MainThread
    @Override
    protected void loadAroundInternal(int index) {
        int prependItems = getPrependItemsRequested(mConfig.prefetchDistance, index,
                mStorage.getLeadingNullCount());
        int appendItems = getAppendItemsRequested(mConfig.prefetchDistance, index,
                mStorage.getLeadingNullCount() + mStorage.getStorageCount());

        mPrependItemsRequested = Math.max(prependItems, mPrependItemsRequested);
        if (mPrependItemsRequested > 0 && mLoadStateManager.getStart() == LoadState.IDLE) {
            schedulePrepend();
        }

        mAppendItemsRequested = Math.max(appendItems, mAppendItemsRequested);
        if (mAppendItemsRequested > 0 && mLoadStateManager.getEnd() == LoadState.IDLE) {
            scheduleAppend();
        }
    }
根据prefetchDistance 与 index 来调用schedulePrepend() 或 scheduleAppend() 哦,上拉加载更多调用的是scheduleAppend() ,
    @MainThread
    private void scheduleAppend() {
        ...
        mBackgroundThreadExecutor.execute(new Runnable() {
            @Override
            public void run() {
                ...
                if (mDataSource.isInvalid()) {
                    detach();
                } else {
                    mDataSource.dispatchLoadAfter(position, item, mConfig.pageSize,
                            mMainThreadExecutor, mReceiver);
                }
            }
        });
    }
在子线程调用了dispatchLoadAfter 方法,对应就是,PageKeyedDataSource 的dispatchLoadAfter 方法,
@Override
    final void dispatchLoadAfter(int currentEndIndex, @NonNull Value currentEndItem,
            int pageSize, @NonNull Executor mainThreadExecutor,
            @NonNull PageResult.Receiver<Value> receiver) {
        @Nullable Key key = getNextKey();
        if (key != null) {
            loadAfter(new LoadParams<>(key, pageSize),
                    new LoadCallbackImpl<>(this, PageResult.APPEND, mainThreadExecutor, receiver));
        } else {
            receiver.onPageResult(PageResult.APPEND, PageResult.<Value>getEmptyResult());
        }
    }
loadAfter 方法,就是自定义PageKeyedDataSource 时,实现的方法,实现了加载更多数据的逻辑。
