

MongoDB相关概念-基于4.0.10的版本
| 术语 | 解释说明 |
|---|---|
| database | 数据库,mongoDB数据库软件中可以建立多个数据库 |
| collection | 集合,一组数据的集合,可以理解为JavaScript中的数组 |
| document | 文档,一条具体的数据,可以理解为JavaScript中的对象,一个json对象 |
| field | 字段,文档中的属性名称,可以理解为JavaScript中的对象属性 |
Mongoose第三方包
- 使用Node.js操作MongoDB数据库需要依赖Node.js第三方包mongoose
- 使用npm install mongoose命令下载
启动mongoDB服务
- 启动:net start mongodb
- 停止 net stop mongodb
使用connect连接数据库
const mongoose = require('mongoose');
mongoose.Promise = global.Promise;
mongoose.connect('mongodb://localhost/play',{
    useMongoClient: true,//useMongoClient您可以在顶层声明许多声明和配置,而无需所有额外的嵌套
}).then((db)=>{
    console.log("success")
}).catch(err => console.log(err));
创建集合
 const mongoose = require('mongoose');
mongoose.Promise = global.Promise;
mongoose.connect('mongodb://localhost/my_data', {
    useMongoClient: true,//useMongoClient您可以在顶层声明许多声明和配置,而无需所有额外的嵌套
}).then((db) => {
    console.log("success")
    /*console.log(db);*/
}).catch(err => console.log(err));
//创建集合规则
const courseSchema = new mongoose.Schema({
    name: String,
    authors: String,
    isPublic: Boolean
});
//使用规则创建集合,返回的是构造函数
const course = mongoose.model('Course', courseSchema);//数据库中的集合名字叫做courses
//创建实例文档
let cou = new course({
    //传入数据
    name: 'lizeyu',
    authors: 'jkcb',
    isPublic: false
});
//保存到数据库当中
cou.save().then(r => console.log(r)).catch(err => console.log(err));
创建文档
创建文档实际上就是向集合当中插入数据
//创建文档的另一种形式,用回调函数接收错误信息和插入的数据
course.create({name:'lihua',authors:'wanghua',isPublic:true},(err,course)=>{
    if (err) console.log(err);
    else console.log(course);
});
//插入数据的操作也是异步的api,可以用then,catch处理返回的Promise
course.create({
    name: 'lihua',
    authors: 'wanghua',
    isPublic: true
}).then(data => {
    console.log(data);
}).catch(err => console.log(err))
导入数据
使用命令行,使用之前要将mongoimport的命令添加到环境变量当中
mongoimport -d 数据库名称 -c 集合名称 --file 要导入的数据文件,可以是json格式相对于当前目录的位置
查询文档
const mongoose = require('mongoose');
mongoose.Promise = global.Promise;
mongoose.connect('mongodb://localhost/my_data', {
    useMongoClient: true,//useMongoClient您可以在顶层声明许多声明和配置,而无需所有额外的嵌套
}).then((db) => {
    console.log("success")
    /*console.log(db);*/
}).catch(err => console.log(err));
const UserSchema = new mongoose. Schema({
    name : String ,
    age : Number ,
    email : String ,
    password: String,
    hobbies: [String]
    });
//使用规则创建集合
const User = mongoose.model('User', UserSchema);//数据库中集合的名字是users
User.find({name:'张三'}).then((user) => {console.log(user)});//返回一个数组
User.findOne({name:'张三'}).then((user) => {console.log(user)});//返回查询到的第一条记录
条件查询
const mongoose = require('mongoose');
mongoose.Promise = global.Promise;
mongoose.connect('mongodb://localhost/my_data', {
    useMongoClient: true,//useMongoClient您可以在顶层声明许多声明和配置,而无需所有额外的嵌套
}).then((db) => {
    console.log("success")
    /*console.log(db);*/
}).catch(err => console.log(err));
const UserSchema = new mongoose.Schema({
    name: String,
    age: Number,
    email: String,
    password: String,
    hobbies: [String]
});
//使用规则创建集合
const User = mongoose.model('User', UserSchema);//数据库中集合的名字是users
/*User.find({name: '张三'}).then((user) => {
    console.log(user)
});
User.findOne({name: '张三'}).then((user) => {
    console.log(user)
});*/
User.find({
//大于和小于
    age: {
        $gt: 9,
        $lt: 60
    }, hobbies: {
    //包含
        $in: ['足球']
    }
    //限制前10条,按照年龄升序排列,只展示name和gae hobbies字段
}).limit(10).sort({age:1}).select('name' +
    ' age hobbies').then(result => {console.log(result)});
删除文档
//删除一条
User.deleteOne({name: '张三'}).then((user) => {
    console.log(user)
});
//删除一个
User.remove({name: '张三'}).then((user) => {
    console.log(user)
});
//删除多条
User.deleteMany({name:
 '张三'}).then((user) => {
    console.log(user)
});
更新文档
//传入查询条件和要修改的值
User.updateOne({name: '李四'}, {name: '李泽'}).then(result => {
    console.log(result)
});
User.updateMany({name: '李四'}, {name: '李泽'}).then(result => {
    console.log(result)
});
Mongoose验证
在创建集合规则的时候,可以设置当前字段的验证规则,验证失败就不能插入,即插入失败
const mongoose = require('mongoose');
mongoose.Promise = global.Promise;
mongoose.connect('mongodb://localhost/my_data', {
    useMongoClient: true,//useMongoClient您可以在顶层声明许多声明和配置,而无需所有额外的嵌套
}).then((db) => {
    console.log("success")
    /*console.log(db);*/
}).catch(err => console.log(err));
const ArticleSchema = new mongoose.Schema({
    title: {
        type: "string",
        //必选属性
        required: [true,'title is required!!'],
        //最大长度
        maxlength:[6,'length must shorter than 7'],
        //最小长度
        minlength:2,
        //为了去除字符串前面两端的空格
        trim:true
    },

});
const Post =  mongoose.model('Article', ArticleSchema);
let pos = new Post({});
pos.save().then((res) => {console.log(res);});
//UnhandledPromiseRejectionWarning: ValidationError: Article validation failed: title: title is required!!
let pos2 = new Post({title:'A'});
pos2.save().then((res) => {console.log(res);});
// UnhandledPromiseRejectionWarning: ValidationError: Article validation failed: title: Path `title` (`A`) is shorter than the minimum allowed length (2).
自定义验证规则
const mongoose = require('mongoose');
mongoose.Promise = global.Promise;
mongoose.connect('mongodb://localhost/my_data', {
    useMongoClient: true,//useMongoClient您可以在顶层声明许多声明和配置,而无需所有额外的嵌套
}).then((db) => {
    console.log("success")
    /*console.log(db);*/
}).catch(err => console.log(err));
const ArticleSchema = new mongoose.Schema({
    title: {
        type: "string",
        required: [true, 'title is required!!'],
        maxlength: [6, 'length must shorter than 7'],
        minlength: 2,
        //为了去除字符串前面两端的空格
        trim: true
    },
    age: {
        type: Number,
        //数值的约束
        default: 18,//默认值
        max: 100,
        min: 1
    },
    publicDate: {
        type: Date,
        default: Date.now(),
    },
    category: {
        type: String,
        enum: ["html", "css"]//枚举属性,只能插入该数组内的值
    },
    author: {
        type: String,
        validate: {
            validator: (value) => {
                //自定义验证器,返回true表示可以插入,false代表不符合验证条件
                return value && value.length >= 4;
            },
            message:'传入的值不符合验证规则'
        }
    }
});
const Post = mongoose.model('Article', ArticleSchema);
let pos = new Post({
    title: "Aacss",
    age: 55,
    category: 'css',
    author:'liw'
});
pos.save().then((res) => {
    console.log(res);
});
打印自定义错误信息
const mongoose = require('mongoose');
mongoose.Promise = global.Promise;
mongoose.connect('mongodb://localhost/my_data', {
    useMongoClient: true,//useMongoClient您可以在顶层声明许多声明和配置,而无需所有额外的嵌套
}).then((db) => {
    console.log("success")
    /*console.log(db);*/
}).catch(err => console.log(err));
const ArticleSchema = new mongoose.Schema({
    title: {
        type: String,
        required: [true, 'title is required!!'],
        maxlength: [6, 'length must shorter than 7'],
        minlength: 2,
        //为了去除字符串前面两端的空格
        trim: true
    },
    age: {
        type: Number,
        //数值的约束
        default: 18,//默认值
        max: 100,
        min: 1
    },
    publicDate: {
        type: Date,
        default: Date.now(),
    },
    category: {
        type: String,
        enum:  [["html", "css"],'不在数字内的数据']//枚举属性,只能插入该数组内的值

    },
    author: {
        type: String,
        validate: {
            validator: (value) => {
                //自定义验证器,返回true表示可以插入,false代表不符合验证条件
                return value && value.length >= 4;
            },
            message: '传入的值不符合验证规则'
        }
    }
});
const Post = mongoose.model('Article', ArticleSchema);
Post.create({
    title: 'aa',
    age: 60,
    category: 'jaa',
    author: 'bd'
}).then(result => console.log(result))
    .catch((error) => {
//获取错误信息对象
            let err = error.errors;
//循环错误信息对象
            for (let attr in err) {
                //将错误信息打印到控制台中
                console.log(err[attr]['message']);
            }
        }
    );
集合的关联查询
const mongoose = require('mongoose');
mongoose.Promise = global.Promise;
mongoose.connect('mongodb://localhost/my_data', {
    useMongoClient: true,//useMongoClient您可以在顶层声明许多声明和配置,而无需所有额外的嵌套
}).then((db) => {
    console.log("success")
    /*console.log(db);*/
}).catch(err => console.log(err));
const User = mongoose.model("User", new mongoose.Schema({name: String}));

const Post = mongoose.model("Post", new mongoose.Schema({
    title: String,
    //使用id将user和post集合关联起来
    author: {
        type: mongoose.Schema.Types.ObjectId,
        ref: 'User'
    }
}));
//插入数据
/*User.create({name: 'lizey'}).then(result => {console.log(result)});*/
/*Post.create({title: 'wohaole',author:'5ea1752dfe70e8330c517185'});*/
//populate关键字实现关联查询
Post.find().populate('author').then((result,err) => {console.log(result)})
例子:用户信息管理
const http = require('http');
const mongoose = require('mongoose');
const url = require('url');
const qs = require('querystring');
const app = http.createServer();
mongoose.connect('mongodb://localhost/my_data', {
    //useMongoClient您可以在顶层声明许多声明和配置,而无需所有额外的嵌套
    useNewUrlParser: true,
    useUnifiedTopology: true
}).then(res => {
    console.log('success')
}).catch(err => console.log(err));
const UserSchema = new mongoose.Schema({
    name: {
        type: String,
        required: true,
        minLength: 2,
        maxLength: 25
    },
    age: {
        type: Number,
        min: 18,
        max: 80
    },
    password: {
        type: String,
        required: true
    },
    email: {
        type: String
    },
    hobbies: {
        type: [String]
    }
});
const User = mongoose.model('User', UserSchema);
app.on('request', async (req, res) => {
    const method = req.method;
    const {pathname, query} = url.parse(req.url, true);
    if (method === 'GET') {
        if (pathname === '/list') {
            let usersData = await User.find();
            /*        console.log(usersData);*/
            let listPageBefore = `<!DOCTYPE html>
<html lang="en">
<head>
\t<meta charset="UTF-8">
\t<title>用户列表</title>
\t<link rel="stylesheet" href="https://cdn.jsdelivr.net/npm/bootstrap@3.3.7/dist/css/bootstrap.min.css">
</head>
<body>
\t<div class="container">
\t\t<h6>
\t\t\t<a href="/add" class="btn btn-primary">添加用户</a>
\t\t</h6>
\t\t<table class="table table-striped table-bordered">
\t\t\t<tr>
\t\t\t\t<td>用户名</td>
\t\t\t\t<td>年龄</td>
\t\t\t\t<td>爱好</td>
\t\t\t\t<td>邮箱</td>
\t\t\t\t<td>操作</td>
\t\t\t</tr>`;
            usersData.forEach(item => {
                listPageBefore += `<tr>
\t\t\t\t<td>${item.name}</td>
\t\t\t\t<td>${item.age}</td>
\t\t\t\t<td>`;
                item.hobbies.forEach((current, index) => {
                    listPageBefore += `\t\t\t\t\t<span>${current}</span>`
                });
                listPageBefore +=
                    `\t\t\t\t</td>
\t\t\t\t<td>${item.email}</td>
\t\t\t\t<td>
\t\t\t\t\t<a href="/delete?id=${item.id}" class="btn btn-danger btn-xs">删除</a>
\t\t\t\t\t<a href="/modify?id=${item.id}" class="btn btn-success btn-xs">修改</a>
\t\t\t\t</td>
\t\t\t</tr>`
            });
            listPageBefore += `
\t\t</table>
\t</div>
</body>
</html>`;
            res.end(listPageBefore);
        } else if (pathname === '/add') {
            let add = `<!DOCTYPE html>
<html lang="en">
<head>
\t<meta charset="UTF-8">
\t<title>用户列表</title>
\t<link rel="stylesheet" href="https://cdn.jsdelivr.net/npm/bootstrap@3.3.7/dist/css/bootstrap.min.css">
</head>
<body>
\t<div class="container">
\t\t<h3>添加用户</h3>
\t\t<form method="post" action="/add">
\t\t  <div class="form-group">
\t\t    <label>用户名</label>
\t\t    <input type="text" class="form-control" placeholder="请填写用户名" name="name">
\t\t  </div>
\t\t  <div class="form-group">
\t\t    <label>密码</label>
\t\t    <input type="password" class="form-control" placeholder="请输入密码" name="password">
\t\t  </div>
\t\t  <div class="form-group">
\t\t    <label>年龄</label>
\t\t    <input type="text" class="form-control" placeholder="请填写邮箱" name="age">
\t\t  </div>
\t\t  <div class="form-group">
\t\t    <label>邮箱</label>
\t\t    <input type="email" class="form-control" placeholder="请填写邮箱" name="email">
\t\t  </div>
\t\t  <div class="form-group">
\t\t    <label>请选择爱好</label>
\t\t    <div>
\t\t    \t<label class="checkbox-inline">
\t\t    \t  <input type="checkbox" value="足球"  name="hobbies"> 足球
\t\t    \t</label>
\t\t    \t<label class="checkbox-inline">
\t\t    \t  <input type="checkbox" value="篮球" name="hobbies"> 篮球
\t\t    \t</label>
\t\t    \t<label class="checkbox-inline">
\t\t    \t  <input type="checkbox" value="橄榄球" name="hobbies"> 橄榄球
\t\t    \t</label>
\t\t    \t<label class="checkbox-inline">
\t\t    \t  <input type="checkbox" value="敲代码" name="hobbies"> 敲代码
\t\t    \t</label>
\t\t    \t<label class="checkbox-inline">
\t\t    \t  <input type="checkbox" value="抽烟" name="hobbies"> 抽烟
\t\t    \t</label>
\t\t    \t<label class="checkbox-inline">
\t\t    \t  <input type="checkbox" value="喝酒" name="hobbies"> 喝酒
\t\t    \t</label>
\t\t    \t<label class="checkbox-inline">
\t\t    \t  <input type="checkbox" value="烫头" name="hobbies"> 烫头
\t\t    \t</label>
\t\t    </div>
\t\t  </div>
\t\t  <button type="submit" class="btn btn-primary" >添加用户</button>
\t\t</form>
\t</div>
</body>
</html>`;
            res.end(add);
        } else if (pathname === "/modify") {
            let user = await User.findOne({_id: query.id});
            let hobbies = ['足球', '篮球', '抽烟', '喝酒', '敲代码', '烫头', '橄榄球'];
            console.log(user);
            let modify = `<!DOCTYPE html>
<html lang="en">
<head>
\t<meta charset="UTF-8">
\t<title>用户列表</title>
\t<link rel="stylesheet" href="https://cdn.jsdelivr.net/npm/bootstrap@3.3.7/dist/css/bootstrap.min.css">
</head>
<body>
\t<div class="container">
\t\t<h3>修改用户</h3>
\t\t<form method="post" action="/modify?id=${user._id}">
\t\t  <div class="form-group">
\t\t    <label>用户名</label>
\t\t    <input type="text" class="form-control" placeholder="请填写用户名" name="name" value="${user.name}">
\t\t  </div>
\t\t  <div class="form-group">
\t\t    <label>密码</label>
\t\t    <input type="password" class="form-control" placeholder="请输入密码" name="password" value="${user.password}">
\t\t  </div>
\t\t  <div class="form-group">
\t\t    <label>年龄</label>
\t\t    <input value="${user.age}" type="text" class="form-control" placeholder="请填写邮箱" name="age" >
\t\t  </div>
\t\t  <div class="form-group">
\t\t    <label>邮箱</label>
\t\t    <input type="email" class="form-control" placeholder="请填写邮箱" name="email" value="${user.email}">
\t\t  </div>
\t\t  <div class="form-group">
\t\t    <label>请选择爱好</label>
\t\t    <div>`;
            hobbies.forEach((item) => {
                if (user.hobbies.includes(item)) {
                    modify += `\t\t    \t<label class="checkbox-inline">
\t\t    \t  <input type="checkbox" value="${item}"  name="hobbies" checked> ${item}
\t\t    \t</label>`
                } else {
                    modify += `\t\t    \t<label class="checkbox-inline">
\t\t    \t  <input type="checkbox" value="${item}"  name="hobbies"> ${item}
\t\t    \t</label>`
                }
            });
            modify +=
                `
\t\t    </div>
\t\t  </div>
\t\t  <button type="submit" class="btn btn-primary" >修改用户</button>
\t\t</form>
\t</div>
</body>
</html>`;
            res.end(modify);
        } else if (pathname === '/delete') {
            let user = await User.findOneAndRemove({_id: query.id});
            console.log(user);
            res.writeHead(301, {
                Location: '/list'
            });
            res.end();
        }
    } else if (method === 'POST') {
        if (pathname === '/add') {
            let formDare = [];
            req.on('data', (data, err) => {
                formDare.push(data);
            });
            req.on('end', async () => {
                let buffer = Buffer.concat(formDare);
                let data = qs.parse(buffer.toString());
                await User.create(data).then((user) => {
                    console.log(user)
                }).catch(err => console.log(err));
                //301代表重定向
                res.writeHead(301, {
                    Location: '/list'
                });
                res.end();
            })
        } else if (pathname === '/modify') {
            let formDare = [];
            req.on('data', (data, err) => {
                formDare.push(data);
            });
            req.on('end', async () => {
                let buffer = Buffer.concat(formDare);
                let data = qs.parse(buffer.toString());
                await User.updateOne({_id: query.id}, data).then((user) => {
                    console.log(user)
                }).catch(err => console.log(err));
                //301代表重定向
                res.writeHead(301, {
                    Location: '/list'
                });
                res.end();
            })
        }
    }
});

app.listen(3000);
使用模板引擎改进用户信息管理系统-art-template
//app.js
const template = require('art-template');
const path = require('path');
//返回拼接好的字符串html代码,也就是模板渲染
const html = template(path.join(__dirname, 'index.art'),{
    name:'liz0',
    age:20
});
console.log(html);
//index.art
<!DOCTYPE html>
<html lang="en">
<head>
    <meta charset="UTF-8">
    <title>Title</title>
</head>
<body>
<span>{{name}}</span>
<span>{{age}}</span>
</body>
</html>
//输出
<!DOCTYPE html>
<html lang="en">
<head>
    <meta charset="UTF-8">
    <title>Title</title>
</head>
<body>
<span>liz0</span>
<span>20</span>
</body>
</html>
模板语法
输出
将某项数据输出在模板中,标准语法和原始语法如下:
- 标准语法:{数据}
- 原始语法:<%=数据%>
- 数据内部也可以写三目运算符
原文输出
如果数据中携带HTML标签,默认模板引掌不会解析标签,会将其转义后输出。
- 标准语法:{@数据}
- 原始语法:<%-数据%>
条件判断
在模板中可以根据条件来决定显示哪块HTML代码。
<1--标准语法-->
- {(if条件))...{/if}}
- ((if v1))...(else if v2))...({/if)}
<2--原始语法--> 类似于原生的js语法
- <% if (value) { %> ... <% } %>
- <% if (v1) { %> ... <% } else if (v2) { %> ... <% } %>
{{if age >18}}
年龄大于18
{{else if age <15}}
年龄小于15
{{else}}
年龄在15-18之间
{{/if}}
循环
{{each 数据}}
    {{$index}} {{$value}}
{{/each}}
<% for(var i = 0; i < 数据.length; i++){ %>
    <%= i %> <%= 数据[i] %>
<% } %>

//例子
<ul>
{{each users}}
<li>
{{$value.name}}
{{$value.age}}
{{$value.sex}}
</1i>
{{/each}}
</u1>
//标准语法类似于js代码的洗发
<ul>
<% for (var i = 0; i < users. length; i++){%>
<li>
<%=users[i].name%>
<%=users[i].age %>
<%=users[i].sex%>
</li>
<%}%>
</ul>
变量
标准语法
{{set temp = data.sub.content}}
原始写法
<% var temp = data.sub.content; %>
子模板
使用子模板可以将网站公共区块(头部、底部)抽离到单独的文件中。
- 标准语法:{{include“模板"}}
- 原始语法:<%include(模板)%>
<!--标准语法-->
{{include'./header.art'}}
{{include './header.art' data}}
<!--原始语法-->
<% include('./header.art') %>
<% include('./header.art', data) %>
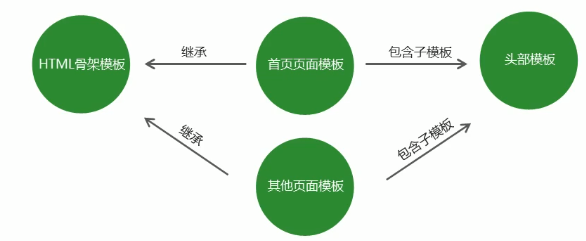
模板继承
使用模板继承可以将网站HTML骨架抽离到单独的文件中,其他页面模板可以继承骨架文件,可以通过在HTML骨架模板中预留一些可以填充的位置,然后在继承的时候进行填充达到自定义
<!--layout.art-->
<!doctype html>
<html>
<head>
    <meta charset="utf-8">
    <title>{{block 'title'}}My Site{{/block}}</title>

    {{block 'head'}}
    <link rel="stylesheet" href="main.css">
    {{/block}}
</head>
<body>
    {{block 'content'}}{{/block}}
</body>
</html>
//继承填充
<!--index.art-->
{{extend './layout.art'}}

{{block 'title'}}{{title}}{{/block}}

{{block 'head'}}
    <link rel="stylesheet" href="custom.css">
{{/block}}

{{block 'content'}}
<p>This is just an awesome page.</p>
{{/block}}
过滤器 在模板当中调用方法
template.defaults.imports.变量名 = 变量值
//app.js
const template = require('art-template');
const path = require('path');
const dateFormat = require('dateformat');
template.defaults.imports.dateFormat = dateFormat;
//返回拼接好的字符串html代码
const html = template(path.join(__dirname, 'index.art'),{
    time:new Date()
});
console.log(html);
//index.art
{{dateFormat(time,'yyyy-MM-dd hh:mm:ss')}}
//输出
2020-39-24 05:04:58
设置根目录,为了方便渲染模板
// 模板根目录。如果 filename 字段不是本地路径,则在 root 查找模板
template.defaults.root =  你存放所有模板的目录
该值在系统中的默认值是'/'
设置完成之后传入template时不再需要路径拼接,因为系统会自动去root目录下找该文件
const html = template('index.art',{
    time:new Date()
});
// 默认后缀名。如果没有后缀名,则会自动添加 extname
extname: '.art',
可以自己设置
同样是template.default.extname = 你希望的后缀名
改成.html会有代码书写的提示
使用模板的信息管理网页
路由实现请求的管理
功能:实现路由
使用步骤:
- 1.获取路由对象
- 2.调用路由对象提供的方法创建路由
- 3.启用路由,使路由生效
const getRouter = require('router')
const router = getRouter ( ) ;
router.get('/add',(req,res)=>{
res.end('Hello world!')
})
server.on('request',(req,res)=>{
router(req,res,()=>{})
})
serve-static实现静态资源访问的功能
功能:实现静态资源访问服务 步骤:
- 1.引入serve-static模块获取创建静态资源服务功能的方法
- 2.调用方法创建静态资源服务并指定静态资源服务目录
- 3.启用静态资源服务功能
const servestatic = require('serve-static')
const serve = servestatic (静态资源的根目录)
server.on('request',()=>{
serve(req,res,()=>{})
})
router实现信息管理系统
代码仓库
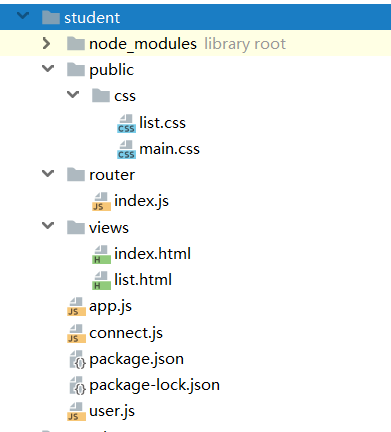
项目目录结构
//app.js 入口文件 主要是监听请求和端口
const http = require('http');
const template = require('art-template');
const path = require('path');
const serveStatic = require('serve-static');
const dateFormat = require('dateformat');
template.defaults.imports.dateFormat = dateFormat;
require('./connect.js');
const router = require('./router/index.js');
//实现静态资源访问目录
const serve = serveStatic(path.join(__dirname, 'public'));
template.defaults.root = path.join(__dirname, 'views');
template.defaults.extname = '.html';
const app = http.createServer();
app.on('request', (req, res) => {
    //启用静态资源访问功能
    serve(req, res, () => {
    });
    router(req, res, () => {
    });
});
app.listen(3000);
console.log('服务器启动成功!!');

//user.js 定义集合约束Schema
const mongoose = require('mongoose');
const studentSchema = new mongoose.Schema({
    name: {
        type: String,
        required: true,
        minLength: 2,
        maxLength: 10
    },
    age: {
        type: Number,
        required: true,
        max: 25,
        min: 10
    },
    sex: {
        type: String,
    },
    email: {
        type: String
    },
    hobbies: {
        type: [String],
    },
    college: {
        type: String,
    },
    entryDate: {
        type: Date,
        default: Date.now()
    }
});
const Student = mongoose.model('Student',studentSchema);
module.exports=  Student;

//创建连接数据库
const mongoose = require('mongoose');
mongoose.Promise = global.Promise;
mongoose.connect('mongodb://localhost/my_data', {
    //useMongoClient您可以在顶层声明许多声明和配置,而无需所有额外的嵌套
    useMongoClient:true
}).then(res => {
    console.log('success')
}).catch(err => console.log(err));

//路由文件,监听get和post请求
const getRouter = require('router');
const router = getRouter();
const template = require('art-template');
const qs = require('querystring');
const Student = require('./../user');
router.get('/add', (req, res) => {
    let index = template('index.html', {});
    //返回增加页面
    res.end(index)
});
router.get('/list', async (req, res) => {
    let student =  await Student.find();
    console.log(student);
    let list = template('list.html', {
        student:student
    });
    //返回列表页面
    res.end(list)
});
router.post('/add', (req, res) => {
    let formDare = [];
    req.on('data', (data) => {
        formDare.push(data);
    });
    req.on('end', async () => {
        let buffer = Buffer.concat(formDare);
        let data = qs.parse(buffer.toString());
        await Student.create(data)
        //301代表重定向
        res.writeHead(301, {
            Location: '/list'
        });
        res.end();
    })
});
module.exports = router;

//模板视图文件 index.html
<!DOCTYPE html>
<html lang="en">
<head>
	<meta charset="UTF-8">
	<meta name="viewport" content="width=device-width, initial-scale=1, user-scalable=no">
	<title>学生档案</title>
	<link rel="stylesheet" href="./css/main.css">
</head>
<body>
	<form method="post"
		  action="/add">
		<fieldset>
			<legend>学生档案</legend>
			<label>
				姓名: <input
					class="normal" type="text" autofocus placeholder="请输入姓名" name="name">
			</label>
			<label>
				年龄: <input
					class="normal"  type="text" placeholder="请输入年龄" name="age">
			</label>
			<label>
				性别:
				<input
						type="radio" value="0" name="sex"> 男
				<input
						type="radio" value="1" name="sex"> 女
			</label>
			<label>
				邮箱地址:
				<input
						class="normal" type="text" placeholder="请输入邮箱地址" name="email">
			</label>
			<label>
				爱好:
				<input
						type="checkbox" value="敲代码" name="hobbies"> 敲代码
				<input
						type="checkbox" value="打篮球" name="hobbies"> 打篮球
				<input
						type="checkbox" value="睡觉" name="hobbies"> 睡觉
			</label>
			<label>
				所属学院:
				<select
						class="normal" name="college">
					<option value="前端与移动开发">前端与移动开发</option>
					<option value="PHP">PHP</option>
					<option value="JAVA">JAVA</option>
					<option value="Android">Android</option>
					<option value="IOS">IOS</option>
					<option value="UI设计">UI设计</option>
					<option value="C++">C++</option>
				</select>
			</label>
			<label>
				入学日期:
				<input
						type="date" class="normal" name="entryDate">
			</label>
			<label class="btn">
				<input type="submit" value="提交" class="normal">
			</label>
		</fieldset>
	</form>
</body>
</html>

//list.html
<!DOCTYPE html>
<html lang="en">
<head>
    <meta charset="UTF-8">
    <title>学员信息</title>
    <link rel="stylesheet"
          href="./css/list.css">
</head>
<body>
<table>
    <caption>学员信息</caption>
    <tr>
        <th>姓名</th>
        <th>年龄</th>
        <th>性别</th>
        <th>邮箱地址</th>
        <th>爱好</th>
        <th>所属学院</th>
        <th>入学时间</th>
    </tr>
    {{each student}}
    <tr>
        <th>{{$value
            .name}}
        </th>
        <th>{{$value
            .age}}
        </th>
        <th>{{$value.
            sex ===
			'0'?'男':'女'}}
        </th>
        <th>{{$value
            .email}}
        </th>
        <th>{{each
            $value.hobbies}}
            {{$value}}
            {{/each}}</th>
        <th>{{$value
			.college}}</th>
        <th>{{dateFormat($value
            .entryDate,'yyyy-MM-dd')
            }}</th>
    </tr>
    {{/each}}
</table>
</body>
</html>
