一、介绍
各位小伙伴,大家好,今天给大家分享的是一个TV端遥控器的交互类库的实现。
好未来从去年的4月底到7月中旬从零到一的开发了我们的第一款智能硬件 - 未来宝盒。未来宝盒类似小米盒子,卡通造型,可以很方便的卡在电视机的屏幕上方,用高清线和电视机连接,内置了好未来的优质课程资源,是由luncher + APP组成的,App里必然的会有一些web页面,交互方式和大家平时开发的H5或者web页面不同,未来宝盒使用遥控器与H5页面进行交互(对,你没听错)。遥控器核心交互按键有上下左右四个方向键,OK键和返回键。在早期的时候,TV端内只有两个简单的页面使用到了遥控器,订单页和直播课程列表。但是里面的跳转元素都是 A标签实现的,并且只有简单的上下滚动且遥控器的交互逻辑和业务耦合在一起,无法复用。然而随着运营伙伴有了新的想法要在TV端上去验证的时候, web或h5是一个很好的方案,但是目前市面上也没有成熟的解决方案,所以需要自己撸一个。
二、关于配适
在开始讲交互类库的实现之前,先讲一下TV端内页面的适配,因为在实现类库的过程中,需要计算各个元素之间的位置关系。TV端的页面和大家经常写的H5页面也没有特别大的区别,TV端App是由安卓端开发,承载页面的容器依然是webview,内核是Chromium(目前我们盒子里的版本是65), 跟我们开发安卓内的H5应用是一样的,只不过尺寸更大了(1920 x 1080)。屏幕适配依然使用移动端的利器-rem;rem的简单实现。
function initRem(opt) { let oWidth = document.documentElement.clientWidth, _designW = opt && opt.hasOwnProperty('designWidth') ? opt.designWidth : 1920, _scale = opt && opt.hasOwnProperty('nScale') ? opt.nScale : 100; document.documentElement.style.fontSize = oWidth / _designW * _scale + "px";}initRem();opt = { designWidth: 1920, // 设计稿宽度 nScale: 100 // px2rem的缩放比例}比如 在1920宽的设计稿上获取的某元素的宽度是100px, 在写样式的时候, width:1rem;就可以了。防止页面跳动,把这个方法外链出去,放到 head 标签中即可。
三、核心技术点
- 确定主体内容需要向上滚动或者向下滚动的临界点的确定
- 使用CSS3处理位置偏移让滚动更平滑
- 水平和竖直方向上筛选最近元素的逻辑
- getBoundingClientRect().left 获取元素距浏览器左侧的准确距离
- 获取当前滚动内容滚动的距离(以下两种方法根据场景选用)
- dom.style.transform
- getComputedStyle(dom).transform
- 抹平由于布局差异导致的计算偏差
- 所有TV端的页面都有一个刷新按钮,所以会涉及到原生组件和H5组件间移交焦点控制权的问题。
使用电脑的方向键、回车和ESC键模拟遥控器的按键以实现TV端调试。
四、遥控器对象实现
遥控器对象采用经典的构造函数 + 原型的混成方式实现。构造函数内的方法每个实例独享,原型内的方法各实例共享以节省内存。
1. 遥控器对象概览
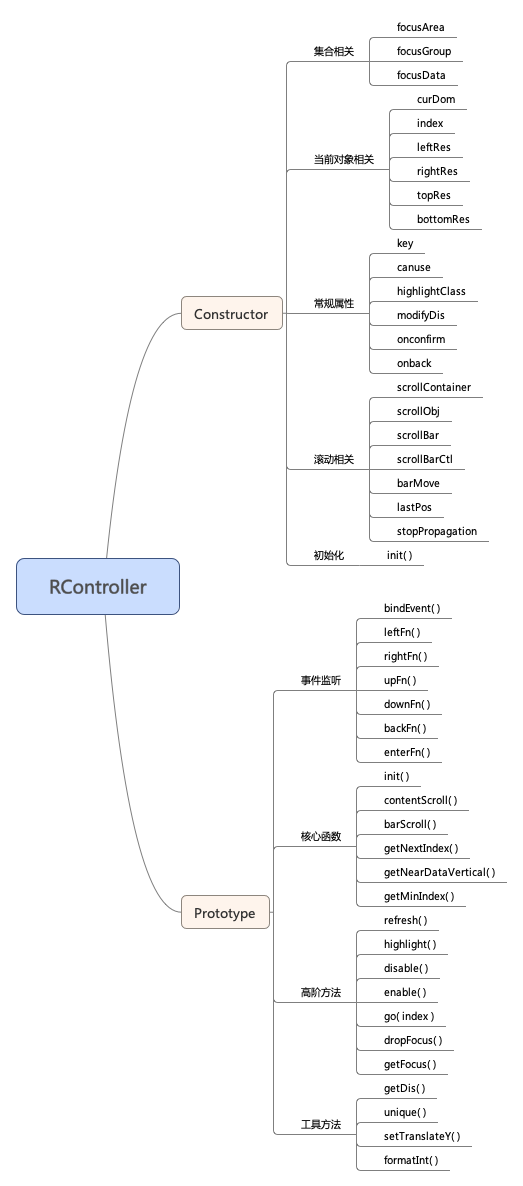
2. 遥控器对象的Constructor
autofocus的属性,或者用过js动态生成HTML结构的时候加上autofocus,通过 querySelectorAll("*[autofocus]")来选择我们需要的元素集合。this.focusArea = opt.allFocusParent || document; // 当前界面下所有需要获取的焦点的父级DOMthis.focusGroup = []; // 所有需要获取焦点的DOM合集this.focusData = []; // 所有需要获取焦点的DOM的x,y,中心点及indexthis.curDom = null; // 当前DOM对象this.index = 0; // 当前高亮的indexthis.leftRes = null; // 当前元素左侧的按钮集合this.topRes = null; // 当前元素上方的按钮集合this.rightRes = null; // 当前元素右侧的按钮集合this.bottomRes = null; // 当前元素下方的按钮集合this.key = "kindex"; // 自定义属性 用于快速定位DOMthis.canuse = true; // 标记当前实例是否可用this.highlightClass = opt.highlightClass; //高亮的样式this.modifyDis = opt.modifyDis || 0; // 用于修正偏移(主要是固定定位的头部)this.onconfirm = opt.onconfirm; // 确认的回调this.onback = opt.onback; // 返回的回调this.scrollContainer = opt.scrollContainer || document.documentElement || document.documentElement.body; // 滚动DOM对象容器this.scrollObj = opt.scrollObj || document.getElementsByTagName("body")[0]; // 需要滚动的DOM对象this.scrollBar = opt.scrollBar; // 自定义滚动条对象this.scrollBarCtl = null; // 滚动条控制滑块this.barMove = 0; // 滚动条滑块动的距离this.lastPos = 0; //记录内容部分上次的位置this.stopPropagation = opt.stopPropagation || false; // 按上方向键且上方没有焦点元素的时候 是否允许调用TV端的方法this.init(); // 初始化3. 遥控器对象的Prototye
遥控器对象的原型分为如下几个部分
I 事件监听
document的keycode,给遥控的四个方向键、enter键和back键绑定相关的事件回调// 绑定事件bindEvent(){ let _this = this; document.addEventListener('keydown', function(e) { if (!_this.canuse) { return false; } let keycode = e.keyCode; // 37,38,39,40,13,27 90 为电脑键盘上的keycode // 21,19,22,20,23,4 为 遥控器上的keycode if (keycode == 37 || keycode == 21) { // left _this.leftFn(e); } else if (keycode == 38 || keycode == 19) { // up _this.upFn(e); } else if (keycode == 39 || keycode == 22) { // right _this.rightFn(e); } else if (keycode == 40 || keycode == 20) { // down _this.downFn(e); } else if (keycode == 13 || keycode == 23) { // enter _this.enterFn(e); } else if (keycode == 27 || keycode == 90 || keycode == 4 ) { // 90是 字母 z; 4是遥控器的返回键 // 27 为 ESC, 但是ESC首先要执行系统的事件,再执行html的事件。可能导致 按一下esc 执行返回上一页不起作用。 _this.backFn(e); } }, true);}// 左键回调leftFn(e) { this.index = this.getNextIndex('left'); this.highlight();}// 上键回调upFn(e) { this.index = this.getNextIndex('up'); if (!this.topRes.length && this.stopPropagation == false) { console.log('H5当前按钮上方已经没有可供获取的焦点,即将把焦点的控制权移交给TV端。'); try { // 调用TV端上的方法 qkJsCallAndroid.onTopFocusNone(); console.log('H5的焦点控制权成功移交给TV端。'); this.dropFocus(); } catch (e) { console.log(e); } return false; } this.highlight();}// 右键回调rightFn(e) { this.index = this.getNextIndex('right'); this.highlight();}// 下键回调downFn(e) { this.index = this.getNextIndex('down'); this.highlight();}// OK 回调enterFn(e) { if (this.onconfirm && typeof this.onconfirm == 'function') { // 执行 回调并传入当前DOM对象 this.onconfirm(this.focusGroup[this.index]); }}// 回退回调backFn(e) { if (this.onback && typeof this.onback == 'function') { this.onback(this.focusGroup[this.index]); }}II 核心函数
- init() 顾名思义 初始化函数,初始化的内容分为如下几个部分:
init(){ // 初始页面到顶端 window.scrollTo(0, 0); // 开启GPU执行动画 this.scrollObj.style.transition = "all .3s ease"; this.setTranslateY(this.scrollObj, 0); if (this.scrollBar) { // 初始化自定义滚动条 let containerH = this.scrollContainer.clientHeight * 1, //滚动对象容易的高度 scrollObjH = this.scrollObj.clientHeight * 1, // 动的DOM对象的高度 scrollBarH = this.scrollBar.clientHeight * 1; // 滚动条的高度 this.scrollBarCtl = this.scrollBar.firstElementChild; // 滚动条指示块对象 if(scrollObjH < containerH){ this.scrollBar.style.display = 'none' }else{ this.scrollBar.style.display = 'block'; this.scrollBarCtl.style.height = parseInt((scrollBarH * containerH) / this.scrollObj.clientHeight) + 'px'; this.scrollBarCtl.style.transition = 'all .3s ease'; this.scrollBarCtl.style.top = 0; } } this.refresh(); // 遍历对应DOM结构内具有 autofocus 的元素 this.highlight(); // 默认第一个选中 this.bindEvent(); // 绑定遥控器事件}- contentScroll() 内容主体滚动逻辑,主要是模拟页面的上下滚动。让主体内容向上滚动或者向下滚动的临界点的图示如下:
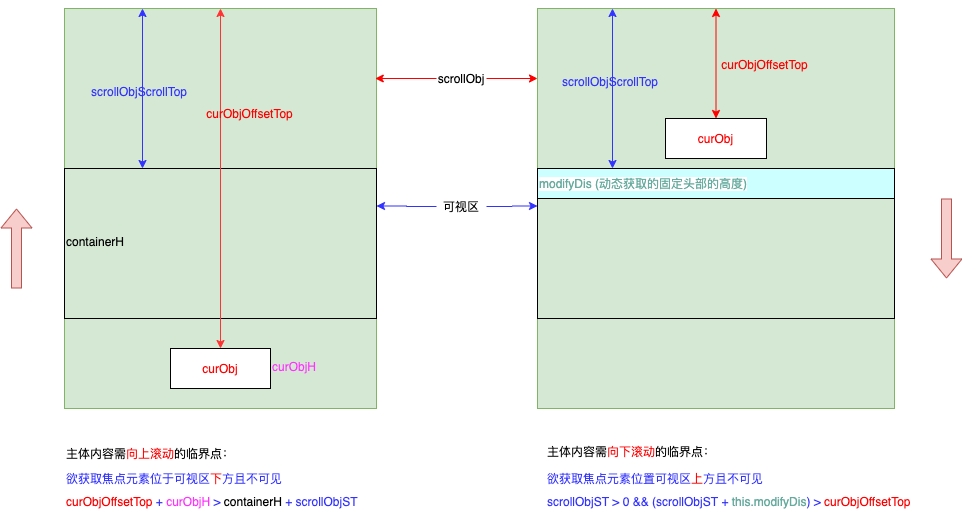
// 内容滚动逻辑contentScroll(){ let tempST = window.getComputedStyle(this.scrollObj).transform.toString(); if (tempST == 'none' || tempST == '0') { tempST = 0; } else { tempST = tempST.substring(7); tempST = tempST.substring(0, tempST.length - 1).split(',')[5]; } // 高亮后做判断 获得焦点的元素是否在可视区内 let scrollObjST = Math.abs(tempST), // 滚动对象上移的距离 containerH = this.scrollContainer.clientHeight, //滚动对象容易的高度 curObjH = this.curDom.offsetHeight, // 当前获得焦点对象的高度 curObjOffsetTop = this.curDom.offsetTop, // ScrollY = 0; // y方向上需要滚动的距离 if ((curObjOffsetTop + curObjH) > (containerH + scrollObjST)) { // console.log('在浏览器下方不可见'); ScrollY = curObjOffsetTop + curObjH * 1.4 - containerH; if (Math.abs(ScrollY) > (this.scrollObj.clientHeight - this.scrollContainer.clientHeight)) { ScrollY = this.scrollObj.clientHeight - this.scrollContainer.clientHeight; } // 优化一下离顶部的距离, ScrollY = parseInt(ScrollY) + curObjH * 0.2; // 滚动条移动的距离barMove的计算方法 ScrollY / (scrollObjH - containerH) = barMove / (this.scrollBar.clientHeight - scrollBarCtl.clientHeight) // 自定义滚动条逻辑 if (this.scrollBar) { this.barScroll('up',ScrollY) } this.setTranslateY(this.scrollObj, -ScrollY); this.lastPos = Math.abs(ScrollY); } if (scrollObjST > 0 && (scrollObjST + this.modifyDis) > curObjOffsetTop) { // console.log('在浏览器上方不可见'); ScrollY = curObjOffsetTop - curObjH * 0.6 - this.modifyDis; if (ScrollY < 0) { ScrollY = 0; } // 自定义滚动条逻辑 if (this.scrollBar) { this.barScroll('down',ScrollY) } this.setTranslateY(this.scrollObj, -ScrollY); this.lastPos = Math.abs(ScrollY); }}- barScroll(): 滚动条逻辑。在init()中通过实际内容与可视区的高度比值动态计算出滚动条滑块的实际高度,在内容滚动的处理逻辑中,如果需要显示滚动条则执行滚动条逻辑。
// 滚动条逻辑barScroll(scrollDirection, ScrollY) { let containerH = parseInt(this.scrollContainer.clientHeight); if(scrollDirection == 'up'){ // scrollDirection 内容即将向上滚动 this.barMove = 0; // 修复一下滚动条滑块的位置 this.barMove += parseInt(ScrollY * (this.scrollBar.clientHeight - this.scrollBarCtl.clientHeight) / (this.scrollObj.clientHeight - containerH)); if (this.barMove > (this.scrollBar.clientHeight - this.scrollBarCtl.clientHeight)) { this.barMove = this.scrollBar.clientHeight - this.scrollBarCtl.clientHeight } this.setTranslateY(this.scrollBarCtl, this.barMove); }else if(scrollDirection == 'down'){ // scrollDirection 内容即将向下滚动 this.barMove -= parseInt(Math.abs(ScrollY - this.lastPos) * (this.scrollBar.clientHeight - this.scrollBarCtl.clientHeight) / (this.scrollObj.clientHeight - containerH)); if (this.barMove <= 5) { this.barMove = 0 } this.setTranslateY(this.scrollBarCtl, this.barMove); }}- getNextIndex() 获取下一个元素的index。水平和竖直的获取逻辑稍不同。竖直方向从上向下要让每一行的按钮依次获得焦点,所以筛选逻辑是找到与当前获得焦点的元素竖直方向上最近的元素并且中心点间距最小的。水平方向上先筛选与当前获得焦点的元素在同一水平线上且中心点间距最小的。
// 获取下一个元素的index 水平和竖直的获取逻辑不同getNextIndex(direction) { let theNearest = null, allResult = [], // 获取对应方向上所有的按钮 curParam = this.focusData[this.index]; // 当前元素对应的参数 if (direction == 'left') { // 分别筛选出 当前高亮元素 左侧水平方向上的所有需要高亮的元素存储于 allResult this.focusData.forEach(item => { if (item.cx < curParam.x && item.cy > curParam.y && item.cy < (curParam.y + curParam.h)) { allResult.push(item); } }); if (allResult.length > 0) { this.leftRes = allResult; theNearest = this.leftRes[this.getMinIndex(this.leftRes)]; } } else if (direction == 'up') { // 筛选出 当前高亮元素 下方所有需要高亮的元素存储于 allResult this.focusData.forEach(item => { if (item.cy < curParam.cy) { allResult.push(item); } }); theNearest = this.getNearDataVertical(allResult, 'cy', 'max', 'up'); } else if (direction == 'down') { // 筛选出 当前高亮元素 下方所有需要高亮的元素存储于 allResult this.focusData.forEach(item => { if (item.cy > curParam.cy) { allResult.push(item); } }); theNearest = this.getNearDataVertical(allResult, 'cy', 'min'); } else if (direction == 'right') { // 筛选出 当前高亮元素 右侧水平方向上的所有需要高亮的元素存储于 allResult this.focusData.forEach(item => { if (item.cx > (curParam.x*1 + curParam.w*1) && item.cy > curParam.y && item.cy < (curParam.y + curParam.h)) { allResult.push(item); } }); if (allResult.length > 0) { this.rightRes = allResult; theNearest = this.rightRes[this.getMinIndex(this.rightRes)]; } } // theNearest是 focusData中的一个元素 if (theNearest) { return theNearest.index; } else { return this.index; }}// 获取竖直方向上最近的元素数据getNearDataVertical(arr, state, direction){ let tempArr = [], // 临时数组 resArr = [], // 结果 tempVal = 0; // 中间值 arr.forEach(item => { tempArr.push(item.cy); }) tempArr = this.unique(tempArr); tempVal = Math[state].apply(null, tempArr); arr.forEach(item => { if(item.cy == tempVal){ resArr.push(item); } }); if(direction && direction == 'up'){ this.topRes = resArr; } return resArr[this.getMinIndex(resArr)];}// 返回 与 curobj 距离最近的indexgetMinIndex(arr) { let arrDis = [], curPoint = this.focusData[this.index]; arr.forEach(item => { arrDis.push(this.getDis(item, curPoint)); }) let minval = Math.min.apply(null, arrDis); return arrDis.indexOf(minval);}III 高阶方法
- refresh() 主要是用来解决布局dom刷新后丢失掉获取焦点的Bug,函数内要处理的是给所有具有
audofocus属性的元素绑定事件,并收集一些数据为接下来的筛选按钮做准备。
// 刷新refresh() { let _this = this, objs = _this.focusArea.querySelectorAll('*[autofocus]'); this.focusGroup = []; // 所有需要获取焦点的DOM合集 this.focusData = []; // 所有需要获取焦点的DOM的x,y,中心点及index this.curDom = null; // 当前DOM对象 if (!objs.length) { console.warn('没有获取到焦点元素集合'); return false; } objs.forEach((item, i) => { item.setAttribute(this.key, i); this.focusGroup.push(item); this.focusData.push({ txt: item.innerHTML.replace(/<.*?>/g,"").replace(/[\r\n]/g,"").replace(/[ ]/g,"").trim(), w: parseInt(item.offsetWidth), h: parseInt(item.offsetHeight), x: parseInt(item.getBoundingClientRect().left), y: this.formatInt(parseInt(item.getBoundingClientRect().top)), cx: this.formatInt(parseInt(item.getBoundingClientRect().left) + parseInt(item.offsetWidth / 2)), cy: this.formatInt(parseInt(item.getBoundingClientRect().top) + parseInt(item.offsetHeight / 2)), index: i }); });}- highlight() 定位到当前元素并给与高亮样式
// 高亮highlight(){ this.focusGroup.forEach(item => { item.classList.remove(this.highlightClass); }); this.curDom = this.focusGroup[this.index]; if(this.curDom){ this.curDom.classList.add(this.highlightClass); this.contentScroll(); }}disable() / enable() 主要是为了解决弹层出现的时候 禁用和启动主体内容的滚动。canuse为false的时候,暂停对遥控器实例的事件监听。详见上面的
事件监听的逻辑
// 禁用disable() { this.canuse = false;}// 启用enable() { this.canuse = true;}- dropFocus() / getFocus() 失去焦点,获得焦点
// 失去焦点dropFocus() { this.focusGroup.forEach(item => { item.classList.remove(this.highlightClass); });}// 获取焦点 todogetFocus() { this.highlight();}go(index) 定位到期望元素
go(index){ if (index == isNaN) { console.log(index + '不是数字呢'); return false; } this.index = index; this.highlight();}IV 工具方法
// 返回两点间的最短距离getDis(p1, p2) { let dx = Math.abs(p1.cx - p2.cx), dy = Math.abs(p1.cy - p2.cy); return parseInt(Math.sqrt(Math.pow(dx, 2) + Math.pow(dy, 2)));}// 数组去重unique(arr) { for (let i = 0; i < arr.length; i++) { for (let j = i + 1; j < arr.length; j++) { if (arr[i] == arr[j]) { //第一个等同于第二个,splice方法删除第二个 arr.splice(j, 1); j--; } } } return arr;}// 设置 translateYsetTranslateY(obj, val){ obj.style.transform = "translate3d(0," + val + "px,0)"; obj.style.webkitTransform = "translate3d(0," + val + "px,0)";}// 格式化数据为10的整倍数 以抹平布局上的轻微差异formatInt(num, prec = 1){ const len = String(num).length; if (len <= prec) { return num }; const mult = Math.pow(10, prec); return Math.floor(num / mult) * mult;}五、遥控器对象的调用
let mainKB = new RController({    highlightClass: 'highlight',   // 高亮样式    allFocusParent: oWrap,	// 所有需要获取焦点的父级DOM对象    scrollObj: oIndex, // 滚动DOM对象    scrollContainer: '', // 滚动DOM对象容器    modifyDis: oHeader.height()// 用于修正偏移(主要是固定定位的头部)});mainKB.onfirm = function(curObj){	// 按enter键的回调 返回的curObj为原生DOM对象, 集合第三方框架或者类库实现 跳转/ajax 等业务逻辑。}mainKB.onback = function(){	// 按返回键的回调}
六、学习与反思
六、学习与反思
1.第一次做遥控器的逻辑的时候,都比较简单,然而这次的逻辑比较复杂,而且未来的尝试预计也会越来越复杂,所以当类似逻辑出现超过两次就要考虑把功能抽象出来做成基础库,既方便了自己,沉淀了技术,更可以方便大家,提升开发效率。
2.TV端的调试时,没有盒子和遥控器,完全依赖浏览器,办法总比问题多。
3.尽管交互类库不会过多的限制UI,但是UI最好也要有一定的规范,这样能规避一些莫名的问题。
end
招聘信息
好未来技术团队正在热招测试、后台、运维、客户端等各个方向高级开发工程师岗位,大家可点击“好未来技术”公众号“技术招聘”栏目了解详情,欢迎感兴趣的伙伴加入我们!