

Consul 入门基础
- 官网:www.consul.io
- github: github.com/hashicorp/c…
- 文档:www.consul.io/docs/agent/…
1. 介绍
1.1 简介
Consul 是 HashiCorp 公司推出的开源工具,使用go语言开发,可用于实现分布式系统的服务发现与配置。 Consul内置了服务注册与发现框 架、分布一致性协议实现、健康检查、Key/Value存储、多数据中心方案,不再需要依赖其他工具(比如ZooKeeper等)。Consul 是分布式的、高可用的、 可横向扩展的。
- 服务发现: Consul 提供了通过 DNS 或者 HTTP 接口的方式来注册服务和发现服务。一些外部的服务通过 Consul 很容易的找到它所依赖的服务。
- 健康检查: Consul的客户端可以通过多种方式来检查某个服务或当前节点是否处于健康状态,比如查看一个服务是否可以返回200 OK,或者是查看client当前部署的机器的内存使用是否在80%以下。利用健康检查可用来避免流量被转发到有故障的服务上。
- Key/Value存储: 应用程序可以根据自己的需要使用 Consul 提供的 Key/Value 存储。 Consul 提供了简单易用的 HTTP 接口,结合其他工具可以实现动态配置、功能标记、领袖选举等等功能。
- 多数据中心: Consul 支持开箱即用的多数据中心. 这意味着用户不需要担心需要建立额外的抽象层让业务扩展到多个区域。
服务注册与发现: 参考: cloud.tencent.com/developer/a…
- 服务注册: 是一个服务将其位置信息在“中心注册节点”注册的过程。该服务一般会将它的主机IP地址以及端口号进行注册,有时也会有服务访问的认证信息,使用协议,版本号,以及关于环境的一些细节信息。
- 服务发现: 可以让一个应用或者组件发现其运行环境以及其它应用或组件的信息。用户配置一个服务发现工具就可以将实际容器跟运行配置分离开。常见配置信息包括:ip、端口号、名称等。
在传统情况下,当出现服务存在于多个主机节点上时,都会使用静态配置的方法来实现服务信息的注册。而当在一个复杂的系统里,需要较强的可扩展性时,服务被频繁替换时,为避免服务中断,动态的服务注册和发现就很重要。 服务注册与发现的组件有很多,如Zookeeper、Etcd等。既可用于服务间的协调,同时又可用于服务的注册。

1.2 Consul特性
- Consul vs. ZooKeeper,doozerd,etcd www.consul.io/intro/vs/zo…
官方出了相比较这些软件区别的一篇 Consul vs. ZooKeeper,doozerd,etcd 文章。
| Feature | Consul | zookeeper | etcd | euerka |
|---|---|---|---|---|
| 服务健康检查 | 服务状态等 | (弱)长连接,keepalive | 连接心跳 | 可配支持 |
| 多数据中心 | 支持 | — | — | — |
| kv存储服务 | 支持 | 支持 | 支持 | — |
| 一致性 | raft | paxos | raft | — |
| cap | ca | cp | cp | ap |
| 使用接口 | 支持http和dns | 客户端 | http/grpc | http(sidecar) |
| watch支持 | 全量/支持long polling | 支持 | 支持 long polling | 支持 long polling |
| 自身监控 | metrics | — | metrics | metrics |
| 安全 | acl | /https | acl | https支持(弱) |
| spring集成 | 已支持 | 已支持 | 已支持 | 已支持 |
1.3 Consul术语
| 词汇 | 说明 |
|---|---|
| Agent | agent是一直运行在Consul集群中每个成员上的守护进程。通过运行 consul agent 来启动。agent可以运行在client或者server模式。指定节点作为client或者server是 非常简单的,除非有其他agent实例。所有的agent都能运行DNS或者HTTP接口,并负责运行时检查和保持服务同步。 |
| Client | 一个Client是一个转发所有RPC到server的代理。这个client是相对无状态的。client唯一执行的后台活动是加入LANgossip池。这有一个最低的资源开销并且仅消耗少量的网络带宽。 |
| Server | 一个server是一个有一组扩展功能的代理,这些功能包括参与Raft选举,维护集群状态,响应RPC查询,与其他数据中心交互WANgossip和转发查询给leader或者远程数据中心。 |
| DataCenter | 虽然数据中心的定义是显而易见的,但是有一些细微的细节必须考虑。例如,在EC2中,多个可用区域被认为组成一个数据中心?我们定义数据中心为一个私有的,低延迟和 高带宽的一个网络环境。这不包括访问公共网络,但是对于我们而言,同一个EC2中的多个可用区域可以被认为是一个数据中心的一部分。 |
| Consensus | 在我们的文档中,我们使用Consensus来表明就leader选举和事务的顺序达成一致。由于这些事务都被应用到有限状态机上,Consensus暗示复制状态机的一致性。 |
| Gossip | Consul建立在Serf的基础之上,它提供了一个用于多播目的的完整的gossip协议。Serf提供成员关系,故障检测和事件广播。更多的信息在gossip文档中描述。这足以知道g ossip使用基于UDP的随机的点到点通信。 |
| LAN Gossip | 它包含所有位于同一个局域网或者数据中心的所有节点。 |
| WAN Gossip | 它只包含Server。这些server主要分布在不同的数据中心并且通常通过因特网或者广域网通信。 |
| RPC | 远程过程调用。这是一个允许client请求server的请求/响应机制。 |
1.4 Consul端口
Consul最多需要6个不同的端口才能正常工作,有些使用TCP,UDP或两种协议。 主要端口说明如下:
| 角色 | Port | 说明 |
|---|---|---|
| 服务器RPC | 默认8300 | 这由服务器用来处理来自其他代理的传入请求。仅限TCP。 |
| Serf LAN | 默认8301 | 这是用来处理局域网中的八卦。所有代理都需要。TCP和UDP。 |
| Serf WAN | 默认8302 | 这被服务器用来在WAN上gossip到其他服务器。TCP和UDP。 |
| HTTP API | 默认8500 | 这被客户用来与HTTP API交谈。仅限TCP。 |
| DNS接口 | 默认8600 | 用于解析DNS查询。TCP和UDP。 |
2. Consul架构
2.1 Consul节点角色
Consul节点角色:
Consul分为Client和Server两种节点(所有的节点也被称为Agent)。
- CLIENT : CLIENT表示consul的client模式,就是客户端模式。是consul节点的一种模式,这种模式下,所有注册到当前节点的服务会被转发到SERVER,本身是不持久化这些信息。
- SERVER: SERVER表示consul的server模式,表明这个consul是个server,这种模式下,功能和CLIENT都一样,唯一不同的是,它会把所有的信息持久化的本地,这样遇到故障,信息是可以被保留的。
- SERVER-LEADER: 表明这个SERVER是它们的老大,它和其它SERVER不一样的一点是,它需要负责同步注册的信息给其它的SERVER,同时也要负责各个节点的健康监测。
2.2 Consul架构
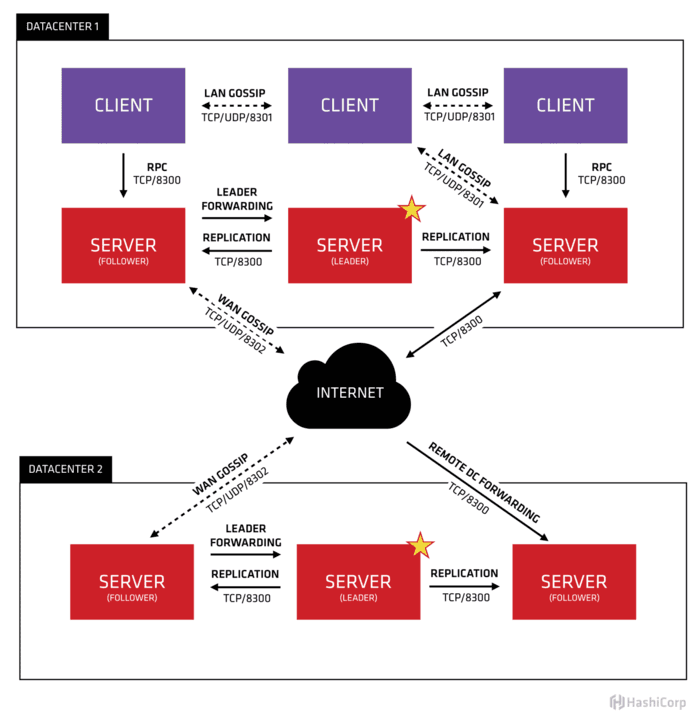
首先Consul支持多数据中心,在上图中有两个DataCenter,他们通过Internet互联,同时请注意为了提高通信效率,只有Server节点才加入跨数据中心的通信。
在单个数据中心中,Consul分为Client和Server两种节点(所有的节点也被称为Agent),Server节点保存数据,Client负责健康检查及转发数据请求到Server;Server节点有一个Leader和多个Follower,Leader节点会将数据同步到Follower。虽然Consul可以运行在一台server , 但是建议使用3到5台来避免失败情况下数据的丢失.每个数据中心建议配置一个server集群。
集群内的Consul节点通过gossip协议(流言协议)维护成员关系,也就是说某个节点了解集群内现在还有哪些节点,这些节点是Client还是Server。单个数据中心的流言协议同时使用TCP和UDP通信,并且都使用8301端口。跨数据中心的流言协议也同时使用TCP和UDP通信,端口使用8302。
集群内数据的读写请求既可以直接发到Server,也可以通过Client使用RPC转发到Server,请求最终会到达Leader节点,在允许数据轻微陈旧的情况下,读请求也可以在普通的Server节点完成,集群内数据的读写和复制都是通过TCP的8300端口完成。
3. 安装
3.1 环境规划
| 角色 | IP | 操作系统 | 角色 |
|---|---|---|---|
| consul-1 | 192.124.64.212 | centos6.4 | consul-server |
| consul-2 | 192.124.64.213 | centos6.4 | consul-server |
| consul-3 | 192.124.64.214 | centos6.4 | consul-server |
3.2 安装软件
Consul使用Go语言编写,安装包仅为一可执行文件,部署方便,也可与Docker容器无缝配合 。
1)Linux环境安装:
linux安装consul软件很简单,你只需要去官网下载相应版本并解压到合适的位置即可。
#在node1,node2,node3执行
$wget 'https://releases.hashicorp.com/consul/1.6.2/consul_1.6.2_linux_amd64.zip' .
$mkdir -p  /usr/local/consul/bin
$unzip consul_1.6.2_linux_amd64.zip -d /usr/local/consul/bin

$echo ' export PATH=$PATH:/usr/local/consul/bin '>>/etc/profile
$source /etc/profile

$echo $PATH
$which consul
/usr/local/consul/bin/consul

$consul --version
Consul v1.6.2

# 帮助 consul agent --help
$consul xx --help
$consul --help
Available commands are:
    acl            Interact with Consul's ACLs
    agent          Runs a Consul agent
    catalog        Interact with the catalog
    config         Interact with Consul's Centralized Configurations
    connect        Interact with Consul Connect
    debug          Records a debugging archive for operators
    event          Fire a new event
    exec           Executes a command on Consul nodes
    force-leave    Forces a member of the cluster to enter the "left" state
    info           Provides debugging information for operators.
    intention      Interact with Connect service intentions
    join           Tell Consul agent to join cluster
    keygen         Generates a new encryption key
    keyring        Manages gossip layer encryption keys
    kv             Interact with the key-value store
    leave          Gracefully leaves the Consul cluster and shuts down
    lock           Execute a command holding a lock
    login          Login to Consul using an auth method
    logout         Destroy a Consul token created with login
    maint          Controls node or service maintenance mode
    members        Lists the members of a Consul cluster
    monitor        Stream logs from a Consul agent
    operator       Provides cluster-level tools for Consul operators
    reload         Triggers the agent to reload configuration files
    rtt            Estimates network round trip time between nodes
    services       Interact with services
    snapshot       Saves, restores and inspects snapshots of Consul server state
    tls            Builtin helpers for creating CAs and certificates
    validate       Validate config files/directories
    version        Prints the Consul version
    watch          Watch for changes in Consul
2)Docker环境安装:
若是Docker环境下也可以方便安装。
docker pull consul:1.6.2
#启动第1个Server节点,集群要求要有3个Server,将容器8500端口映射到主机8900端口,同时开启管理界面
docker run -d --name=consul1 -p 8500:8500 -e CONSUL_BIND_INTERFACE=eth0 consul agent --server=true --bootstrap-expect=3 --client=0.0.0.0 -ui

#启动第2个Server节点,并加入集群
docker run -d --name=consul2 -e CONSUL_BIND_INTERFACE=eth0 consul agent --server=true --client=0.0.0.0 --join 172.17.0.2

#启动第3个Server节点,并加入集群
docker run -d --name=consul3 -e CONSUL_BIND_INTERFACE=eth0 consul agent --server=true --client=0.0.0.0 --join 172.17.0.2

#启动第4个Client节点,并加入集群
docker run -d --name=consul4 -e CONSUL_BIND_INTERFACE=eth0 consul agent --server=false --client=0.0.0.0 --join 172.17.0.2
3.3 配置文件
在node1,node2,node3节点创建目录及编写配置文件。
创建目录:
$mkdir -p /data1/consul/{data,conf,logs}
$tree
.
├── conf
├── data
└── logs
编写配置文件:
node1编写配置文件,其它节点配置文件同node1,但需要修改node_name,advertise_addr为本机ip。ports可以进行修改,默认端口分别是: 8500 8600 8400 8301 8302 8300。
#生成encrypt ,各节点需要相同
$consul keygen
9gvOvcmiZW8XzRot6MH22Rf6vW/neOo0LcNNzNtf2nw=
#node1编写配置文件
vim /data1/consul/conf/config.json
{
    "bootstrap_expect": 3,
    "server": true,
    "datacenter": "BJ-DC01",
    "node_name": "consul-node01",
    "data_dir": "/data1/consul/data",
    "client_addr": "0.0.0.0",
    "ports": {
        "http": 8500 ,
        "https": 8501 ,
        "dns": 8600 ,
        "grpc": 8400 ,
        "serf_lan": 8301 ,
        "serf_wan": 8302 ,
        "server": 8300
    },
    "advertise_addr":"192.124.64.212",
    "ui": true,
    "encrypt": "0hVQNFBR6BlIMJ/Xb4+2tEmpJl76ngS9JMNvI15RXOo=",
    "log_level": "INFO",
    "log_file": "/data1/consul/logs",
    "enable_syslog": false,
    "start_join": ["192.124.64.212","192.124.64.213","192.124.64.214"]
}

#node2,node3编写配置文件,同node1。需要修改node_name,advertise_addr为本机ip。
consul的配置信息可以在文档-配置查看,其中部分选项如下:
#配置说明:
-advertise:通知展现地址用来改变我们给集群中的其他节点展现的地址,一般情况下-bind地址就是展现地址。
-bootstrap:用来控制一个server是否在bootstrap模式,在一个datacenter中只能有一个server处于bootstrap模式,当一个server处于bootstrap模式时,可以自己选举为raft leader。
-bootstrap-expect:在一个datacenter中期望提供的server节点数目,当该值提供的时候,consul一直等到达到指定sever数目的时候才会引导整个集群,该标记不能和bootstrap公用
-bind:该地址用来在集群内部的通讯,集群内的所有节点到地址都必须是可达的,默认是0.0.0.0
-client:consul绑定在哪个client地址上,这个地址提供HTTP、DNS、RPC等服务,默认是127.0.0.1
-config-file:明确的指定要加载哪个配置文件
-config-dir:配置文件目录,里面所有以.json结尾的文件都会被加载
-data-dir:提供一个目录用来存放agent的状态,所有的agent允许都需要该目录,该目录必须是稳定的,系统重启后都继续存在
-dc:该标记控制agent允许的datacenter的名称,默认是dc1
-encrypt:指定secret key,使consul在通讯时进行加密,key可以通过consul keygen生成,同一个集群中的节点必须使用相同的key
-join:加入一个已经启动的agent的ip地址,可以多次指定多个agent的地址。如果consul不能加入任何指定的地址中,则agent会启动失败,默认agent启动时不会加入任何节点。
-retry-join:和join类似,但是允许你在第一次失败后进行尝试。
-retry-interval:两次join之间的时间间隔,默认是30s
-retry-max:尝试重复join的次数,默认是0,也就是无限次尝试
-log-level:consul agent启动后显示的日志信息级别。默认是info,可选:trace、debug、info、warn、err。
-node:节点在集群中的名称,在一个集群中必须是唯一的,默认是该节点的主机名
-protocol:consul使用的协议版本
-rejoin:使consul忽略先前的离开,在再次启动后仍旧尝试加入集群中。
-server:定义agent运行在server模式,每个集群至少有一个server,建议每个集群的server不要超过5个
-syslog:开启系统日志功能,只在linux/osx上生效
-pid-file:提供一个路径来存放pid文件,可以使用该文件进行SIGINT/SIGHUP(关闭/更新)agent
3.4 启动服务
启动服务:
官方推荐 bootstrap-expect 自动引导方式启动集群。在各node节点分别执行启动命令,并观察日志,当三个 server 都启动时才会选举 leader。
Consul安装之后,可启动consul agent。agent可以运行为server或client模式.每个数据中心至少必须拥有一台server . 建议在一个集群中有3或者5个server.部署单一的server,在出现失败时会不可避免的造成数据丢失。 其他代理以客户端模式运行。 客户端是一个非常轻量级的进程,它注册服务,运行健康检查,并将查询转发给服务器。 代理程序必须在集群中的每个节点上运行。
#若不编写配置文件,直接启动命令类似如下
# consul agent -dev  #测试环境,不能在生产中使用,不会持续任何状态

#consul agent -server -bootstrap-expect 1 -datacenter=DC01 -node=s1  -ui  -client=0.0.0.0 -data-dir=/data1/consul/data  -log-file=/data1/consul/logs  # 单个节点场景


#三个节点场景
#consul agent -server -bootstrap-expect 3 -data-dir /tmp/consul -node=s1 -bind=192.124.64.212 -ui-dir ./consul_ui/ -rejoin -config-dir=/etc/consul.d/ -client 0.0.0.0 -advertise=192.124.64.212 -rejoin

#或写好配置文件,node1 、node2、node3执行启动命令
cd /data1/consul/
cat /data1/consul/conf/config.json
nohup consul agent -server -config-dir=/data1/consul/conf/ >/data1/consul/logs/consul.log 2>&1 &
启动日志:
bootstrap_expect > 0: expecting 3 servers
==> Starting Consul agent...
           Version: 'v1.6.2'
           Node ID: '4135abe9-2a6a-7a99-913d-b9718c53c116'
         Node name: 'consul-node01'
        Datacenter: 'data-center01' (Segment: '<all>')
            Server: true (Bootstrap: false)
       Client Addr: [0.0.0.0] (HTTP: 8500, HTTPS: -1, gRPC: -1, DNS: 8600)
      Cluster Addr: 192.124.64.212 (LAN: 8301, WAN: 8302)
           Encrypt: Gossip: true, TLS-Outgoing: false, TLS-Incoming: false, Auto-Encrypt-TLS: false

==> Log data will now stream in as it occurs:

    2020/01/07 16:01:13 [INFO]  raft: Initial configuration (index=0): []
    2020/01/07 16:01:13 [INFO]  raft: Node at 192.124.64.212:8300 [Follower] entering Follower state (Leader: "")
    2020/01/07 16:01:13 [INFO] serf: EventMemberJoin: consul-node01.data-center01 192.124.64.212
    ...
==> Consul agent running!
...
    2020/01/07 16:01:20 [ERR] agent: failed to sync remote state: No cluster leader
    2020/01/07 16:01:21 [WARN]  raft: no known peers, aborting election
    2020/01/07 16:01:23 [INFO] serf: EventMemberJoin: consul-node03 192.124.64.214
    2020/01/07 16:01:23 [INFO] consul: Adding LAN server consul-node03 (Addr: tcp/192.124.64.214:8300) (DC: data-center01)
    2020/01/07 16:01:23 [INFO] serf: EventMemberJoin: consul-node03.data-center01 192.124.64.214
    2020/01/07 16:01:23 [INFO] consul: Handled member-join event for server "consul-node03.data-center01" in area "wan"
    2020/01/07 16:01:23 [INFO] consul: Found expected number of peers, attempting bootstrap: 192.124.64.212:8300,192.124.64.213:8300,192.124.64.214:8300
    2020/01/07 16:01:29 [WARN]  raft: Heartbeat timeout from "" reached, starting election
    2020/01/07 16:01:29 [INFO]  raft: Node at 192.124.64.212:8300 [Candidate] entering Candidate state in term 2
    2020/01/07 16:01:29 [INFO]  raft: Election won. Tally: 2
    2020/01/07 16:01:29 [INFO]  raft: Node at 192.124.64.212:8300 [Leader] entering Leader state
    2020/01/07 16:01:29 [INFO]  raft: Added peer 767572c5-577c-8cab-5038-5d871b1a5498, starting replication
    2020/01/07 16:01:29 [INFO]  raft: Added peer e0accec7-3f08-bd85-c761-1b021eb3714d, starting replication
    2020/01/07 16:01:29 [INFO] consul: cluster leadership acquired
    2020/01/07 16:01:29 [INFO] consul: New leader elected: consul-node01
    2020/01/07 16:01:29 [INFO]  raft: pipelining replication to peer {Voter 767572c5-577c-8cab-5038-5d871b1a5498 192.124.64.213:8300}
    2020/01/07 16:01:29 [WARN]  raft: AppendEntries to {Voter e0accec7-3f08-bd85-c761-1b021eb3714d 192.124.64.214:8300} rejected, sending older logs (next: 1)
    2020/01/07 16:01:29 [INFO] consul: member 'consul-node01' joined, marking health alive
    2020/01/07 16:01:29 [INFO]  raft: pipelining replication to peer {Voter e0accec7-3f08-bd85-c761-1b021eb3714d 192.124.64.214:8300}
    2020/01/07 16:01:29 [INFO] consul: member 'consul-node02' joined, marking health alive
    2020/01/07 16:01:29 [INFO] consul: member 'consul-node03' joined, marking health alive
    2020/01/07 16:01:31 [INFO] agent: Synced node info
停止服务:
ps aux|grep consul
kill -pid
3.5 检查服务
检查服务状态:
#查看帮助
$consul agent --help
# 查看集群状态
$consul info
#查看成员信息
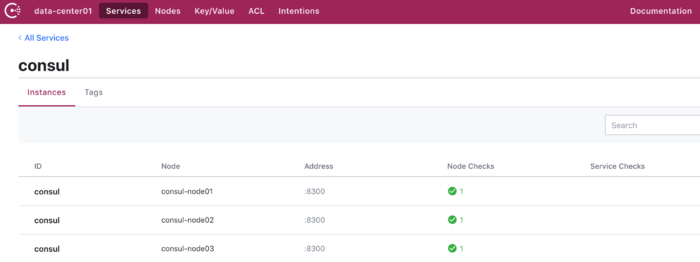
$consul members
Node Address Status Type Build Protocol DC Segment
consul_node01 192.124.64.212:8301 alive server 1.6.2 2 data_center <all>
consul_node02 192.124.64.213:8301 alive server 1.6.2 2 data_center <all>
consul_node03 192.124.64.214:8301 alive server 1.6.2 2 data_center <all>
#
$consul operator raft list-peers
Node ID Address State Voter RaftProtocol
consul-node01 4135abe9-2a6a-7a99-913d-b9718c53c116 192.124.64.212:8300 leader true 3
consul-node02 767572c5-577c-8cab-5038-5d871b1a5498 192.124.64.213:8300 follower true 3
consul-node03 e0accec7-3f08-bd85-c761-1b021eb3714d 192.124.64.214:8300 follower true 3
#查看节点
$curl 127.0.0.1:8500/v1/catalog/nodes | python -m json.tool
Web界面:
可以登录consul来查看服务情况。 http://192.124.64.212:8500/ui/data-center01/nodes
4. Consul运维
4.1 常用命令
# 帮助,consul xx -h
$consul agent -h
Usage: consul [--version] [--help] <command> [<args>]

# 查看集群状态
$consul info
# 查看集群成员
$consul members
#列出秘钥
consul keyring -list
#加入集群
$consul join 192.124.64.212
#将节点移除所在集群
$consul leave
#重载配置
$consul reload
#查看节点
$curl 127.0.0.1:8500/v1/catalog/nodes | python -m json.tool

#使用DNS协议查看节点信息,'节点名'.node.consul
#dig @127.0.0.1 -p 8600 `hostname`.node.consul
$dig @127.0.0.1 -p 8600  consul-node01.node.consul
 ...
;; ANSWER SECTION:
consul-node01.node.consul. 0    IN      A       192.124.64.212

# 查看服务信息
$dig @127.0.0.1 -p 8600 web.service.consul SRV
$curl http://127.0.0.1:8500/v1/catalog/services |  python -m json.tool
$curl http://127.0.0.1:8500/v1/catalog/service/service-id
# 服务注销
$curl  --request PUT  http://127.0.0.1:8500/v1/agent/service/deregister/xxx
4.2 备份与还原
备份: 需要备份的主要有两类数据:consul相关的配置文件、consul的服务器状态,采用下面的脚本备份就可以了:
$ts=$(date +%Y%m%d%H%M%S)

# 备份配置文件
$tar -czpf consul_config_$ts.tar.gz /etc/consul/config.json /etc/consul/consul.d

# 备份consul的服务器状态,注意由于该consul开启了ACL,执行consul snapshot save时必须带Management Token,关于consul ACL token的说明见上一篇"consul安全加固"
#consul snapshot save --http-addr=http://10.12.142.216:8500 -token=b3a9bca3-6e8e-9678-ea35-ccb8fb272d42 consul_state_$ts.snap

$consul snapshot save --http-addr=http://127.0.0.1:8500 consul_state_$ts.snap

# 查看一下生成的consul服务器状态文件
$consul snapshot inspect consul_state_$ts.snap
最后将生成的consul_config_xxx.tar.gz、consul_state_xxx.snap拷贝到其它服务器妥善存储。
还原:
# 还原配置文件
tar -xzpf consul_config_20200420215514.tar.gz -C /

# 还原consul服务器状态
consul snapshot restore --http-addr=http://127.0.0.1:8500 -token=b3a9bca3-6e8e-9678-ea35-ccb8fb272d42 consul_state_20200420215514.snap
4.3 节点增删
Consul服务器执行领导者选举和复制。对于要处理的更改,必须提供最低法定数量的服务器(N/2)+1。这意味着3个服务器的集群,则必须至少有2个节点正常。通常,如果要同时添加和删除节点,最好先添加新节点,然后删除旧节点。
增加:
Consul cli:
  consul agent -retry-join=["192.124.64.212","192.124.64.213","192.124.64.214"]
配置中添加选项:
 "retry_join": ["192.124.64.212","192.124.64.213","192.124.64.214"]
配置中添加并重启:
"start_join": ["192.124.64.212","192.124.64.213","192.124.64.214"]
删除:
#检查当前情况
$consul members
$curl http://127.0.0.1:8500/v1/status/leader

#正常删除, 若服务是健康的,并且集群可以处理节点离开
consul leave 命令

#无法正常删除服务
consul force-leave <node>

#force-leave <node> 也失败可以尝试
consul operator raft remove-peer -address="IP:port"
或使用peers.json: 在正常操作下,peers.json文件不存在。使用raft/peers.json进行恢复可能会导致未提交的Raft日志条目被隐式提交,因此只应在没有其他选项可用于恢复丢失的服务器的中断之后使用。
4.4 日志
日志配置
rm -rf /etc/rsyslog.d/consul.conf
rm -rf /etc/logrotate.d/consul
echo ':programname, isequal, "consul" /var/log/consul.log' >> /etc/rsyslog.d/consul.conf
echo '& ~' >> /etc/rsyslog.d/consul.conf

vim /etc/logrotate.d/consul
/var/log/consul.log
{
    daily
    rotate 7
    missingok
    dateext
    copytruncate
    compress
}

#重启服务
/etc/init.d/rsyslog restart  # centos6
consul reload

/bin/systemctl restart consul #centos7
配置开机启动
echo "/bin/systemctl start consul" >> /etc/rc.local
4.5 DNS设置
可自定义本地 DNS Server将.consul域的请求全部转发到Consul Agent,Windows 上有 DNS Agent,Linux上有 dnsmasq;对于非Consul提供的服务则继续请求原DNS;使用DNS Server时Consul会随机返回具体服务的多个部署中的一个,仅能提供简单的负载均衡。
有几种方法可以使用DNS:
- 使用自定义DNS解析程序库并将其指向Consul。
- 将Consul设置为节点的DNS服务器并提供 recursors配置,以解析非Consul查询。
- 转发“consul”的所有查询,域到现有DNS服务器的Consul代理。
dnsmasq配置:
- 在 /etc/dnsmasq.conf 配置文件中添加 :conf-dir=/etc/dnsmasq.d/,*.conf
- cat /etc/dnsmasq.d/consul.conf server=/consul/127.0.0.1#8600
- 重启dnsmasq ping 域名测试
$yum install dnsmasq
$vim /etc/dnsmasq.d/consul.conf
server=/consul/127.0.0.1#8600

$vim /etc/dnsmasq.conf
listen-address=127.0.0.1
bind-interfaces
no-hosts
no-resolv
#all-servers
cache-size=10000
no-negcache
max-cache-ttl=600
filter-aaaa
server=192.110.220.231
server=192.15.64.15
conf-dir=/etc/dnsmasq.d/,*.conf

$service dnsmasq restart
5. HTTP API
Agent HTTP API:
- agent - Agent控制
- catalog - 管理nodes和services
- health - 管理健康监测
- session - Session操作
- acl - ACL创建和管理
- event - 用户Events
- status - Consul系统状态
- kv - Key/Value存储
5.1 agent api
agent endpoints用来和本地agent进行交互,一般用来服务注册和检查注册,支持以下接口。
/v1/agent/checks : 返回本地agent注册的所有检查(包括配置文件和HTTP接口)
/v1/agent/services : 返回本地agent注册的所有 服务
/v1/agent/members : 返回agent在集群的gossip pool中看到的成员
/v1/agent/self : 返回本地agent的配置和成员信息
/v1/agent/join/<address> : 触发本地agent加入node
/v1/agent/force-leave/<node>>: 强制删除node
/v1/agent/check/register : 在本地agent增加一个检查项,使用PUT方法传输一个json格式的数据
/v1/agent/check/deregister/<checkID> : 注销一个本地agent的检查项
/v1/agent/check/pass/<checkID> : 设置一个本地检查项的状态为passing
/v1/agent/check/warn/<checkID> : 设置一个本地检查项的状态为warning
/v1/agent/check/fail/<checkID> : 设置一个本地检查项的状态为critical
/v1/agent/service/register : 在本地agent增加一个新的服务项,使用PUT方法传输一个json格式的数据
/v1/agent/service/deregister/<serviceID> : 注销一个本地agent的服务项

#示例:
#返回agent在集群的gossip pool中看到的成员
curl 'http://127.0.0.1:8500/v1/agent/members'  |  python -m json.tool
#返回本地agent注册的所有检查(包括配置文件和HTTP接口)
curl 'http://127.0.0.1:8500/v1/agent/checks'  |  python -m json.tool
#返回本地agent注册的所有 服务
curl 'http://127.0.0.1:8500/v1/agent/services'  |  python -m json.tool
#返回本地agent的配置和成员信息
curl 'http://127.0.0.1:8500/v1/agent/self'  |  python -m json.tool
#触发本地agent加入node
curl 'http://127.0.0.1:8500/v1/agent/join/<address> '  |  python -m json.tool
#强制删除node
curl 'http://127.0.0.1:8500/v1/agent/force-leave/<node>'  |  python -m json.tool
5.2 catalog api
catalog endpoints用来注册/注销nodes、services、checks。
/v1/catalog/register : Registers a new node, service, or check
/v1/catalog/deregister : Deregisters a node, service, or check
/v1/catalog/datacenters : Lists known datacenters
/v1/catalog/nodes : Lists nodes in a given DC
/v1/catalog/services : Lists services in a given DC
/v1/catalog/service/<service> : Lists the nodes in a given service
/v1/catalog/node/<node> : Lists the services provided by a node
5.3 health
health endpoints用来查询健康状况相关信息。
/v1/healt/node/<node>: 返回node所定义的检查,可用参数?dc=
/v1/health/checks/<service>: 返回和服务相关联的检查,可用参数?dc=
/v1/health/service/<service>: 返回给定datacenter中给定node中service
/v1/health/state/<state>: 返回给定datacenter中指定状态的服务,state可以是"any", "unknown", "passing", "warning", or "critical",
5.4 session
可用来create、update、destory、query sessions。
/v1/session/create: Creates a new session
/v1/session/destroy/<session>: Destroys a given session
/v1/session/info/<session>: Queries a given session
/v1/session/node/<node>: Lists sessions belonging to a node
/v1/session/list: Lists all the active sessions
5.5 acl
acl endpoints:acl endpoints用来create、upd ate、destory、query acl
/v1/acl/create: Creates a new token with policy
/v1/acl/update: Update the policy of a token
/v1/acl/destroy/<id>: Destroys a given token
/v1/acl/info/<id>: Queries the policy of a given token
/v1/acl/clone/<id>: Creates a new token by cloning an existing token
/v1/acl/list: Lists all the active tokens
5.6 status
/v1/status/leader : 返回当前集群的Raft leader
/v1/status/peers : 返回当前集群中同事
5.7 event
/v1/event/fire/<name>: 触发一个新的event,用户event需要name和其他可选的参数,使用PUT方法
/v1/event/list: 返回agent知道的events
6. KV操作
6.1 KV增删改查
Consul提供一个易于使用的KV存储。 这可以用来保存动态配置,协助服务协调,建立leader选举,并使开发人员可以考虑构建的任何东西。
1)命令行操作:
1. 增加(如果存在则更新)
consul kv put redis/config/minconns 1
2. 查询
consul kv get redis/config/minconns
3. 使用-detailed标志检索详细信息
consul kv get -detailed redis/config/minconns
4. 设置值的时候,还可以使用-flags标志,flags用来做客户端自定义标志,consul并不使用它,你可以在你自己的程序中随便定义,所有密钥都支持设置64位整数标志值
consul kv put -flags=42 redis/config/users/admin abcd1234
5. 列出所有keys,返回结果按照字母排序
consul kv get -recurse
6. 删除
consul kv delete redis/config/minconns
7. 还可以使用recurse选项递归选项删除含某个前缀的所有keys(模糊匹配,如果不加/ 则会删除所有redis开头的键)
consul kv delete -recurse redis
8. Consul可以使用Check-And-Set操作提供原子密钥更新。要执行CAS操作,请指定-cas标志,指定此值还需要设置-modify-index标志。
$ consul kv put -cas -modify-index=123 foo bar
Success! Data written to: foo
$ consul kv put -cas -modify-index=123 foo bar
Error! Did not write to foo: CAS failed
2)HTTP操作:
1. 查看
curl 'http://127.0.0.1:8500/v1/kv/?recurse' |python -m json.tool
curl 'http://127.0.0.1:8500/v1/kv/test/key1'|python -m json.tool
2. 添加(存在则更新)
curl -X PUT -d 'test' http://127.0.0.1:8500/v1/kv/test/key1
curl -X PUT -d 'test' http://127.0.0.1:8500/v1/kv/test/key1?flag=33
3. Cas修改
curl -X PUT -d 'testxxxx' http://127.0.0.1:8500/v1/kv/test/key1?cas=25007
4.删除
curl -X DELETE http://127.0.0.1:8500/v1/kv/test/key1
curl -X DELETE http://127.0.0.1:8500/v1/kv/test/?recurse 删除指定前缀范围内的kv
6.2 KV导入导出
导出:
$ts=$(date +%Y%m%d%H%M%S)
# 导出所有kv键值对,注意最后一个参数是导出键值对的前缀,为空字符串,说明要导出所有
$consul kv export --http-addr=http://127.0.0.1:8500 '' > consul_kv_$ts.json

# 查看下导出的json文件格式
$cat consul_kv_$ts.json
[
        {
                "key": "web/key1",
                "flags": 0,
                "value": "dGVzdA=="
        },
        {
                "key": "web/key2",
                "flags": 42,
                "value": "dGVzdA=="
        },
        {
                "key": "web/sub/key3",
                "flags": 0,
                "value": "dGVzdA=="
        }
]

#base64 -D命令可以解码
$echo "dGVzdA==" | base64 -d
test
导出的结果,key为键值key名称,value为base64编码,使用base64 -D命令编码就可以看到原始的value值。
导入:
#consul kv delete -recurse  web
$consul kv get -keys
$consul kv import --http-addr=http://127.0.0.1:8500 -token=xx @consul_kv.json
7. 服务注册及发现
7.1 模拟一个服务
用nodejs模拟一个最简单的服务node_server.js,供后续测试使用。
vim node_server.js
var http = require('http');

http.createServer(function(request, response) {
    response.write('<html>');
    response.write('<body>');
    response.write('<h1>Hello, World!</h1>');
    response.write('</body>');
    response.write('</html>');
    response.end();
}).listen(8080);
运行服务:
node node_server.js
7.2 服务格式
{
  "ID": "userServiceId", //服务id
  "Name": "userService", //服务名
  "Tags": [              //服务的tag,自定义,可以根据这个tag来区分同一个服务名的服务
    "userWebService"
  ],
  "Address": "127.0.0.1",//服务注册到consul的IP,服务发现,发现的就是这个IP
  "Port": 8080,          //服务注册consul的PORT,发现的就是这个PORT
  "EnableTagOverride": false,
  "Check": {             //健康检查部分
    "DeregisterCriticalServiceAfter": "10m",
    "HTTP": "http://localhost:8080/", //指定健康检查的URL,调用后只要返回20X,consul都认为是健康的
    "Interval": "10s"   //健康检查间隔时间,每隔10s,调用一次上面的URL
  }
}
7.3 服务注册
服务可向Consul注册相应的服务信息,如主机、端口号及其它身份验证信息,协议,版本号,以及运行环境等详细资料。
1)配置文件静态注册
配置文件静态注册:/etc/consul.d/myserver.json, 将配置文件的路径给consul(指定参数:-config-dir /etc/consul.d),重启consul或consul reload。
echo '{"service": {"name": "web", "tags": ["rails"], "port": 80}}' | sudo tee /etc/consul.d/web.json

#重新启动代理程序
consul agent -dev -config-dir=/etc/consul.d
2)命令行注册
$consul services register -name=web1
Registered service: web1
3)动态注册
HTTP API接口来动态注册:/v1/agent/service/register http put方法注册。
#注册服务
curl http://127.0.0.1:8500/v1/agent/service/register -X PUT -i -H "Content-Type:application/json" -d '{"name": "web", "tags": ["rails"], "port": 80}'

curl http://127.0.0.1:8500/v1/agent/service/register -X PUT -i -H "Content-Type:application/json" -d '{
 "ID": "userServiceId",
 "Name": "userService",
 "Tags": [
   "nodejsServer",
   "v1"
 ],
 "Address": "127.0.0.1",
 "Port": 8080,
 "EnableTagOverride": false,
 "Check": {
   "DeregisterCriticalServiceAfter": "90m",
   "HTTP": "http://localhost:8080",
   "Interval": "10s"
 }
}'
7.4 服务发现
客户端应用通过向注册中心查询,可获取可用服务列表,相应服务详细信息。 查询方法可以用DNS或HTTP API。
7.4.1 DNS查询
对于DNS API,服务的DNS名称是NAME.service.consul。还可按标签过滤服务, 基于标记的服务查询的格式是TAG.NAME.service.consul
#查询服务可用的节点的IP地址,A记录
$dig @127.0.0.1 -p 8600 userService.service.consul
#检索整个地址/端口对作为SRV记录
$dig @127.0.0.1 -p 8600 userService.service.consul SRV
#可按Tag标签过滤服务
dig @127.0.0.1 -p 8600 nodejsServer.userService.service.consul SRV
7.4.2 HTTP API查询
除了DNS API之外,也可以HTTP API用来查询服务。
#全部service
$curl 'http://127.0.0.1:8500/v1/agent/services'  |  python -m json.tool
#检查某个service,例如userService
$curl http://127.0.0.1:8500/v1/catalog/service/userService
#只查找健康的服务实例
$curl 'http://localhost:8500/v1/health/service/userService?passing'
[
    {
        "ID": "51a3f168-7a7b-4daf-d781-573f2b19c0af",
        "Node": "node1.local",
        "Address": "127.0.0.1",
        "Datacenter": "dc1",
 ...
        "ServiceID": "userServiceId",
        "ServiceName": "userService",
        "ServiceTags": [
            "nodejsServer",
        ],
        "ServiceAddress": "127.0.0.1",
        "ServiceTaggedAddresses": {
            "lan_ipv4": {
                "Address": "127.0.0.1",
                "Port": 8080
            },
            "wan_ipv4": {
                "Address": "127.0.0.1",
                "Port": 8080
            }
        },
        "ServiceWeights": {
            "Passing": 1,
            "Warning": 1
        },
        "ServiceMeta": {},
        "ServicePort": 8080,
        "ServiceEnableTagOverride": false,
        "ServiceProxy": {
            "MeshGateway": {},
            "Expose": {}
        },
        "ServiceConnect": {},
        "CreateIndex": 49,
        "ModifyIndex": 49
    }
]
7.5 更新服务
可以使用HTTP API动态地添加,删除和修改服务。
#注册服务
curl http://127.0.0.1:8500/v1/agent/service/register -X PUT -i -H "Content-Type:application/json" -d '{"name": "web", "tags": ["rails"], "port": 80}'
#对tag及port进行更新
curl http://127.0.0.1:8500/v1/agent/service/register -X PUT -i -H "Content-Type:application/json" -d '{"name": "web", "tags": ["newtag"], "port": 8080}'
7.6 服务删除
#consul services register -name=web1
#dig @127.0.0.1 -p 8600 web1.service.consul SRV
#删除服务
$curl -X PUT http://127.0.0.1:8500/v1/agent/service/deregister/service-id
consul services deregister -id web1
8. 健康检查
健康检查是服务发现的关键组件,可以防止使用不健康的服务。检查可以在配置文件中定义,也可以运行时通过HTTP接口添加。
8.1 添加检查
可以在配置文件或API数据文件添加检查。
{
 "Service:"{
 ...
  },
  "Check": {             //健康检查部分
    "DeregisterCriticalServiceAfter": "10m",
    "HTTP": "http://localhost:8080/", //指定健康检查的URL,调用后只要返回20X,consul都认为是健康的
    "Interval": "10s"   //健康检查间隔时间,每隔10s,调用一次上面的URL
  }
}
Multiple Check:
也可以使用字段“checks”,定义多个check。
{
  "checks": [
    {
      "id": "chk1",
      "name": "mem",
      "args": ["/bin/check_mem", "-limit", "256MB"],
      "interval": "5s"
    },
    {
      "id": "chk2",
      "name": "/health",
      "http": "http://localhost:5000/health",
      "interval": "15s"
    },
    ...
  ]
}
添加check示例:
注意数据中的Check内容,实现了一个端口检查。
$curl http://127.0.0.1:8500/v1/catalog/service/mysql  |  python -m json.tool

$curl  http://127.0.0.1:8500/v1/agent/service/register --connect-timeout 10 -m 20 -X PUT -i -H "Content-Type:application/json" -d '{
"ID": "192.168.199.171:3101",
"Name": "mysql",
"Address": "192.168.199.171:3101",
"Port": 3101,
"Tags": ["mysql_192.168.199.171_3101"],
"Check": {
  "Tcp": "192.168.199.171:3101",
  "Interval": "5s"
 }
}'

$curl http://127.0.0.1:8500/v1/catalog/service/mysql  |  python -m json.tool
$dig @127.0.0.1 -p 8600 mysql_192.168.199.171_3101.mysql.service.consul
#curl -X PUT http://127.0.0.1:8500/v1/agent/service/deregister/192.168.199.171:3101
$consul services deregister -id 192.168.199.171:3101
8.2 检查的类型
- Script+ Interval
{
  "check": {
    "id": "mem-util",
    "name": "Memoryutilization",
    "script": "/usr/local/bin/check_mem.sh",
    "interval": "10s",
    "timeout": "1s"
  }
}
script退出代码0(正常),退出代码1(告警), 其他值( 失败)。
- HTTP+ Interval
{
  "check": {
    "id": "api",
    "name": "HTTPAPI on port 5000",
    "http": "http://localhost:5000/health",
    "interval": "10s",
    "timeout": "1s"
  }
}
- TCP+ Interval
{
  "check": {
    "id": "ssh",
    "name": "SSHTCP on port 22",
    "tcp": "localhost:22",
    "interval": "10s",
    "timeout": "1s"
  }
}
- Timeto Live(TTL)
{
  "check": {
    "id": "web-app",
    "name": "WebApp Status",
    "notes": "Webapp does a curl internally every 10 seconds",
    "ttl": "30s"
  }
}
- Docker check
{
"check": {
    "id": "mem-util",
    "name": "Memoryutilization",
    "docker_container_id": "f972c95ebf0e",
    "shell": "/bin/bash",
    "script": "/usr/local/bin/check_mem.py",
    "interval": "10s"
  }
}
8.3 健康检查示例
1)注册服务:
#注册服务
curl http://127.0.0.1:8500/v1/agent/service/register -X PUT -i -H "Content-Type:application/json" -d '
{"name": "web", "tags": ["nodejsServer"], "Address": "127.0.0.1","port": 8080,"Check": {"HTTP": "http://localhost:8080", "Interval": "3s"} }'
2)启动web服务:
node node_server.js
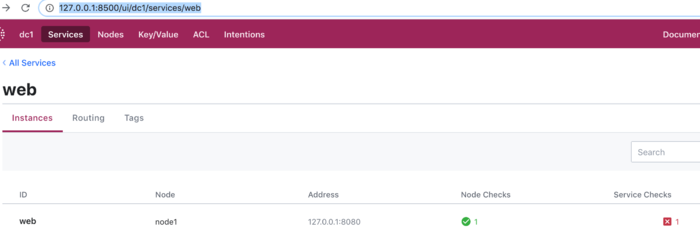
3)检查服务状态:
此事Web服务正常:
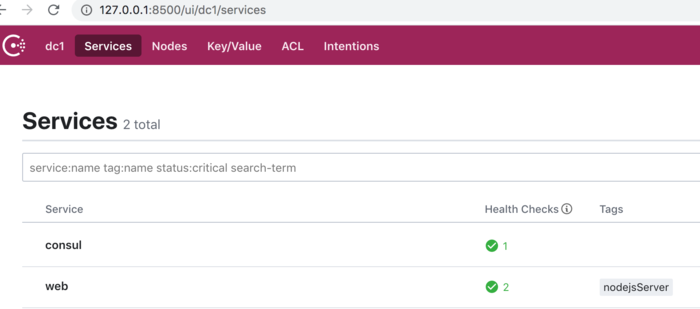
$curl http://127.0.0.1:8500/v1/catalog/services |  python -m json.tool
$curl http://localhost:8500/v1/health/state/critical
$dig @127.0.0.1 -p 8600 web.service.consul SRV
4)停止web服务:
kill web服务pid,服务异常:
kill node_server.pid
5)检查服务状态:
$curl http://localhost:8500/v1/health/state/critical
[
    {
        "Node": "node1",
        "CheckID": "service:web",
        "Name": "Service 'web' check",
        "Status": "critical",
        "Notes": "",
        "Output": "Get http://localhost:8080: dial tcp [::1]:8080: connect: connection refused",
        "ServiceID": "web",
        "ServiceName": "web",
        "ServiceTags": [
            "nodejsServer"
        ],
        "Type": "http",
        "Definition": {},
        "CreateIndex": 42,
        "ModifyIndex": 96
    }
]
参考:
-
Consul介绍: www.consul.io/intro/index…
-
Consul入门: learn.hashicorp.com/consul/gett…
-
Consul指南: www.consul.io/docs/guides…
-
Consul api: www.consul.io/api/index.h…
-
微服务注册发现配置中心-consul https://juejin.cn/post/6844904003764125703
-
Consul 原理和使用简介 : blog.coding.net/blog/intro-…
-
Consul 镜像仓库地址 :hub.docker.com/_/consul
-
Consul 镜像使用文档:github.com/docker-libr…
-
Consul 官方文档 :www.consul.io/docs/agent/…
-
使用Consul和Registration对Docker容器进行服务发现
-
基于Consul+Registrator+Nginx实现容器服务自动发现的集群框架
-
.NET Core微服务之基于Consul实现服务治理
