

说说 Spring Security
1 : 解决安全性的两种手段
Spring security通常从两个角度解决安全性问题。
- 使用servlet规范中的filter保护web请求并限制url级别的访问。
- 使用AOP保护方法的调用。借助于对象代理和使用通知,确保只有具备适当权限的用户才能访问安全访问的方法。
2 : 过滤web请求
DelegatingFilterProxy是一个特殊的servlet filter。它会拦截发往应用中的请求,并将工作委托给一个javax.servlet.filter实现类。这个实现类作为一个bean注册在spring应用的上下文中。

这个filter bean叫做springSecurityFilterChain。它是一个特殊的filter,可以链接一个或多个的其他filter。Spring security依赖一系列的servlet filter来提供不同的安全特性。
3 : 如何实现
在spring应用上下文中,任何实现了WebSecurityConfigurer的bean都可以用来配置spring security。
public interface WebSecurityConfigurer<T extends SecurityBuilder<Filter>> extends SecurityConfigurer<Filter, T> {
}
实际上是通过实现父接口security configurer中的configure来实现security的功能的。
public interface SecurityConfigurer<O, B extends SecurityBuilder<O>> {
    void init(B var1) throws Exception;

    void configure(B var1) throws Exception;
}
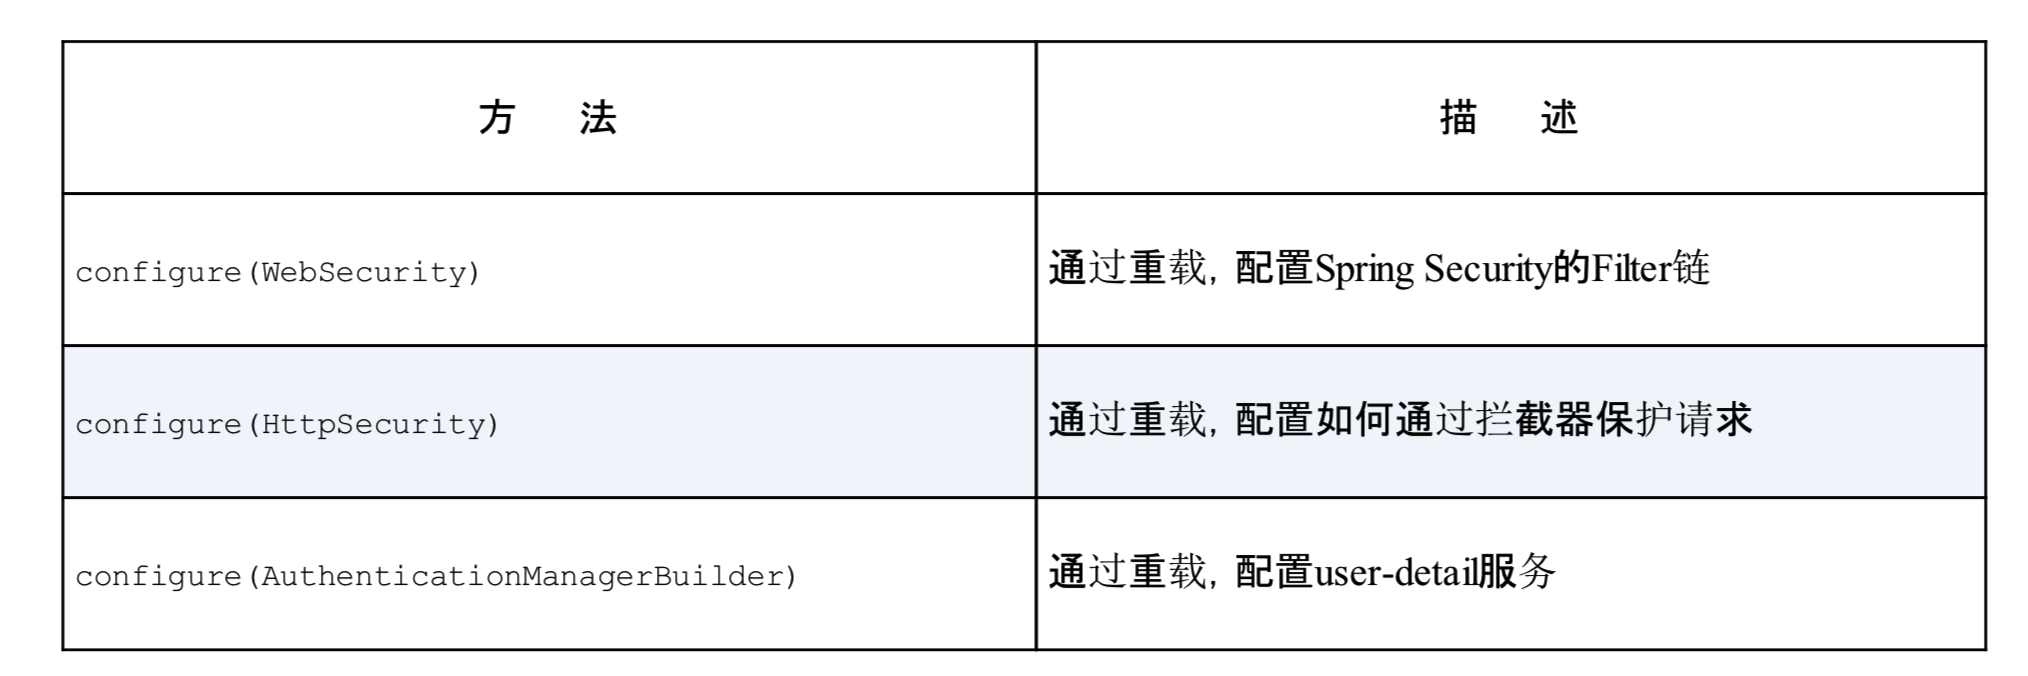
更常见的实现这一接口的方式是扩展WebSecurityConfigurerAdapter。通过重载Adapter中的3个configure()方法来配置web安全性。
4 : HttpSecurity请求管理
/**
 * Security配置
 *
 * @author yanghaolei
 */
@Configuration
@AllArgsConstructor
public class SecurityConfiguration extends WebSecurityConfigurerAdapter {

/**
	 * configure(HttpSecurity)方法定义了哪些URL路径应该被保护,哪些不应该
	 * 参数说明:http://www.spring4all.com/article/419
	 * @param http
	 */
	@Override
	@SneakyThrows
	protected void configure(HttpSecurity http) {
		http.authorizeRequests()
			.anyRequest().authenticated()
			.and().formLogin().and().httpBasic();
	}

}
- Http Configure: 默认配置为http.authorizeRequests().anyRequest().authenticated().and().formLogin().and().httpBasic()。通过调用authorizedRequests()和anyResquest().authenticated()要求所有进入的http请求都进行认证。
5: 用户储存
-
认证过程需要用户资料支撑。就好像去米其林餐厅吃饭的时候我们需要预约,到餐厅的时候服务员会检查名单上是否有我们的名字。如果有名字才会允许我们进入。这个用户名单就是spring security进行认证决策的依据。security同时支持内存,关系型数据库,ldap多种方式来存放用户。一般业务中都需要构建自定义的userDetail配合存放。
-
在configurer中传入AuthenticationManagerBuilder作为参数。简单调用withUser()方法就可以添加新用户。
    /**
	 * @author yanghaolei
	 */
	@Bean
	@SneakyThrows
	public void authenticationManagerBean(AuthenticationManagerBuilder authenticationManagerBuilder) {
		 authenticationManagerBuilder.inMemoryAuthentication().withUser("user").password("password").roles("student")
				.and().withUser("admin").password("password").roles("student,admin");

	}
- 配置自定义的用户配合数据库实现用户存储。核心就是实现 UserDetailsService接口中的loadUserByUsername()方法。这一方法返回accessToken构筑必需的user。
public UserDetails loadUserByUsername(String username) {
		Cache cache = cacheManager.getCache(SecurityConstants.USER_DETAILS);
		if (cache != null && cache.get(username) != null) {
			return (User) cache.get(username).get();
		}

		UserDetails userDetails = getUserDetails(result);
		cache.put(username, userDetails);
		return userDetails;
	}

	/**
	 * 构建userdetails
	 *
	 * @param userInfo 用户信息
	 * @return
	 */
	private UserDetails getUserDetails(UserInfo userInfo) {
		// 1 数据库读取
		Set<String> dbAuthsSet = new HashSet<>();
		if (ArrayUtil.isNotEmpty(userInfo.getRoles())) {
			// 获取角色
			Arrays.stream(userInfo.getRoles()).forEach(roleId -> dbAuthsSet.add(SecurityConstants.ROLE + roleId));
			// 获取资源
			if (ObjectUtil.isNotNull(userInfo.getPermissions())) {
				dbAuthsSet.addAll(Arrays.asList(userInfo.getPermissions()));
			}

		}
		// 2 获取user
		Collection<? extends GrantedAuthority> authorities
				= AuthorityUtils.createAuthorityList(dbAuthsSet.toArray(new String[0]));
		User user = userInfo.getUser();
		boolean enabled = (user.getLockFlag().equals(LockFlagEnum.NO)) ? true : false;

		// 构造security用户
		return new User(user.getId(), user.getMobile(),
				SecurityConstants.BCRYPT + user.getPassword(), true,
				true, true, true, authorities);
	}
- 成功返回userDetails 可以发放accessToken了。
