

1.安装CodePush CLI
安装CodePush指令,直接在终端输入如下命令即可
$ npm install -g code-push-cli
2.注册CodePush账号
$ code-push register
注意:当执行完上面的命令后,会自动打开一个授权页面。注册成功后,CodePush会给我们一个key,将这个key在终端中填入即可
CodePush注册登录相关命令
- code-push login 登录
- code-push loout 注销
- code-push access-key ls 列出登录的token
- code-push access-key rm 删除某个accessKey
3.在CodePush服务器注册App
在CodePush注册App,输入下面的命令即可完成注册,这里需要注意的是我们的应用如果分为iOS和Android两个平台,这时需要分别注册两套key
应用添加成功后就会返回对应的
Production和Staging两个Key,Production表示生产环境的热更新部署,Staging表示开发环境的热更新部署
添加平台应用
$ code-push app add <appName> <os> <platform>
我们可以输入如下命令来查看添加的App
$ code-push app list
CodePush管理App相关命令
- code-push app add 在账号里面添加一个新的app
- code-push app remove 或者 rm 在账号里移除一个app
- code-push app rename 重命名一个存在app
- code-push app list 或则 ls 列出账号下面的所有app
- code-push app transfer 把app的所有权转移到另外一个账号
4.RN代码中集成CodePush
安装组件
$ npm install react-native-code-push
我们在RN项目的根组件中添加热更新逻辑代码如下:
import React, { Component } from 'react';
import {
  View,
  Text,
} from 'react-native';
import CodePush from 'react-native-code-push';

let codePushOptions = {
  //设置检查更新的频率
  //ON_APP_RESUME APP恢复到前台的时候
  //ON_APP_START APP开启的时候
  //MANUAL 手动检查
  checkFrequency: CodePush.CheckFrequency.ON_APP_START,
};

//这一行必须
App = CodePush(codePushOptions)(App);

export default class App extends Component {
  //如果有更新的提示
  syncImmediate() {
    CodePush.sync({
      //安装模式
          //ON_NEXT_RESUME 下次恢复到前台时
          //ON_NEXT_RESTART 下一次重启时
          //IMMEDIATE 马上更新
      installMode: CodePush.InstallMode.IMMEDIATE,
      //强制更新
      mandatoryInstallMode: CodePush.InstallMode.IMMEDIATE,
      //对话框
      updateDialog: {
        //是否显示更新描述
        appendReleaseDescription: true,
        //更新描述的前缀。 默认为"Description"
        descriptionPrefix: '更新内容:',
        //强制更新按钮文字,默认为continue
        mandatoryContinueButtonLabel: '立即更新',
        //强制更新时的信息. 默认为"An update is available that must be installed."
        mandatoryUpdateMessage: '必须更新后才能使用',
        //非强制更新时,按钮文字,默认为"ignore"
        optionalIgnoreButtonLabel: '稍后',
        //非强制更新时,确认按钮文字. 默认为"Install"
        optionalInstallButtonLabel: '后台更新',
        //非强制更新时,检查到更新的消息文本
        optionalUpdateMessage: '有新版本了,是否更新?',
        //Alert窗口的标题
        title: '更新提示',
      },
    });
  }

  UNSAFE_componentWillMount() {
    CodePush.disallowRestart(); //禁止重启
    this.syncImmediate(); //开始检查更新
  }

  componentDidMount() {
    CodePush.allowRestart(); //允许重启
  }

  render() {
    return (
      <View style={{ flex: 1, justifyContent: 'center', alignItems: 'center' }}>
        <Text>code Push Demo</Text>
        <Text>版本号 33333</Text>
      </View>
    );
  }
}
5.原生应用中配置CodePush
-
配置iOS平台
-
使用Xcode打开项目,Xcode的项目导航视图中的PROJECT下选择你的项目,选择Info页签 ,在Configurations节点下单击 + 按钮 ,选择Duplicate "Release Configaration,输入Staging,完成之后需要执行
pod install生成相关配置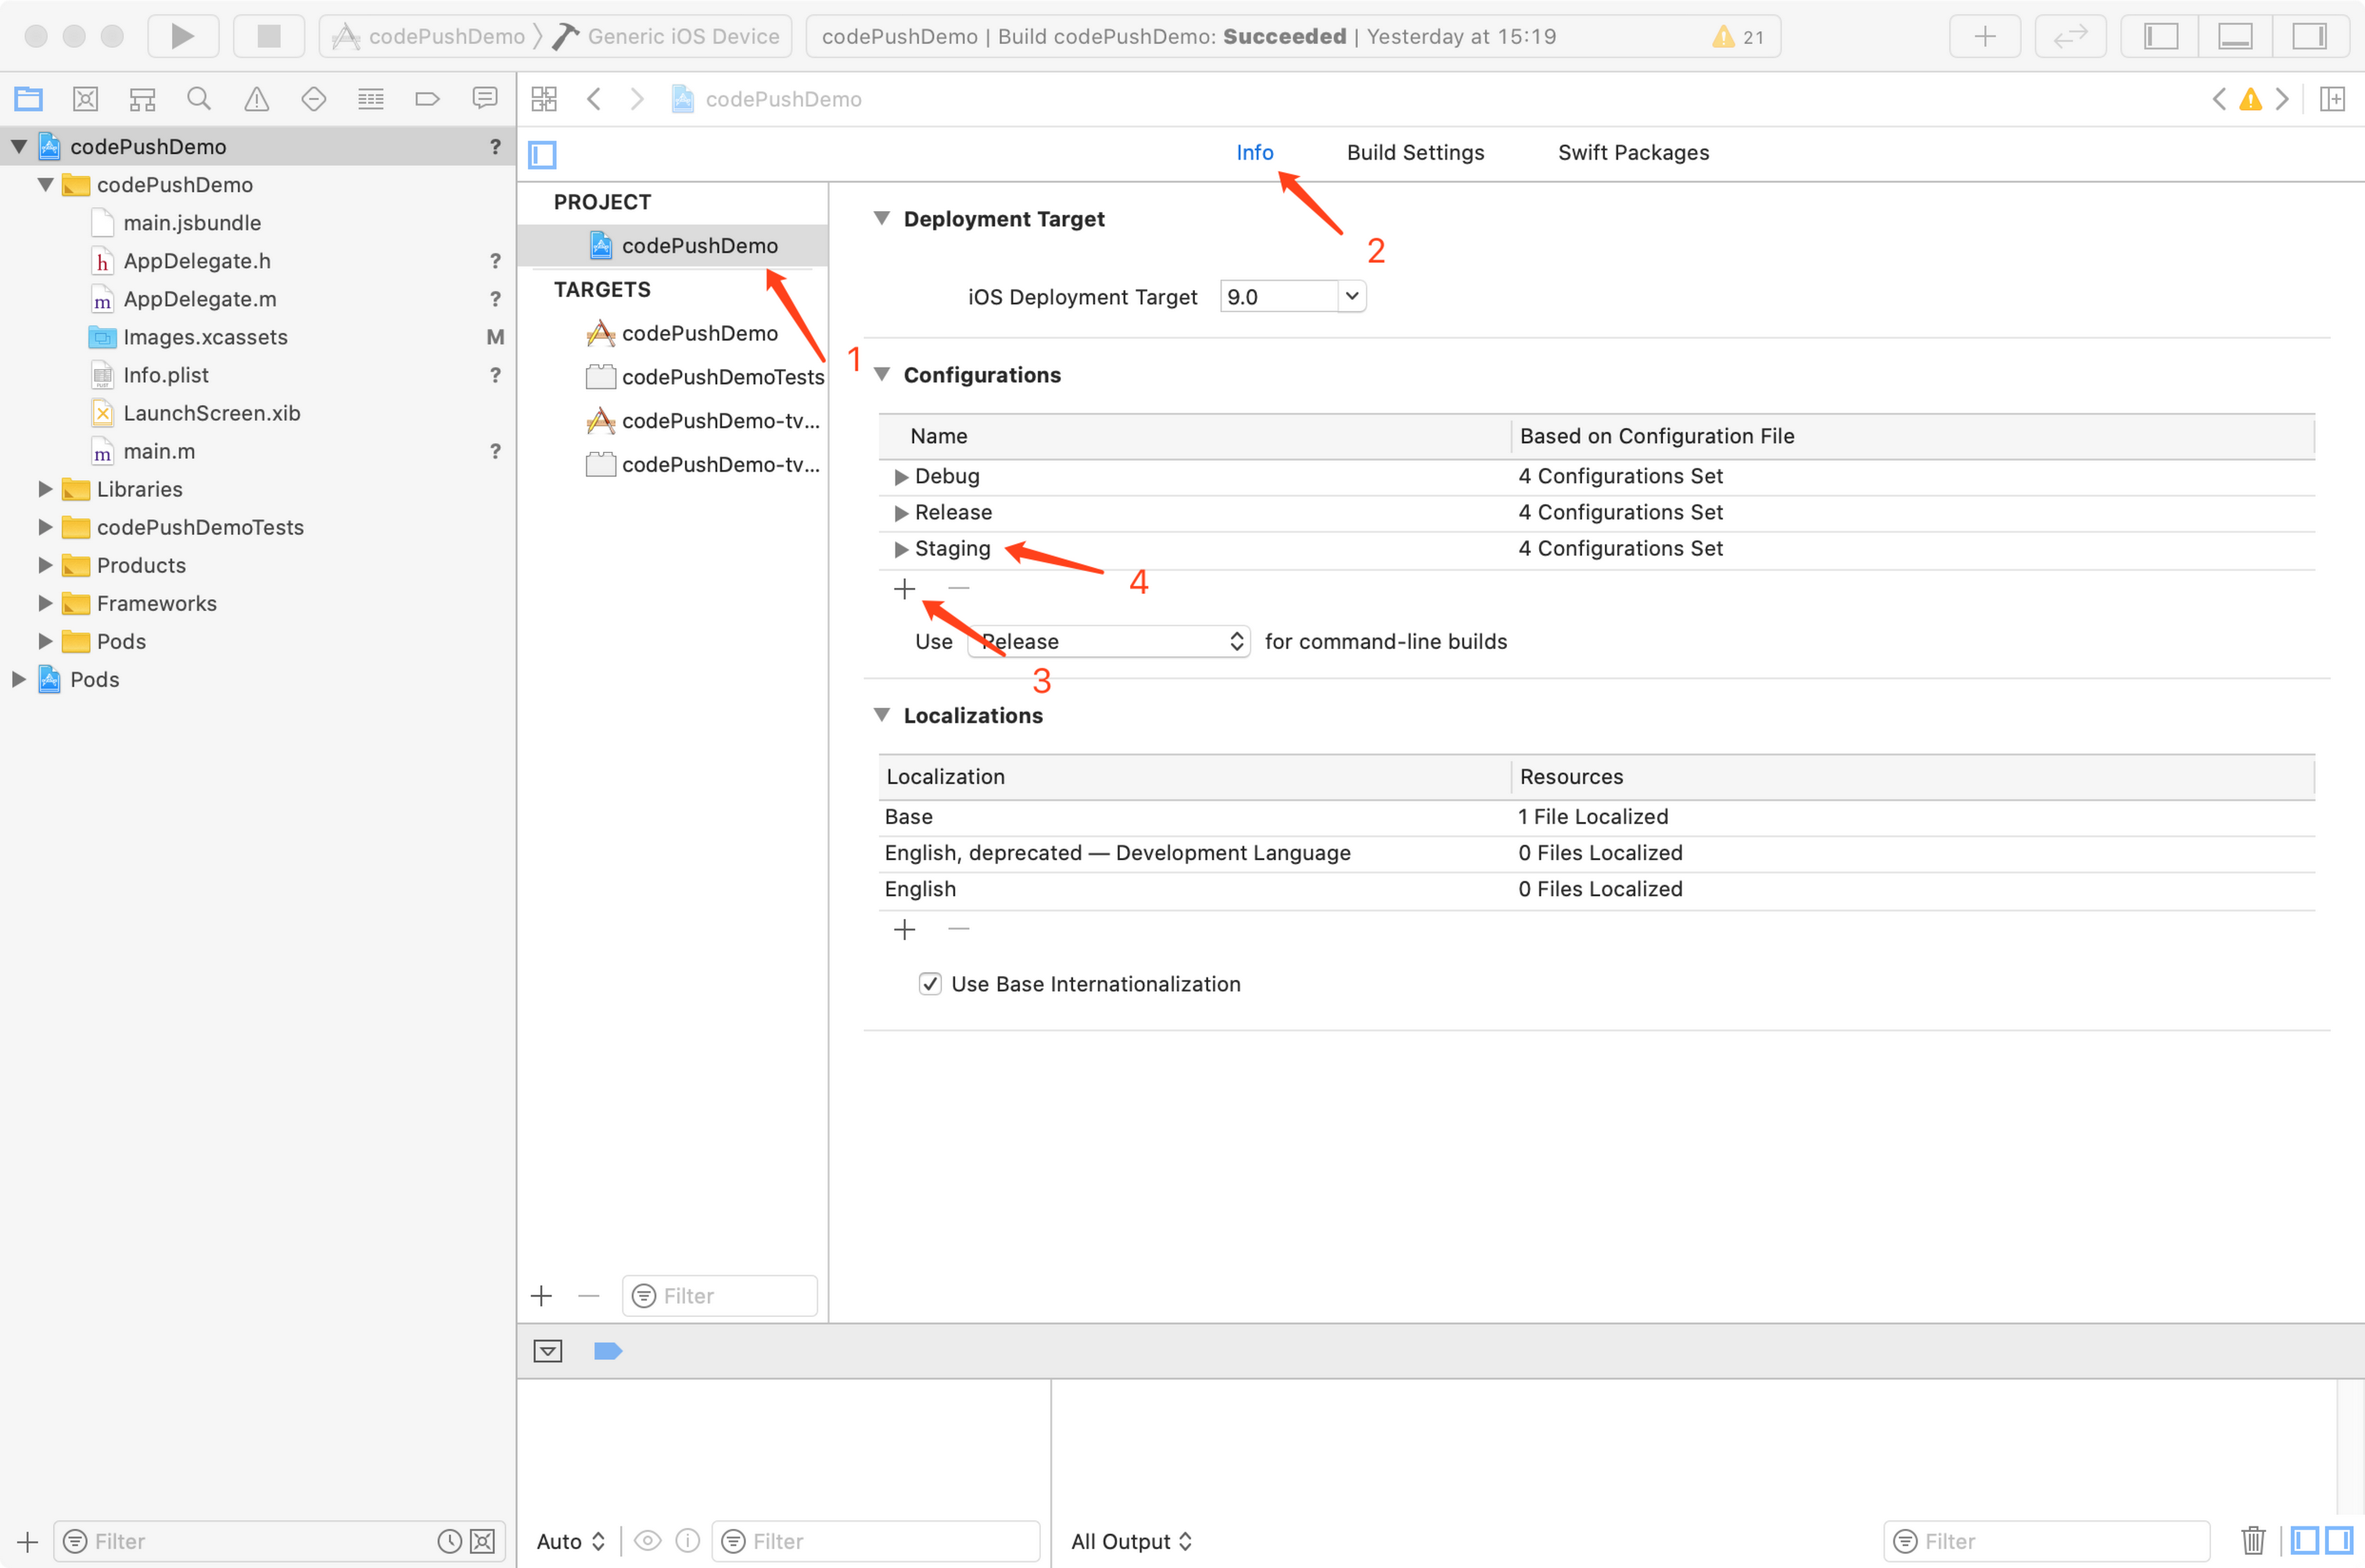
-
选择Build Settings tab,点击
+号,选择Add User-Defined Setting,将key设置为CODE_PUSH_KEY,Release 和 Staging的值为前面创建的key,我们直接复制进去即可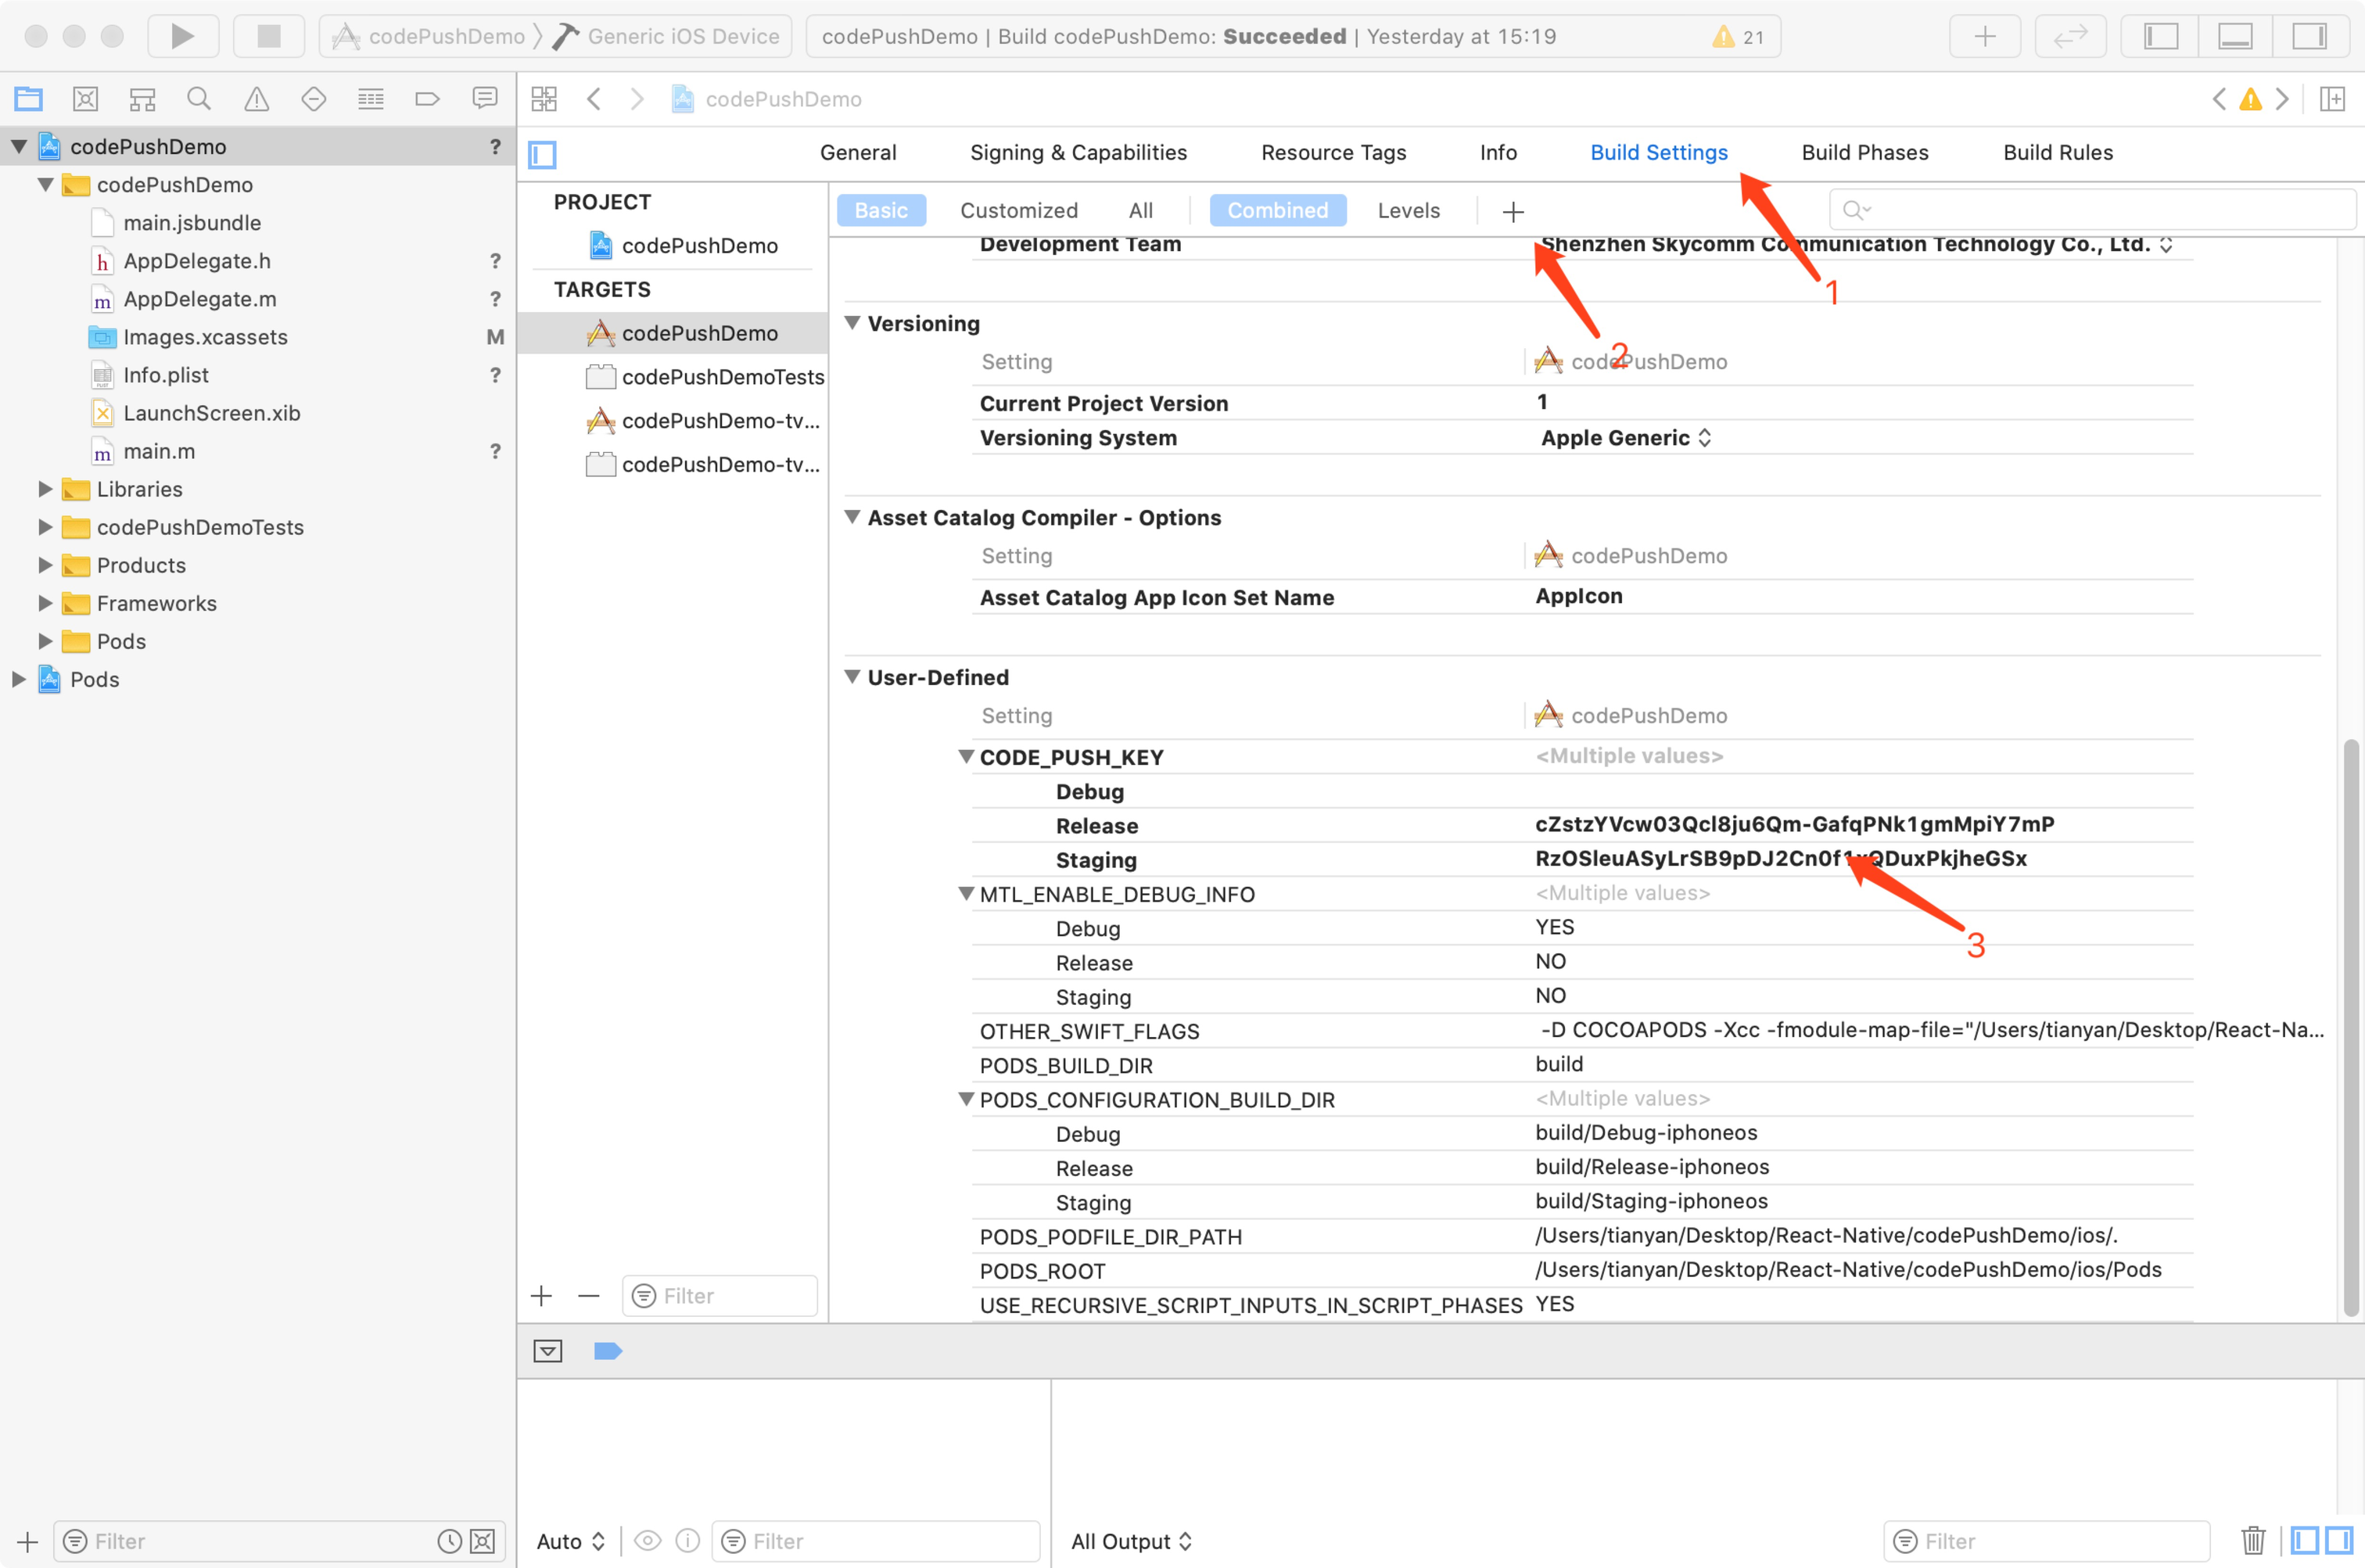
-
打开Info.plist文件,添加
CodePushDeploymentKey键,其值为$(CODEPUSH_KEY),并修改Bundle versions为三位 -
在AppDelegate.m中导入#import <CodePush/CodePush.h>并修改方法
- (NSURL *)sourceURLForBridge:(RCTBridge *)bridge
 {
 #if DEBUG
 return [[RCTBundleURLProvider sharedSettings] jsBundleURLForBundleRoot:@"index" fallbackResource:nil];
 #else
 //  return [[NSBundle mainBundle] URLForResource:@"main" withExtension:@"jsbundle"];
  return [CodePush bundleURL];
 #endif
 }
至此iOS平台环境配置完成
-
-
配置Android平台
6.发布更新
一般常见的应用内更新时机分为两种,一种是打开App就检查更新,一种是放在设置界面让用户主动检查更新并安装
-
打开APP就检查更新
在根组件的componentDidMount方法中通过 CodePush.sync()方法检查并安装更新,如果有更新包可供下载则会在重启后生效。不过这种下载和安装都是静默的,即用户不可见。如果需要用户可见则需要额外的配置。具体可以参考codePush官方API文档
codePush.sync({
  updateDialog: {
    appendReleaseDescription: true,
    descriptionPrefix:'\n\n更新内容:\n',
    title:'更新',
    mandatoryUpdateMessage:'',
    mandatoryContinueButtonLabel:'更新',
  },
  mandatoryInstallMode:codePush.InstallMode.IMMEDIATE,
});
上面的配置在检查更新时会弹出提示对话框, mandatoryInstallMode表示强制更新,appendReleaseDescription表示发布更新时的描述
-
用户点击检查更新
用户点击检查更新按钮后进行检查,如果有更新则弹出提示框让用户选择是否更新,下载完成后会立即重启并生效(也可配置稍后重启),部分代码如下
codePush.checkForUpdate(deploymentKey).then((update) => {
    if (!update) {
        Alert.alert("提示", "已是最新版本--", [
            {
                text: "Ok", onPress: () => {
                console.log("点了OK");
            }
            }
        ]);
    } else {
        codePush.sync({
                deploymentKey: deploymentKey,
                updateDialog: {
                    optionalIgnoreButtonLabel: '稍后',
                    optionalInstallButtonLabel: '立即更新',
                    optionalUpdateMessage: '有新版本了,是否更新?',
                    title: '更新提示'
                },
                installMode: codePush.InstallMode.IMMEDIATE,

            },
            (status) => {
                switch (status) {
                    case codePush.SyncStatus.DOWNLOADING_PACKAGE:
                        console.log("DOWNLOADING_PACKAGE");
                        break;
                    case codePush.SyncStatus.INSTALLING_UPDATE:
                        console.log(" INSTALLING_UPDATE");
                        break;
                }
            },
            (progress) => {
                console.log(progress.receivedBytes + " of " + progress.totalBytes + " received.");
            }
        );
    }
 }
如何发布CodePush更新包
CodePush支持两种发布更新的方式,一种是通过code-push release-react简化方式,另外一种是通过code-push release的复杂方式
-
code-push release-react
code-push release-react这种方式将打包与发布两个命令合二为一,简化了操作流程命令格式:
code-push release-react <appName> <platform>eg:
code-push release-react MyApp ios --t 1.0.0 --dev false --d Production --des "1.优化操作流程" --m true其中参数--t为二进制(.ipa与apk)安装包的的版本;--dev为是否启用开发者模式(默认为false);--d是要发布更新的环境分Production与Staging(默认为Staging);--des为更新说明;--m 是强制更新。
关于
code-push release-react更多可选的参数,可以在终端输入code-push release-react进行查看。 -
code-push release
生成bundle
发布更新之前,需要先把 js打包成 bundle,如:
第一步: 在 工程目录里面新增 bundles文件:
mkdir bundles第二步: 运行命令打包
react-native bundle --platform <平台> --entry-file 启动文件 --bundle-output 打包js输出文件 --assets-dest 资源输出目录 --dev 是否调试。eg:
react-native bundle --platform android --entry-file index.js --bundle-output ./bundles/main.jsbundle --dev false发布更新
打包bundle结束后,就可以通过CodePush发布更新了。在终端输入
code-push release <应用名称> <对应的应用版本> --deploymentName: 更新环境 --description: 更新描述 --mandatory: 是否强制更新eg:code-push release GitHubPopular ./bundles/main.bundle 1.0.6 --deploymentName Production --description "1.支持文章缓存。" --mandatory true
