

前期准备:
为什么要用taro?
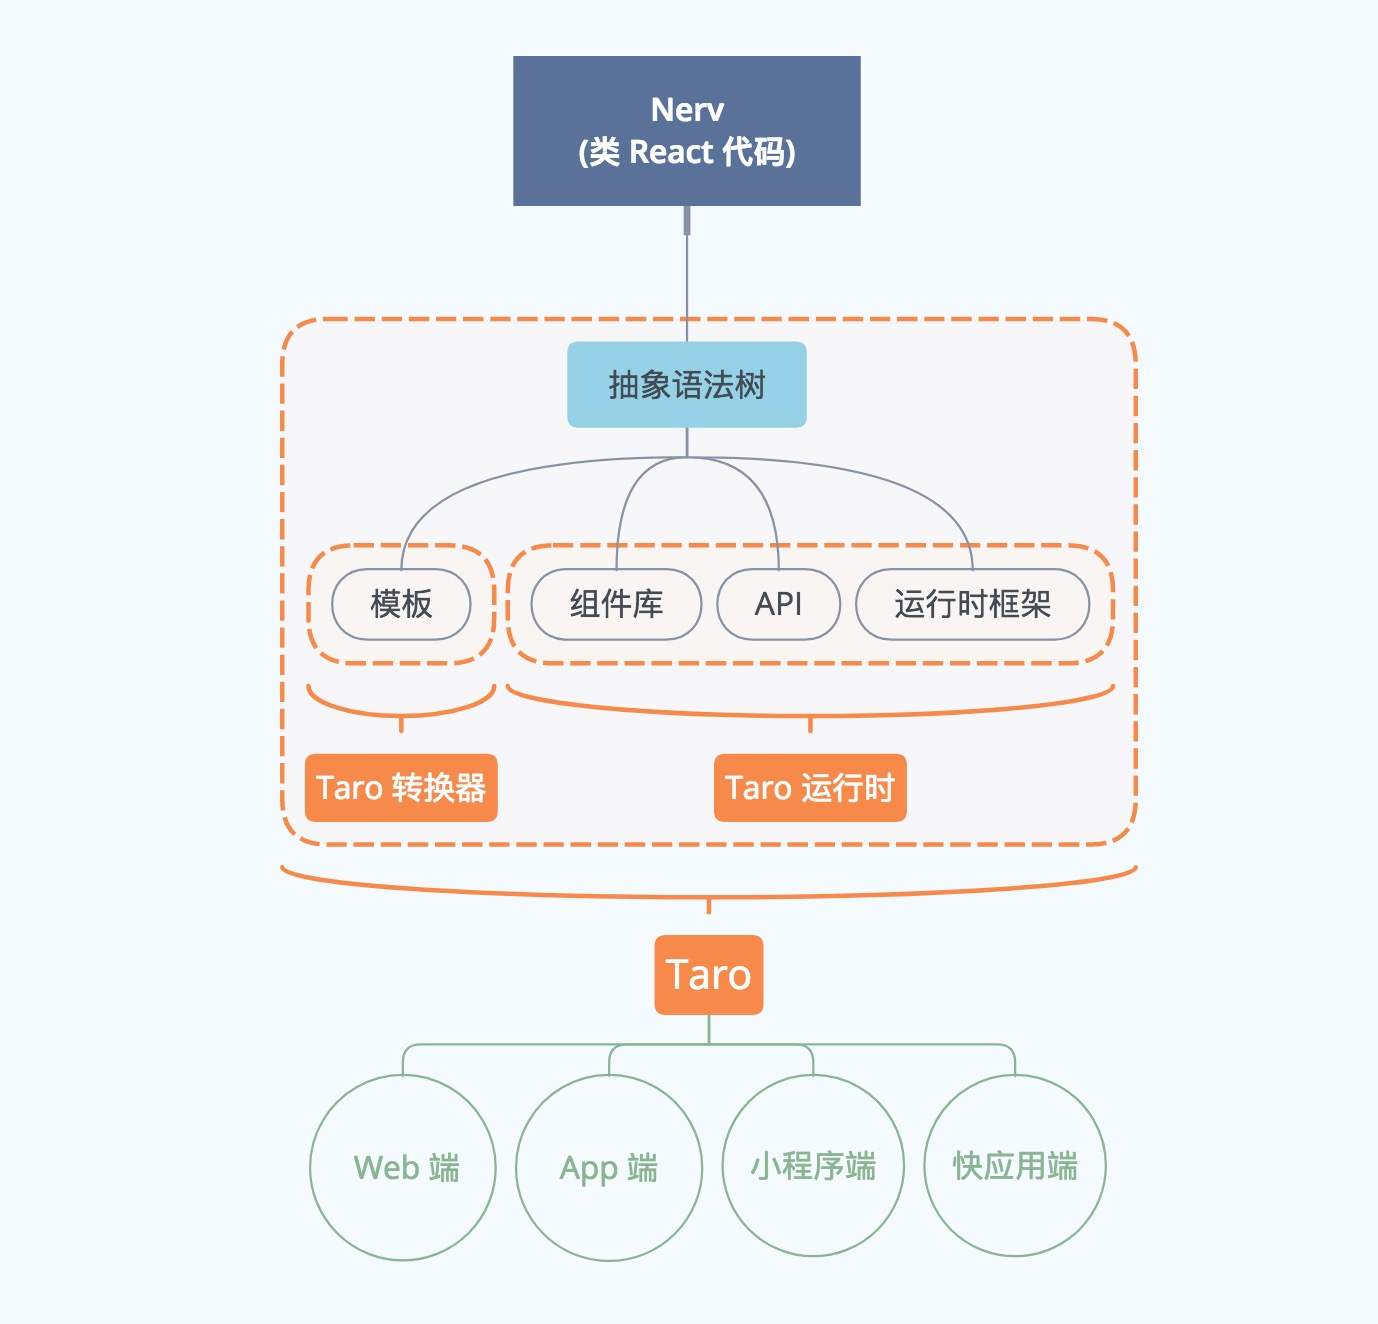
用Taro,已通用性技术解决生产开发问题,一套代码,通过Taro 编译工具运行在多个客户端,Taro框架使用React语法规范,方便易学,一个框架,解决各种小程序/技术开发困扰,即便出现新兴应用框架,依然可以在Taro上适配。
目前Taro支持的终端
- 微信小程序
- H5 移动端Web页面
- 百度小程序
- 支付宝小程序
- 快应用
- ReactNative
- 字节跳动小程序
- QQ轻应用
疑问:
1、taro最大化的让可以统一的组件,逻辑交互成为公用,像支付,支付宝和微信差别本身就很大,另外,taro中支持通过环境变量来区分环境,适配
2、转成h5可以混合开发,转成rn就是原生开发,基本上,只要它想,未来可以适配任何端
开发技术栈:react、redux、axios、scss、taro、taro-ui
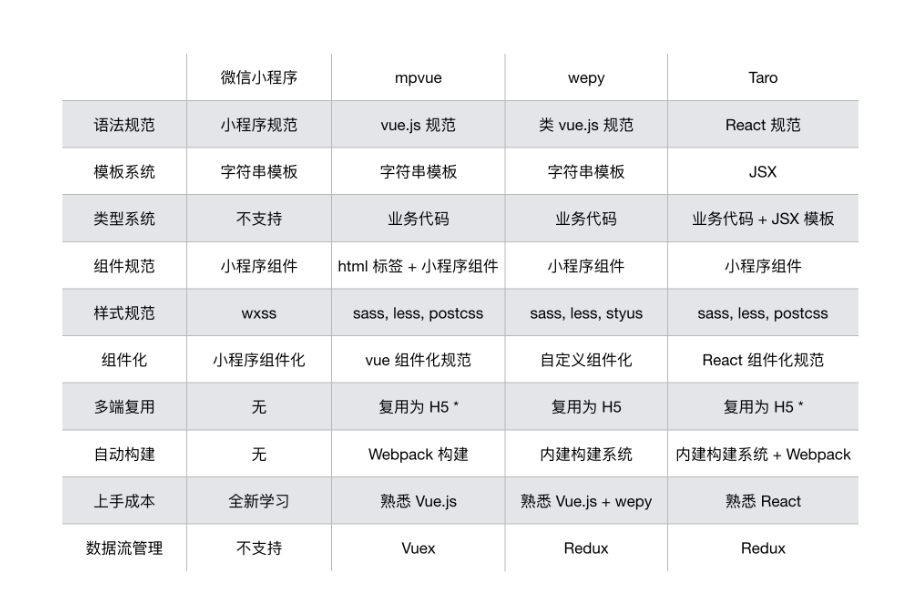
技术选型与权衡
需要结合我们团队技术栈、技术需求以及框架特点、特性进行选型和权衡。
安装
安装 Taro 开发工具 @tarojs/cli
使用 npm 或者 yarn 全局安装
npm install -g @tarojs/cli
// 或
yarn global add @tarojs/cli
运行代码
文件目录如下:
├── dist                   编译结果目录
├── config                 配置目录
|   ├── dev.js             开发时配置
|   ├── index.js           默认配置
|   └── prod.js            打包时配置
├── src                    源码目录
|   ├── pages              页面文件目录
|   |   ├── index          index页面目录
|   |   |   ├── index.js   index页面逻辑
|   |   |   └── index.css  index页面样式
|   ├── app.css            项目总通用样式
|   └── app.js             项目入口文件
└── package.json
开发前注意
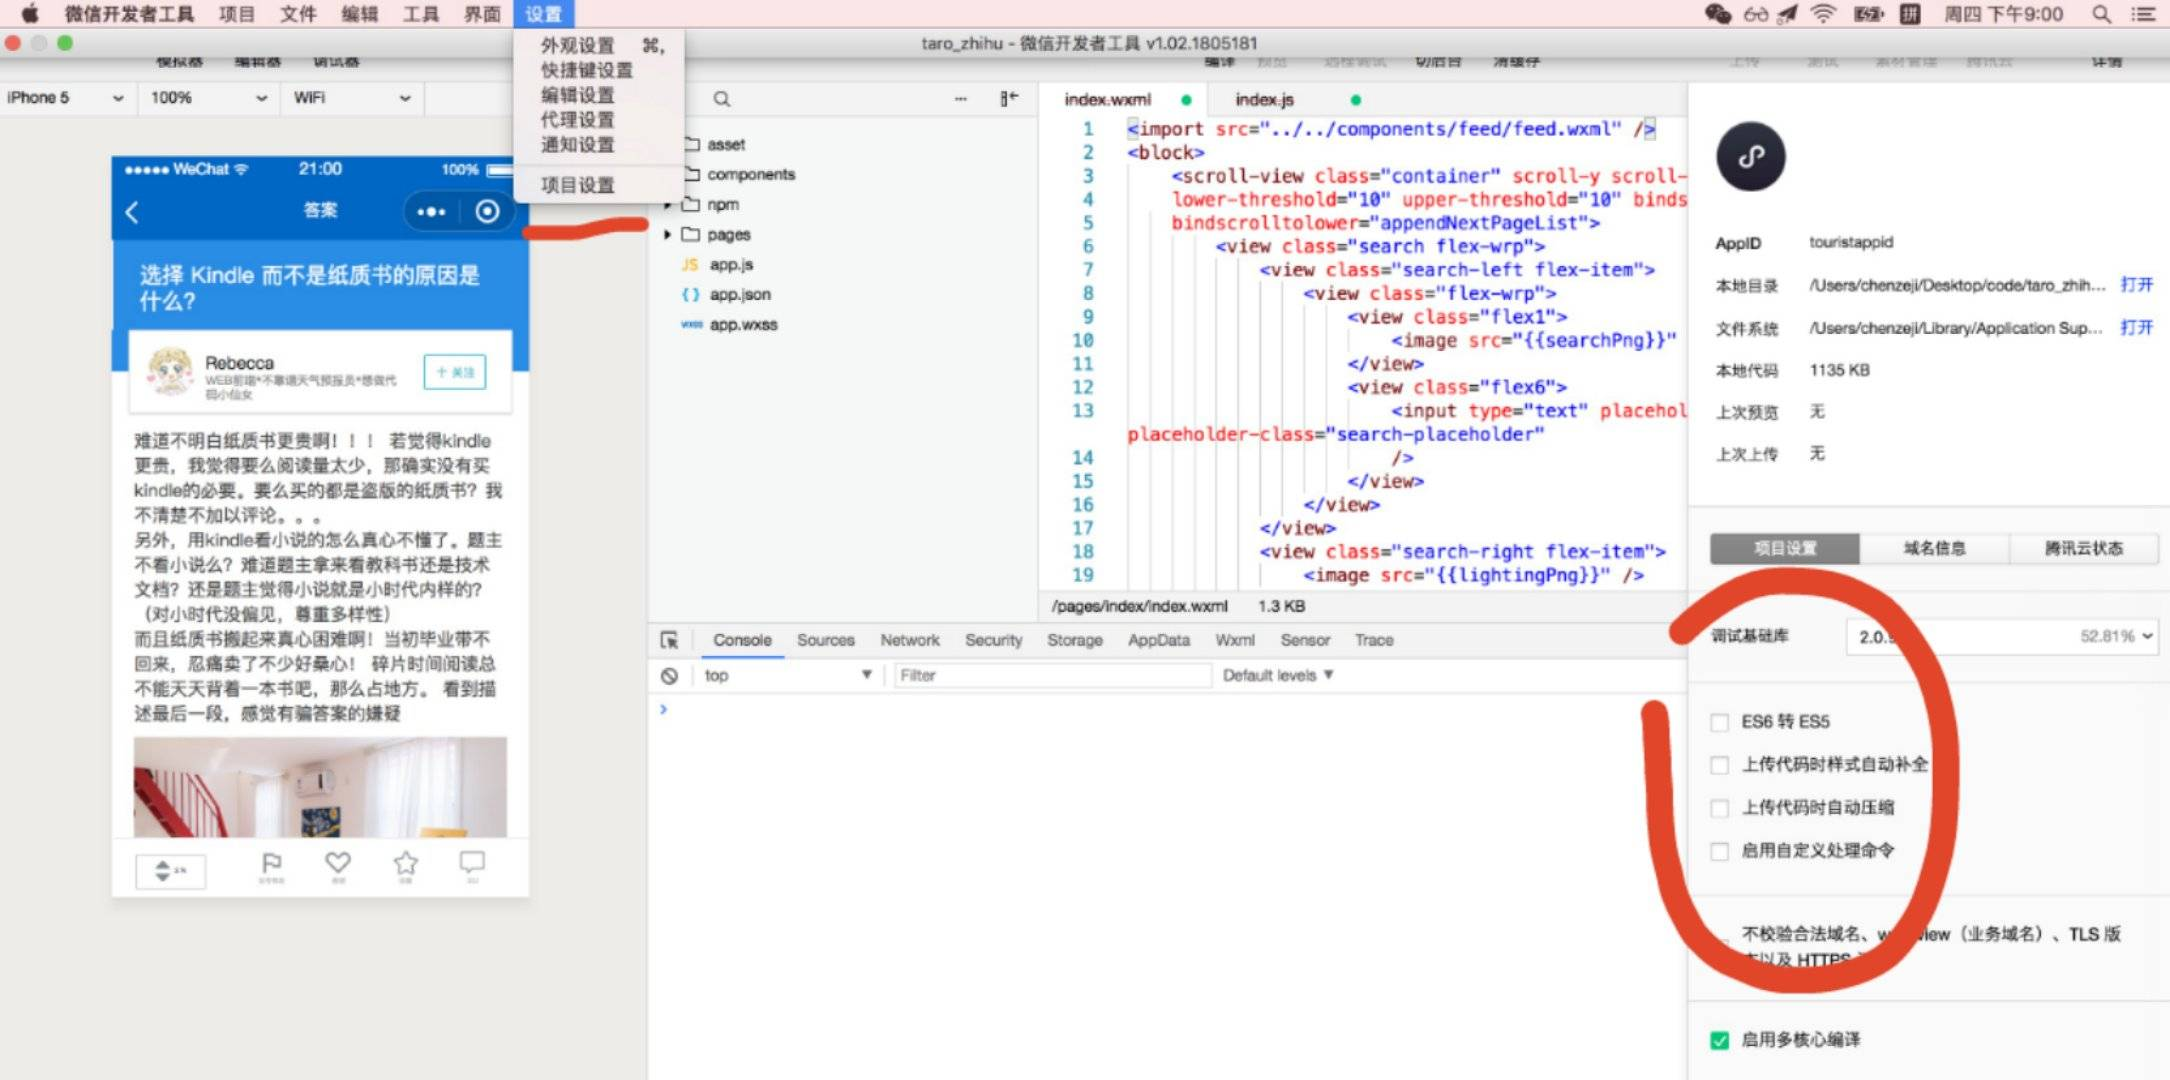
若使用 微信小程序预览模式 ,则需下载并使用 微信开发者工具 添加项目进行预览,此时需要注意微信开发者工具的项目设置
- 需要设置关闭ES6转ES5功能,开启可能报错
- 需要设置关闭上传代码时样式自动补全,开启可能报错
- 需要设置关闭代码压缩上传,开启可能报错
一些需要注意的地方
用Taro开发小程序,需要注意的地方?
页面栈只有10层
- 估计是每个页面的数据在小程序内部都有缓存,所以做了10层的限制。带来的问题就是假如页面存在循环跳转,即A页面可以跳到B页面,B页面也可以跳到A页面,然后用户从A进入了B,想返回A的时候,往往是直接在B页面里点击跳转到A,而不是点返回回到A,如此一来,10层很快就突破了。所以我们自己对navigateTo函数做了一层封装,防止溢出。
页面内容有缓存
- 上面说到,页面内容有缓存。所以假如某个页面是根据不同的数据渲染视图,新渲染时会有上一次渲染的缓存,导致页面看起来有个闪烁的变化,用户体验非常不好。其实解决的办法也很简单,每次在componentWillUnmount生命周期中清理一下当前页面的数据就好了。小程序说到底不是h5,不会说每次进入页面就会刷新,也不会离开就销毁,刷新,清理数据的动作都需要自己再生命周期函数里主动触发。
不能随时地监听页面滚动事件
- 页面的滚动事件只能通过onPageScroll来监听,所以当我想在组件里进监听操作时,要将该部分的逻辑提前到onPageScroll函数,提高了抽象成本。例如我需要开发一个滚动到某个位置就吸顶的tab,本来可以在tab内部处理的逻辑被提前了,减少了其可复用性。
项目前期准备
- 初始化项目
- taro 脚手架初始化
- 调整文件目录
- 微信预览环境
- 准备项目资源与接口
- 基础请求类封装
登录页面
- 登录页面简单快写
- Promise与异步编程联合使用
- 验证token与页面跳转
- Taro路由跳转与限制
导航菜单实现
- Taro封装抽提组件
- Taro组件与Redux的应用
- Taro生态UI库使用
- scss中的嵌套样式
- 组件中的Props传值
- Taro中的资源引用
列表开发
- 话题列表请求与异步编程
- 话题列表样式实现
- 列表分页加载与页码追加
- 切换分类请求到页面跳转
- Taro中的列表渲染
详情开发
- 详情接口请求
- 详情主内容区、回复列表实现
- 点赞功能Redux的属性变化
- 点赞功能函数实现
- 回复组件封装与state状态
- 回复主题小程序与H5的区别
- 子组件调用父组件函数参数的误区
个人信息页面
- 个人信息页面数据拉取
- 信息页面中的panel组件
- 发布话题中的picker
- 发布页面样式调整及Redux缓存数据
- 公共验证逻辑
每个平台的编译打包方式
1、微信小程序
选择微信小程序模式,需要自行下载并打开微信开发者工具,然后选择项目根目录进行预览。
微信小程序编译预览及打包
# npm script

$ npm run dev:weapp

$ npm run build:weapp
2、H5
H5 模式,无需特定的开发者工具,在执行完下述命令之后即可通过浏览器进行预览
H5 编译预览及打包
# npm script

$ npm run dev:h5

npm run build:h5 -- --watch

taro build --type h5 "--watch"
3、React Native
React Native 端运行需执行如下命令,React Native 端相关的运行说明请参见 React Native 教程
# npm script

$ npm run dev:rn
4、百度小程序
选择百度小程序模式,需要自行下载并打开百度开发者工具,然后在项目编译完后选择项目根目录下 dist 目录进行预览。
百度小程序编译预览及打包
# npm script

$ npm run dev:swan

$ npm run build:swan
5、支付宝小程序
选择支付宝小程序模式,需要自行下载并打开支付宝小程序开发者工具,然后在项目编译完后选择项目根目录下 dist 目录进行预览。
支付宝小程序编译预览及打包
# npm script

$ npm run dev:alipay

$ npm run build:alipay
首页
功能描述:上滑刷新,下拉加载更多,数据请求,
刷新及继续加载的动作, 依靠的是ScrollView组件,并在组件上绑定 onScrolltoupper 和 onScrolltolower 来绑定滚动到顶部及底部所触发的事件, 同时 upperThreshold 和 lowerThreshold 能够调整触发时距边界的距离。
数据请求 api 使用 Taro.request, 跟wx.request 使用方法基本一致,不同的是 Taro.request 天然支持 promise 化,mock 数据使用 easy-mock 来提供 。
点击跳转使用 Taro.navigateTo,跟 wx.navigateTo 也基本一致,在写跳转的时候,一开始想用匿名函数的形式写,发现 Taro 目前还不支持,据说就要支持了,Taro 的迭代速度还是很快的。
将首页进行页面重构的时候,遇到最费时间的问题,应该是wxss转化为scss,Taro 的组件转化为微信小程序和 web 后,标签是不一样的,比如Image组件会变成image或img标签,然而原来的wxss里面使用了标签名来命名 css,这样一来就造成了微信小程序跟 web 样式表现不一致。所以不建议使用标签名命名 css,建议直接用 class。
export default class Index extends Component {
  config = {
    navigationBarTitleText: '首页'
  }
  constructor() {
    super(...arguments)
    this.state = {
      loading:true,
      list:[]
    }
  }
  componentDidMount () {
    // 获取远程数据
    this.updateList()
  }
  updateList() {
    Taro.showLoading({title: '加载中'})
    Taro.request({
      url: 'https://easy-mock.com/mock/5b21d97f6b88957fa8a502f2/example/feed'
    }).then(res => {
      Taro.hideLoading()
      if (res.data.success) {
        this.setState({
          loading:false,
          list:res.data.data
        })
      }
    })
  }
  appendNextPageList() {
    Taro.showLoading({title: '加载中'})
    Taro.request({
      url: 'https://easy-mock.com/mock/5b21d97f6b88957fa8a502f2/example/feed'
    }).then(res => {
      Taro.hideLoading()
      if (res.data.success) {
        this.setState({
          list: this.state.list.concat(res.data.data)
        })
      }
    })
  }
  render () {
    return (<ScrollView className='container'
        scrollY
        scrollWithAnimation
        scrollTop='0'
        lowerThreshold='10'
        upperThreshold='10'
        onScrolltoupper={this.updateList}
        onScrolltolower={this.appendNextPageList}
        >
        <View className='search flex-wrp'>
          <View className='search-left flex-item'>
              <View className='flex-wrp'>
                <View className='flex1'><Image src={searchPng}></Image></View>
                <View className='flex6'><Input type='text' placeholder='搜索话题, 问题或人' placeholderClass='search-placeholder'/></View>
              </View>
          </View>
          <View className='search-right flex-item'>
              <Image src={lightingPng}></Image>
          </View>
        </View>
        {
          this.state.loading
          ? <View className='txcenter'><Text>加载中</Text></View>
          : this.state.list.map((item,index)=>{
          return <Feed key={item} />})
        }
      </ScrollView>
    )
  }
}
Taro 组件
微信小程序的 Component 组件跟Page 页面的生命周期函函数不一致很让人头疼,页面的生命周期方法有 onLoad、onReady、onUnload 等,而到了组件中则是 created、attached 、ready 等,相比之下 Taro 就比较统一了,不管是页面还是组件,写法都跟 React 的生命周期一致,统一的api开发起来也顺畅了许多。
然而 Taro 组件目前还是有很多局限,比如,不支持直接渲染 children, 即不支持 this.props.children;props 不能传递jsx;
在抽象组件的时候,主要有以下注意点
- 在写法上,Taro 组件首字母要大写并采用驼峰命名法,比如在 wxml里面的标签是view、scroll-view、image,在 Taro 要写成View、ScrollView、Image。Taro 的事件绑定事件绑定都以 on 开头并采用驼峰命名法
// 小程序代码
<scroll-view scroll-y='true' class='container' bindscrolltoupper='upper' upper-threshold='10' lower-threshold='5' bindscrolltolower='lower'>
</scroll-view>

// Taro 代码
<ScrollView className='container'
        scrollY
        scrollWithAnimation
        scrollTop='0'
        lowerThreshold='10'
        upperThreshold='10'
        onScrolltoupper={this.upper.bind(this)}
        onScrolltolower={this.lower.bind(this)}
        >
</ScrollView>
小程序引用本地静态资源直接在 src 写上相对路径,Taro 引用本地静态资源需要先 import 进来再使用,为了让 h5 部署的时候图片路径不出错,最好把图片放在服务器上,然后直接写 http 路径
// 小程序 引用本地静态资源
<image src='../../images/search.png'></image>

// Taro 引用本地静态资源
import searchPng from '../../asset/images/search.png'
// ...此处省略无数代码
<Image src={searchPng}></Image>

// 最好把图片放在服务器上,然后写http 路径
<Image src='https://image.ibb.co/kUissy/search.png'></Image>
遍历列表的区别,小程序使用模版语言,而 Taro 使用 jsx
// 小程序
<block wx:for='{{feed}}' wx:for-index='idx' wx:for-item='item' data-idx='{{idx}}'>
    <view class='feed-item'>
        ...
    </view>
</block>

// Taro 代码
{
    this.state.list.map((item,index)=>{
       return <Feed {...item} key={index} />
    })
}
“发现页面”的 tab 切换功能
tab切换原理: 在组件上绑定 onClick 事件 改变 this.state.currentNavtab 值,再通过判断来实现 tab 切换,函数参数传递方式为 this.switchTab.bind(this,index),具体代码如下:
export default class Discovery extends Component {
    constructor() {
    super(...arguments)
    this.state = {
        currentNavtab: 0,
        navTab: ['推荐', '圆桌', '热门', '收藏'],
    }
  }
  switchTab(index,e) {
    this.setState({
      currentNavtab: index
    });
  }
  render () {
    return (
      <View>
        <View className='top-tab flex-wrp flex-tab' >
        {
          this.state.navTab.map((item,index) => {
            return (<View className={this.state.currentNavtab === index ? 'toptab flex-item active' : 'toptab flex-item' } key={index} onClick={this.switchTab.bind(this,index)}>
              {item}
            </View>)
          })
        }
        </View>
        <ScrollView scroll-y className='container discovery withtab'>
          <View className='ctnt0' hidden={this.state.currentNavtab==0 ? false : true}>
              ...
          </View>
            <View className='txcenter' hidden={this.state.currentNavtab==1 ? false : true}>
              <Text>圆桌</Text>
            </View>
            <View className='txcenter' hidden={this.state.currentNavtab==2 ? false : true}>
              <Text>热门</Text>
            </View>
            <View className='txcenter' hidden={this.state.currentNavtab==3 ? false : true}>
              <Text>收藏</Text>
            </View>
        </ScrollView>
      </View>
    )
  }
}
轮播功能
轮播页使用了 Swiper 组件,参数跟小程序都是一一对应,具体可以查看详细文档,在重构过程也主要是把 wxml 换成 jsx 的形式。
<Swiper className='activity' indicatorDots='true'
    autoplay='true' interval='5000' duration='500'>
    {this.state.imgUrls.map((item,index) => {
        return (<SwiperItem key={index}>
            <Image src={item} className='slide-image' width='355' height='375' />
        </SwiperItem>)
    })}
</Swiper>
使用中发现的问题总结
Taro 的组件转化为微信小程序跟web后,标签是不一样的,比如Image组件会变成image或img标签,所以不建议使用标签名命名css,建议直接用 class 目前的事件绑定不支持匿名函数
// 不支持
<View onClick={()=> this.navigateTo('/pages/answer/answer')} >  </View>
Taro 组件在 web 端有许多属性和事件暂不支持 运行环境不同,某些 api 需要根据环境不同处理,比如 wx.getUserInfo 在 web 端是不存在的,此时我们需要判断环境来执行代码
if (Taro.getEnv() === Taro.ENV_TYPE.WEAPP) {
    // 小程序环境
} else if (Taro.getEnv() === Taro.ENV_TYPE.WEB ) {
    // WEB(H5)环境
}
Taro 目前不支持 SVG(毕竟小程序不支持) 目前的第三方库还比较少(毕竟 Taro 刚出来不久,希望接下来社区能出来各种 ui 库),Taro 组件暂时不支持纯函数,不支持解构赋值 {...item}
实现多端登录(主要包括微信登录和支付宝登录)
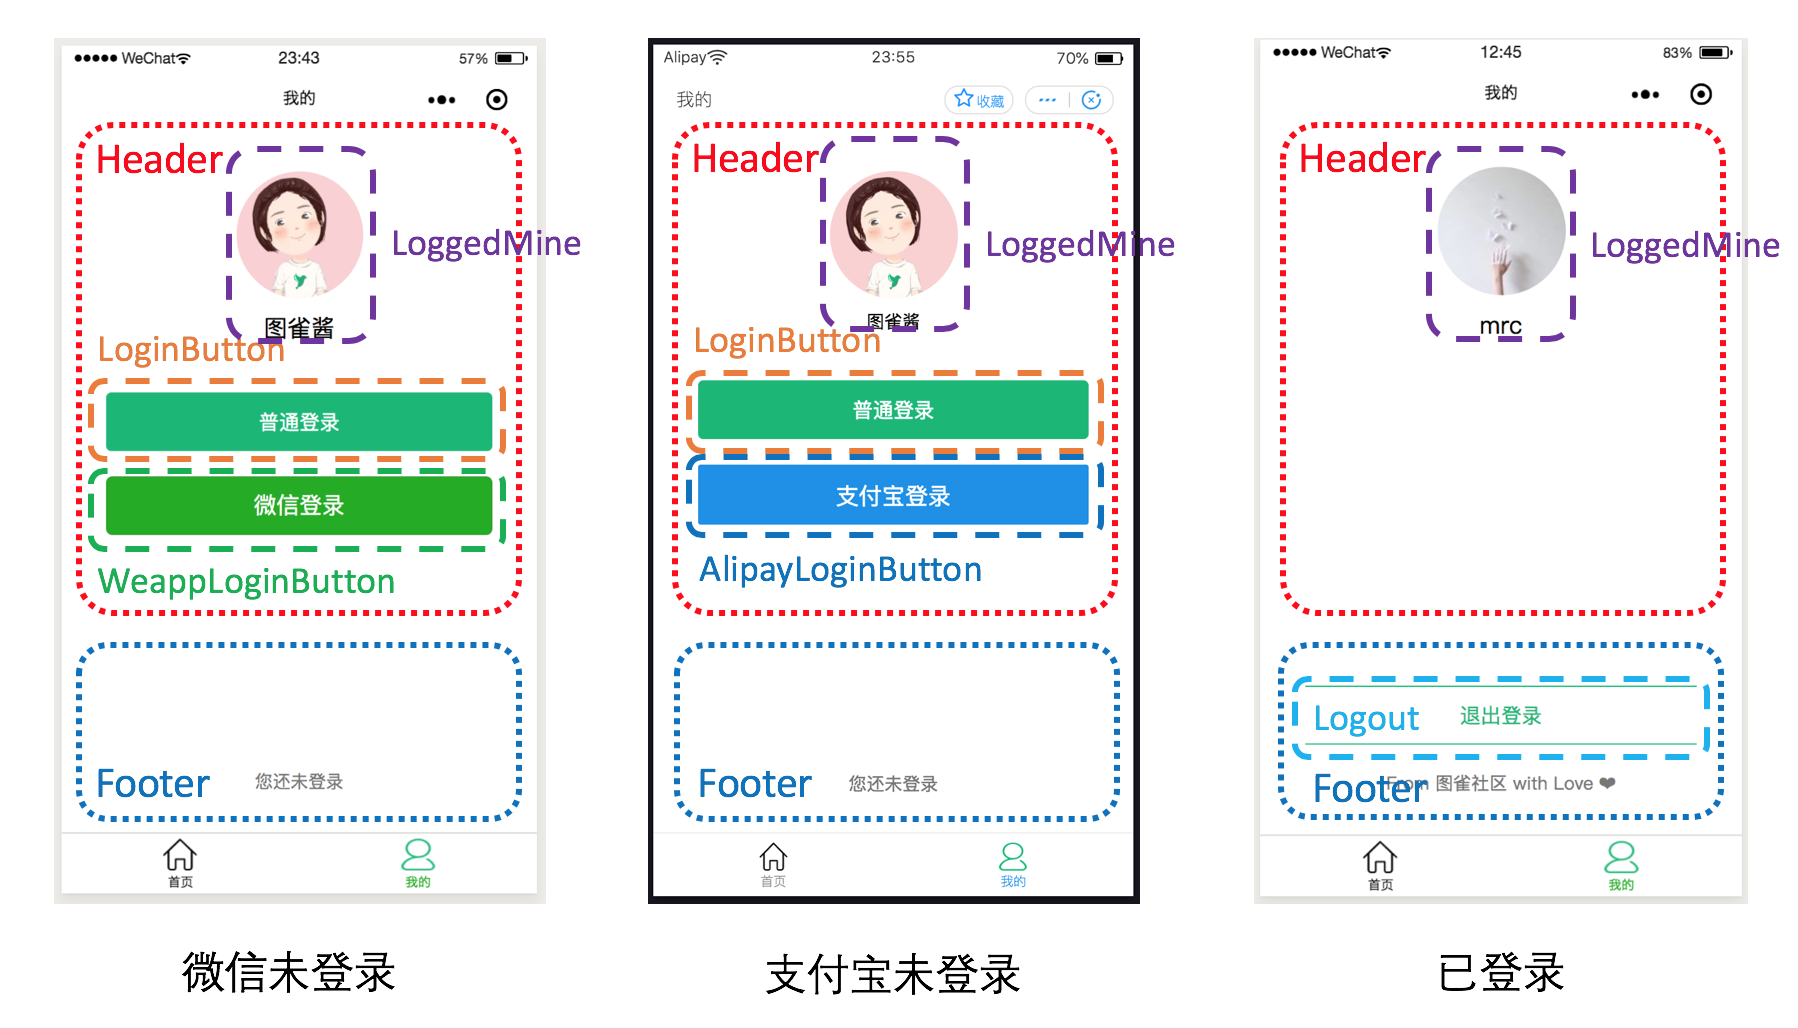
可以看到“我的”页面整体拆分成了 Header 和 Footer:
- Header 包括 LoggedMine(个人信息),如果在未登录状态下则还有 LoginButton(普通登录按钮)、WeappLoginButton(微信登录按钮,仅在微信小程序中出现)以及 AlipayLoginButton(支付宝登录按钮,仅在支付宝小程序中出现)
- Footer 则用来显示是否已登录的文字,在已登录的情况下会显示 Logout(退出登录按钮)
配置 Babel 插件
从这一步开始,我们将首次开始写异步代码。本项目将采用流行的 async/await 来编写异步逻辑,因此我们配置一下相应的 Babel 插件:
然后在 config/index.js 中为 config.babel.plugins 添加相应的配置如下:
const config = {
  // ...
  babel: {
    // ...
    plugins: [
      // ...
      [
        'transform-runtime',
        {
          helpers: false,
          polyfill: false,
          regenerator: true,
          moduleName: 'babel-runtime',
        },
      ],
    ],
  },
  // ...
}

// ...
各组件的实现
实现 LoginButton 首先,我们来实现普通登录按钮 LoginButton 组件。创建 src/components/LoginButton 目录,在其中创建 index.js,代码如下:
import Taro from '@tarojs/taro'
import { AtButton } from 'taro-ui'

export default function LoginButton(props) {
  return (
    <AtButton type="primary" onClick={props.handleClick}>
      普通登录
    </AtButton>
  )
}
我们使用了 Taro UI 的 AtButton 组件,并定义了一个 handleClick 事件,后面在使用时会传入。
实现 WeappLoginButton
接着我们实现微信登录按钮 WeappLoginButton。创建 src/components/WeappLoginButton 目录,在其中分别创建 index.js 和 index.scss。index.js 代码如下:
import Taro, { useState } from '@tarojs/taro'
import { Button } from '@tarojs/components'

import './index.scss'

export default function LoginButton(props) {
  const [isLogin, setIsLogin] = useState(false)

  async function onGetUserInfo(e) {
    setIsLogin(true)

    const { avatarUrl, nickName } = e.detail.userInfo
    await props.setLoginInfo(avatarUrl, nickName)

    setIsLogin(false)
  }

  return (
    <Button
      openType="getUserInfo"
      onGetUserInfo={onGetUserInfo}
      type="primary"
      className="login-button"
      loading={isLogin}
    >
      微信登录
    </Button>
  )
}
可以看到,微信登录按钮和之前的普通登录按钮多了很多东西:
- 添加了 isLogin 状态,用于表示是否在等待登录中,以及修改状态的 setIsLogin 函数
- 实现了 onGetUserInfo async 函数,用于处理在用户点击登录按钮、获取到信息之后的逻辑。其中,我们将获取到的用户信息传入 props 中的 setLoginInfo,从而修改整个应用的登录状态
- 添加了 openType(微信开放能力)属性,这里我们输入的是 getUserInfo(获取用户信息),欲查看所有支持的 open-type,请查看微信开放文档对应部分
- 添加了 onGetUserInfo这个handler,用于编写在获取到用户信息后的处理逻辑,这里就是传入刚刚实现的 onGetUserInfo
WeappLoginButton 的样式 index.scss 代码如下:
.login-button {
  width: 100%;
  margin-top: 40px;
  margin-bottom: 40px;
}
实现 AlipayLoginButton
让我们来实现支付宝登录按钮组件。创建 src/components/AlipayLoginButton 目录,在其中分别创建 index.js 和 index.scss。index.js 代码如下:
import Taro, { useState } from '@tarojs/taro'
import { Button } from '@tarojs/components'

import './index.scss'

export default function LoginButton(props) {
  const [isLogin, setIsLogin] = useState(false)

  async function onGetAuthorize(res) {
    setIsLogin(true)
    try {
      let userInfo = await Taro.getOpenUserInfo()

      userInfo = JSON.parse(userInfo.response).response
      const { avatar, nickName } = userInfo

      await props.setLoginInfo(avatar, nickName)
    } catch (err) {
      console.log('onGetAuthorize ERR: ', err)
    }

    setIsLogin(false)
  }

  return (
    <Button
      openType="getAuthorize"
      scope="userInfo"
      onGetAuthorize={onGetAuthorize}
      type="primary"
      className="login-button"
      loading={isLogin}
    >
      支付宝登录
    </Button>
  )
}
可以看到,内容与之前的微信登录按钮基本相似,但是有以下差别:
- 实现 onGetAuthorize 回调函数。与之前微信的回调函数不同,这里我们要调用 Taro.getOpenUserInfo 手动获取用户基础信息(实际上调用的是支付宝开放平台 my.getOpenUserInfo)
- Button 组件的 openType(支付宝开放能力)设置成 getAuthorize(小程序授权)
- 在设定开放能力为 getAuthorize 时,需要添加 scope 属性为 userInfo,让用户可以授权小程序获取支付宝会员的基础信息(另一个有效值是 phoneNumber,用于获取手机号码)
- 传入 onGetAuthorize 回调函数
提示
关于支付宝小程序登录按钮的细节,可以查看官方文档。
样式文件 index.scss 的代码如下:
.login-button {
  width: 100%;
  margin-top: 40px;
}
实现 LoggedMine
接着我们实现已经登录状态下的 LoggedMine 组件。创建 src/components/LoggedMine 目录,在其中分别创建 index.jsx 和 index.scss。index.jsx 代码如下:
import Taro from '@tarojs/taro'
import { View, Image } from '@tarojs/components'
import PropTypes from 'prop-types'

import './index.scss'
import avatar from '../../images/avatar.png'

export default function LoggedMine(props) {
  const { userInfo = {} } = props
  function onImageClick() {
    Taro.previewImage({
      urls: [userInfo.avatar],
    })
  }

  return (
    <View className="logged-mine">
      <Image
        src={userInfo.avatar ? userInfo.avatar : avatar}
        className="mine-avatar"
        onClick={onImageClick}
      />
      <View className="mine-nickName">
        {userInfo.nickName ? userInfo.nickName : '图雀酱'}
      </View>
      <View className="mine-username">{userInfo.username}</View>
    </View>
  )
}

LoggedMine.propTypes = {
  avatar: PropTypes.string,
  nickName: PropTypes.string,
  username: PropTypes.string,
}
这里我们添加了点击头像可以预览的功能,可以通过 Taro.previewImage 函数实现。
LoggedMine 组件的样式文件如下:
.logged-mine {
  display: flex;
  flex-direction: column;
  align-items: center;
}

.mine-avatar {
  width: 200px;
  height: 200px;
  border-radius: 50%;
}

.mine-nickName {
  font-size: 40;
  margin-top: 20px;
}

.mine-username {
  font-size: 32px;
  margin-top: 16px;
  color: #777;
}
实现 Header 组件
在所有的“小零件”全部实现后,我们就实现整个登录界面的 Header 部分。创建 src/components/Header 目录,在其中分别创建 index.js 和 index.scss。index.js 代码如下:
import Taro from '@tarojs/taro'
import { View } from '@tarojs/components'
import { AtMessage } from 'taro-ui'

import LoggedMine from '../LoggedMine'
import LoginButton from '../LoginButton'
import WeappLoginButton from '../WeappLoginButton'
import AlipayLoginButton from '../AlipayLoginButton'

import './index.scss'

export default function Header(props) {
  const isWeapp = Taro.getEnv() === Taro.ENV_TYPE.WEAPP
  const isAlipay = Taro.getEnv() === Taro.ENV_TYPE.ALIPAY

  return (
    <View className="user-box">
      <AtMessage />
      <LoggedMine userInfo={props.userInfo} />
      {!props.isLogged && (
        <View className="login-button-box">
          <LoginButton handleClick={props.handleClick} />
          {isWeapp && <WeappLoginButton setLoginInfo={props.setLoginInfo} />}
          {isAlipay && <AlipayLoginButton setLoginInfo={props.setLoginInfo} />}
        </View>
      )}
    </View>
  )
}
可以看到,我们根据 Taro.ENV_TYPE 查询当前所在的平台(微信、支付宝或其他),然后确定是否显示相应平台的登录按钮。
提示
你也许发现了,setLoginInfo 还是要等待父组件的传入。虽然 Hooks 简化了状态的定义和更新方式,但是却没有简化跨组件修改状态的逻辑。在接下来的一步,我们将用 Redux 进行简化。
Header 组件的样式代码如下:
.user-box {
  display: flex;
  flex-direction: column;
  align-items: center;
  justify-content: flex-start;
}

.login-button-box {
  margin-top: 60px;
  width: 100%;
}
实现 LoginForm
接着我们实现用于普通登录的 LoginForm 组件。由于本系列教程的目标是讲解 Taro,因此这里简化了注册/登录的流程,用户可以直接输入用户名并上传头像进行注册/登录,无需设置密码和其他验证过程。创建 src/components/LoginForm 目录,在其中分别创建 index.jsx 和 index.scss。index.jsx 代码如下:
import Taro, { useState } from '@tarojs/taro'
import { View, Form } from '@tarojs/components'
import { AtButton, AtImagePicker } from 'taro-ui'

import './index.scss'

export default function LoginForm(props) {
  const [showAddBtn, setShowAddBtn] = useState(true)

  function onChange(files) {
    if (files.length > 0) {
      setShowAddBtn(false)
    }

    props.handleFilesSelect(files)
  }

  function onImageClick() {
    Taro.previewImage({
      urls: [props.files[0].url],
    })
  }

  return (
    <View className="post-form">
      <Form onSubmit={props.handleSubmit}>
        <View className="login-box">
          <View className="avatar-selector">
            <AtImagePicker
              length={1}
              mode="scaleToFill"
              count={1}
              files={props.files}
              showAddBtn={showAddBtn}
              onImageClick={onImageClick}
              onChange={onChange}
            />
          </View>
          <Input
            className="input-nickName"
            type="text"
            placeholder="点击输入昵称"
            value={props.formNickName}
            onInput={props.handleNickNameInput}
          />
          <AtButton formType="submit" type="primary">
            登录
          </AtButton>
        </View>
      </Form>
    </View>
  )
}
这里我们使用 Taro UI 的 ImagePicker 图片选择器组件,让用户能够选择图片进行上传。AtImagePicker 最重要的属性就是 onChange 回调函数,这里我们通过父组件传进来的 handleFilesSelect 函数来搞定。
LoginForm 组件的样式代码如下:
.post-form {
  margin: 0 30px;
  padding: 30px;
}

.input-nickName {
  border: 1px solid #eee;
  padding: 10px;
  font-size: medium;
  width: 100%;
  margin-top: 40px;
  margin-bottom: 40px;
}

.avatar-selector {
  width: 200px;
  margin: 0 auto;
}
实现 Footer
所有的子组件全部实现之后,我们就来实现 Footer 组件。创建 src/components/Footer 目录,在其中分别创建 index.jsx 和 index.scss。index.jsx 代码如下:
import Taro, { useState } from '@tarojs/taro'
import { View } from '@tarojs/components'
import { AtFloatLayout } from 'taro-ui'

import Logout from '../Logout'
import LoginForm from '../LoginForm'
import './index.scss'

export default function Footer(props) {
  // Login Form 登录数据
  const [formNickName, setFormNickName] = useState('')
  const [files, setFiles] = useState([])

  async function handleSubmit(e) {
    e.preventDefault()

    // 鉴权数据
    if (!formNickName || !files.length) {
      Taro.atMessage({
        type: 'error',
        message: '您还有内容没有填写!',
      })

      return
    }

    // 提示登录成功
    Taro.atMessage({
      type: 'success',
      message: '恭喜您,登录成功!',
    })

    // 缓存在 storage 里面
    const userInfo = { avatar: files[0].url, nickName: formNickName }
    await props.handleSubmit(userInfo)

    // 清空表单状态
    setFiles([])
    setFormNickName('')
  }

  return (
    <View className="mine-footer">
      {props.isLogged && (
        <Logout loading={props.isLogout} handleLogout={props.handleLogout} />
      )}
      <View className="tuture-motto">
        {props.isLogged ? 'From 图雀社区 with Love ' : '您还未登录'}
      </View>
      <AtFloatLayout
        isOpened={props.isOpened}
        title="登录"
        onClose={() => props.handleSetIsOpened(false)}
      >
        <LoginForm
          formNickName={formNickName}
          files={files}
          handleSubmit={e => handleSubmit(e)}
          handleNickNameInput={e => setFormNickName(e.target.value)}
          handleFilesSelect={files => setFiles(files)}
        />
      </AtFloatLayout>
    </View>
  )
}
Footer 组件的样式文件代码如下:
.mine-footer {
  font-size: 28px;
  color: #777;
  margin-bottom: 20px;
}

.tuture-motto {
  margin-top: 40px;
  text-align: center;
}
所有小组件都搞定之后,我们在 src/components 中只需暴露出 Header 和 Footer。修改 src/components/index.jsx,代码如下:
import PostCard from './PostCard'
import PostForm from './PostForm'
import Footer from './Footer'
import Header from './Header'

export { PostCard, PostForm, Footer, Header }
