通过前一章的分析,当我们通过 createComponent 创建了组件 VNode,接下来会走到 vm._update,执行 vm.__patch__ 去把 VNode 转换成真正的 DOM 节点。这个过程我们已经熟悉了,但是针对的是一个普通的 VNode 节点,接下来我们来看看组件的 VNode 会有哪些不一样的地方。
贯穿全文的例子:
// index.html
<body>
  <div id="app"></div>
</body>

// main.js
new Vue({
  render: h => h(App),
}).$mount('#app')

// App.vue
<template>
  <div id="app">
    hello Vue
  </div>
</template>
<script>
export default {
  name: "app"
};
</script>
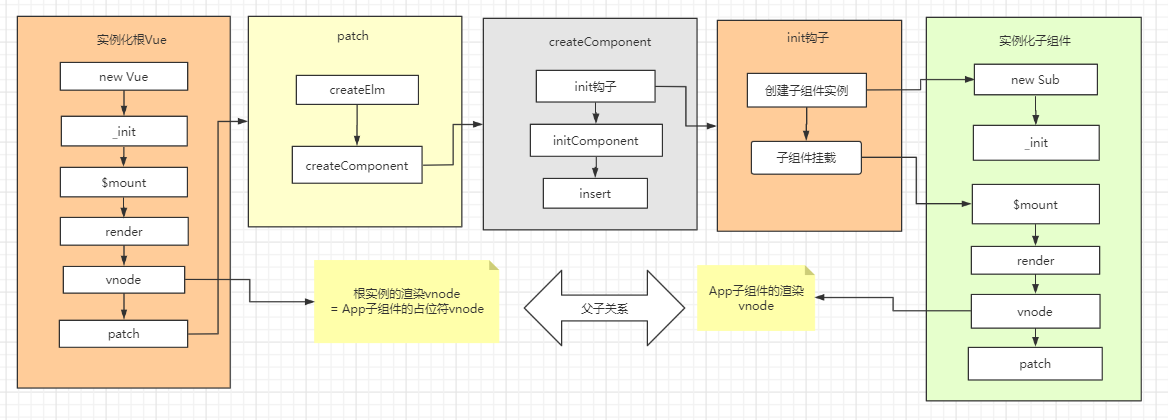
由于这节课比较复杂,所以简单画了个流程图方便理解

1. 三个概念
在进入正文之前,要先了解两个概念,这样才能方便学习
1.1 组件的两个vnode
- 占位符
vnode:vm.$vnode只有组件实例才有。在_render过程中赋值 - 渲染
vnode:vm._vnode可以直接映射成真实DOM。在_update过程中赋值 - 它们是父子关系:
vm._vnode.parent = vm.$vnode
比如对于本文的例子来说:
- 当根
Vue实例的render函数执行完毕,会生成根实例的_vnode - 由于
createElement直接返回了App组件,所以根实例_vnode同样也是App组件的$vnode

- 对于
App组件来说,他的占位符vnode和渲染vnode实际上是一种父子关系
1.2 activeInstance
整个初始化是一个深度遍历的过程。在实例化子组件的过程中,它需要知道当前上下文的 Vue 实例是什么,并把它作为子组件的父 Vue 实例。
它是一个全局变量,定义在 src/core/instance/lifecycle.js
// src/core/instance/lifecycle.js

export let activeInstance: any = null

export function setActiveInstance(vm: Component) {
  const prevActiveInstance = activeInstance
  activeInstance = vm
  return () => {
    activeInstance = prevActiveInstance
  }
}

export function lifecycleMixin (Vue: Class<Component>) {
  Vue.prototype._update = function (vnode: VNode, hydrating?: boolean) {
    const vm: Component = this

    // 在调用 __patch__ 前先用 prevActiveInstance 保存 activeInstance
    // 然后将当前实例 vm 赋给 activeInstance
    const restoreActiveInstance = setActiveInstance(vm)

    // vm.__patch__...

    // 在执行完 __patch__ 后再恢复 activeInstance 原来的值
    restoreActiveInstance()
  }
}
在 vm._update 的过程中,把当前的 vm 赋值给 activeInstance,同时用 prevActiveInstance 保留上一次的 activeInstance。prevActiveInstance 和当前的 vm 是一个父子关系
当一个 vm 实例完成它的所有子树的 patch 或者 update 过程后,activeInstance 会回到它的父实例
这样就完美地保证了整个深度遍历过程中,我们在实例化子组件的时候能传入当前子组件的父 Vue 实例。
2. 组件patch
上一章我们其实分析了组件在 render 阶段的细节,本章分析的就是在 patch 阶段的细节
走到 patch 阶段会调用 createElm 创建元素节点,其中有这么一段逻辑:
// src/core/vdom/patch.js

function createElm (
  vnode,
  insertedVnodeQueue,
  parentElm,
  refElm,
  nested,
  ownerArray,
  index
) {
  // ...
  if (createComponent(vnode, insertedVnodeQueue, parentElm, refElm)) {
    return
  }
  // ...
}
如果调用 createComponent 函数返回 true ,则结束执行 createElm 函数。
这里传给 createComponent 函数的 vnode 参数是 App 组件的$vnode,因此可以通过 createComponent 成功创建组件,createElm 函数也就不会再往下执行。下面来看 createComponent 函数的定义:
// src/core/vdom/patch.js

export function createPatchFunction (backend) {
  // ...
  function createComponent (vnode, insertedVnodeQueue, parentElm, refElm) {
    let i = vnode.data
    if (isDef(i)) {
      if (isDef(i = i.hook) && isDef(i = i.init)) {
        // 2.1 执行 init 钩子,执行完时已经创建了一个子实例并挂载
        i(vnode, false /* hydrating */)
      }
      if (isDef(vnode.componentInstance)) {
        // 2.2 设置占位符vnode的elm
        initComponent(vnode, insertedVnodeQueue)
        // 2.3 挂载子组件
        insert(parentElm, vnode.elm, refElm)

        // ...

        return true
      }
    }
  }
  // ...
}
if语句的意思是判断vnode.data.hook.init是否存在,这里vnode是一个组件VNode,那么条件满足,并且得到i就是init钩子函数。主要作用是:- 实例化
App子组件 - 执行子组件挂载
child.$mount
- 实例化
initComponent主要是执行了vnode.elm = vnode.componentInstance.$elinsert是将其组件插入到body中
2.1 执行init钩子
回顾上一章,在执行 createComponent 函数的时候会调用 installComponentHooks 函数给 vnode.data.hook 安装四个钩子函数。回顾 init 钩子函数的代码,它被定义在 src/core/vdom/create-component.js 文件中:
// src/core/vdom/create-component.js

import { activeInstance } from '../instance/lifecycle'

const componentVNodeHooks = {
  init (vnode: VNodeWithData, hydrating: boolean): ?boolean {
    if (
      vnode.componentInstance &&
      !vnode.componentInstance._isDestroyed &&
      vnode.data.keepAlive
    ) {
      // keepAlive 相关...
    } else {
      // 创建一个 Vue 的实例
      const child = vnode.componentInstance = createComponentInstanceForVnode(
        vnode,
        activeInstance
      )
      // 子组件挂载
      child.$mount(hydrating ? vnode.elm : undefined, hydrating)
    }
  },
}
- 关于
keepAlive的逻辑我们暂时不关心 - 通过
createComponentInstanceForVnode创建一个 Vue 实例,传入两个参数:vnode表示当前App组件的占位符VNodeactiveInstance表示根Vue实例
- 返回的子组件实例保存到
App组件的占位符vnode的componentInstance属性中。 - 通过
$mount挂载子组件
2.1.1 创建子组件实例
先来看看 createComponentInstanceForVnode 函数是怎么创建子组件实例的,它定义在 src/core/vdom/create-component.js
// src/core/vdom/create-component.js

export function createComponentInstanceForVnode (
  vnode: any,
  parent: any, // activeInstance in lifecycle state
): Component {
  const options: InternalComponentOptions = {
    _isComponent: true,
    _parentVnode: vnode,
    parent
  }

  // inline-template 相关...

  return new vnode.componentOptions.Ctor(options)
}
- 创建
options对象_isComponent为true表示它是一个组件_parentVnode表示当前组件的vnode,也就是占位符vnodeparent表示当前激活的组件实例,也就是 根Vue实例
- 实例化
App子组件vnode.componentOptions.Ctor就是子组件的构造函数- 我们上一节分析了它实际上是继承于
Vue的一个构造器Sub,所以相当于new Sub(options)
const sub = function VueComponent() {
  // 执行 this._init 逻辑再次走到了 Vue 实例的初始化逻辑
  this._init(options)
}
这个过程有一些和之前不同的地方需要挑出来说,代码在 src/core/instance/init.js 中:
// src/core/instance/init.js

Vue.prototype._init = function (options?: Object) {
  const vm: Component = this
  if (options && options._isComponent) {
    // 子组件mergeOptions
    initInternalComponent(vm, options)
  } else {
    // mergeOptions...
  }

  // ...
  initLifecycle(vm)
  // ...

  if (vm.$options.el) {
    vm.$mount(vm.$options.el)
  }
}
- 合并
options的过程有变化,_isComponent为true,所以走到了initInternalComponent过程。合并createComponentInstanceForVnode函数中传入的options对象 - 执行
initLifecycle,建立父子实例之间的关系 - 组件初始化的时候是不传
el的,因此组件是自己接管了$mount的过程
下面来简单看看 initInternalComponent 函数:
// src/core/instance/init.js

export function initInternalComponent (vm: Component, options: InternalComponentOptions) {
  // 创建 vm.$options 对象
  const opts = vm.$options = Object.create(vm.constructor.options)
  const parentVnode = options._parentVnode
  opts.parent = options.parent // 保存父Vue实例
  opts._parentVnode = parentVnode // 保存组件占位符vnode

  // ...
}
再来简单看看 initLifecycle 函数
// src/core/instance/lifecycle.js

export function initLifecycle (vm: Component) {
  const options = vm.$options

  // 找到第一个非抽象的parent
  let parent = options.parent
  if (parent && !options.abstract) {
    while (parent.$options.abstract && parent.$parent) {
      parent = parent.$parent
    }
    // 保存父子实例关系
    parent.$children.push(vm)
  }

  vm.$parent = parent
  vm.$root = parent ? parent.$root : vm
  vm.$children = []
  // ...
}
可以看到 vm.$parent 就是用来保留当前 vm 的父实例,并且通过 parent.$children.push(vm) 来把当前的 vm 存储到父实例的 $children 中。
2.1.2 子组件挂载
在完成子组件实例化的 _init 后,接着会执行
child.$mount(hydrating ? vnode.elm : undefined, hydrating)
这里 hydrating 表示服务端渲染的情况,我们只考虑客户端渲染,所以这里相当于执行
child.$mount(undefined, false)
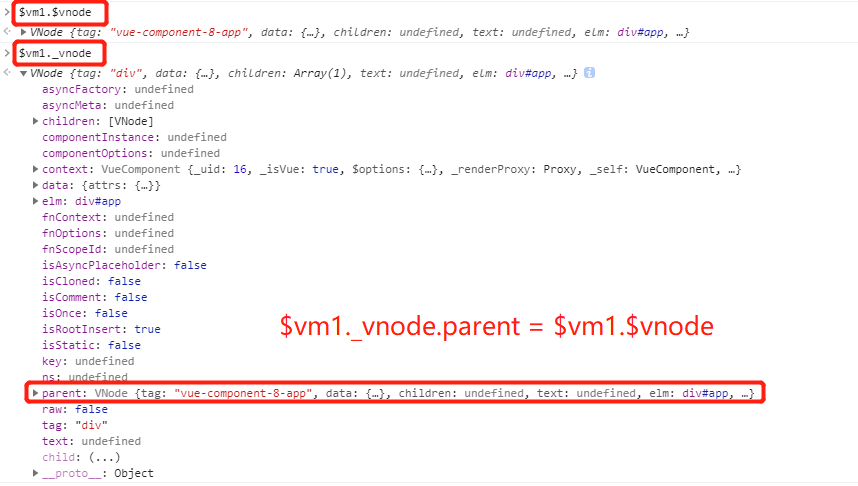
它最终会调用 mountComponent 方法,进而执行 vm._render() 方法:
// src/core/instance/render.js

Vue.prototype._render = function (): VNode {
  const vm: Component = this
  const { render, _parentVnode } = vm.$options

  // 保存占位符vnode / 外壳节点
  vm.$vnode = _parentVnode

  let vnode
  try {
    // 通过render函数创建组件渲染vnode
    vnode = render.call(vm._renderProxy, vm.$createElement)
  } catch (e) {
    // ...
  }
  // 将占位符vnode保存到渲染vnode的parent属性中
  vnode.parent = _parentVnode
  return vnode
}
- 保存占位符
vnode到App组件实例的vm.$vnode中 - 调用
render函数生成渲染vnode - 保存占位符
vnode和渲染vnode的父子关系。vm._vnode.parent = vm.$vnode
我们知道在执行完 vm._render 生成 VNode 后,接下来就要执行 vm._update 去渲染 VNode 了。来看一下组件渲染的过程中有哪些需要注意的,vm._update 的定义在 src/core/instance/lifecycle.js 中:
// src/core/instance/lifecycle.js

export function lifecycleMixin (Vue: Class<Component>) {
  Vue.prototype._update = function (vnode: VNode, hydrating?: boolean) {
    const vm: Component = this
    const prevEl = vm.$el
    const prevVnode = vm._vnode

    // activeInstance 保存为当前 App 组件的实例...

    // 保存通过render生成的渲染vnode
    vm._vnode = vnode

    if (!prevVnode) {
      // 首次渲染
      vm.$el = vm.__patch__(vm.$el, vnode, hydrating, false /* removeOnly */)
    } else {
      // ...
    }

    // 恢复 activeInstance 为根Vue实例...
  }
}
- 保存通过
render生成的渲染vnode activeInstance更新为App组件的实例- 调用
__patch__渲染VNode,- 返回结果为
App子组件的渲染vnode的elm,也就是vnode.elm - 将结果赋值给
App子组件实例的$el
- 返回结果为
- 恢复
activeInstance为根Vue实例
来看看这次子组件的 patch 有何不同,当调用了 __patch__ 方法,会执行 patch 方法,传入的前两个参数分别是:
oldVnode:App子组件的$el,此时是undefinedvnode:App子组件的渲染vnode
vm.$el = vm.__patch__(vm.$el, vnode, hydrating, false /* removeOnly */)

function patch (oldVnode, vnode, hydrating, removeOnly) {
  // ...
  let isInitialPatch = false
  const insertedVnodeQueue = []

  if (isUndef(oldVnode)) {
    // empty mount (likely as component), create new root element
    isInitialPatch = true
    createElm(vnode, insertedVnodeQueue)
  } else {
    // ...
  }
  // ...
  return vnode.elm
}
- 再次执行
createElm方法,会生成渲染vnode的elm - 返回
App组件的渲染vnode的elm
来看看 createElm 方法,注意这里我们只传了 2 个参数,所以对应的 parentElm 是 undefined。我们再来看看它的定义:
// src/core/vdom/patch.js

export function createPatchFunction (backend) {
  // ...
  function createElm (
    vnode, // 渲染vnode
    insertedVnodeQueue,
    parentElm, // undefined
    refElm,
    nested,
    ownerArray,
    index
  ) {
    // ...
    if (createComponent(vnode, insertedVnodeQueue, parentElm, refElm)) {
      return
    }

    const data = vnode.data
    const children = vnode.children
    const tag = vnode.tag
    if (isDef(tag)) {
      // ...

      vnode.elm = vnode.ns
        ? nodeOps.createElementNS(vnode.ns, tag)
        : nodeOps.createElement(tag, vnode)
      setScope(vnode)

      if (__WEEX__) {
        // ...
      } else {
        createChildren(vnode, children, insertedVnodeQueue)
        if (isDef(data)) {
          invokeCreateHooks(vnode, insertedVnodeQueue)
        }
        insert(parentElm, vnode.elm, refElm)
      }

      // ...
    } else if (isTrue(vnode.isComment)) {
      vnode.elm = nodeOps.createComment(vnode.text)
      insert(parentElm, vnode.elm, refElm)
    } else {
      vnode.elm = nodeOps.createTextNode(vnode.text)
      insert(parentElm, vnode.elm, refElm)
    }
  }
  // ...
}
- 再次执行了
createComponent判断,此时组件根节点是普通元素,因此返回false - 先创建一个父节点占位符
- 然后再遍历所有子
VNode递归调用createElm - 在遍历的过程中,如果遇到子
VNode是一个组件的VNode,则重复本节开始的过程 - 由于我们这个时候传入的
parentElm是空,所以实际上insert(parentElm, vnode.elm, refElm)不做任何事,那子组件是怎么插入的呢?带着这个疑问往下看
2.2. initComponent
当执行完 init 钩子之后,会执行 initComponent
// src/core/vdom/patch.js

export function createPatchFunction (backend) {
  // ...
  function createComponent (vnode, insertedVnodeQueue, parentElm, refElm) {
    let i = vnode.data
    if (isDef(i)) {
      if (isDef(i = i.hook) && isDef(i = i.init)) {
        // 2.1 执行 init 钩子,执行完时已经创建了一个子实例并挂载
        i(vnode, false /* hydrating */)
      }
      if (isDef(vnode.componentInstance)) {
        // 2.2 设置占位符vnode的elm
        initComponent(vnode, insertedVnodeQueue)
        // 2.3 挂载子组件
        insert(parentElm, vnode.elm, refElm)

        // ...

        return true
      }
    }
  }
  // ...
}
看下 initComponent 函数:
// src/core/vdom/patch.js

export function createPatchFunction (backend) {
  // ...
  function initComponent (vnode, insertedVnodeQueue) {
    // ...
    vnode.elm = vnode.componentInstance.$el
    // ...
  }
  // ...
}
这个函数主要就是将 App 子组件实例上的 $el 保存到占位符 vnode 的 elm 属性上
2.3 挂载子组件
实际上对于对组件的插入,在 createComponent 中调用了 insert 方法:
// src/core/vdom/patch.js

export function createPatchFunction (backend) {
  // ...
  function createComponent (vnode, insertedVnodeQueue, parentElm, refElm) {
    let i = vnode.data
    if (isDef(i)) {
      if (isDef(i = i.hook) && isDef(i = i.init)) {
        // 2.1 执行 init 钩子,执行完时已经创建了一个子实例并挂载
        i(vnode, false /* hydrating */)
      }
      if (isDef(vnode.componentInstance)) {
        // 2.2 设置占位符vnode的elm
        initComponent(vnode, insertedVnodeQueue)
        // 2.3 挂载子组件
        insert(parentElm, vnode.elm, refElm)

        // ...

        return true
      }
    }
  }
  // ...
}
调用 insert 时传入的参数
parentElm:就是bodyvnode.elm:在initComponent中完成赋值,就是App子组件的$el
这样就完成了组件的 DOM 插入
总结
那么到此,一个组件的 VNode 是如何创建、初始化、渲染的过程也就介绍完毕了。