

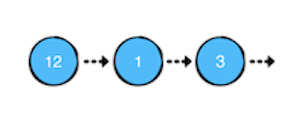
一个链表是一个单一方向序列的数据集合。和数组这种元素连续存储的数据结构相比,它有以下一些优势:
- 在链表中的数据插入和移除操作的时间是一个常量
- 可靠的性能特征
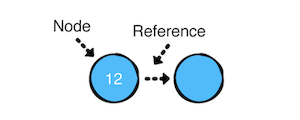
如图所示,一个链表包含一系列的节点(Node),节点包含两个责任
- 包含一个值。
- 拥有下一个节点的引用。如果下一个节点的引用为 nil, 则表明是末尾节点。
-
节点(Node)
创建一个节点类
public class Node<Value> {

    var value: Value
    var next: Node?

    init(value: Value, next: Node? = nil) {
        self.value = value
        self.next = next
    }

}

extension Node: CustomStringConvertible {

    public var description: String {
        guard let next = next else {
            return "\(value)"
        }
        return "\(value) -> " + "\(String(describing: next))" + " "
    }

}
添加一个输出辅助方法:
func example(of des: String, block:() -> ()) {
    print("---Example of \(des)---")
    block()
}
测试代码:
example(of: "creating and linking nodes") {
    let node1 = Node(value: 1)
    let node2 = Node(value: 2)
    let node3 = Node(value: 3)

    node1.next = node2
    node2.next = node3

    print(node1)
}
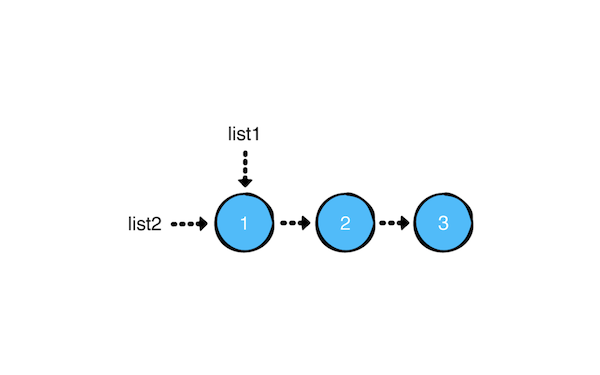
此时创建了一个如图所示的3个节点信息:
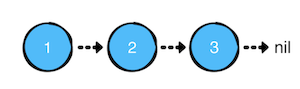
---Example of creating and linking nodes---
1 -> 2 -> 3
-
链表(LinkedList)
创建一个链表类:
public struct LinkedList<Value> {

    public var head: Node<Value>?
    public var tail: Node<Value>?

    public init() {}

    public var isEmpty: Bool {
        return head == nil
    }

}

extension LinkedList: CustomStringConvertible {

    public var description: String {

        guard let head = head else {
            return "Empty list"
        }
        return String(describing: head)
    }

}
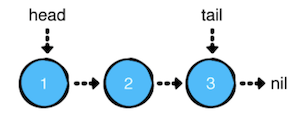
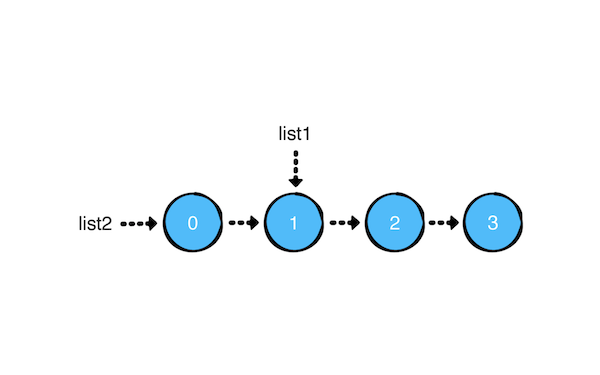
如上图所示,链表有头(head) 和尾(tail)的概念。head 指向第一个,tail 指向最后一个。
-
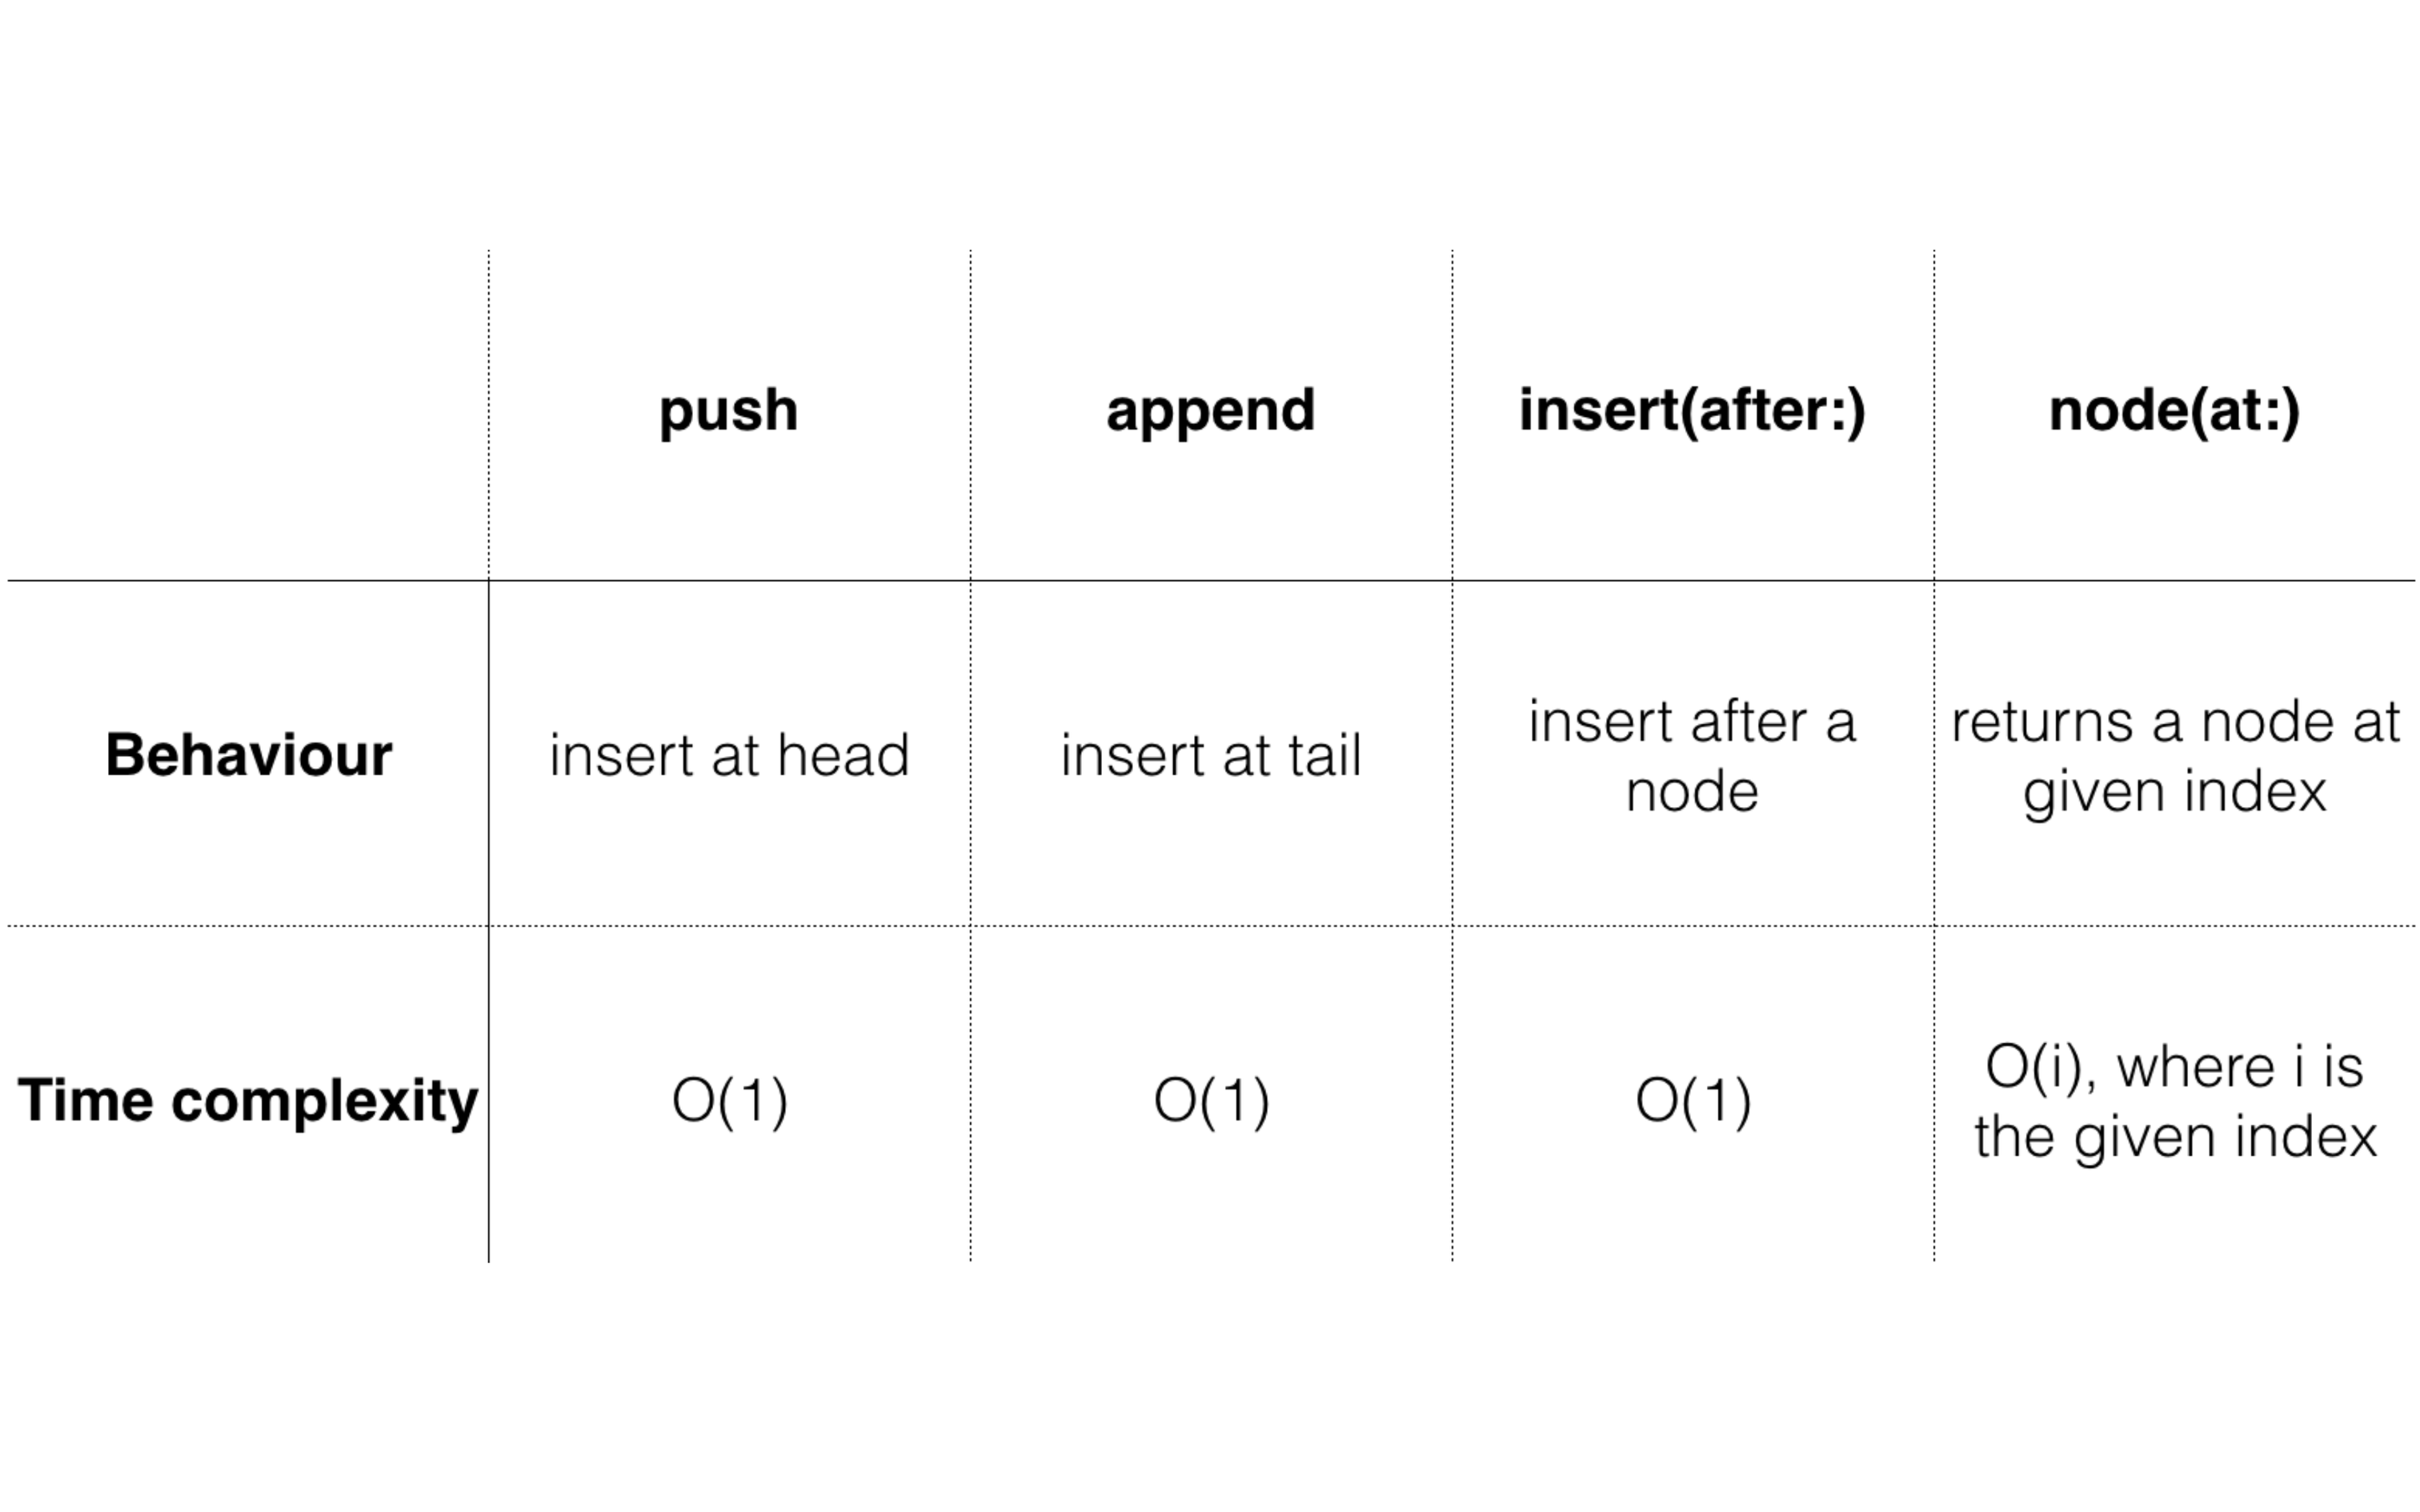
链表中添加值
在链表中我们有3种方式添加值
- push 从链表头部添加值
- append 从链表尾部添加值
- insert(after: ) 在链表某个节点后面添加值
-
push 方式添加
实现:
    public mutating func push(_ value: Value) {
        head = Node(value: value, next: head)
        if tail == nil {
            tail = head
        }
    }
测试:
example(of: "push") {
    var list = LinkedList<Int>()

    list.push(3)
    list.push(2)
    list.push(1)

    print(list)
}
输出:
---Example of push---
1 -> 2 -> 3
-
append 方式添加
实现:
    public mutating func append(_ value: Value) {
        guard !isEmpty else {
            push(value)
            return
        }
        tail?.next = Node(value: value)
        tail = tail?.next
    }
如果链表为空,直接push操作,否则添加节点并且更改 tail 指向。
测试:
example(of: "append") {
    var list = LinkedList<Int>()

    list.append(1)
    list.append(2)
    list.append(3)

    print(list)
}
输出:
---Example of append---
1 -> 2 -> 3
-
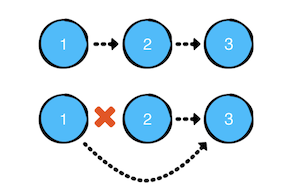
insert(after: ) 方式添加
insert(after: ) 添加一个节点需要分两个步骤:
- 找到链表中的某个节点
- 插入一个新节点
下面是根据下标找到某个节点的实现:
    public func node(at index: Int) -> Node<Value>? {
        var currentNode = head
        var currentIndex = 0

        while currentNode != nil && currentIndex < index {
            currentNode = currentNode!.next
            currentIndex += 1
        }

        return currentNode
    }
代码的目的是从头部遍历到尾部查找对应下标的节点
插入方法的实现:
    @discardableResult
    public mutating func insert(_ value: Value, after node: Node<Value>) -> Node<Value> {
        guard tail !== node else {
            append(value)
            return tail!
        }
        node.next = Node(value: value, next: node.next)
        return node.next!
    }
如果是尾部节点则直接添加,否则添加一个新节点,并且返回它。
测试:
example(of: "inserting at a particular index") {
    var list = LinkedList<Int>()

    list.append(1)
    list.append(2)
    list.append(3)

    print("Before inserting: \(list)")

    let middleIndex = list.node(at: 1)!
    for _ in 1...4 {
        list.insert(-1, after: middleIndex)
    }

    print("After inserting: \(list)")
}
输出:
---Example of inserting at a particular index---
Before inserting: 1 -> 2 -> 3
After inserting: 1 -> 2 -> -1 -> -1 -> -1 -> -1 -> 3
-
性能分析
-
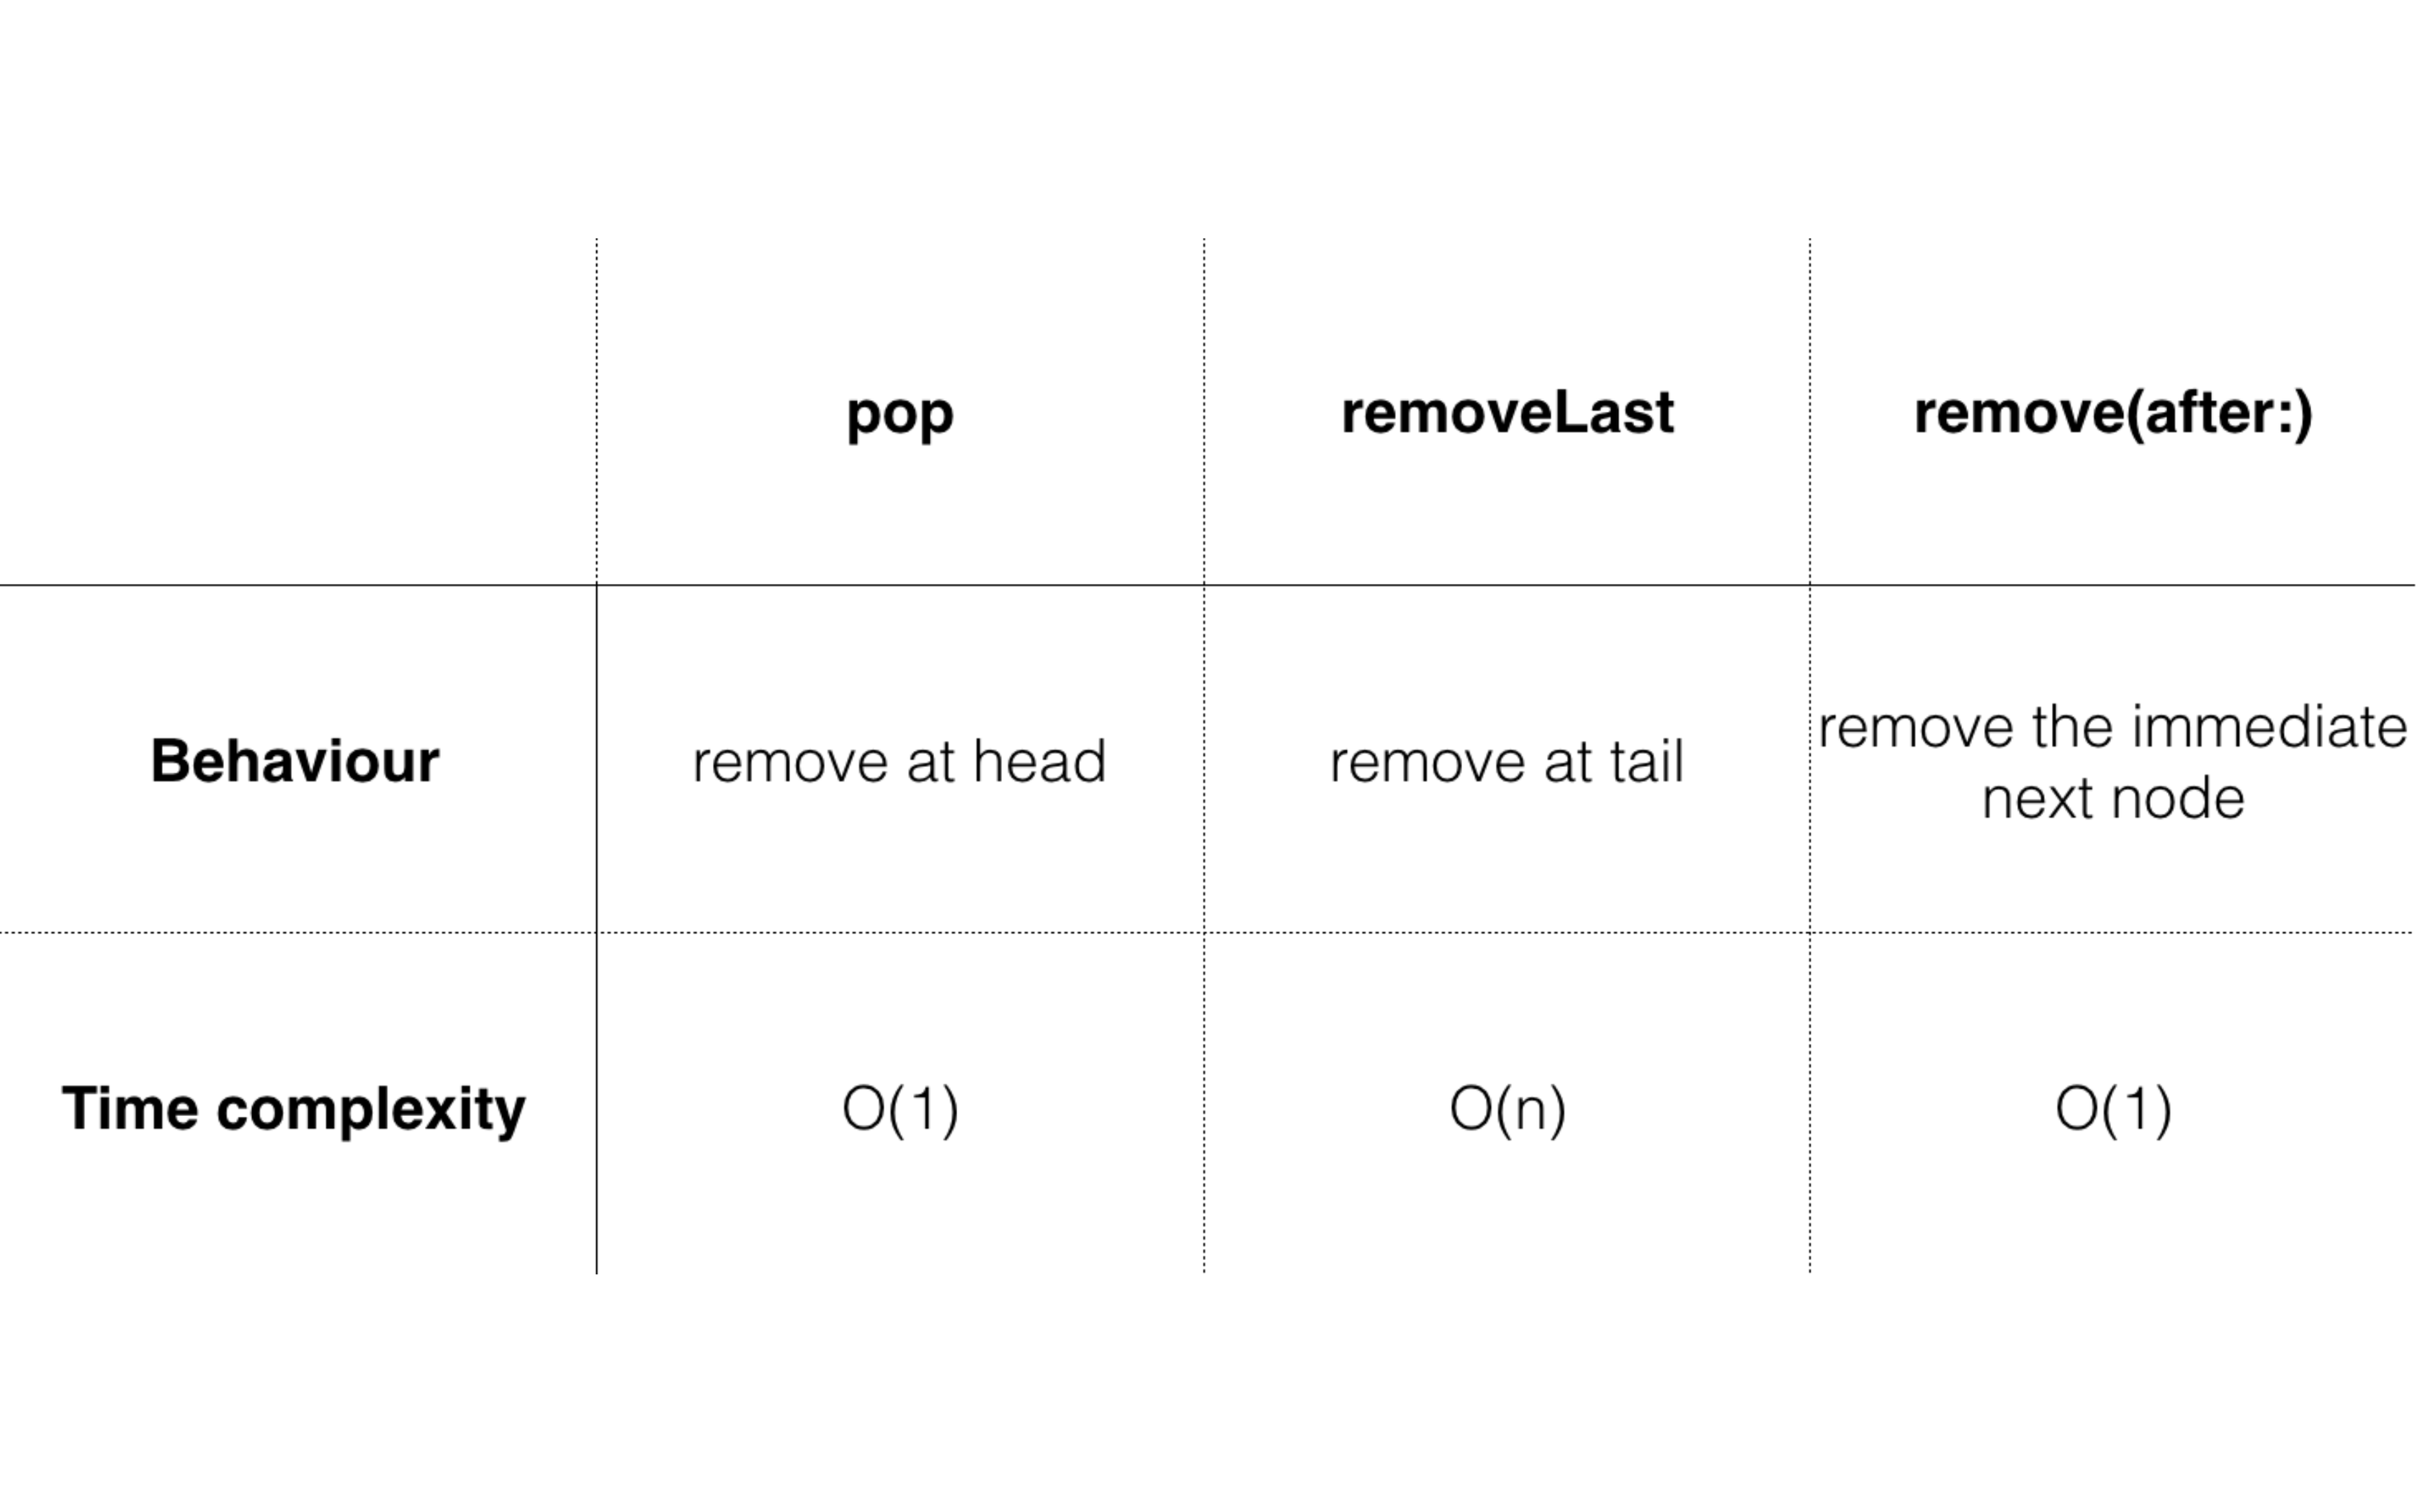
链表中移除值
在链表中我们有3种方式移除值
- pop 从链表头部移除值
- removeLast 从链表尾部移除值
- remove(at: ) 在链表中移除某个下标的节点
-
pop 方式移除
实现:
    @discardableResult
    public mutating func pop() -> Value? {
        head = head?.next
        if isEmpty {
            tail = nil
        }
        return head?.value
    }
其实和上面的方法实现一样,需要注意的是边界问题。如果此时 head === tail,表明链表中只有一个节点就需要特殊判断一下。
测试:
example(of: "pop") {
    var list = LinkedList<Int>()

    list.append(1)
    list.append(2)
    list.append(3)

    print("Before popping: \(list)")
    let popedValue = list.pop()
    print("After popping: \(list)")

    print("PopedValue = \(String(describing: popedValue))")
}
输出:
---Example of pop---
Before popping: 1 -> 2 -> 3
After popping: 2 -> 3
PopedValue = Optional(2)
-
removeLast 方式移除
实现:
@discardableResult
public mutating func removeLast() -> Value? {
// count >= 1
guard let head = head else {
return nil
}
// count >= 2
guard head.next != nil else {
return pop()
}
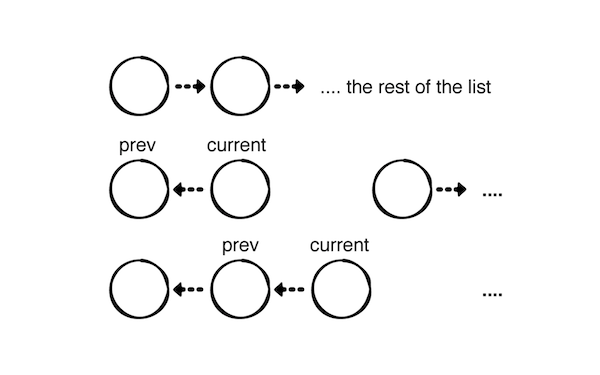
var prev = head
var current = head
while let next = current.next {
prev = current
current = next
}
prev.next = nil
tail = prev
return current.value
}
需要做的就是2个注意步骤:
- 找到 tail 之前的节点。
- 重值 tail 节点。
测试:
example(of: "removing the last node") {
    var list = LinkedList<Int>()
    1. 找到 tail 之前的节点

    list.append(1)
    list.append(2)
    list.append(3)

    print("Before removing last node: \(list)")
    let removedValue = list.removeLast()
    print("After removing last node: \(list)")

    print("RemovedValue = \(String(describing: removedValue))")
}
输出:
---Example of removing the last node---
Before removing last node: 1 -> 2 -> 3
After removing last node: 1 -> 2
RemovedValue = Optional(3)
-
remove(after: ) 方式移除
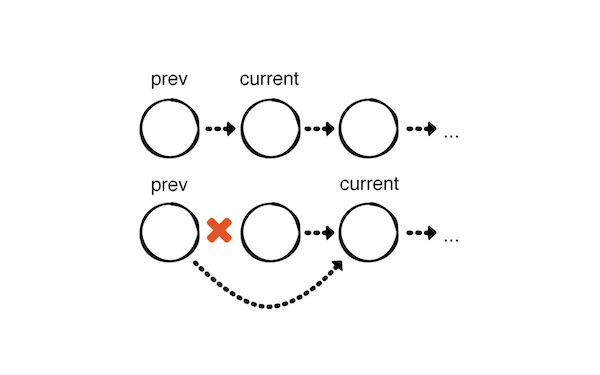
实现:
    @discardableResult
    public mutating func remove(after node: Node<Value>) -> Value? {
        defer {
            if node.next === tail {
                tail = node
            }
            node.next = node.next?.next
        }
        return node.next?.value
    }
这里有一个 defer 的一个操作,它会在方法退出之前执行。
测试:
example(of: "removing a node after a particular node") {
    var list = LinkedList<Int>()

    list.append(1)
    list.append(2)
    list.append(3)

    print("Before removing at particular node: \(list)")
    let index = 1
    let node = list.node(at: 1-index)!
    let removedValue = list.remove(after: node)
    print("After removing at particular node: \(list)")

    print("RemovedValue = \(String(describing: removedValue))")
}
输出:
---Example of removing a node after a particular node---
Before removing at particular node: 1 -> 2 -> 3
After removing at particular node: 1 -> 3
RemovedValue = Optional(2)
-
性能分析
-
Swift 集合协议
Swift 里有有4种集合协议
- Sequence(序列协议),遵循序列类型可以对里面的元素进行顺序访问,但是使用顺序访问可能会破坏性地消耗里面的元素。
- Collection(集合协议), Collection 继承 Sequence 协议,集合类型是提供额外保证的序列类型。集合类型是有限的,允许重复的非破坏性顺序访问。
- BidirectionalColllection(双向集合协议), BidirectionalColllection 继承 Collection 协议, 如名字所示,它是一个双向集合协议, 可以允许在序列上双向的上下移动。这对于链表是不可能的,因为链表只能从头部到尾部,而不能从头部到尾部。
- RandomAccessCollection(随机访问集合协议), RandomAccessCollection 继承 BidirectionalColllection 协议,一个双向的集合类型可以是一个随机访问集合类型,如果它能保证在一个特定的索引上访问一个元素将花费与在任何其他索引上访问一个元素一样长的时间。这对于链表来说是不可能的,因为访问靠近链表前面的节点要比访问位于链表后面的节点快得多。
对于链表来说,它可一实现两个结合协议,一个是 Sequence(序列)协议,因为链表里面的元素其实就是一系列的节点。然后链表还可以实现 Collection(集合)协议, 因为链表里面节点的数目是有限的。
-
链表实现集合协议
在 Collection(集合)协议 中,我们有一个下标访问功能 subscript。 比如数组的 array[5],访问数组里面的对应下标的元素。由于数组里面使用下标访问的时间复杂度为 O(1),但是在链表里达不到这种效果,所以我们需要一个自定义的下标,让自定义的下标包含一个节点的引用。
-
自定义下标
实现:
extension LinkedList: Collection {

    // 自定义下标
    public struct Index: Comparable {
        public var node: Node<Value>?

        static public func ==(lhs: Self, rhs: Self) -> Bool {
            switch (lhs.node, rhs.node) {
            case let (left?, right?):
                return left === right
            case (nil, nil):
                return true
            default:
                return false
            }
        }

        static public func < (lhs: Self, rhs: Self) -> Bool {
            guard lhs != rhs else {
                return false
            }
            let nodes = sequence(first: lhs.node) { $0?.next }
            return nodes.contains { $0 === rhs.node }
        }
    }

    // 下面的是 Collection 结合协议需要的最少实现内容

    public var startIndex: Index {
        return Index(node: head)
    }

    public var endIndex: Index {
        return Index(node: tail?.next)
    }

    public func index(after i: Index) -> Index {
        return Index(node: i.node?.next)
    }

    public subscript(position: Index) -> Value {
        return position.node!.value
    }

}
测试:
example(of: "using collection") {
    var list = LinkedList<Int>()

    for i in 0...9 {
        list.append(i)
    }

    print("List: \(list)")
    print("First Element: \(list[list.startIndex])")

    print("Array containing first 3 elements: \(Array(list.prefix(3)))")
    print("Array containing last 3 elements: \(Array(list.suffix(3)))")

    let sum = list.reduce(0, +)
    print("Sum of all values: \(sum)")
}
输出:
---Example of using collection---
List: 0 -> 1 -> 2 -> 3 -> 4 -> 5 -> 6 -> 7 -> 8 -> 9
First Element: 0
Array containing first 3 elements: [0, 1, 2]
Array containing last 3 elements: [7, 8, 9]
Sum of all values: 45
-
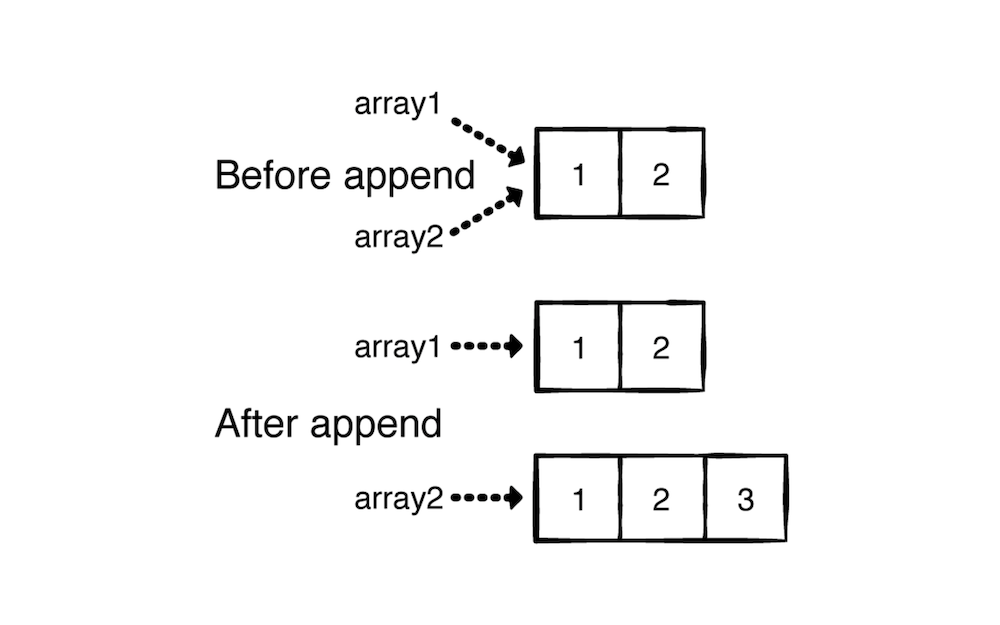
值语义 与 写时复制
在Swift里,集合类型是值语义的,它们通过写时复制(COW copy-on-write)行为来实现。下面使用数组验证:
example(of: "array cow") {
    let array1 = [1, 2]
    var array2 = array1

    print("array1: \(array1)")
    print("array2: \(array2)")

    print("After add 3 to array2")
    array2.append(3)
    print("array1: \(array1)")
    print("array2: \(array2)")
}
输出:
---Example of array cow---
array1: [1, 2]
array2: [1, 2]
After add 3 to array2
array1: [1, 2]
array2: [1, 2, 3]
可以看成修改 array2 不影响 array1。里面的实现逻辑是当设置 array2 = array1 的时候里面的数据其实还没有真正的复制一份,而是等到 append 方法调用的时候 array2 才复制一份内容的。
下面测试一下链表是否也有写时复制功能:
测试:
example(of: "linked list cow") {
    var list1 = LinkedList<Int>()
    list1.append(1)
    list1.append(2)

    var list2 = list1

    print("list1: \(list1)")
    print("list2: \(list2)")

    print("After add 3 to list2")
    list2.append(3)
    print("list1: \(list1)")
    print("list2: \(list2)")
}
输出:
---Example of linked list cow---
list1: 1 -> 2
list2: 1 -> 2
After add 3 to list2
list1: 1 -> 2 -> 3
list2: 1 -> 2 -> 3
很不幸,链表目前还没有值语义。这是因为链表里面的元素是一个节点,而节点的实现是一个类,类是引用类型,不是值类型。但是链表是一个结构体(Struct),所以我们还是需要让链表有值语义特性,这就需要用写时复制的功能实现它了。具体的实现逻辑是在修改链表里面的内容时从头到尾拷贝一份新内容。
在链表结构体里面添加如下方法:
    // 从头到尾复制一份
    private mutating func copyNodes() {
        guard var oldNode = head else {
            return
        }

        head = Node(value: oldNode.value)
        var newNode = head

        while let nextOldNode = oldNode.next {
            newNode?.next = Node(value: nextOldNode.value)
            newNode = newNode?.next

            oldNode = nextOldNode
        }

        tail = newNode
    }
然后在链表里面所以的有修改内容的方法(mutating标示)开始的时候添加 copyNodes()。也就是目前所以的添加操作和移除操作方法里面添加。
测试运行刚刚的链表复制测试,可以看到输出:
---Example of linked list cow---
list1: 1 -> 2
list2: 1 -> 2
After add 3 to list2
list1: 1 -> 2
list2: 1 -> 2 -> 3
嗯,我们为链表实现了值语义特性了!(虽然目前实现的是一个复杂度为O(n)操作)
-
优化写时复制(COW)
在上面链表中,每次的可变操作复杂度都是O(n),这样是不行的。下面是一些优化的尝试
-
isKnownUniquelyReferenced
在 Swift中有一个函数 isKnownUniquelyReferenced ,它判断对象是否只有一个引用。
在上面的链表测试方法里面添加查看:
print("List1 uniquely referenced: \(isKnownUniquelyReferenced(&list1.head))")
print("After add 3 to list2")
list2.append(3)
print("List1 uniquely referenced: \(isKnownUniquelyReferenced(&list1.head))")
可以看到输出:
List1 uniquely referenced: false
After add 3 to list2
List1 uniquely referenced: true
在链表中,如果只有一个对象引用的话,我们就不用每次可变操作都复制一份新的链表内容了。现在我们来添加单引用判断的优化。在 copyNodes() 方法里面的顶部添加如下代码:
        guard !isKnownUniquelyReferenced(&head) else {
            return
        }
此时如果只有一个对象引用那么就不用复制链表了。
-
一个小问题
在之前的测试输出方法里面添加:
print("Removing node at middle")
if let node = list2.node(at: 0) {
    print("Can remove....")
    list2.remove(after: node)
}
print("List2: \(list2)")
输出:
---Example of linked list cow---
list1: 1 -> 2
list2: 1 -> 2
After add 3 to list2
list1: 1 -> 2
list2: 1 -> 2 -> 3
Removing node at middle
Can remove....
List2: 1 -> 2 -> 3
突然发现移除功能不起作用了。那是由于之前的COW优化导致的,在上面的测试代码 if let node = list2.node(at: 0) { // xxx } 头部设置,导致此时对链表是有多个引用的,然后实际的移除操作复制了一份新的链表数据。所以此时操作是在一个新的链表上,老的链表list2 没被操作到。
下面添加一个新的修复方法:
    private mutating func copyNodes(returningCopyOf node: Node<Value>?) -> Node<Value>? {
        guard !isKnownUniquelyReferenced(&head) else {
            return nil
        }

        guard var oldNode = head else {
            return nil
        }

        head = Node(value: oldNode.value)
        var newNode = head
        var copyNode: Node<Value>?

        while let nextOldNode = oldNode.next {
            if oldNode === node {
                copyNode = newNode
            }
            newNode?.next = Node(value: nextOldNode.value)
            newNode = newNode?.next

            oldNode = nextOldNode
        }

        return copyNode
    }
这个方法和之前的拷贝方法看起来差不多,只是返回了一个拷贝的节点。
修改 remove(after: ) 方法的实现:
    @discardableResult
    public mutating func remove(after node: Node<Value>) -> Value? {
        guard let node = copyNodes(returningCopyOf: node) else {
            return nil
        }

        defer {
            if node.next === tail {
                tail = node
            }
            node.next = node.next?.next
        }
        return node.next?.value
    }
此时替换了需要移除的节点信息。
测试输出:
---Example of linked list cow---
list1: 1 -> 2
list2: 1 -> 2
After add 3 to list2
list1: 1 -> 2
list2: 1 -> 2 -> 3
Removing node at middle
Can remove....
List2: 1 -> 3
问题修复了!
-
共用节点(Node)
第二的可以优化的点是共用节点。这样就可以避免一些没必要的链表数据的复制了。(目前只是谈论优化的方向,此时这个优化还没实现)
查看下面的例子:
var list1 = LinkedList<Int>()
(1...3).forEach { list1.append($0) }
var list2 = list1
添加如下操作:
list2.push(0)
输出是这样的:
list1: 1 -> 2 -> 3
list2: 0 -> 1 -> 2 -> 3
添加如下操作:
list1.push(100)

输出是这样的:
list1: 100 -> 1 -> 2 -> 3
list2: 0 -> 1 -> 2 -> 3
对于链表这种单方向的数据结构来说,对头部 head 的插入操作可以忽略写时复制功能的。
-
要点总结
-
链表是一个线型的的单一方向访问的数据结构,你只能按照从一个节点到另一个节点的顺序访问。
-
链表的头部插入操作的时间复杂度是 O(1), 而数组的的头部插入则是 O(n)。
-
链表只需要简单实现Swift的一些集合协议就能使用协议里面定义的很多便利方法。
-
实现写时复制(COW)行为,就可以让链表拥有值语义功能。
更多来自:data-structures-and-algorithms-in-swift
-
试题
-
题目1:实现链表的反向输出
比如 1 -> 2 -> 3 如下输出
3
2
1
实现:
    private func printInReverse<T>(_ list: LinkedList<T>) {
        printInReverse(list.head)
    }

    private func printInReverse<T>(_ node: Node<T>?) {
        guard let node = node else {
            return
        }
        printInReverse(node.next)
        print(node.value)
    }
这个其实是一个递归的思想。最后面的最先输出。上面的时间复杂度和空间复杂度都是 O(n)
测试:
example(of: "linked list chalenge 1") {
    var list = LinkedList<Int>()
    (1...3).forEach { list.append($0) }
    print("list: \(list)")
    printInReverse(list)
}
输出:
---Example of linked list chalenge 1---
list: 1 -> 2 -> 3
3
2
1
-
题目2:找到链表的中间节点
比如:
// 中间是 3
1 -> 2 -> 3 -> 4 -> nil

// 中间是 2
1 -> 2 -> 3 -> nil
实现:
    private func getMiddle<T>(_ list: LinkedList<T>) -> Node<T>? {
        var slow = list.head
        var fast = list.head
        while let nextFast = fast?.next {
            fast = nextFast.next
            slow = slow?.next
        }
        return slow
    }
在上面的方法中定义了两个节点的引用,慢节点每次指向自己的下一个节点,快节点每次指向自己的下下一个节点。这样能加快访问速度。时间复杂度 O(n)
测试:
example(of: "linked list chalenge 2") {
    var list = LinkedList<Int>()
    (1...4).forEach { list.append($0) }
    print("Original list: \(list)")
    if let middleNode = getMiddle(list) {
        print("Middle list: \(middleNode)")
    }
}
输出:
---Example of linked list chalenge 2---
Original list: 1 -> 2 -> 3 -> 4
Middle list: 3 -> 4
-
题目3:反转一个链表
比如:
1 -> 2 -> 3 -> nil

3 -> 2 -> 1 -> nil
实现:
extension LinkedList {

    // Chalenge 3
    mutating func reverse() {
        tail = head

        var prev = head
        var current = head?.next
        prev?.next = nil

        while current != nil {
            let next = current?.next
            current?.next = prev
            prev = current
            current = next
        }

        head = prev
    }

}
在上面的实现中直接使用 prev 和 current 的节点引用直接反转。虽然此时的时间复杂度还是为 O(n),但是这样能避免不必要的内存开支。
测试:
example(of: "linked list chalenge 1") {
    var list = LinkedList<Int>()
    (1...3).forEach { list.append($0) }
    print("list: \(list)")
    printInReverse(list)
输出:
---Example of linked list chalenge 3---
Original list: 1 -> 2 -> 3
After reverse list: 3 -> 2 -> 1
-
题目4:合并两个链表
比如:
// list1
1 -> 4 -> 10 -> 11

// list2
-1 -> 2 -> 3 -> 6

// merged list
-1 -> 1 -> 2 -> 3 -> 4 -> 6 -> 10 -> 11
实现:
    private func mergeList<T: Comparable>(_ left: LinkedList<T>, with right: LinkedList<T>) -> LinkedList<T> {
        // 判断是否有空链表
        if left.isEmpty {
            return right
        }

        if right.isEmpty {
            return left
        }

        var newHead: Node<T>?

        // 找到起始节点
        var tail: Node<T>?
        var currentLeft = left.head
        var currentRight = right.head

        if let leftNode = currentLeft, let rightNode = currentRight {
            if leftNode.value < rightNode.value {
                newHead = leftNode // 设置新头部
                currentLeft = leftNode.next
            } else {
                newHead = rightNode // 设置新头部
                currentRight = rightNode.next
            }
            tail = newHead
        }

        // 遍历一遍,此时会有一个链表遍历完
        while let leftNode = currentLeft, let rightNode = currentRight {
            if leftNode.value < rightNode.value {
                tail?.next = leftNode
                currentLeft = leftNode.next
            } else {
                tail?.next = rightNode
                currentRight = rightNode.next
            }
            tail = tail?.next
        }

        // 把某个剩余的链表遍历完
        if let leftNodes = currentLeft {
            tail?.next = leftNodes
        }

        if let rightNodes = currentRight {
            tail?.next = rightNodes
        }

        // 创建一个新的链表
        var newList = LinkedList<T>()
        newList.head = newHead
        newList.tail = {
            while let next = tail?.next {
                tail = next
            }
            return tail
        }()

        return newList
    }
上面方法的时间复杂度是 O(n+m)。 n 为链表1的长度,m 为链表2的长度。
测试:
example(of: "linked list chalenge 4") {
    var list1 = LinkedList<Int>()
    list1.append(-1)
    list1.append(2)
    list1.append(3)
    list1.append(6)

    var list2 = LinkedList<Int>()
    list2.append(1)
    list2.append(4)
    list2.append(10)
    list2.append(11)

    print("List1: \(list1)")
    print("List2: \(list2)")

    let merge = mergeList(list1, with: list2)
    print("MergeList: \(merge)")
}
输出:
---Example of linked list chalenge 4---
List1: -1 -> 2 -> 3 -> 6
List2: 1 -> 4 -> 10 -> 11
MergeList: -1 -> 1 -> 2 -> 3 -> 4 -> 6 -> 10 -> 11
-
题目5:移除链表中出现的某些值的节点
比如:
// 开始
1 -> 3 -> 3 -> 4

// 移除 3 后
1 -> 4
实现:
extension LinkedList where Value: Equatable {

    // Chalenge 5
    mutating func removeAll(_ value: Value) {
        // 如果必要移除头部
        while let head = self.head, head.value == value {
            self.head = head.next
        }

        // 遍历移除
        var prev = head
        var current = head?.next
        while let currentNode = current {
            guard currentNode.value != value else {
                prev?.next = currentNode.next
                current = prev?.next
                continue
            }
            prev = current
            current = current?.next
        }

        // 设置尾部
        tail = prev
    }
}
时间复杂度 O(n)
测试:
example(of: "linked list chalenge 5") {
    var list = LinkedList<Int>()
    list.append(1)
    list.append(3)
    list.append(3)
    list.append(4)

    print("Before removing list: \(list)")
    list.removeAll(3)
    print("After removing list: \(list)")
}
输出:
---Example of linked list chalenge 5---
Before removing list: 1 -> 3 -> 3 -> 4
After removing list: 1 -> 4
