有时需要测试一下某个功能的并发性能,又不要想借助于其他工具,索性就自己的开发语言,来一个并发请求就最方便了。
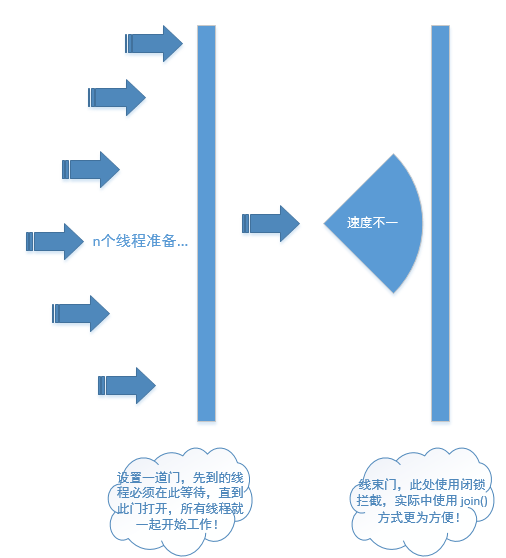
java中模拟并发请求,自然是很方便的,只要多开几个线程,发起请求就好了。但是,这种请求,一般会存在启动的先后顺序了,算不得真正的同时并发!怎么样才能做到真正的同时并发呢?是本文想说的点,java中提供了闭锁 CountDownLatch, 刚好就用来做这种事就最合适了。
只需要:
-
开启n个线程,加一个闭锁,开启所有线程;
-
待所有线程都准备好后,按下开启按钮,就可以真正的发起并发请求了。
LatchTest.java
package com.gp.user;
import com.gp.user.utils.HttpUtils;
import java.util.concurrent.CountDownLatch;
import java.util.concurrent.TimeUnit;
/**
* @Author: GP3
* @Description: 并发请求测试
* @Date: Created in 10:16 2020/4/17
* @Modified By:
*/
public class LatchTest {
private static final int NUM = 1000; //并发数
public static void main(String[] args) throws InterruptedException {
Runnable taskTemp = new Runnable() {
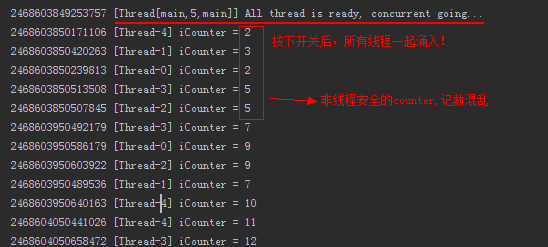
// 注意,此处是非线程安全的,留坑
private int iCounter;
@Override
public void run() {
// for(int i = 0; i < 10; i++) {
// 发起请求
HttpUtils.sendPost("http://172.16.7.206:8085/a/actApi/integrationTodoList",
"userName=gaopeng&pageNum=1&pageSize=15");
iCounter++;
System.out.println(System.nanoTime() + " [" + Thread.currentThread().getName() + "] iCounter = " + iCounter);
try {
Thread.sleep(5);
} catch (InterruptedException e) {
e.printStackTrace();
}
// }
}
};
LatchTest latchTest = new LatchTest();
latchTest.startTaskAllInOnce(NUM, taskTemp);
}
public long startTaskAllInOnce(int threadNums, final Runnable task) throws InterruptedException {
final CountDownLatch startGate = new CountDownLatch(1);
final CountDownLatch endGate = new CountDownLatch(threadNums);
for(int i = 0; i < threadNums; i++) {
Thread t = new Thread() {
public void run() {
try {
// 使线程在此等待,当开始门打开时,一起涌入门中
startGate.await();
try {
task.run();
} finally {
// 将结束门减1,减到0时,就可以开启结束门了
endGate.countDown();
}
} catch (InterruptedException ie) {
ie.printStackTrace();
}
}
};
t.start();
}
long startTime = System.nanoTime();
System.out.println(startTime + " [" + Thread.currentThread() + "] All thread is ready, concurrent going...");
// 因开启门只需一个开关,所以立马就开启开始门
startGate.countDown();
// 等等结束门开启
endGate.await();
long endTime = System.nanoTime();
System.out.println(endTime + " [" + Thread.currentThread() + "] All thread is completed.");
System.err.println("=====执行时间:" + TimeUnit.NANOSECONDS.toMillis(endTime - startTime) + "豪秒");
return endTime - startTime;
}
}
HttpUtils.java
package com.gp.user.utils;

import java.io.*;
import java.net.URL;
import java.net.URLConnection;
import java.util.Iterator;
import java.util.Map;

/**
 * @Author: GP3
 * @Description: http请求
 * @Date: Created in 10:10 2020/4/17
 * @Modified By:
 */
public class HttpUtils {

    public HttpUtils() {

    }

    /**
     * 向指定URL发送POST请求
     * @param url
     * @param paramMap
     * @return 响应结果
     */
    public static String sendPost(String url, Map<String, String> paramMap) {
        PrintWriter out = null;
        BufferedReader in = null;
        String result = "";
        try {
            URL realUrl = new URL(url);
            // 打开和URL之间的连接
            URLConnection conn = realUrl.openConnection();
            // 设置通用的请求属性
            conn.setRequestProperty("accept", "*/*");
            conn.setRequestProperty("connection", "Keep-Alive");
            conn.setRequestProperty("user-agent","Mozilla/4.0 (compatible; MSIE 6.0; Windows NT 5.1;SV1)");
            // conn.setRequestProperty("Charset", "UTF-8");
            // 发送POST请求必须设置如下两行
            conn.setDoOutput(true);
            conn.setDoInput(true);
            // 获取URLConnection对象对应的输出流
            out = new PrintWriter(conn.getOutputStream());

            // 设置请求属性
            String param = "";
            if (paramMap != null && paramMap.size() > 0) {
                Iterator<String> ite = paramMap.keySet().iterator();
                while (ite.hasNext()) {
                    String key = ite.next();// key
                    String value = paramMap.get(key);
                    param += key + "=" + value + "&";
                }
                param = param.substring(0, param.length() - 1);
            }

            // 发送请求参数
            out.print(param);
            // flush输出流的缓冲
            out.flush();
            // 定义BufferedReader输入流来读取URL的响应
            in = new BufferedReader(
                    new InputStreamReader(conn.getInputStream()));
            String line;
            while ((line = in.readLine()) != null) {
                result += line;
            }
        } catch (Exception e) {
            System.err.println("发送 POST 请求出现异常!" + e);
            e.printStackTrace();
        }
        // 使用finally块来关闭输出流、输入流
        finally {
            try {
                if (out != null) {
                    out.close();
                }
                if (in != null) {
                    in.close();
                }
            } catch (IOException ex) {
                ex.printStackTrace();
            }
        }
        return result;
    }

    /**
     * 向指定 URL 发送POST方法的请求
     *
     * @param url
     *            发送请求的 URL
     * @param param
     *            请求参数,请求参数应该是 name1=value1&name2=value2 的形式。
     * @return 所代表远程资源的响应结果
     */
    public static String sendPost(String url, String param) {
        PrintWriter out = null;
        BufferedReader in = null;
        String result = "";
        try {
            URL realUrl = new URL(url);
            // 打开和URL之间的连接
            URLConnection conn = realUrl.openConnection();
            // 设置通用的请求属性
            // conn.setRequestProperty("Accept", "application/json"); // 设置接收数据的格式
            // conn.setRequestProperty("Content-Type", "application/json");
            conn.setRequestProperty("accept", "*/*");
            // conn.setRequestProperty("connection", "Keep-Alive");
            // conn.setRequestProperty("user-agent","Mozilla/4.0 (compatible; MSIE 6.0;
            // Windows NT 5.1;SV1)");
            // 发送POST请求必须设置如下两行
            conn.setDoOutput(true);
            conn.setDoInput(true);
            // 获取URLConnection对象对应的输出流
            out = new PrintWriter(conn.getOutputStream());
            // 发送请求参数
            out.print(param);
            // flush输出流的缓冲
            out.flush();
            // 定义BufferedReader输入流来读取URL的响应
            in = new BufferedReader(new InputStreamReader(conn.getInputStream(), "UTF-8"));
            String line;
            while ((line = in.readLine()) != null) {
                result += line;
            }
        } catch (Exception e) {
            System.out.println("发送 POST 请求出现异常!" + e);
            e.printStackTrace();
        }
        // 使用finally块来关闭输出流、输入流
        finally {
            try {
                if (out != null) {
                    out.close();
                }
                if (in != null) {
                    in.close();
                }
            } catch (IOException ex) {
                ex.printStackTrace();
            }
        }
        return result;
    }
}
执行结果如下:
并发请求操作流程示意图如下: