在写Java Annotation中文末说过要讲解一下Java APT 今天就来聊聊Java APT如何使用。
lombok
- 相信大家对Lombok非常熟悉
```
@Getter
@Setter
@AllArgsConstructor
public class Test {
    private String id;
    private String password;
}
```
- 在这里问大家一个问题,这段代码中的Getter,Setter,还有Constructor是在运行时被添加的还是在代码中还是运行时被添加到代码中的?先来个分割,大家思考一下?
⠀⠀ ⡖⠒⠒⠤⢄⠀⠀⠀ ⠀⠀⠀⠀⠀⠀⠀⠀⠀⠀⠀⠀⠀⠀⠀⢸⠁⠀⠀⠀⡼⠀⠀⠀⠀ ⠀ ⠀⠀⠀⠀⠀⠀⠀⠀⠀⠀⠀⠀⢶⣲⡴⣗⣲⡦⢤⡏⠀⠀⠀⠀⠀ ⠀⠀⠀⠀⠀⠀⠀⠀⠀⠀⠀⠀⣰⠋⠉⠉⠓⠛⠿⢷⣶⣦⠀⠀⠀ ⠀⠀⠀⠀⠀⠀⠀⠀⠀⠀⠀⢠⠇⠀⠀⠀⠀⠀⠀⠘⡇⠀⠀⠀⠀ ⠀⠀⠀⠀⠀⠀⠀⠀⠀⠀⠀⡞⠀⠀⠀⠀⠀⠀⠀⢰⠇⠀⠀⠀⠀ ⠀⠀⠀⠀⠀⠀⠀⠀⡴⠊⠉⠳⡄⠀⢀⣀⣀⡀⠀⣸⠀⠀⠀⠀⠀ ⠀⠀⠀⠀⠀⠀⠀⢸⠃⠀⠰⠆⣿⡞⠉⠀⠀⠉⠲⡏⠀⠀⠀⠀⠀ ⠀⠀⠀⠀⠀⠀⠀⠈⢧⡀⣀⡴⠛⡇⠀⠈⠃⠀⠀⡗⠀⠀⠀⠀⠀ ⠀⠀⠀⠀⠀⠀⠀⠀⠀⣿⣱⠃⡴⠙⠢⠤⣀⠤⡾⠁⠀⠀⠀⠀⠀ ⠀⠀⠀⠀⠀⠀⠀⠀⢀⡇⣇⡼⠁⠀⠀⠀⠀⢰⠃⠀⠀⠀⠀⠀⠀ ⠀⠀⠀⠀⠀⠀⠀⠀⣸⢠⣉⣀⡴⠙⠀⠀⠀⣼⠀⠀⠀⠀⠀⠀⠀ ⠀⠀⠀⠀⠀⠀⠀⠀⡏⠀⠈⠁⠀⠀⠀⠀⢀⡇⠀⠀⠀⠀⠀⠀⠀ ⠀⠀⠀⠀⠀⠀⠀⢸⠃⠀⠀⠀⠀⠀⠀⠀⡼⠀⠀⠀⠀⠀⠀⠀⠀ ⠀⠀⠀⠀⠀⠀⠀⢸⠀⠀⠀⠀⠀⠀⠀⣰⠃⠀⠀⠀⠀⠀⠀⠀⠀ ⠀⠀⠀⠀⠀⣀⠤⠚⣶⡀⢠⠄⡰⠃⣠⣇⠀⠀⠀⠀⠀⠀⠀⠀⠀ ⠀⢀⣠⠔⣋⣷⣠⡞⠀⠉⠙⠛⠋⢩⡀⠈⠳⣄⠀⠀⠀⠀⠀⠀⠀ ⠀⡏⢴⠋⠁⠀⣸⠁⠀⠀⠀⠀⠀⠀⣹⢦⣶⡛⠳⣄⠀⠀⠀⠀⠀ ⠀⠙⣌⠳⣄⠀⡇ ⠀⡏⠀⠀⠈⠳⡌⣦⠀⠀⠀⠀ ⠀⠀⠈⢳⣈⣻ ⠀⠀⠀⢰⣇⣀⡠⠴⢊⡡⠋⠀⠀⠀⠀ ⠀⠀⠀⠀⠳⢿⡇⠀⠀⠀⠀⠀⠀⢸⣻⣶⡶⠊⠁⠀⠀ ⠀⠀⠀⠀⠀⢠⠟⠙⠓⠒⠒⠒⠒⢾⡛⠋⠁⠀⠀⠀⠀⠀⠀⠀⠀ ⠀⠀⠀⠀⣠⠏⠀⣸⠏⠉⠉⠳⣄⠀⠙⢆⠀⠀⠀⠀⠀⠀⠀⠀⠀ ⠀⠀⠀⡰⠃⠀⡴⠃⠀⠀⠀⠀⠈⢦⡀⠈⠳⡄⠀⠀⠀⠀⠀⠀⠀ ⠀⠀⣸⠳⣤⠎⠀⠀⠀⠀⠀⠀⠀⠀⠙⢄⡤⢯⡀⠀⠀⠀⠀⠀⠀ ⠀⠐⡇⠸⡅⠀⠀⠀⠀⠀⠀⠀⠀⠀⠀⠀⠹⡆⢳⠀⠀⠀⠀⠀⠀ ⠀⠀⠹⡄⠹⡄⠀⠀⠀⠀⠀⠀⠀⠀⠀⠀⠀⣇⠸⡆⠀⠀⠀⠀⠀ ⠀⠀⠀⠹⡄⢳⡀⠀⠀⠀⠀⠀⠀⠀⠀⠀⠀⢹⡀⣧⠀⠀⠀⠀⠀ ⠀⠀⠀⠀⢹⡤⠳⡄⠀⠀⠀⠀⠀⠀⠀⠀⠀⢀⣷⠚⣆⠀⠀⠀⠀ ⠀⠀⠀⡠⠊⠉⠉⢹⡀⠀⠀⠀⠀⠀⠀⠀⠀⢸⡎⠉⠀⠙⢦⡀⠀ ⠀⠀⠾⠤⠤⠶⠒⠊⠀⠀⠀⠀⠀⠀⠀⠀⠀⠀⠉⠙⠒⠲⠤⠽⠀
- 相信大家都应该能猜到是在 编译期 在IDEA中ctrl+F9编译一下。
```
package com.example.lombok;

public class Test {
    private String id;
    private String password;

    public String getId() {
        return this.id;
    }

    public String getPassword() {
        return this.password;
    }

    public void setId(final String id) {
        this.id = id;
    }

    public void setPassword(final String password) {
        this.password = password;
    }

    public Test(final String id, final String password) {
        this.id = id;
        this.password = password;
    }
}
```
那么它是怎么做到的呢?废话不多说今日进行的正题 如何在编译器搞事情!
- 因为这次运用的是APT 顾名思义ANNOTATION PROCESSOR TOOLS这个JAVA给我们在编译器提供的一个注解处理工具。
- 所以第一步我们需要一个注解
- 1.声明需要处理的注解 TestAbstractProcessor
```
@Target(ElementType.TYPE)
@Retention(RetentionPolicy.CLASS)
public @interface TestAbstractProcessor {
}
```
- 2.第二步我们需要继承一个类AbstractProcessor
- An abstract annotation processor designed to be a convenient superclass for most concrete annotation processors.这个类让我们方便的concrete(具体化)?注解处理过程。我认为是重建。
```
@AutoService(Processor.class)
@SupportedAnnotationTypes("com.example.lombok.annotation.TestAbstractProcessor")
public class TestAbstractProcessor extends AbstractProcessor {
    @Override
    public boolean process(Set annotations, RoundEnvironment roundEnv) {
        System.out.println("i'm Abstract Processor");
        return false;
    }
}
```
-
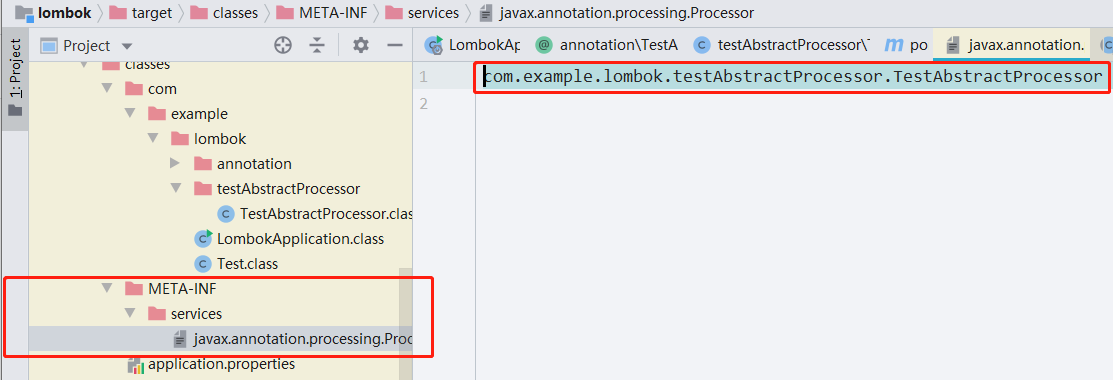
3.说明一下@AutoService(Processor.class)是Google提供的一个注解,它的作用是帮我们生成一个文件,在META-INF/下生成一个文件,文件的内容是对应我自己的注解处理类的全命名
dependency <groupId>com.google.auto.service</groupId> <artifactId>auto-service</artifactId> <version>1.0-rc5</version> </dependency> -
4.大家想一下这个类不声明处理的是哪个注解是否会找不到需要处理的注解类型呢?
-
所以@SupportedAnnotationTypes("com.example.lombok.annotation.TestAbstractProcessor"),所以这个注解是声明注解处理类型的。
-
5.注解和处理类都声明完了,最后我们需要在test文件夹中使用这个注解(测试文件夹中)
```
@TestAbstractProcessor
public class ApplicationAbstractProcessor {
}
```
看到这里很多人都会想,这人有病吧,写了这么多我靠运行不了的,骗我们?
如何运行?
- 如何debug javac 我靠这好像有点难,但是我们使用的是maven进行项目管理的对吧,平常我们时候使用最多的就是 mvn clean install
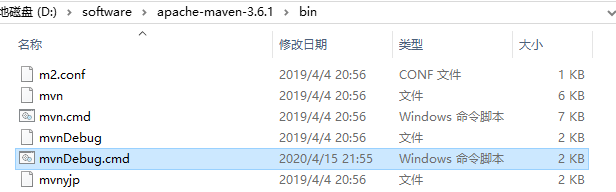
- 我们是否能debug maven呢,在maven的安装目录我们可以找到答案
- 使用idea的远程debug模式,相信小伙伴在测试环境中debug服务中都有使用过,maven默认的dubug端口是8000,我这里改成了9000;大家应该填写的是8000.
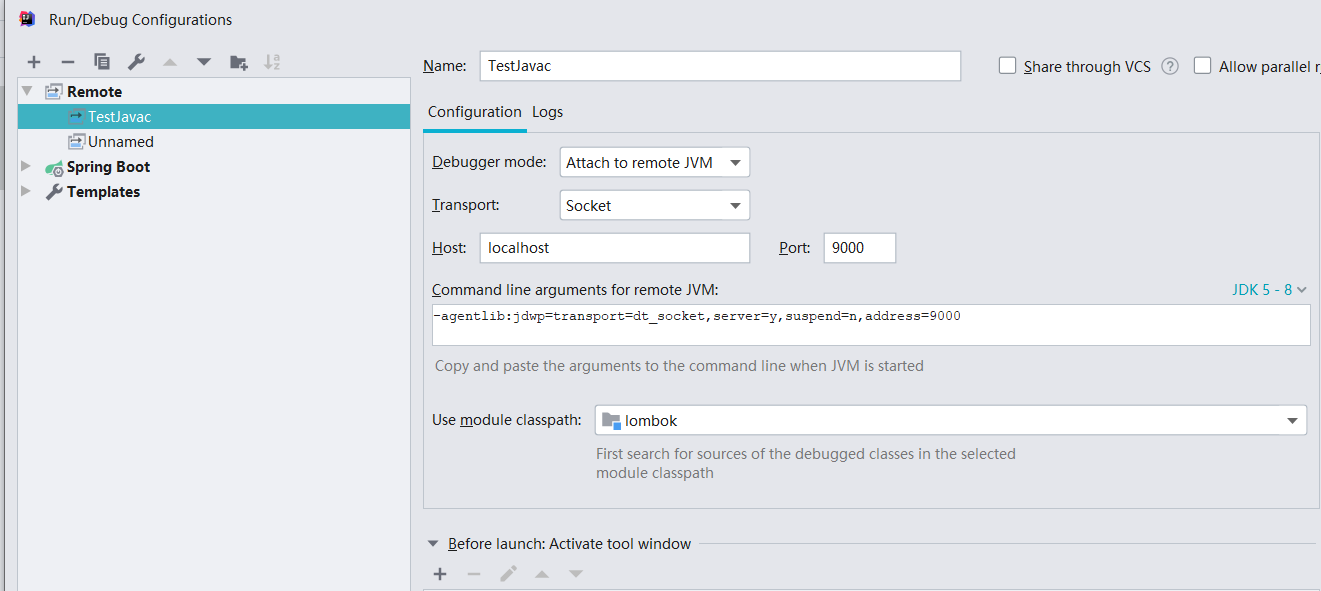
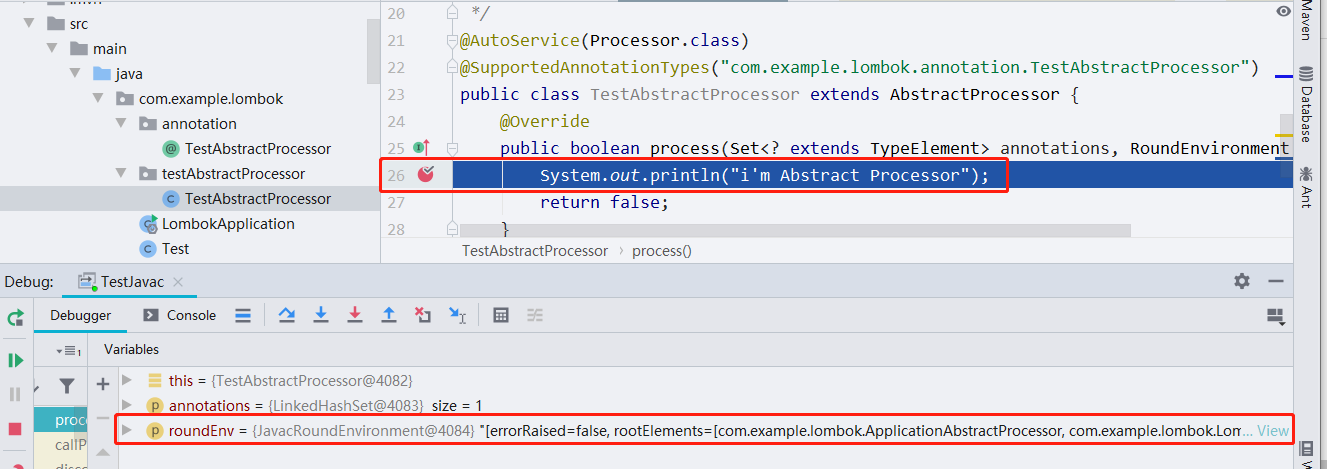
- 最后开干,这里是等待远程端口接入,我们点解debug运行我们配置好的程序

- 最后成功进入。这个时候其他我们已经完成了,接下来想干什么-无非就是发射等一系列操作了。