

开发工具Hbuilder-运行到微信小程序即可
1:自定义头部+下拉刷新
先获取手机型号,然后适配头部高度
page.json
"style": {
	"navigationBarTitleText": "首页",
	"navigationStyle":"custom",//自定义头部
	"enablePullDownRefresh": true//下拉刷新
}
homepage.vue
<template>
    <view class="TitleFixed" :style='getTitleTop' v-if="titleTop">
        首页
    </view>
</template>
//js
onPullDownRefresh:function(){//下拉刷新
    this.initApi();
},
computed:{
    ...mapState(['phoneData']),
    getTitleTop(){//头部适配
        if(this.isPlat == 3){
            return 'padding-top:54px';
        }else if(this.isPlat == 2){
            return 'padding-top:32px';
        }else if(this.isPlat == 1){
            return 'padding-top:32px';
        }
    }
};
 methods: {
    ...mapMutations(['getPhoneType']),
    init(){
        this.getPhoneType();
        if (this.phoneData.model.indexOf('iPhone') !== -1) {//ios
            if(this.phoneData.screenHeight >= 812){//x
                this.isPlat = 3;
            }else{
                this.isPlat = 2;
            }
        } else {//安卓
            this.isPlat = 1;
        }
    },
 }
store/index.js //获取手机型号
getPhoneType(state){
    uni.getSystemInfo({
	    success: function(res) {
		    state.phoneData = res;
	    },
    })
},
2: 四位数验证码的输入 交互模拟 类似下面图片这样的
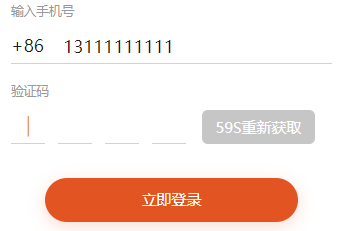
//验证码部分代码
<template>
    <view class="loginInput-row e-verifiNum">
		<text class="title">验证码</text>
		<view class="verifCode clearfix" >
			<view class="code-area" @tap.stop='clickInside($event)'>
				<view class="flex-box">
					<input
						v-show="onceInput"
						:value="val"
						type="number"
						:focus="isfocus"
						maxlength="4"
						class="hide-input"
						@input="getVal"
					/>
					<view v-bind:class="['item', { active: codeIndex == 1 }]">
						<view class="line"></view>
						<block>	{{ codeArr[0] ? codeArr[0] : ''}}</block>
					</view>
					<view v-bind:class="['item', { active: codeIndex == 2 }]">
						<view class="line"></view>
						<block >{{ codeArr[1] ? codeArr[1] : ''}}</block>
					</view>
					<view v-bind:class="['item', { active: codeIndex == 3 }]">
						<view class="line"></view>
						<block >{{ codeArr[2] ? codeArr[2] : ''}}</block>
					</view>
					<view v-bind:class="['item', { active: codeIndex == 4 }]">
						<view class="line"></view>
						<block >{{ codeArr[3] ? codeArr[3] : ''}}</block>
					</view>
				</view>
			</view>
			<button
			class="priButton"
			@tap.stop="sendVerifi($event)"
			:class="{'btn_gray':verGrayBtn}">
				{{codeTips}}
			</button>
		</view>
	</view>
</template>
<script>
    getVal(e) {//获取输入验证码
		let { value } = e.detail;
		this.val = value;
		let arr = value.split('');
		this.codeIndex = arr.length + 1;
		this.codeArr = arr;12
		if (this.codeIndex > 4) {
			//输入完成
			this.codeArr.join('');
			this.isfocus = true;
		}
	},
	clearCode(){//清除验证码
		this.isfocus = false;
		this.codeIndex = 1;
		this.codeArr = [];
		this.val = "";
	},
	clickOutside(e){//点击输入框外失去焦点
		this.isfocus = false;
		this.codeIndex = -1;
	},
	clickInside(e){//焦点定位到第一个没输入的位置,如果都输入了则不显示光标
		if(!this.onceInput){
			return;
		}
		this.isfocus = true;
		switch(this.val.length){
			case 0:
				this.codeIndex = 1;
			break;
			case 1:
				this.codeIndex = 2;
			break;
			case 2:
				this.codeIndex = 3;
			break;
			case 3:
				this.codeIndex = 4;
			break;
			case 4:
				// this.codeIndex = 4;
			break;
		}
	},
</script>
//验证码ui
<style lang='scss'>
    .code-area {
		text-align: center;
		.flex-box {
			display: flex;
			flex-wrap: wrap;
			position: relative;
			justify-content: center;
		}
		.item {
			position: relative;
			width:72upx;
			height: 72upx;
			margin-right: 26upx;
			font-size: 36upx;
			color: #1A1D1E;
			line-height: 72upx;
			box-sizing: border-box;
			border-bottom:1px solid  #D3D3D3;
		}
		.item:last-child {
			margin-right: 0;
		}
		.active {
			border-color:#D3D3D3;
		}
		.active .line {
			display: block;
		}
		.line {
			display: none;
			position: absolute;
			left: 50%;
			top: 50%;
			transform: translate(-50%, -50%);
			width:2upx;
			height: 40upx;
			background: #E25422;
			animation: twinkling 1s infinite ease;
		}
		.hide-input {
			position: absolute;
			top: 0;
			left: -100%;
			width: 200%;
			height: 100%;
			text-align: left;
			z-index: 9;
			opacity: 1;
		}
		@keyframes twinkling {
			0% {
				opacity: 0.7;
			}
			50% {
				opacity: 1;
			}
			100% {
				opacity: 0.7;
			}
		}
		.content {
			height: 400upx;
		}
		button{
			margin-top: 30upx;
		}
	}

</style>
3: 富文本框图片显示问题
富文本框里的图片不能像H5一样 操作dom改变图片的宽度,切uni不支持filter 所以就在拿到数据的时候 调用formatRichText方法先处理一遍,
<rich-text :nodes="detai"></rich-text>
formatRichText (html) { //控制小程序中图片大小
	/**
	 * 处理富文本里的图片宽度自适应
	 * 1.去掉img标签里的style、width、height属性
	 * 2.img标签添加style属性:max-width:100%;height:auto
	 * 3.修改所有style里的width属性为max-width:100%
	 * 4.去掉<br/>标签
	 * @param html
	 * @returns {void|string|*}
	 * */
	let newContent;
    newContent = html.replace(/<img[^>]*>/gi,function(match,capture){
        match = match.replace(/style="[^"]+"/gi, '').replace(/style='[^']+'/gi, '');
        match = match.replace(/width="[^"]+"/gi, '').replace(/width='[^']+'/gi, '');
        match = match.replace(/height="[^"]+"/gi, '').replace(/height='[^']+'/gi, '');
        return match;
    });
    newContent = newContent.replace(/style="[^"]+"/gi,function(match,capture){
        match = match.replace(/width:[^;]+;/gi, 'max-width:100%;').replace(/width:[^;]+;/gi, 'max-width:100%;');
        return match;
    });
    // newContent = newContent.replace(/<br[^>]*\/>/gi, '');
	newContent = newContent.replace(/\<img/gi, '<img style="max-width:100%;height:auto;display:inline-block;margin:10rpx auto;"');
    return newContent;
}
4: 小程序登录逻辑
我们有自己项目的登录,获取用户手机号去走登录逻辑+wx的login方法拿code码(code只能用一次),如果在获取手机号成功回调里去拿code码,可能会出现解密失败,原因:回调中调login,可能刷新登录状态,此时服务器使用code换取的sessionKey不是加密时使用的sessionKey,导致解密失败==解决:在onLoad()里去拿code码, wx.checkSession再确认一遍 ,双管
<button type="primary" class="login_btn" open-type="getPhoneNumber" @getphonenumber="getPhoneNumber">微信手机号快捷登录</button>
    methods: {
        getPhoneNumber(e){
        	let _this = this;
        	if(e.detail.errMsg == "getPhoneNumber:ok"){
    	        wx.checkSession({
			success(res){
		          uni.showLoading({
				title: '登陆中'
			   });
		  	_this.$api.wxPhoneLogin({...e.detail,code:_this.jscode}).then(json=>{
				uni.hideLoading();
				if(json.code !== -1){
					setTimeout(()=>{
						uni.showToast({
							icon: 'none',
							title: '登录成功'
						});
					},10)
					uni.setStorageSync('token', json.token);
					setTimeout(()=>{
						uni.navigateBack();
					},500)
				}else{
					_this.initCode();
				}
			})
    	},
    		})
            }
        }
    },
    onLoad(){
    	uni.login({
    		success: res => {
    			this.jscode = res.code;
    		}
    	});
    }
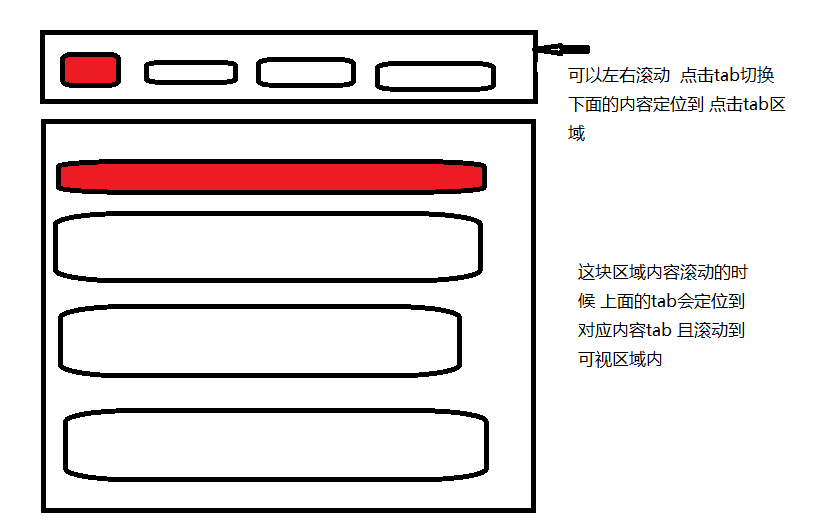
5: tab点击锚点定位 , 滚动定位
简陋的效果图 如下:
    //数据结构
    arr = [
        list:[]
    ]
布局--吸顶+隐藏scroll-view在安卓机下的滚动条(隐藏滚动条逻辑: 外面拿一个div包起来,把滚动条放到可视区域外)
<div class="recomd-wapper" :class="{'nav-tabber_fixed':isFixed}" :style="getTopX" >
    <scroll-view class="selectionTab"
    scroll-x="true" @scroll="scroll" :scroll-left='tabScrollLeft' @scrolltolower="scrolltolower">
        <view
            v-for="(item, index) in deTailList"
            class="scroll-view-item_H"
            :class="{Tabactive:tabActiveIndex == index}"
            @tap="switchBar(item, index)"
            :key="item.id"
        >
        {{ item.name }}
        </view>
    </scroll-view>
</div>
 <ul class="tab-list" :style="getBottomX">
    <li v-for="(item1,ind1) in deTailList" :key="item1.id" class='mainTab'>
        <!-- {{item1.name}} -->
        <ul>
            <li v-for="(item2,ind2) in item1.merches" :key="ind2" @tap="goodsDetail(item2.id)">
                <img :src="item2.merchPic[0].fileUrl" alt="">
                <div class="recomd-detail">
                    <h1>{{item2.title}}</h1>
                    <p>{{item2.subtitle}}</p>
                    <div>
                        <span class="price">
                            ¥<span class="price-num">{{item2.price}}</span>
                        </span> 元
                    </div>
                </div>
            </li>
        </ul>
    </li>
</ul>
 //js
    data:{
        return{
            isFixed:false,
            stickyTop:'',
            scrollTop:'',
            tabScrollLeft:'100%',
        }
    },
    computed:{
        getTopX(){
            if(this.isFixed){
                if(this.isPlat == 3){
                    return 'padding-top:84px';
                }else if(this.isPlat == 2){
                    return 'padding-top:62px';
                }else if(this.isPlat == 1){
                    return 'padding-top:62px';
                }
            }else{
                return 'padding-top:0';
            }
        },
    },
    //页面滚动执行方式
    onPageScroll(e) {
        this.scrollTop = e.scrollTop;
        this.titleTop = this.scrollTop > 150 ? true : false;
        if(this.scrollTop > this.stickyTop-80){
            this.isFixed = true;
            this.deTailList.forEach((item,index)=>{
                if(this.scrollTop > item.top -250){
                    if(!this.clickTab){
                        this.tabActiveIndex = index;
                        this.tabScrollLeft = this.deTailList[index].left - 20;
                    }
                }
            })
        }else{
            this.isFixed = false;
        }
    },
    methods: {
        switchBar(item, i){//点击切换tab
            setTimeout(()=>{
                this.tabActiveIndex = i;
                this.clickTab = false;
            },200);
            uni.pageScrollTo({
                scrollTop:this.deTailList[i].top - 200,
                duration: 300
            });
        },
        calcSize(){//计算滚动tab的高度
            setTimeout(()=>{
                uni.createSelectorQuery().selectAll('.mainTab').boundingClientRect(rects=> {
                    rects.forEach((rect,index)=> {
                        this.deTailList[index].top = rect.top;
                        this.deTailList[index].height = rect.height;
                    })
                }).exec();
                uni.createSelectorQuery().selectAll('.scroll-view-item_H').boundingClientRect(rects=> {
                    rects.forEach((rect,index)=> {
                        this.deTailList[index].left = rect.left;
                        this.deTailList[index].width = rect.width;
                    })
                }).exec();
                uni.createSelectorQuery().select('.selectionTab').boundingClientRect(rects=> {
                    this.stickyTop = rects.top;
                }).exec();
            },300);
        },
    }
样式
.recomd-wapper{
    height: 114rpx;
    width: 100%;
    overflow: hidden;
}
.nav-tabber_fixed{
    position: fixed;
    top: 0;
    left: 0;
    z-index: 999;
    background:#fff;
    box-shadow: 0 10px 16px 0 rgba(164,164,164,0.20);
    padding: 0 26rpx;
    height: 96rpx;
    .scroll-view-item_H{
        &:last-child{
            margin-right: 40rpx;
        }
    }
}
.selectionTab{
    height: 96rpx;
    padding-top: 26rpx;
    padding-bottom: 34rpx;
    width: 100%;
    background:#fff;
    white-space: nowrap;
    .scroll-view-item_H{
        padding:10rpx 27rpx 10rpx 27rpx;
        background: #F7F7FD;
        display: inline-block;
        margin-right: 28rpx;
        position: relative;
    }
    .Tabactive{
        color: #FFFFFF;
        background-image: linear-gradient(to right,#E25422 , #FF9C64 );
    }
}
6: 自定义导航栏
注释掉pages.json的tabBar的配置 自己写tabBar ,iPhone的适配上面代码有
<template>
    <view
        class="tarbar-list"
        :style="{
            background: tabBar.backgroundColor,
            color: tabBar.color,
            'border-top': tabBar.position == 'bottom' ? '1rpx solid ' + tabBar.borderStyle : 0,
            'border-bottom': tabBar.position == 'top' ? '1rpx solid ' + tabBar.borderStyle : 0,
            'paddingBottom':`${barPadding}px`
        }">
        <view class="tarbar-list-ul">
            <view class="tarbar-list-li" :class="index == 2 ? 'tarbar-list-li-center' : ''" v-for="(item, index) in tabBar.list" :key="index" @click.top="setSelected(index)">
                <view class="tarbar-list-li-icon"><image :src="tabSelect == index ? item.selectedIconPath : item.iconPath" mode=""></image></view>
                <view class="tarbar-list-li-name">{{ item.text }}</view>
            </view>
        </view>
    </view>
</template>
<script>
    props:{
        tabSelect: {
            type:Number,
            default:0
        }
    },
    data(){
        return {
            selected:1,
            barPadding:0,
            tabBar: {
                color: '#ccc',
                selectedColor: '#E84351',
                borderStyle: '#ccc',
                backgroundColor: '#fff',
                position: 'bottom',
                list: [
                    {
                        pagePath: '/pages/homePage/homePage',
                        iconPath: 'xxxx',
                        selectedIconPath: 'xxxx'',
                        text: 'xxxx''
                    },
                    {
                        pagePath: '/pages/xxxx/xxxx',
                        iconPath: 'xxxx',
                        selectedIconPath: 'xxxx',
                        text: 'xxxx''
                    }
                ]
            },
        }
    },
</script>
7: 微信支付
 async requestPayment(){
        let orderInfo = await this.getOrderInfo();
        if(orderInfo.code == -1) {
            uni.showModal({
                content: orderInfo.message,
                showCancel: false,
                success: (res)=> {
                    this.orderDetail();
                }
            })
            return;
        }
        orderInfo.data.package = orderInfo.data.packageValue
        uni.requestPayment({
            provider: 'wxpay',
            ...orderInfo.data,
            success: (e) => {
                uni.showToast({
                    title: "支付成功!",
                    icon: 'none',
                });
                this.orderResult();
            },
            fail: (e) => {
                console.log("fail", e);
                if(e.errMsg == "requestPayment:fail cancel"){//商户取消

                }else{
                    uni.showModal({
                        content: "支付失败!",
                        showCancel: false
                    })
                }
            },
            complete: () => {

            }
        })
    },
    getOrderInfo() {
        return new Promise((res,rej) => {
            this.$api.orderDetail({
                id:this.preDataId
            }).then(json=>{
                if(json.status == 40){//已取消
                    uni.showToast({
                        title: "因超时未支付,订单已取消",
                        icon: 'none',
                    });
                }else if(json.status == 10){//待支付
                    this.$api.orderPrepay({
                        orderId:this.preDataId,
                    }).then(json=>{
                        res(json);
                    })
                }
            })
        });
    },
8: 根据经纬度打开内置地图
if (this.latitude != -1 && this.longitude !=-1){
	uni.openLocation({
	  latitude:this.latitude,
	  longitude:this.longitude,
	  address: this.workPlace,
	  name: "[位置]"
	})
  }
9:点击客服 拨号
uni.makePhoneCall({
  phoneNumber: 10086
})
10: uni.navigateTo和uni.redirectTo和uni.navigateBack()的区别
- uni.navigateTo:导航的意思, 类似于打开二级目录
- uni.redirectTo:重定向到另一个页面
- uni.navigateBack():返回上一个页面
11 :滚动加载
    methods:{
        onReachBottom(){
            this.param.pageNo++;
            this.$api.myOrder(this.param).then(json=>{
                this.arr = this.arr.concat(json.list);
            });
    	},
    }
12 :一些小收获 uni&vue uni的表现
- 1):computed里方法不能传参
- 2):不能用filter
- 3):watch 无法监听wx小程序
- 4):如果想要进入页面(无论什么方式)就刷新数据, 数据加载写到onShow(){}里面
- 5): :style=""这样的方式设置px像素值,其值为实际像素,不会被编译器转换。
- 6): 不提供:key,会报一个 warning,
13: 下面文档uni使用小技巧更加全面些 上面记录的我自己开发遇见的问题
传送带: blog.csdn.net/qq_37939251…
14: 上传图片
我们项目的图片是统一存到图片服务器的 , 所以要先把选择的图片上传到图片服务器,拿到地址后再给数据库
    uni.chooseImage({
	  count: 1,
	  sizeType: ['original', 'compressed'],
	  sourceType: ['album', 'camera'],
	  success (res) {
	    const tempFilePaths = res.tempFilePaths;
		let token = uni.getStorageSync('token');
		let upToken = xxxx;//图片服务器
		let url=xxx;
		let urlPath=xxxxx;
		uni.uploadFile({
		  url: urlPath+"xxxxxx", //图片服务器的地址
		  filePath: tempFilePaths[0],
		  name:"file",
		  header: {
			  'content-type': 'multipart/form-data',
			  "X-Token":token,
			  "upToken":upToken
		  },
		  success: function(res) {
		    _this.$api.xxx//上传到数据库
		  }
		})
	  }
	})
15: axios请求封装
后端接口风格是restful的
    //api.js
        const httpRequest = (method,url, data) => {
            let httpDefaultOpts = {
                url: url,
                data: data,
                method: method,
                header: method == 'get' ? {
    			'X-Requested-With': 'XMLHttpRequest',
    			"Accept": "application/json",
    			"Content-Type": "application/json; charset=UTF-8"
    		} : {
    			'X-Requested-With': 'XMLHttpRequest',
    			'Content-Type': 'application/x-www-form-urlencoded; charset=UTF-8'
    		},
    		dataType: 'json',
    	    }
            let promise = new Promise(function(resolve, reject) {
                uni.request(httpDefaultOpts).then(
                    (res) => {
                        if(res[1].statusCode === 200){
                            resolve(res[1].data);
                        }else{
                            httpCode(res);
                        }
                    }
                ).catch(
                    (response) => {
                        reject(response)
                    }
                )
            })
            return promise
        };
        //带Token请求
        const httpTokenRequest = (method,url,data) => {
            let token = uni.getStorageSync('token');
            //此token是登录成功后后台返回保存在storage中的
            let httpDefaultOpts = {
                url: url,
                data: data,
                method: method,
                header: method == 'get' ? {
            	'X-Token': token,
                    'X-Requested-With': 'XMLHttpRequest',
                    "Accept": "application/json",
                    "Content-Type": "application/json; charset=UTF-8"
                } : method == 'post' ?  {
            	'X-Token': token,
                    'X-Requested-With': 'XMLHttpRequest',
                    'Content-Type': 'application/json; charset=UTF-8'
                }:{//put
                    'X-Token': token,
                    'X-Requested-With': 'XMLHttpRequest',
                    'Content-Type': 'application/x-www-form-urlencoded; charset=UTF-8'
                },
                dataType: 'json',
            }
            let promise = new Promise(function(resolve, reject) {
                uni.request(httpDefaultOpts).then(
                    (res) => {
                        if(res[1].statusCode === 200){
                            resolve(res[1].data);
                        }else{
                            httpCode(res);
                        }
                    }
                ).catch(
                    (response) => {
                        reject(response)
                    }
                )
            })
            return promise
        };
        let httpCode = (res)=>{
            switch(res[1].statusCode){
                case 401:
                    uni.showToast({
                        icon: 'none',
                        title: res[1].data.message
                    });
                    setTimeout(()=>{
                        uni.navigateTo({
                            url: '/pages/login/login'
                        });
                    },500);
                break;
                case 417:
                    uni.showToast({
                        icon: 'none',
                        title: res[1].data.message
                    });
                break;
                default:
                    uni.showToast({
                        icon: 'none',
                        title: res[1].data.message
                    });
            }
        }
        export default {
        	httpRequest,
            httpTokenRequest,
        }
    //url.js
        import http from './api.js';
        let baseUrl;
        if(process.env.NODE_ENV === 'development'){// 开发环境
            baseUrl = 'https://*****.com/'
        }else{ // 生产环境
            baseUrl = 'https://*****.com/'
        }
        export default {
            //绑定手机号
              wxPhoneLogin(params){
                 return http.httpTokenRequest('POST',`${baseUrl}/xxx`,params)
              },
        }
    //main.js
        import api from "./fetch/url";
        Vue.prototype.$api = api;
    //xxx.vue文件调用
         this.$api.wxPhoneLogin().then()
待更新
-小程序跳转H5
