

原文地址: medium.com/@acesmndr/t…
译文地址:github.com/xiao-T/note…
本文版权归原作者所有,翻译仅用于学习。

React 函数组件本质上是一个返回 React Element 的简单函数。这是 React v16.8 中最值得期待的功能,通过 Hooks 的文档,我们知道使用 Hooks 可以在无状态的函数组件中注入 state 和生命周期方法,让组件变成 stateful。Hooks 简单的语法和即插即用的特性,让编写函数组件变得有趣,反观,编写类组件变得有点麻烦。
看下这个用 Hooks 实现的 React 函数组件。
import React from 'react';

export default function Login(props) {
  const { email: propsEmail, password: propsPassword, dispatch } = props;
  const [isLoginDisabled, setIsLoginDisabled] = React.useState(true);
  const [email, setEmail] = React.useState(propsEmail || '');
  const [password, setPassword] = React.useState(propsPassword || '');

  React.useEffect(() => {
    validateForm();
  }, [email, password]);

  const validateEmail = text => /@/.test(text);

  const validateForm = () => {
    setIsLoginDisabled(password.length < 8 || !validateEmail(email));
  };

  const handleEmailBlur = evt => {
    const emailValue = evt.target.value.trim();
    setEmail(emailValue);
  };

  const handlePasswordChange = evt => {
    const passwordValue = evt.target.value.trim();
    setPassword(passwordValue);
  };

  const handleSubmit = () => {
    dispatch('submit(email, password)');
    setIsLoginDisabled(true);
  };

  return (
    <form>
      <input
        type="email"
        placeholder="email"
        className="mx-auto my-2"
        onBlur={handleEmailBlur}
      />
      <input
        type="password"
        className="my-2"
        onChange={handlePasswordChange}
        value={password}
      />
      <input
        type="button"
        className="btn btn-primary"
        onClick={handleSubmit}
        disabled={isLoginDisabled}
        value="Submit"
      />
    </form>
  );
}
上面函数组件中的 form 由一个不可控的 email input 和一个可控 password input 组成,内部通过 useState 和 useEffect Hooks 来更新 state,然后,提交按钮触发一个提交的动作。
针对这个组件我要覆盖各种各样的情况,因此,我不得不为函数组件编写测试用例。
Enzyme 和 Jest
如何安装 Enzyme 和 Jest,我不打算做过多的介绍。为了让这片文章更加简短,我假设你们已经对其有所了解。简单的说,Jest 就一个 javascript 测试框架,我用它来写测试;Enzyme 是一个测试工具库,为了更加容易的编写测试用例,两者配合一起使用。以下是有关 Jest 和 Enzyme 相关设置的资源:
Shallow vs Mount
对于外行来说,mount 会渲染组件的所有的节点,但是,shallow 就像它的名字一样它只会渲染组件本身,并不会渲染子组件。
相比 mount 我更喜欢 shallow,这是因为它更有助于对组件做单元测试,而不是断言组件内部的行为。如果,我们用到了一些 UI 组件库比如:Reactstrap,这就非常有用。因为,我们并不想对这些库里面的组件进行测试(因为组件自身已经测试过了)。如果,我们用 mount,那么组件库的相关节点也会被渲染。shallow 并不会渲染它们,我们可以正常使用这些组件。同时,相比 mount,shallow 在性能方面也更有优势。
过去,我编写的类组件都是用 shallow,并配合 Jest 来测试的。Enzyme 中类组件的测试文档非常完善。但是,关于函数组件的测试文档就很少,我在使用的时候,也只是刚刚发布。React 团队推荐使用 react-testing-library 去测试 Hooks。
使用 Enzyme 我无法找到合适方式访问并测试那些可以更新组件 state 的内部方法。google 搜索后,也没找到合适的方案通过 Enzyme shallow 测试函数组件,我试了各种方法,比如:在 stackoverflow 提问。然后得到了 Alex 的回复:
因为,我们无法知道 hooks 是通过 spy ,还是组件自身调用的,但是,我们可以通过检测 state 的更新来确定 hooks 的执行状态,这似乎是正确的测试函数组件的方法。
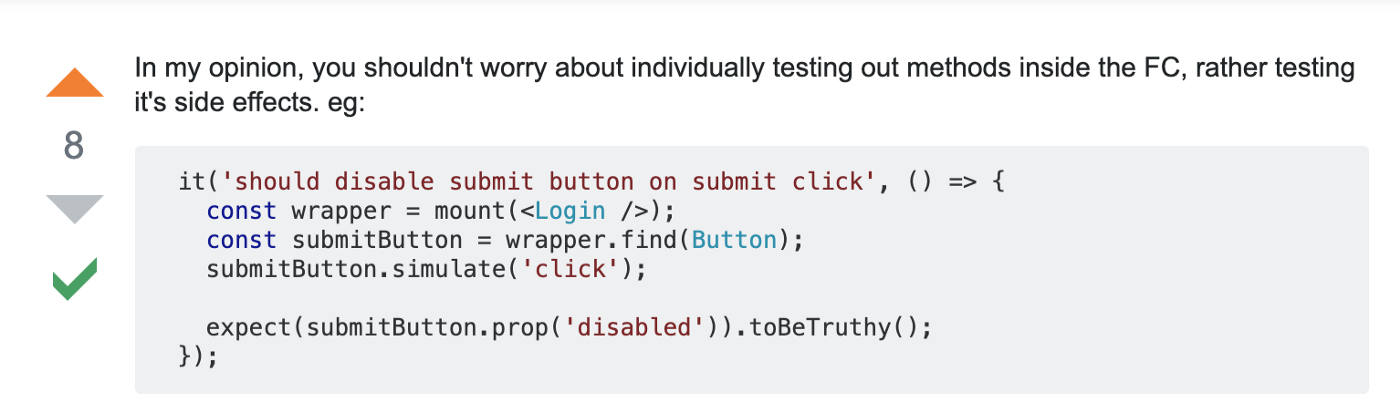
测试组件的 UI 和 Props
因此,测试 Login 组件,我们用 shallow 渲染它。为了测试完整的 UI,我们可以通过 快照 来测试。快照是组件渲染后完整的 html 内容。它包含所有的元素,如果,有任何改动新的快照不能和上一次的匹配就会失败。
然后,测试渲染后的组件我们用 find 选择器,来取保所有的元素都存在并与 props 匹配,以便检测 props 的完整性。
import React from 'react';
import { shallow } from 'enzyme';
import Login from '../index';

describe('<Login /> with no props', () => {
  const container = shallow(<Login />);
  it('should match the snapshot', () => {
    expect(container.html()).toMatchSnapshot();
  });

  it('should have an email field', () => {
    expect(container.find('input[type="email"]').length).toEqual(1);
  });

  it('should have proper props for email field', () => {
    expect(container.find('input[type="email"]').props()).toEqual({
      className: 'mx-auto my-2',
      onBlur: expect.any(Function),
      placeholder: 'email',
      type: 'email',
    });
  });

  it('should have a password field', () => { /* Similar to above */ });
  it('should have proper props for password field', () => { /* Trimmed for less lines to read */ });
  it('should have a submit button', () => { /* */ });
  it('should have proper props for submit button', () => { /* */ });
});
我们可以测试个别的属性来代替测试所有的属性。
例如,测试密码框的 value 属性我们可以这么做:

但是,为了更简单的编写测试用例,我更倾向于检测所有的属性。你不必关心哪些属性需要测试,哪些会被漏掉,这节省了时间,也满足了需求。
现在,我们来测试有传递属性的 Login 组件,我们使用上面相同的方法,来检测当传递 initalProps 时相关的属性是否有改变。
describe('<Login /> with other props', () => {
  const initialProps = {
    email: 'acesmndr@gmail.com',
    password: 'notapassword',
  };
  const container = shallow(<Login {...initialProps} />);

  it('should have proper props for email field', () => {
    expect(container.find('input[type="email"]').props()).toEqual({
      className: 'mx-auto my-2',
      onBlur: expect.any(Function),
      placeholder: 'email',
      type: 'email',
    });
  });

  it('should have proper props for password field', () => {
    expect(container.find('input[type="password"]').props()).toEqual({
      className: 'my-2',
      onChange: expect.any(Function),
      type: 'password',
      value: 'notapassword',
    });
  });

  it('should have proper props for submit button', () => { /* */ });
});
测试 state 的更新
函数组件通过 useState 来维护 state。因为,state hook 在组件内部并不能导出,因此,我们无法通过调用来测试它们。为了测试 state 是否有更新,我们可以 simulate 事件或者调用组件的属性方法,来检测 state 是否有更新并正确的渲染组件。
换句话说:我们要检测副作用。
从 React 16.8.5 开始支持 useState,因此,我们需要相同或者16.8.5以上版本 React。
it('should set the password value on change event with trim', () => {
    container.find('input[type="password"]').simulate('change', {
      target: {
        value: 'somenewpassword  ',
      },
    });
    expect(container.find('input[type="password"]').prop('value')).toEqual(
      'somenewpassword',
    );
  });

  it('should call the dispatch function and disable the submit button on button click', () => {
    container.find('input[type="button"]').simulate('click');
    expect(
      container.find('input[type="button"]').prop('disabled'),
    ).toBeTruthy();
    expect(initialProps.dispatch).toHaveBeenCalledTimes(1);
  });
替代 simulate 的另外一方法是:可以通过调用挂载在 prop 上的方法,并传递必要的参数。

当我们需要测试自定义组件上的方法时这非常有用。

以下是触发 onDropdownClose 的方式:

生命周期 hooks
在使用 shallow 渲染组件时,useEffect 这种生命周期相关 hooks 还不支持 (这些 hooks 不会被调用),因此,我们需要用 mount 代替。就像 useState 一样,我们可以模式事件或者作为属性方法来执行,然后检测 props 是否有更新来验证 hooks 是否正确。
describe('<Login /> test effect hooks', () => {
  const container = mount(<Login />);

  it('should have the login disabled by default', () => {
    expect(
      container.find('input[type="button"]').prop('disabled'),
    ).toBeTruthy();
  });

  it('should have the login enabled with valid values', () => {
    container.find('input[type="password"]').simulate('change', {
      target: {
        value: 'validpassword',
      },
    });
    expect(container.find('input[type="button"]').prop('disabled')).toBeFalsy();
  });

  it('should have the login disabled with invalid values', () => {
    container.find('input[type="email"]').simulate('blur', { /* */ });
    expect(
      container.find('input[type="button"]').prop('disabled'),
    ).toBeTruthy();
  });
});
有关 Enzyme 支持的生命周期 hooks 详情可以看这。
那些不更新 state 的方法
那些不需要维护 state 的方法可以重构从组件内部抽离放在单独文件中,单独测试这些功能函数,而不是在组件内部测试它们。如果,这个方法对组件非常特别,并不能提取到外面,我们也可以把它们跟组件放在同个一个文件中,但是,不要放在组件内部。为了使函数标准化,我们可以把它们抽象单一的方法。
export const LoginMethods = () => {
  const isEmailValid = text => /@/.test(text);
  const isPasswordValid = password => password.length >= 8;
  const areFormFieldsValid = (email, password) =>
    isEmailValid(email) && isPasswordValid(password);

  return {
    isEmailValid,
    isPasswordValid,
    areFormFieldsValid,
  };
};

export default function Login(props) {
  /* useState declarations unchanged */

  React.useLayoutEffect(() => {
    setIsLoginDisabled(!LoginMethods().areFormFieldsValid(email, password));
  }, [email, password]);
这时,测试它们就非常的直接了。
describe('LoginMethods()', () => {
  it('isEmailValid should return false if email is invalid', () => {
    expect(LoginMethods().isEmailValid('notvalidemail')).toBeFalsy();
    expect(LoginMethods().isEmailValid('notvalidemail.aswell')).toBeFalsy();
  });
  it('isEmailValid should return false if email is valid', () => {
    expect(LoginMethods().isEmailValid('validemail@gmail.com')).toBeTruthy();
  });
  /* Similar for isPasswordValid and areFormFieldsValid */
});
测试不可控的组件
但是,如何测试不可控组件呢?由于,email input 是不可控的,它的 state 并不会受组件内部控制。如果,给组件设置一个 value 属性,我将会得到一个错误提示:onChange 是必须的,否则,组件将会变成一个只读的可控组件,并不能输入任何值。

因此,为了在不设置 value 的情况下测试组件,我们将会把 email 的 state 赋值给 data-value 属性。
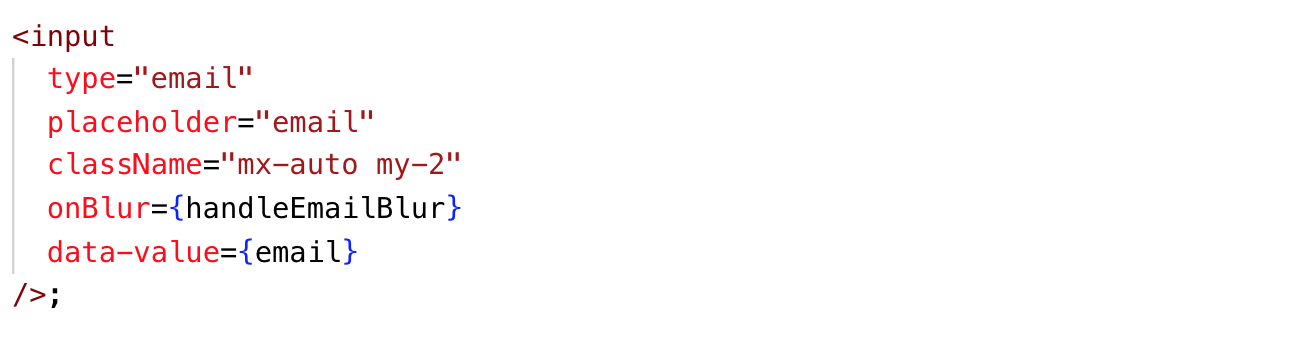
把 value 赋值给 data-value 后,我们就可以像可控组件一样通过模拟事件来测试,然后,检查一下 data-value 是否正确。
it('should set the email data value prop', () => {
    container.find('input[type="email"]').simulate('blur', {
      target: {
        value: 'email@gmail.com',
      },
    });
    expect(container.find('input[type="email"]').prop('data-value')).toEqual(
      'email@gmail.com',
    );
  });
现在,我们的测试覆盖率应该达到了100%,这就代表着,你已经成功的测试了组件,并有适当的覆盖率。

重构无状态组件和自定义 Hook(可选)
为了减少不可控组件的相关问题,有一个实现上的建议(多谢 Rohit dai),就是把 state 和生命周期相关的 hooks 抽离真实的组件,然后把它们作为自定义 hook来测试。
把 hook 抽离到一个单独方法中,并返回一个对象,然后,通过自定义 hook 把对象注入到函数组件中。通过这种实现后,函数组件被拆分成了一个自定义 hook 和一个无状态组件。通过注入自定义组件让无状态组件变得有状态。
import React from 'react';

export const LoginMethods = () => { /* Same as before */ };

export const useLoginElements = props => {
  const { email: propsEmail, password: propsPassword, dispatch } = props;
  const [isLoginDisabled, setIsLoginDisabled] = React.useState(true);
  const [email, setEmail] = React.useState(propsEmail || '');
  const [password, setPassword] = React.useState(propsPassword || '');

  React.useEffect(() => {
    setIsLoginDisabled(!LoginMethods().areFormFieldsValid(email, password));
  }, [email, password]);

  const handleEmailBlur = evt => {
    const emailValue = evt.target.value.trim();
    setEmail(emailValue);
  };

  const handlePasswordChange = evt => {
    const passwordValue = evt.target.value.trim();
    setPassword(passwordValue);
  };

  const handleSubmit = () => {
    dispatch('submit(email, password)');
    setIsLoginDisabled(true);
  };

  return {
    emailField: {
      onBlur: handleEmailBlur,
      value: email,
    },
    passwordField: {
      onChange: handlePasswordChange,
      value: password,
    },
    submitBtn: {
      onClick: handleSubmit,
      disabled: isLoginDisabled,
    },
  };
};

export default function Login(props) {
  const { emailField, passwordField, submitBtn } = useLoginElements(props);

  return (
    <form>
      <input
        type="email"
        placeholder="email"
        className="mx-auto my-2"
        onBlur={emailField.onBlur}
      />
      <input
        type="password"
        className="my-2"
        {...passwordField}
      />
      <input
        type="button"
        className="btn btn-primary"
        value="Submit"
        {...submitBtn}
      />
    </form>
  );
这将会解决不可控组件的问题,我们甚至可以通过自定义 hook 中的 value 属性(在 emailField 元素中)导出 email state,然后,在组件中,我们可以放弃那些不需要的属性,就像上面的示例一样只用那些必要的属性。上面的示例中我们只用到了来自 emailField 的 onBlur 方法。现在,我们可以把所有方法作为属性暴露出来,然后测试它们,其实,我们并不一定真正的用到它们。
测试自定义 hook
现在,为了测试自定义 hook,我们把它引入到一个函数组件中,如果,我们不这么做,hook 将无法测试,这是因为 hooks 设计之初就只能在函数组件中使用。然后,我们期望自定义 hook 可以在函数组件中正常工作。
describe('useLoginElements', () => {
  const Elements = () => {
    const props = useLoginElements({});
    return <div {...props} />;
  }; // since hooks can only be used inside a function component we wrap it inside one
  const container = shallow(<Elements />);

  it('should have proper props for email field', () => {
    expect(container.prop('emailField')).toEqual({
      value: '',
      onBlur: expect.any(Function),
    });
  });

  it('should set value on email onBlur event', () => {
    container.prop('emailField').onBlur({
      target: {
        value: 'newemail@gmail.com',
      },
    });
    expect(container.prop('emailField').value).toEqual('newemail@gmail.com');
  });

  it('should have proper props for password field', () => { /* Check onChange and value props */ });
  /* check other functional behavior of the component */
});

describe('<Login/>', () => {
  const container = shallow(<Login />);
  it('should match the snapshot', () => {
    expect(container.html()).toMatchSnapshot();
  });
 /* Test for other ui aspects of the page and not the functional behavior of the component */
});
最后,在 login 组件中,我们只需测试 UI,并不要关心其中的方法和行为。这样,我们就可以把 App 的行为和 UI 分开。
总结
- 测试组件的整个 props 对象,而不是测试单个 prop
- 不管有没有传递 props,可以复用相同的测试规范
- 通过模拟事件,检查副作用,来测试 hooks
- 测试不支持的 hooks 要使用 mount,并检查副作用
- 那些不需要更新组件 state 逻辑要提取到组件外部
- 使用 data-attributes 来测试不可控组件
这些方法并不是一成不变的,但是,我一直在用。希望对你们有所帮助。利用自定义 hooks 去测试函数组件是否为正确的方法,或者,你有更好的方式测试函数组件,请在评论中告诉我。
多谢支持。👏 😇
