

线程
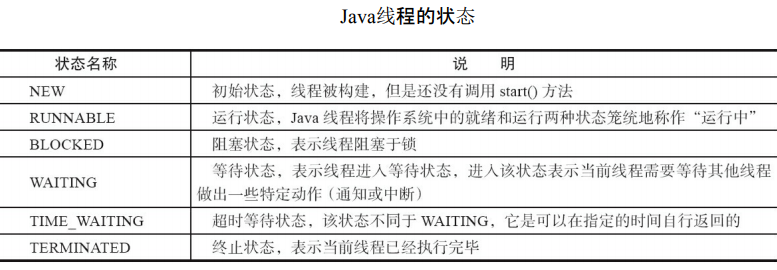
线程的状态
线程的运行存在几种不同的状态,跟cpu级别的线程状态相比,java线程已经抽象出相对更好理解的状态。
以下是从书上copy的一张图

public class ThreadState {
    public static void main(String[] args) {
        new Thread(new TimeWaiting(), "TimeWaitingThread").start();
        new Thread(new Waiting(), "WaitingThread").start();
		// 使用两个Blocked线程,一个获取锁成功,另一个被阻塞
        new Thread(new Blocked(), "BlockedThread-1").start();
        new Thread(new Blocked(), "BlockedThread-2").start();
    }
    // 该线程不断地进行睡眠
    static class TimeWaiting implements Runnable {
        @Override
        public void run() {
            while (true) {
                TimeUnit.SECONDS.sleep(100);
            }
        }
    }
    // 该线程在Waiting.class实例上等待
    static class Waiting implements Runnable {
        @Override
        public void run() {
            while (true) {
                synchronized (Waiting.class) {
                    try {
                        Waiting.class.wait();
                    } catch (InterruptedException e) {
                        e.printStackTrace();
                    }
                }
            }
        }
    }
    // 该线程在Blocked.class实例上加锁后,不会释放该锁
    static class Blocked implements Runnable {
        public void run() {
            synchronized (Blocked.class) {
                while (true) {
                    TimeUnit.SECONDS.sleep(100);
                }
            }
        }
    }
}
启动线程,并不会看到任何现象。所以我们需要通过jstack查看线程状态
使用jstack+进程ID查看线程关系
我们会得到:
// BlockedThread-2线程阻塞在获取Blocked.class示例的锁上
"BlockedThread-2" prio=5 tid=0x00007feacb05d000 nid=0x5d03 waiting for monitor
entry [0x000000010fd58000]
java.lang.Thread.State: BLOCKED (on object monitor)
// BlockedThread-1线程获取到了Blocked.class的锁
"BlockedThread-1" prio=5 tid=0x00007feacb05a000 nid=0x5b03 waiting on condition
[0x000000010fc55000]
java.lang.Thread.State: TIMED_WAITING (sleeping)
// WaitingThread线程在Waiting实例上等待
"WaitingThread" prio=5 tid=0x00007feacb059800 nid=0x5903 in Object.wait()
[0x000000010fb52000]
java.lang.Thread.State: WAITING (on object monitor)
// TimeWaitingThread线程处于超时等待
"TimeWaitingThread" prio=5 tid=0x00007feacb058800 nid=0x5703 waiting on condition
[0x000000010fa4f000]
java.lang.Thread.State: TIMED_WAITING (sleeping)
可以看到BlockedThread-2线程阻塞、WaitingThread线程在Waiting实例上等待、TimeWaitingThread线程处于超时等待
Java线程状态变迁
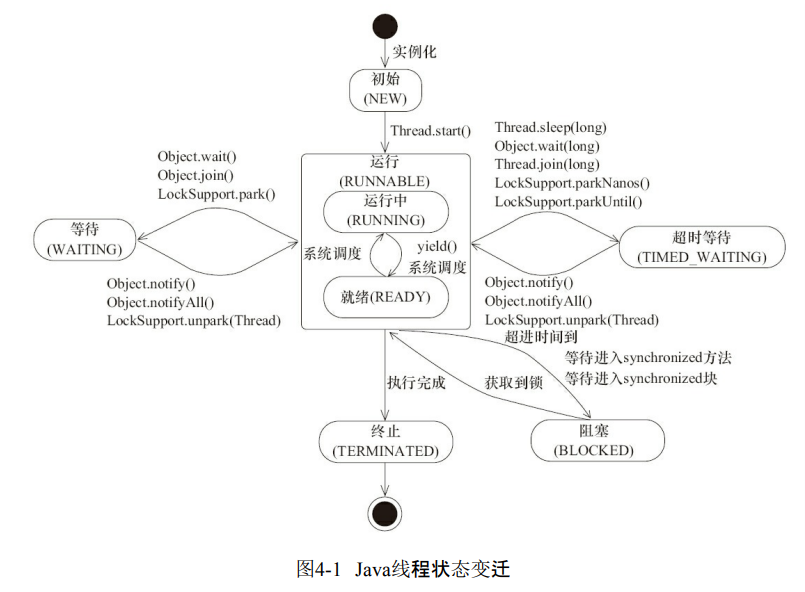
Java将操作系统中的运行和就绪两个状态合并称为运行状态。
阻塞状态是线程阻塞在进入synchronized关键字修饰的方法或代码块(获取锁)时的状态,但是阻塞在 java.concurrent包中Lock接口的线程状态却是等待状态,因为java.concurrent包中Lock接口对于阻塞的实现均使用了LockSupport类中的相关方法。
## Daemon线程
Daemon线程是一种支持型线程,因为它主要被用作程序中后台调度以及支持性工作。
这意味着,当一个Java虚拟机中不存在非Daemon线程的时候,Java虚拟机将会退出
这句话反过来说也是成立的,也就是
只要存在非Daemon线程,Java虚拟机就不会退出
Daemon属性需要在启动线程之前设置,不能在启动线程之后设置。
public class Daemon {
    public static void main(String[] args) {
        Thread thread = new Thread(new DaemonRunner(), "DaemonRunner");
        thread.setDaemon(true);
        thread.start();
    }
    static class DaemonRunner implements Runnable {
        @Override
        public void run() {
            try {
                SleepUtils.second(10);
            } finally {
                System.out.println("DaemonThread finally run.");
            }
        }
    }
}
运行Daemon程序,可以看到在终端或者命令提示符上没有任何输出。main线程(非 Daemon线程)在启动了线程DaemonRunner之后随着main方法执行完毕而终止,而此时Java虚拟机中已经没有非Daemon线程,虚拟机需要退出。Java虚拟机中的所有Daemon线程都需要立即终止,因此DaemonRunner立即终止,但是DaemonRunner中的finally块并没有执行
启动与终止
线程初始化
Thread类中初始化代码
private void init(ThreadGroup g, Runnable target, String name,long stackSize,
                      AccessControlContext acc) {
        if (name == null) {
            throw new NullPointerException("name cannot be null");
        }
        // 当前线程就是该线程的父线程
        Thread parent = currentThread();
        this.group = g;
        // 将daemon、priority属性设置为父线程的对应属性
        this.daemon = parent.isDaemon();
        this.priority = parent.getPriority();
        this.name = name.toCharArray();
        this.target = target;
        setPriority(priority);
        // 将父线程的InheritableThreadLocal复制过来
        if (parent.inheritableThreadLocals != null)
            this.inheritableThreadLocals=ThreadLocal.createInheritedMap(parent.
                    inheritableThreadLocals);
        // 分配一个线程ID
        tid = nextThreadID();
    }
线程对象是由其parent线程来进行空间分配的,而child线程继承了parent是否为Daemon、优先级和加载资源的contextClassLoader以及可继承的 ThreadLocal,同时还会分配一个唯一的ID来标识这个child线程。
中断
Java提供了一种用于停止线程的机制----中断
首先,一个线程不应该由其他线程来强制中断或停止,而是应该由线程自己自行停止。所以,Thread.stop, Thread.suspend, Thread.resume 都已经被废弃了。 而 Thread.interrupt 的作用其实也不是中断线程,而是「通知线程应该中断了」, 具体到底中断还是继续运行,应该由被通知的线程自己处理。
具体来说,当对一个线程,调用 interrupt() 时,
- 如果线程处于被阻塞状态(例如处于sleep, wait, join 等状态),JVM会使该线程离开阻塞状态,并抛出一个异常并抛出一个InterruptedException异常。
- 如果线程处于正常活动状态,那么会将该线程的中断标志设置为 true,仅此而已。被设置中断标志的线程将继续正常运行,不受影响。
如何使用中断?
要使用中断,首先需要在可能会发生中断的线程中不断监听中断状态,一旦发生中断,就执行相应的中断处理代码。 当需要中断线程时,调用该线程对象的interrupt函数即可。
1.设置中断监听
Thread t1 = new Thread(new Runnable(){
    public void run(){
        // 若未发生中断,就正常执行任务
        while(!Thread.currentThread.isInterrupted()){
            // 正常任务代码……
        }
        // 中断的处理代码……
        doSomething();
    }
} ).start();
正常的任务代码被封装在while循环中,每次执行完一遍任务代码就检查一下中断状态;一旦发生中断,则跳过while循环,直接执行后面的中断处理代码。
2.触发中断
t1.interrupt();
上述代码执行后会将t1对象的中断状态设为true,此时t1线程的正常任务代码执行完成后,进入下一次while循环前Thread.currentThread.isInterrupted()的结果为true,此时退出循环,执行循环后面的中断处理代码。
线程通过检查自身是否被中断来进行响应,线程通过方法isInterrupted()来进行判断是否被中断,也可以调用静态方法Thread.interrupted()来进行判断是否被中断(但是这个方法执行后会对当前线程的中断标识位进行复位,也就是置为false)。如果该线程已经处于终结状态,即使该线程被中断过,在调用该线程对象的isInterrupted()时依旧会返回false
过时的suspend()、resume()和stop()方法
suspend()、resume()和stop()方法完成了线程的暂停、恢复和终止工作,而且非常“人性化”。
但是这些API是过期的,也就是不建议使用的。
不建议使用的原因主要有:以suspend()方法为例,在调用后,线程不会释放已经占有的资源(比如锁),而是占有着资源进入睡眠状态,这样容易引发死锁问题。同样,stop()方法在终结一个线程时不会保证线程的资源正常释放,通常是没有给予线程完成资源释放工作的机会,因此会导致程序可能工作在不确定状态下。
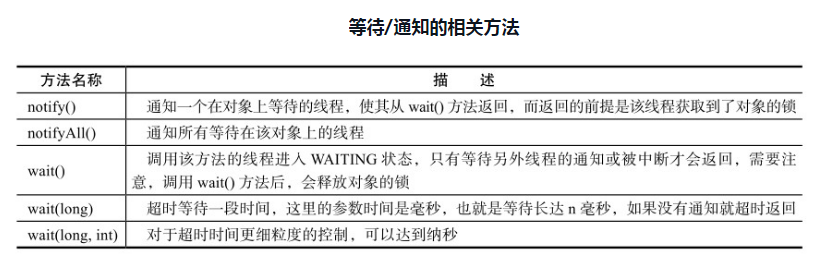
等待/通知机制
等待/通知的相关方法是任意Java对象都具备的,因为这些方法被定义在所有对象的超类java.lang.Object上
public class WaitNotify {
    static boolean flag = true;
    static Object lock = new Object();

    public static void main(String[] args) throws Exception {
        Thread waitThread = new Thread(new Wait(), "WaitThread");
        waitThread.start();
        TimeUnit.SECONDS.sleep(1);
        Thread notifyThread = new Thread(new Notify(), "NotifyThread");
        notifyThread.start();
    }

    static class Wait implements Runnable {
        public void run() {
            // 加锁,拥有lock的Monitor
            synchronized (lock) {
                // 当条件不满足时,继续wait,同时释放了lock的锁
                while (flag) {
                    try {
                        System.out.println(Thread.currentThread() + " flag is true. wait " +new SimpleDateFormat(" HH:mm:ss ").format(new Date()));
                        lock.wait();//释放lock锁
                    } catch (InterruptedException e) {
                    }
                }
                // 条件满足时,完成工作
                System.out.println(Thread.currentThread() + " flag is false. running " +
                        new SimpleDateFormat(" HH:mm:ss ").format(new Date()));
            }
        }
    }

    static class Notify implements Runnable {
        public void run() {
            // 加锁,拥有lock的Monitor
            synchronized (lock) {
                // 获取lock的锁,然后进行通知,通知时不会释放lock的锁,
                // 直到当前线程释放了lock后,WaitThread才能从wait方法中返回
                System.out.println(Thread.currentThread() + " hold lock. notify @ " +
                        new SimpleDateFormat("HH:mm:ss").format(new Date()));
                lock.notifyAll();
                flag = false;
                SleepUtils.second(5);
            }
            // 再次加锁
            synchronized (lock) {
                System.out.println(Thread.currentThread() + " hold lock again. sleep " +
                        new SimpleDateFormat(" HH:mm:ss ").format(new Date()));
                SleepUtils.second(5);
            }
        }
    }
}
输出如下(输出内容可能不同,主要区别在时间上)。
 Thread[WaitThread,5,main] flag is true. wait @ 22:23:03
 Thread[NotifyThread,5,main] hold lock. notify @ 22:23:04
 Thread[NotifyThread,5,main] hold lock again. sleep @ 22:23:09
 Thread[WaitThread,5,main] flag is false. running @ 22:23:14
3、4行结果可能会互换
执行流程:
- WaitThread首先获取了对象的锁,然后调用对象的wait()方法,从而放弃了锁
- WaitThread进入了对象的等待队列WaitQueue中,进入等待状态
- 由于WaitThread释放了对象的锁, NotifyThread随后获取了对象的锁,并调用对象的notify()方法,将WaitThread从WaitQueue移到 SynchronizedQueue中
- 此时WaitThread的状态变为阻塞状态。NotifyThread释放了锁之后, WaitThread再次获取到锁并从wait()方法返回继续执行
wait、notify、notifyAll使用细节
-
使用wait()、notify()和notifyAll()时需要先对调用对象加锁(否则会抛出 IllegalMonitorStateException)
-
调用wait()方法后,线程状态由RUNNING变为WAITING,并将当前线程放置到对象的等待队列。
-
notify()或notifyAll()方法调用后,等待线程依旧不会从wait()返回,需要调用notify()或notifAll()的线程释放锁之后,等待线程才有机会从wait()返回。
-
notify()方法将等待队列中的一个等待线程从等待队列中移到同步队列中,而notifyAll() 方法则是将等待队列中所有的线程全部移到同步队列,被移动的线程状态由WAITING变为 BLOCKED(因为之前释放了锁,现在锁在别人那里)。
-
从wait()方法返回的前提是获得了调用对象的锁。
wait/notify为什么一定要写在同步块中
一个线程调用了wait()之后, 必然需要由另外一个线程调用notify()来唤醒该线程, 所以本质上, wait()与notify()的成对使用, 是一种线程间的通信手段。
进一步分析, wait() 操作的调用必然是在等待某种条件的成立, 而条件的成立必然是由其他的线程来完成的。
下面是等待/通知的经典范式:
// 线程A 的代码
while(!condition){
    wait();
}
// do something

// 线程 B 的代码
if(!condition){
	// do something ...
    condition = true;
    notify();
}
假设没有应用Synchronized关键字,当消费者线程执行wait操作的同时,生产线线程执行notify,生产者线程可能在等待队列中找不到消费者线程。导致消费者线程一直处于阻塞状态。
在使用 wait() 和 notify() 这种会挂起线程的操作时, 我们需要一种同步机制保证, condition 的检查与 wait() 操作, 以及 condition 的更新与 notify() 是互斥的
Thread.join()
Thread.join()的使用
如果一个线程A执行了thread.join()语句,其含义是:当前线程A等待thread线程终止之后才 从thread.join()返回。线程Thread除了提供join()方法之外,还提供了join(long millis)和join(long millis,int nanos)两个具备超时特性的方法。这两个超时方法表示,如果线程thread在给定的超时 时间里没有终止,那么将会从该超时方法中返回。
下边代码中,创建了10个线程,编号0~9,每个线程调用前一个线程的 join()方法,也就是线程0结束了,线程1才能从join()方法中返回,而线程0需要等待main线程结 束。
public class Join {
    public static void main(String[] args) throws Exception {
        Thread previous = Thread.currentThread();
        for (int i = 0; i < 10; i++) {
			// 每个线程拥有前一个线程的引用,需要等待前一个线程终止,才能从等待中返回
            Thread thread = new Thread(new Domino(previous), String.valueOf(i));
            thread.start();
            previous = thread;
        }
        TimeUnit.SECONDS.sleep(5);
        System.out.println(Thread.currentThread().getName() + " terminate.");
    }
    static class Domino implements Runnable {
        private Thread thread;
        public Domino(Thread thread) {
            this.thread = thread;
        }
        public void run() {
            try {
                thread.join();
            } catch (InterruptedException e) {
            }
            System.out.println(Thread.currentThread().getName() + " terminate.");
        }
    }
}
输出
main terminate.
0 terminate.
1 terminate.
2 terminate.
3 terminate.
4 terminate.
5 terminate.
6 terminate.
7 terminate.
8 terminate.
9 terminate.
join()源码
public final synchronized void join(long millis) throws InterruptedException {
        long base = System.currentTimeMillis();
        long now = 0;

        if (millis < 0) {
            throw new IllegalArgumentException("timeout value is negative");
        }

        // 当millis为0时,表示不限时长地等待
        if (millis == 0) {
            // 通过while()死循环,只要线程还活着,那么就等待
            while (isAlive()) {
                wait(0);
            }
        } else {
            // 当millis不为0时,就需要进行超时时间的计算,然后让线程等待指定的时间
            while (isAlive()) {
                long delay = millis - now;
                if (delay <= 0) {
                    break;
                }
                wait(delay);
                now = System.currentTimeMillis() - base;
            }
        }
    }
从上边我们可以看出 最重要的代码就是
     // 当millis为0时,表示不限时长地等待
    if (millis == 0) {
        // 通过while()死循环,只要线程还活着,那么就等待
        while (isAlive()) {
            wait(0);
        }
    }
join()方法的作用,其本质实际上就是
线程之间的通信
那么问题来了,既然调用了wait()方法,那么notify()或者notifyAll()方法是在哪儿被调用的?
然而我们找遍了join()方法的源码以及我们自己写的Demo代码,都没有看到notify()或者notifyAll()方法的身影。我们都知道,wait()和notify()或者notifyAll()肯定是成对出现的,单独使用它们毫无意义,那么在join()方法的使用场景下,notify()或者notifyAll()方法是在哪儿被调用的呢?答案就是jvm。
追踪源码
最终会执行到
void JavaThread::exit(bool destroy_vm, ExitType exit_type) {
	assert(this == JavaThread::current(),  "thread consistency check");
	// ...省略了很多代码
// Notify waiters on thread object. This has to be done after exit() is called
// on the thread (if the thread is the last thread in a daemon ThreadGroup the
// group should have the destroyed bit set before waiters are notified).

// 关键代码就在这一行,从方法名就可以推断出,它是线程在退出时,用来确保join()方法的相关逻辑的。而这里的this就是指的当前线程。
// 从上面的英文注释也能看出,它是用来处理join()相关的逻辑的
ensure_join(this);

// ...省略了很多代码
}
static void ensure_join(JavaThread* thread) {
  // We do not need to grap the Threads_lock, since we are operating on ourself.
  Handle threadObj(thread, thread->threadObj());
  assert(threadObj.not_null(), "java thread object must exist");
  ObjectLocker lock(threadObj, thread);
  // Ignore pending exception (ThreadDeath), since we are exiting anyway
  thread->clear_pending_exception();
  // Thread is exiting. So set thread_status field in  java.lang.Thread class to TERMINATED.
  java_lang_Thread::set_thread_status(threadObj(), java_lang_Thread::TERMINATED);
  // Clear the native thread instance - this makes isAlive return false and allows the join()
  // to complete once we've done the notify_all below
  java_lang_Thread::set_thread(threadObj(), NULL);


  // 核心代码在下面这一行
  // 是不是很惊喜?果然见到了和notify相关的单词,不用怀疑,notify_all()方法肯定就是用来唤醒。这里的thread对象就是我们demo中的子线程thread这个实例对象
  lock.notify_all(thread);


  // Ignore pending exception (ThreadDeath), since we are exiting anyway
  thread->clear_pending_exception();
}
管道输入/输出流
Java中还有另一种用的比较少的线程间的通信方式
管道输入/输入流主要包括了如下4种具体实现:PipedOutputStream,PipedInputStream,PipedReader 和 PipedWriter,前两种面向字节,而后两种面向字符。
demo:
public class Piped {
    public static void main(String[] args) throws Exception {
        PipedWriter out = new PipedWriter();
        PipedReader in = new PipedReader();
        // 将输出流和输入流进行连接,否则在使用时会抛出IOException
        out.connect(in);
        Thread printThread = new Thread(new Print(in), "PrintThread");
        printThread.start();
        int receive = 0;
        try {
            while ((receive = System.in.read()) != -1) {
                out.write(receive);
            }
        } finally {
            out.close();
        }
    }
    static class Print implements Runnable {
        private PipedReader in;

        public Print(PipedReader in) {
            this.in = in;
        }
        public void run() {
            int receive = 0;
            try {
                while ((receive = in.read()) != -1) {
                    System.out.print((char) receive);
                }
            } catch (IOException ex) {
            }
        }
    }
}
运行该示例,输入一组字符串,可以看到被printThread进行了原样输出。
Repeat my words.
Repeat my words.
对于Piped类型的流,必须先要进行绑定,也就是调用connect()方法,如果没有将输入/输 出流绑定起来,对于该流的访问将会抛出异常。
ThreadLocal
ThreadLocal,即线程变量,是一个以ThreadLocal对象为键、任意对象为值的存储结构。这个结构被附带在线程上,也就是说一个线程可以根据一个ThreadLocal对象查询到绑定在这个线程上的一个值。
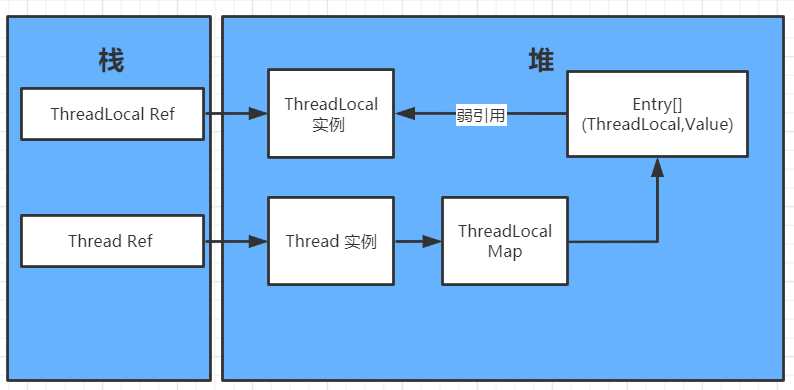
threadLocal,threadLocalMap,entry之间的关系如下图所示:
实例代码
下面通过如下代码说明 ThreadLocal 的使用方式
public class ThreadLocalDemo {
    private static class InnerClass {
        public void add(String newStr) {
            StringBuilder str = Counter.counter.get();
            Counter.counter.set(str.append(newStr));
        }

        public void print() {
            System.out.printf("Thread name:%s , ThreadLocal hashcode:%s, 									Instance hashcode:%s, Value:%s\n",
                    Thread.currentThread().getName(), Counter.counter.hashCode(),
                    Counter.counter.get().hashCode(), Counter.counter.get().toString());
        }

        public void set(String words) {
            Counter.counter.set(new StringBuilder(words));
            System.out.printf("Set, Thread name:%s , ThreadLocal hashcode:%s,  								Instance hashcode:%s, Value:%s\n",
                    Thread.currentThread().getName(), Counter.counter.hashCode(),
                    Counter.counter.get().hashCode(), Counter.counter.get().toString());
        }
    }

    private static class Counter {
        private static ThreadLocal<StringBuilder> counter
            = new ThreadLocal<StringBuilder>() {
            @Override
            protected StringBuilder initialValue() {
                return new StringBuilder();
            }
        };
    }

    public static void main(String[] args) throws InterruptedException {
        int threads = 3;
        CountDownLatch countDownLatch = new CountDownLatch(threads);
        InnerClass innerClass = new InnerClass();
        for (int i = 1; i <= threads; i++) {
            new Thread(() -> {
                for (int j = 0; j < 4; j++) {
                    innerClass.add(String.valueOf(j));
                    innerClass.print();
                }
                innerClass.set("hello world");
                countDownLatch.countDown();
            }, "thread - " + i).start();
        }
        countDownLatch.await();
    }
}
实例分析
ThreadLocal本身支持范型。该例使用了 StringBuilder 类型的 ThreadLocal 变量。可通过 ThreadLocal 的 get() 方法读取 StringBuidler 实例,也可通过 set(T t) 方法设置 StringBuilder。
上述代码执行结果如下
Thread name:thread - 1 , ThreadLocal hashcode:372282300, Instance hashcode:418873098, Value:0
Thread name:thread - 3 , ThreadLocal hashcode:372282300, Instance hashcode:1609588821, Value:0
Thread name:thread - 2 , ThreadLocal hashcode:372282300, Instance hashcode:1780437710, Value:0
Thread name:thread - 3 , ThreadLocal hashcode:372282300, Instance hashcode:1609588821, Value:01
Thread name:thread - 1 , ThreadLocal hashcode:372282300, Instance hashcode:418873098, Value:01
Thread name:thread - 3 , ThreadLocal hashcode:372282300, Instance hashcode:1609588821, Value:012
Thread name:thread - 3 , ThreadLocal hashcode:372282300, Instance hashcode:1609588821, Value:0123
Set, Thread name:thread - 3 , ThreadLocal hashcode:372282300,  Instance hashcode:1362597339, Value:hello world
Thread name:thread - 2 , ThreadLocal hashcode:372282300, Instance hashcode:1780437710, Value:01
Thread name:thread - 1 , ThreadLocal hashcode:372282300, Instance hashcode:418873098, Value:012
Thread name:thread - 2 , ThreadLocal hashcode:372282300, Instance hashcode:1780437710, Value:012
Thread name:thread - 1 , ThreadLocal hashcode:372282300, Instance hashcode:418873098, Value:0123
Thread name:thread - 2 , ThreadLocal hashcode:372282300, Instance hashcode:1780437710, Value:0123
Set, Thread name:thread - 1 , ThreadLocal hashcode:372282300,  Instance hashcode:482932940, Value:hello world
Set, Thread name:thread - 2 , ThreadLocal hashcode:372282300,  Instance hashcode:1691922941, Value:hello world
以上,我们可以得到结论
- 用的ThreadLocal都是同一个实例
- 每个线程通过 ThreadLocal 的 get() 方法拿到的是不同的实例
- 使用 set(T t) 方法后,ThreadLocal 变量所指向的 StringBuilder 实例被替换
ThreadLocal为什么会内存泄漏
看上边这幅图,可以分析 ThreadLocal里面使用了一个存在弱引用的map, map的类型是ThreadLocal.ThreadLocalMap. Map中的key为一个threadlocal实例。这个Map对key使用了弱引用。每个key都弱引用指向threadlocal。 当把threadlocal实例置为null以后,没有任何强引用指向threadlocal实例,所以threadlocal将会被gc回收。
但是,我们的value却不能回收,而这块value永远不会被访问到了,所以存在着内存泄露。因为存在一条从current thread连接过来的强引用。
查看源码,可以知道ThreadLocalMap的设计中已经考虑到这种情况,也加上了一些防护措施:在ThreadLocal的get(),set(),remove()的时候都会清除线程ThreadLocalMap里所有key为null的value,但这些被动的预防措施并不能保证不会内存泄漏
所以,只有我们在每次使用ThreadLocal的时候,尽可能去调用remove(),就可以解决这个问题
