

一.axios拦截器
axios.config.js
import axios from "axios"
import qs from "qs"
import {Message} from "iview"
import store from "@/store/index"
import router from "@/router/router.js"
//通过axios.create创建一个axios实例 工厂模式
var api = axios.create({
  //baseurl:一般会配置成一个相对的路径,那么完整的链接就是:域名+baseUrl+请求里的url
  baseURL: ENV,
  timeout: 5000
})
//请求拦截
//请求拦截可以对请求的参数做不同的处理,比如添加公共的请求头,请求token等信息
api.interceptors.request.use(config => {
    //设置公共请求头
     config.headers['Content-Type'] = 'application/json;charset=utf-8'
    //设置请求token,JWT token认证机制,可以将token存在localStorage或者vuex(sessionStorage)中
    if(sessionStorage){
        const token = sessionStorage.getItem('TOKEN_KEY')
        if (token) {
          config.headers['Authorization'] = 'bearer ' + token
        }
    }
    //可以对参数做处理,比如get请求传数组或者对象需要做参数序列化,get请求参数传params,post请求参数传data,参数序列化需要用到qs库
    if(config.method.toLowerCase === "get"){
        config.params = qs.stringify(config.params,{arrayFormat:"indices"})
    }
    return config
},error=>{
    return Promise.reject(error)
})
//响应拦截
//响应拦截可以根据不同的响应状态码做不同的处理,比如跳转登录页,页面找不到等
api.interceptors.response.use(response=>{
    //此处要用到弹框提示,可以将element-ui,iview中的弹框引入使用,这里以iview为例
    if(response.data.code !="000000"){
      Message.error({
        content:response.data.resultMsg
      })
    }
},error=>{
    //这里可以处理状态码非200的情况
     let errorMsg = ''
    if (error.toString().indexOf('timeout') !== -1) {
      errorMsg = '连接服务器超时'
    } else {
      const errorStatus = error.response.status
      const resErrorMsg = errorStatus + ':' + error.response.data.message
      switch (errorStatus) {
        case 401:
          //如果有做了token缓存的话,重登陆去掉缓存中的token信息,在js中可以使用router和vuex,可以不需要绑定在window全局对象上,直接导入对应模块就可以使用
          router.push('/login')
          window.sessionStorage.removeItem("TOKEN_KEY")
          store.commit('SET_TAB_VIEW_LIST', [])
          Message.error({
            title: '请重新登录',
            content:errorMsg
          })
          return
        case 403:
          errorMsg = '没有权限'
          break
        case 404:
          errorMsg = '请求路径找不到'
          break
        case 422:
          errorMsg = resErrorMsg + ':' + JSON.stringify(error.response.data.data)
          break
        default:
          errorMsg = resErrorMsg
      }
    }
    Message.error({
      content:errorMsg
    })
   	return Promise.reject(error)
})
export default api;
拦截器的目的是创建一个单例的axios实例,所以,整个项目的请求都通过这个单例来发起,以此达到拦截请求和响应的目的。
一般会创建一个api清单,来达到统一管理请求的目的。
xx.api.js
//将axios单例引入
import Api from "@/service/axios.config.js"
class xxApi {
	// post请求
  updateMerchantBaseInfo(data) {
    return Api({
      url: '/merApply/updateMerBase.json',
      method: 'post',
      data
    })
  }
  // get请求
  queryMerchantInfo(data) {
    return Api({
      url: '/merApply/getMerApplyInfo.json',
      method: 'get',
      params: data
    })
  }
}
export default new xxApi();
//使用
import xxApi from "xx.api.js"
xxApi.updateMerchantBaseInfo({})
xxApi.queryMerchantInfo({})
二.路由守卫,路由拦截器
vue-router路由守卫主要有三种类型:
- 全局路由守卫
- 路由独享守卫
- 组件内的守卫
全局路由守卫
项目中主要用到的是全局前置守卫,即路由跳转前,进行拦截路由前置守卫,可以用来判断用户时候已经登录,未登录就让跳转到登录页
const router = new VueRouter({ ... })

router.beforeEach((to, from, next) => {
  // ...
})
守卫方法接收三个参数:
to:Route:表示即将要进入的目标,登录页(login)跳转首页(home),to代表home对应的路由对象from:Route:当前导航正要离开的路由,登录页(login)跳转首页(home),from代表login对应的路由对象next:Function:一定要调用这个方法,不然这个钩子不会被resolve,路由会一直卡住。next():表示直接跳到想要跳转的路由(to对应的路由),不做限制next(false):中断当前的导航跳转,保持原路由,即from对应的路由next("/"):可以跳转到你想要的跳转的路由
使用的案例:
  {
      path: "/about",
      name: "about",
      component: () => import("@views/About.vue"),
      meta: {
      	//通过这个字段判断进入这个路由是不是必须登录
        requireAuth:true
      }
  }
router.beforeEach((to,from,next)=>{
    let accessToken = store.getters["auth/getAccesstoken"]
    //必须登录,去vuex查是否有access_token
    if(to.meta.requireAuth){
      if(Boolean(accessToken)){
        next()
      } else {
        Message.info({
          content:"您尚未登陆,请先登录再查看",
          duration: 2,
          onClose(){
            next({
              path:"/login"
            })
          }
        })
      }
    } else {
      if(Boolean(accessToken)) {
        if (to.path != "/login") {
          next();
        } else {
          next({
            path: '/'
          })
        }
      } else {
        next();
      }
    }
  })
全局解析守卫:
在 2.5.0+ 你可以用 router.beforeResolve 注册一个全局守卫。这和 router.beforeEach 类似,区别是在导航被确认之前,同时在所有组件内守卫和异步路由组件被解析之后,解析守卫就被调用
全局后置钩子:
router.afterEach((to, from) => {
  // ...
})
路由独享的守卫
const router = new VueRouter({
  routes: [
    {
      path: '/foo',
      component: Foo,
      beforeEnter: (to, from, next) => {
        // ...
      }
    }
  ]
})
用法跟全局前置守卫一样
组件内的守卫
-
beforeRouteEnter在这里可以进行页面埋点操作
 beforeRouteEnter (to, from, next) {
    // 在渲染该组件的对应路由被 confirm 前调用
    // 不!能!获取组件实例 `this`
    // 因为当守卫执行前,组件实例还没被创建
  }
如果要使用
this,可以next里面传入一个回调函数beforeRouteEnter (to, from, next) { next(vm => { // 通过 `vm` 访问组件实例 }) }注意:只有
beforeRouteEnter钩子才支持给next传递回调,因为其他钩子,已经可以访问vue组件实例 -
beforeRouteUpdate(2.2 新增)beforeRouteUpdate (to, from, next) { // 在当前路由改变,但是该组件被复用时调用 // 举例来说,对于一个带有动态参数的路径 /foo/:id,在 /foo/1 和 /foo/2 之间跳转的时候, // 由于会渲染同样的 Foo 组件,因此组件实例会被复用。而这个钩子就会在这个情况下被调用。 // 可以访问组件实例 `this` }, -
beforeRouteLeavebeforeRouteLeave (to, from, next) { // 导航离开该组件的对应路由时调用 // 可以访问组件实例 `this` }路由离开时,可以做
vuex的清除操作
完整的导航解析流程
- 导航被触发。
- 在失活的组件里调用离开守卫。
- 调用全局的
beforeEach守卫。 - 在重用的组件里调用
beforeRouteUpdate守卫 (2.2+)。 - 在路由配置里调用
beforeEnter。 - 解析异步路由组件。
- 在被激活的组件里调用
beforeRouteEnter。 - 调用全局的
beforeResolve守卫 (2.5+)。 - 导航被确认。
- 调用全局的
afterEach钩子。 - 触发 DOM 更新。
- 用创建好的实例调用
beforeRouteEnter守卫中传给next的回调函数。
三.路由权限控制 router.addRoutes
四.路由传参
Router实例:在vue中通过this.$router访问
路由对象:在vue中通过this.$route访问
路由的跳转,可以通过router实例提供的方法,比如push,replace等。
路由对应参数的获取,比如query,params等参数可以通过路由对象获取。比如this.$route.params,this.$route.query
总得来说,通过路由传参,有两种方式:
-
query:类似于/path?name="zhangsan"&age="20",跟get请求的方式很像页面刷新,参数不会消失
this.$router.push({ name:"pathName", //或者:path:'/xxx' query:{ name:"zhangsan", age:"20" } }) -
params方式,参数不会携带在浏览器路由中,页面刷新参数会丢失this.$router.push({ name:"pathName", //不能使用:path:"/xxx",只能使用命名路由 params:{ name:"zhangsan", age:"20" } })有时候,在组件中使用
this.$route.query和this.$route.params来获取路由参数,会增加路由和组件的耦合,所以,可以采用动态路由的方式,来减少这种耦合。通过这种方式,可以将参数以
props的方式传递给组件。最简单的方式,就是定义路由的时候,设置props属性为
trueconst router = new VueRouter({ routes: [ { path: '/user/:id', component: User, props: true }, ] }) //在组件中,通过props来接收路由中的c参数id { props:{ id:{ type:NUmber, default:null } } }同样,这种方式,刷新页面时参数也不会丢失。
五.vuex持久化保存
vuex使用的话,如果页面刷新,整个数据都会丢失,但是很多情况下,并不希望他消失,所以,一般会把vuex中的state保存在sessionStorage中做保存。
实现方式是通过vuex的插件机制。
//保存的sessionStorage标识
const storageId = 'oms/state'

//获取sessioStoragr中的数据
function loadSate() {
  return window.sessionStorage.getItem(storageId)
}

//将vuex中的state数据保存进sessionStorage中
function saveSate(mutation, state) {
  window.sessionStorage.setItem(storageId, JSON.stringify(state))
}

//插件,里面主要是用通过store.replaceState和store.subScribe来实现的
export default function sessionStoragePlugin(store) {
  let sessionState = loadSate()
  if (sessionState) {
    sessionState = JSON.parse(sessionState)
    store.replaceState(sessionState)
  }
  store.subscribe(saveSate)
}
store.subscribe(saveSate)这个方法,会订阅store的mutation。然后savestate整个方法会在每次mutation完成后调用,实现了缓存中数据的替换。store.replaceState(sessionState)每次刷新的时候,vuex中的数据会清空,但是这个方法,会替换store的根状态,就把上一次的state数据复原了。
六.秘钥等随环境信息不同而不同,设置不同环境下的打包命令
基于vue-cli3.0
比如sit环境,在项目根目录新建.env.sit
NODE_ENV = 'production'
VUE_APP_SECRET_KEY = '30818902818100B4592877F2400A09AE65A46349A3F08821EDD2B1CEE460157F03DF92211542D7022BBE37DC76D4BB8495720C8173BC1EA3E8D745DB6528E6E9D000B29DC76280883EDFECBA046D68F3DCD527F43A2BECB0D87535E454A67F19D4650087684754EEC6CEF456C7C9FE67E90D8140364D713B1FD0EAD6DF9F2F9717655AB57DF38B0203010001'
注意里面的变量要使用VUE_APP开头。
然后修改下打包命令package.json中,新增
"sit": "vue-cli-service build --mode sit",
然后,就可以通过process.env.VUE_APP_SECRET_KEY来获取:
secret.config.js
export const secretKey= process.env.VUE_APP_SECRET_KEY;
七.按钮级别的权限控制
自已通过自定义指令来实现,自定义指令可以看做是一条对当前绑定的dom元素的命令,它可以在特定的钩子函数中,操作该dom元素,同v-if,v-for一样。
实现按钮控制的原理就是,在它创建dom的时候,判断该用户是否有控制该按钮的权限,如果没有,就移除这个dom元素(按钮)
//permission.js
import store from '@/store';

export default {
  //inserted钩子函数:-被绑定元素插入父节点时调用。
  inserted(el, binding) {
    // bind.value 即为 按钮权限的key值
    if (binding.value) {
      /**
       * key不存在该数组中 移除元素
       */
      if (!store.state.user.permissionKey.includes(binding.value)) {
        el.parentNode.removeChild(el);
      }
    } else {
      throw new Error('need permission key! Like v-permission="\'addUser\'"');
    }
  },
};
注册指令
//index.js
import permission from './permission';

const install = (Vue) => {
  Vue.directive('permission', permission);
};
export default { install };
//其实就是调用下Vue.directive()注册下
使用
<button v-permission="key">解冻</button>
八.自定义页面配置
首先,把需要自定义配置的页面,拆成一个个可配置的组件。提高灵活性。
每一个组件,对应着一个表单组件,表单组件中,是你要对该组件设置的内容。
const registerComponents = (Vue) => {
  Vue.component('indexSearch', () => import('./indexSearch/indexSearch.vue'))
  Vue.component('indexSearchForm', () => import('./indexSearch/indexSearchForm.vue'))
  Vue.component('indexBanner', () => import('./indexBanner/indexBanner.vue'))
  Vue.component('indexBannerForm', () => import('./indexBanner/indexBannerForm.vue'))
  Vue.component('indexEmptyList', () => import('./indexEmptyList/indexEmptyList.vue'))
  Vue.component('indexListItem', () => import('./indexListItem/indexListItem.vue'))
  Vue.component('indexListItemForm', () => import('./indexListItem/indexListItemForm.vue'))
  Vue.component('indexEmptyBetween', () => import('./indexEmptyBetween/indexEmptyBetween.vue'))
  Vue.component('indexCouponEntry', () => import('./indexCouponEntry/indexCouponEntry.vue'))
  Vue.component('indexCouponEntryForm', () => import('./indexCouponEntry/indexCouponEntryForm.vue'))
  Vue.component('indexActivityEntry', () => import('./indexActivityEntry/indexActivityEntry.vue'))
  Vue.component('indexActivityEntryForm', () => import('./indexActivityEntry/indexActivityEntryForm.vue'))
  Vue.component('indexLookMore', () => import('./indexLookMore/indexLookMore.vue'))
  Vue.component('indexLookMoreForm', () => import('./indexLookMore/indexLookMoreForm.vue'))
  Vue.component('indexRecommendBox', () => import('./indexRecommendBox/indexRecommendBox.vue'))
  Vue.component('indexRecommendBoxForm', () => import('./indexRecommendBox/indexRecommendBoxForm.vue'))
  Vue.component('indexCouponItem', () => import('./indexCouponItem/indexCouponItem.vue'))
  Vue.component('indexCouponItemForm', () => import('./indexCouponItem/indexCouponItemForm.vue'))
  Vue.component('discountStoreItem', () => import('./discountStoreItem/discountStoreItem.vue'))
  Vue.component('discountStoreItemForm', () => import('./discountStoreItem/discountStoreItemForm.vue'))
  Vue.component('dropDownMenu', () => import('./dropDownMenu/dropDownMenu.vue'))
  Vue.component('storeListScrollBox', () => import('./storeListScrollBox/storeListScrollBox.vue'))
  Vue.component('storeListScrollBoxForm', () => import('./storeListScrollBox/storeListScrollBoxForm.vue'))
  Vue.component('couponListScrollBox', () => import('./couponListScrollBox/couponListScrollBox.vue'))
  Vue.component('couponListScrollBoxForm', () => import('./couponListScrollBox/couponListScrollBoxForm.vue'))
  Vue.component('AuditTable', () => import('@com/audit/AuditTable'))
}
export default registerComponents

//然后在main.js中
// 注册全局组件
registerComponents(Vue)
为了能够更好的使用这些小组件,需要给这些组件做一个命名+分类
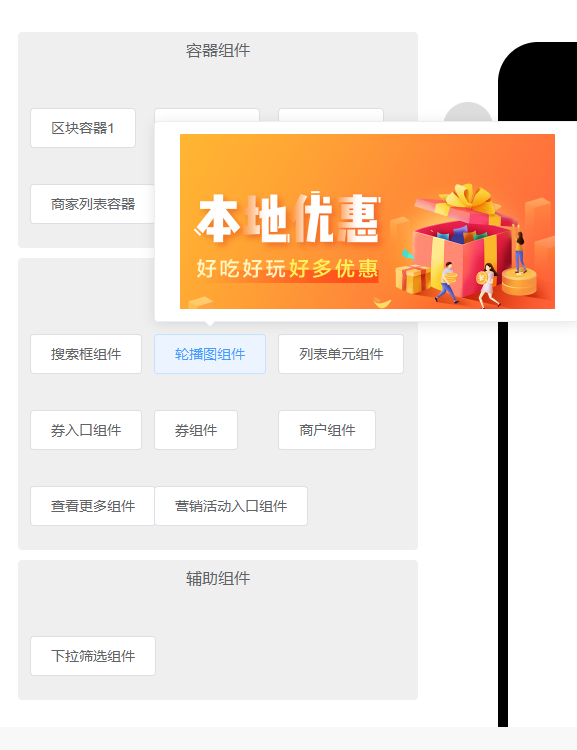
//component.js
export default [
  {
    name: '容器组件',
    child: [
      {
        name: '区块容器1',
        component: 'indexEmptyList',
        container: true
      },
      {
        name: '区块容器2',
        component: 'indexEmptyBetween',
        container: true
      },
      {
        name: '区块容器3',
        component: 'indexRecommendBox',
        container: true
      },
      {
        name: '商家列表容器',
        component: 'storeListScrollBox',
        container: true
      },
      {
        name: '优惠券列表容器',
        component: 'couponListScrollBox',
        container: true
      }
    ]
  },
  {
    name: '功能组件',
    child: [
      {
        name: '搜索框组件',
        component: 'indexSearch'
      },
      {
        name: '轮播图组件',
        component: 'indexBanner'
      },
      {
        name: '列表单元组件',
        component: 'indexListItem'
      },
      {
        name: '券入口组件',
        component: 'indexCouponEntry'
      },
      {
        name: '券组件',
        component: 'indexCouponItem'
      },
      {
        name: '商户组件',
        component: 'discountStoreItem'
      },
      {
        name: '查看更多组件',
        component: 'indexLookMore'
      },
      {
        name: '营销活动入口组件',
        component: 'indexActivityEntry'
      }
    ]
  },
  {
    name: '辅助组件',
    child: [
      {
        name: '下拉筛选组件',
        component: 'dropDownMenu'
      }
    ]
  }
]
其实对于这种可配置的页面,灵活性不能太高,样式上尽量平淡写,这样复用起来才更好,花里呼哨的话,通用性就会降低很多。
基础组件开发好之后,先把这些组件都展示在页面中,并且加一个预览功能。
这个其实很简单,就是把component.js里面的内容循环出来,组件的显示,通过动态组件来显示。
<template>
  <div class="componentListWrap">
    <div v-for="typeItem in components" :key="typeItem.name" class="container-box">
      <p class="container-text">{{ typeItem.name }}</p>
      <el-popover
        v-for="cptItem in typeItem.child"
        :key="cptItem.name"
        placement="top-start"
        width="400"
        trigger="hover"
      >
        //动态组件
        <component :is="cptItem.component" />
        <el-button
          slot="reference"
          style="margin-top:24px;"
          class="item"
          @click.native="handleAddComponent(cptItem)"
        >{{ cptItem.name }}</el-button>
      </el-popover>
    </div>
  </div>
</template>
接下来,需要把这些组件拼接成页面。
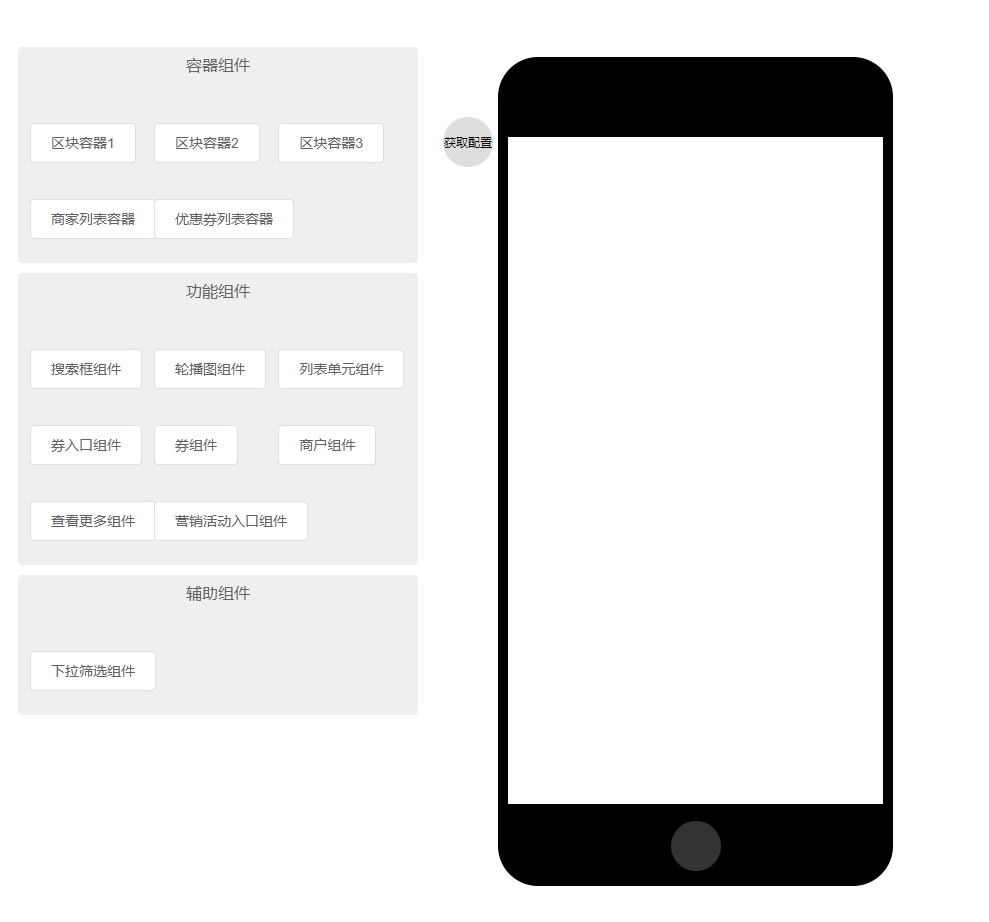
展示配置页面这部分,本质上是iframe,展示的链接是自己定义的一个路由。
<template>
  <div class="viewPageWrap">
    <div class="viewWrap">
      <iframe ref="frame" :src="url" frameborder="0" class="viewContent" @load="onLoad" />
      <div class="viewPageBtnWrap">
        <div class="viewPageBtn" @click="handleGetConfig">获取配置</div>
      </div>
    </div>
  </div>
</template>

<script>
export default {
  name: 'ViewPageWrap',
  props: {
    pushMsg: {
      type: Function,
      default: null
    },
    mode: {
      type: String,
      default: ''
    },
    pageType: {
      type: String,
      default: ''
    }
  },
  computed: {
    url: function() {
      return `${window.location.protocol}//${window.location.host + window.location.pathname}#/mobileView?mode=${this.mode}`
    }
  },
  methods: {
    /**
     * iframe 加载后执行
     */
    onLoad: function() {
      this.$emit('frameLoad', this.$refs.frame)
    },
    /**
     * 获取配置
     */
    handleGetConfig: function() {
      this.$emit('getConfig', { type: 'getConfig' })
    }
  }
}
</script>
router.js对应的路由:
{
      path: '/mobileView',
      component: () => import(/* webpackChunkName: "mobileView"*/ '@com/mobileClientPages/mobileClientView/deep-wrap.vue')
}
如何点击左侧的组件添加对应的组件到deep-wrap中?
由于deep-wrap是加载在iframe中,所以需要将点击的组件信息传给iframe,就涉及到页面的通信了。
这里采用的postMessage来进行页面之间的消息传递。
在componentList.vue中:
点击对应的组件,会向父级派发事件,并带上对应的参数,这里可以对参数做修改,满足业务的需求。
    /**
     * 添加组件
     * component 组件名
     * container 是否是容器组件
     */
    handleAddComponent: function({ component, container }) {
      let uuid = generateUUID()
      // 给组件定义一个唯一的id,用户删除,更新等操作
      const componentInfo = {
        component, uuid
      }
      if (container) {
        componentInfo.child = []
      }
      console.log(componentInfo)
      this.$emit('selectComponent', {
        type: 'addCpt',
        data: componentInfo
      })
    }
在父级页面,监听这个事件,并触发pushMsg事件:
<ComponentList @selectComponent="pushMsg" />
/**
     * 发送消息:iframe.contentWindow.postMessage(data,childDomain)
     */
pushMsg: function(data) {
    if (!this.viewFrame) return
    this.viewFrame.contentWindow.postMessage(data, `${window.location.protocol}//${window.location.host + window.location.pathname}#/mobileView`)
}
由于需要通过iframe派发事件之前,需要等iframe已经加载完成。
iframe通过自身的onload事件,将iframe对应的实例派发出去。
父页面把消息发出去之后,子页面接收消息:
deep-wrap.vue
mounted() {
	window.addEventListener('message', this.onMsg)
},
beforeDestroy() {
	window.removeEventListener('message', this.onMsg)
}
监听到事件之后,会执行接收onMsg方法:
 onMsg({ data }) {
     const { type } = data
     switch (type) {
         /**
         * 添加组件
         */
         case 'addCpt':
             this.handleAddCpt(data.data)
             break
         case 'getConfig':
             this.handleGetConfig()
             break
         case 'changeProps':
             this.handleChangeProps(data.data)
             break
         case 'delCpt':
             this.handleDelCpt()
             break
         case 'changeTheme':
             this.handleChangeTheme(data.data)
             break
         case 'changeEditStatus':
             this.handleChangeEditStatus(data.data)
             break
         case 'renderConfig':
             console.log(data.data)
             this.handlePageConfig(data.data)
             break
         default:
             break
     }
 }
/**
* 添加组件
*/
handleAddCpt(cpt) {
	this.config.push(cpt)
}
这样就得到了config的配置信息:
[
  {
    "component": "indexBanner",
    "uuid": "d56b01e4-5303-4168-9007-d1137c069a7f"
  },
  {
    "component": "indexEmptyList",
    "uuid": "a74e26d5-adc7-45e5-90f4-5c97b5e26503",
    "child": [
      {
        "component": "indexListItem",
        "uuid": "eebce9d9-4a22-40ce-aa9f-eff18b2313b0"
      },
      {
        "component": "indexListItem",
        "uuid": "d0e899d6-543e-4b87-9eb2-294fd2d03986"
      }
    ]
  }
]
得到config数据之后,需要遍历config数据,把对应的组件渲染出来:此处是组件递归
//deepItem.vue
<template>
  <draggable
    class="dragArea"
    :class="{
      'dragAreaEdit': edit
    }"
    :disabled="mode === 'content'"
    :list="list"
    :group="{ name: 'g1' }"
    v-bind="dragOptions"
    @start="drag = true"
    @end="drag = false"
  >
    <template v-for="(item, index) in list">
      <component
        :is="item.component"
        :key="index"
        :ref="`cpt-${indexKey(index)}`"
        v-bind="item.props"
        :class="{
          'viewCptItem': edit,
          'active': activeKey === indexKey(index)
        }"
        :index-list="indexKey(index)"
        @click.native.stop="handleSelect(indexKey(index),item.component,item.uuid)"
      >
        <DeepItem
          v-if="item.child"
          :list="item.child"
          :edit="edit"
          :prev-index-key="indexKey(index)"
          :active-key="activeKey"
          :select="select"
          :init-key="initKey"
        />
      </component>
    </template>
  </draggable>
</template>

<script>
import draggable from 'vuedraggable'

export default {
  name: 'DeepItem',
  components: {
    draggable
  },
  props: {
    list: {
      type: Array,
      default: () => []
    },
    edit: {
      type: Boolean,
      default: false
    },
    activeKey: {
      type: String,
      default: ''
    },
    select: {
      type: Function,
      default: null
    },
    prevIndexKey: {
      type: String,
      default: ''
    },
    initKey: {
      type: Function,
      default: null
    }
  },
  data() {
    return {
      mode: '',
      drag: false
    }
  },
  computed: {
    dragOptions() {
      return {
        animation: 200,
        group: 'description',
        disabled: !this.edit,
        ghostClass: 'ghost'
      }
    }
  },
  watch: {
    drag: function() {
      this.initKey()
    }
  },
  created() {
    this.mode = this.$route.query.mode
  },
  methods: {
    /**
     * 生成 key 值
     */
    indexKey: function(index) {
      return this.prevIndexKey ? this.prevIndexKey + '-' + index : index.toString()
    },

    /**
     * 选择组件
     */
    handleSelect: function(key, componentName, uuid) {
      const props = this.$refs[`cpt-${key}`][0].getConfig()
      console.log(props)
      this.select(key, props, componentName, uuid)
    }
  }
}
</script>
到这里,就实现了往页面增加组件。
利用vuedraggable实现拖拽组件的功能。
