

什么是Window?
/**
 * Abstract base class for a top-level window look and behavior policy.  An
 * instance of this class should be used as the top-level view added to the
 * window manager. It provides standard UI policies such as a background, title
 * area, default key processing, etc.
 *
 * <p>The only existing implementation of this abstract class is
 * android.view.PhoneWindow, which you should instantiate when needing a
 * Window.
 */
public abstract class Window {
这里看出window类是一个抽象类。结合注释可以了解到,Window是为了呈现顶级窗口的显示和行为准则的,具体来说就是呈现视图View。从下面介绍它的流程我们可以了解到,Window它其实就是来管理view的,是一个抽象的概念,所有显示到我们眼前的View都是要依附在它的上面。WindowManger负责管理window的增删改,实际上就是在管理View的增删改。
Window工作流程
要了解Window的工作流程,首先来看看WindowMananger。WindowManger继承自ViewManger,ViewManger是一个接口:
public interface ViewManager
{
    /**
     * Assign the passed LayoutParams to the passed View and add the view to the window.
     * <p>Throws {@link android.view.WindowManager.BadTokenException} for certain programming
     * errors, such as adding a second view to a window without removing the first view.
     * <p>Throws {@link android.view.WindowManager.InvalidDisplayException} if the window is on a
     * secondary {@link Display} and the specified display cant be found
     * (see {@link android.app.Presentation}).
     * @param view The view to be added to this window.
     * @param params The LayoutParams to assign to view.
     */
    public void addView(View view, ViewGroup.LayoutParams params);
    public void updateViewLayout(View view, ViewGroup.LayoutParams params);
    public void removeView(View view);
}
这里看到它定义了三个方法,字面意思分别是新增,更新和删除view。Window管理View主要也是做的这三件事。 然后WindowMananger同样是个接口,里面有个LayoutParams的内部类,里面定义了:
- 布局参数,x、y坐标,horizontalWeight(水平权重),verticalWeight(竖直权重)
- type,Window类型。有三大类Window:
- APPLICATION_WINDOW 应用程序窗口窗口,type值的范围在1~99
- SUB_WINDOW 子窗口,必须依附在父窗口上,例如PopupWindow就属于子窗口,type值的范围在1000~1999
- SYSTEM_WINDOW 系统窗口,例如Toast、输入法就属于系统窗口,type值的范围在2000~2999 Type的取值实际上代表了Window的层级,数值越大,显示到越顶层,也就是离屏幕越近。
除了Type,LayoutParams里面还定义了多个Flag标记位,列举一些常用的:
- FLAG_NOT_FOCUSABLE 窗口不会获取输入焦点,输入事件会传递给下层其他具有焦点的Window,同时还会开启FLAG_NOT_TOUCH_MODAL 这个标记位。
- FLAG_NOT_TOUCHABLE 窗口不能接收触摸事件。
- FLAG_NOT_TOUCH_MODAL 窗口只处理在其范围之内的触摸事件,范围之外的触摸事件交给下层的Window处理。
- FLAG_KEEP_SCREEN_ON 窗口只要对用户可见,那么屏幕保持亮启。
- FLAG_FULLSCREEN 隐藏所有的窗口装饰,例如statusbar等,让窗口达到一个全屏显示的效果。这个标记位会忽略SOFT_INPUT_ADJUST_RESIZE这个输入模式。
- FLAG_SHOW_WHEN_LOCKED 让窗口显示在锁屏窗口之上。
WindowManager的实现类是WindowManagerImpl,实现了ViewManager中的三个方法:
public final class WindowManagerImpl implements WindowManager {
    @UnsupportedAppUsage
    private final WindowManagerGlobal mGlobal = WindowManagerGlobal.getInstance();
    private final Context mContext;
    private final Window mParentWindow;

    private IBinder mDefaultToken;

    ...

    @Override
    public void addView(@NonNull View view, @NonNull ViewGroup.LayoutParams params) {
        applyDefaultToken(params);
        mGlobal.addView(view, params, mContext.getDisplay(), mParentWindow);
    }

    @Override
    public void updateViewLayout(@NonNull View view, @NonNull ViewGroup.LayoutParams params) {
        applyDefaultToken(params);
        mGlobal.updateViewLayout(view, params);
    }

    ...

    @Override
    public void removeView(View view) {
        mGlobal.removeView(view, false);
    }

    @Override
    public void removeViewImmediate(View view) {
        mGlobal.removeView(view, true);
    }
    ...
}
省略掉部分代码,可以看到,初始化了一个WindowManangerGlobal的单例,WindowManagerImpl的addView、updateViewLayout、removeView三个操作实际上是调用到了WindowManangerGlobal 这个类当中的相应方法。
Window的添加流程
先来看WindowManangerGlobal的addView方法:
public void addView(View view, ViewGroup.LayoutParams params,
            Display display, Window parentWindow) {
            ...
            root = new ViewRootImpl(view.getContext(), display);

            view.setLayoutParams(wparams);

            mViews.add(view);
            mRoots.add(root);
            mParams.add(wparams);

            // do this last because it fires off messages to start doing things
            try {
                root.setView(view, wparams, panelParentView);
            } catch (RuntimeException e) {
                // BadTokenException or InvalidDisplayException, clean up.
                if (index >= 0) {
                    removeViewLocked(index, true);
                }
                throw e;
            }
        }
    }
这里看到是new了一个ViewRootImpl实例,将view做为根view传递给ViewRootImpl,并且调用了的它的setView方法。来看看ViewRootImpl的setView方法:
/**
     * We have one child
     */
    public void setView(View view, WindowManager.LayoutParams attrs, View panelParentView) {
        synchronized (this) {
            if (mView == null) {
                mView = view;

                ...
                mAdded = true;
                int res; /* = WindowManagerImpl.ADD_OKAY; */

                // Schedule the first layout -before- adding to the window
                // manager, to make sure we do the relayout before receiving
                // any other events from the system.
                // 异步开始view的测量布局绘制三大流程。
                requestLayout();
                if ((mWindowAttributes.inputFeatures
                        & WindowManager.LayoutParams.INPUT_FEATURE_NO_INPUT_CHANNEL) == 0) {
                    mInputChannel = new InputChannel();
                }
                mForceDecorViewVisibility = (mWindowAttributes.privateFlags
                        & PRIVATE_FLAG_FORCE_DECOR_VIEW_VISIBILITY) != 0;
                try {
                    mOrigWindowType = mWindowAttributes.type;
                    mAttachInfo.mRecomputeGlobalAttributes = true;
                    collectViewAttributes();
                    //通过Binder对象,IPC调用,将添加Window操作交给系统WindowManagerService去处理,
                    //实现window添加。
                    res = mWindowSession.addToDisplay(mWindow, mSeq, mWindowAttributes,
                            getHostVisibility(), mDisplay.getDisplayId(), mTmpFrame,
                            mAttachInfo.mContentInsets, mAttachInfo.mStableInsets,
                            mAttachInfo.mOutsets, mAttachInfo.mDisplayCutout, mInputChannel,
                            mTempInsets);
                    setFrame(mTmpFrame);
                } catch (RemoteException e) {
                    mAdded = false;
                    mView = null;
                    mAttachInfo.mRootView = null;
                    mInputChannel = null;
                    mFallbackEventHandler.setView(null);
                    unscheduleTraversals();
                    setAccessibilityFocus(null, null);
                    throw new RuntimeException("Adding window failed", e);
                } finally {
                    if (restore) {
                        attrs.restore();
                    }
                }
                ...
            }
        }
    }
这里可以看到ViewRootImpl实际上是调用了mWindowSession这个Binder对象的addToDisplay方法,这个方法通过IPC调用,调用到了WindowManangerService的addWindow方法,这样就将添加Window的操作交给了系统的WindowManangerService,让它来完成Window的添加操作。
public class Session extends IWindowSession.Stub implements IBinder.DeathRecipient {
    final WindowManagerService mService;
    ...
    @Override
    public int addToDisplay(IWindow window, int seq, WindowManager.LayoutParams attrs,
            int viewVisibility, int displayId, Rect outContentInsets, Rect outStableInsets,
            Rect outOutsets, InputChannel outInputChannel) {
        return mService.addWindow(this, window, seq, attrs, viewVisibility, displayId,
                outContentInsets, outStableInsets, outOutsets, outInputChannel);
    }
    ...
}

public class WindowManagerService extends IWindowManager.Stub
        implements Watchdog.Monitor, WindowManagerPolicy.WindowManagerFuncs {
    ...
    public int addWindow(Session session, IWindow client, int seq,
            WindowManager.LayoutParams attrs, int viewVisibility, int displayId,
            Rect outContentInsets, Rect outStableInsets, Rect outOutsets,
            InputChannel outInputChannel) {
        ...
    }
}
总结Window的添加过程,如下图:

那么问题来了,是WindowManager的addView是谁调用的呢?这个被添加的View是从哪里传递过来的?我们知道Activity、Dialog、Toast、PopUpWindow等都可以提供View,而这些View都是依附于Window上面的,通过添加Window来显示视图。这里就分析一下Activity的Window创建的过程。
Activity的Window添加流程
首先从Activity的启动流程开始,最终会调用到ActivityThread的performLaunchActivity方法来完成启动流程。里面调用了Activity的attach方法,在这个方法里面创建了Activity关联的Window实例,也就是PhoneWindow,然后调用Window的setWindowManager方法,给PhoneWindow设置了一个WindowManager的实现类,即WindowManangerImpl。代码如下:
 /**  Core implementation of activity launch. */
 public final class ActivityThread extends ClientTransactionHandler {
    ...
    private Activity performLaunchActivity(ActivityClientRecord r, Intent customIntent) {
        ...
        try {
            ...
            if (activity != null) {
                CharSequence title = r.activityInfo.loadLabel(appContext.getPackageManager());
                Configuration config = new Configuration(mCompatConfiguration);
                if (r.overrideConfig != null) {
                    config.updateFrom(r.overrideConfig);
                }
                if (DEBUG_CONFIGURATION) Slog.v(TAG, "Launching activity "
                        + r.activityInfo.name + " with config " + config);
                Window window = null;
                if (r.mPendingRemoveWindow != null && r.mPreserveWindow) {
                    window = r.mPendingRemoveWindow;
                    r.mPendingRemoveWindow = null;
                    r.mPendingRemoveWindowManager = null;
                }
                appContext.setOuterContext(activity);
                activity.attach(appContext, this, getInstrumentation(), r.token,
                        r.ident, app, r.intent, r.activityInfo, title, r.parent,
                        r.embeddedID, r.lastNonConfigurationInstances, config,
                        r.referrer, r.voiceInteractor, window, r.configCallback,
                        r.assistToken);
                ...
            }
            ...

        } catch (SuperNotCalledException e) {
            throw e;

        } catch (Exception e) {
            ...
        }

        return activity;
    }
 }

 public class Activity extends ContextThemeWrapper
        implements LayoutInflater.Factory2,
        Window.Callback, KeyEvent.Callback,
        OnCreateContextMenuListener, ComponentCallbacks2,
        Window.OnWindowDismissedCallback, WindowControllerCallback,
        AutofillManager.AutofillClient, ContentCaptureManager.ContentCaptureClient {

    @UnsupportedAppUsage
    final void attach(Context context, ActivityThread aThread,
            Instrumentation instr, IBinder token, int ident,
            Application application, Intent intent, ActivityInfo info,
            CharSequence title, Activity parent, String id,
            NonConfigurationInstances lastNonConfigurationInstances,
            Configuration config, String referrer, IVoiceInteractor voiceInteractor,
            Window window, ActivityConfigCallback activityConfigCallback, IBinder assistToken) {
        attachBaseContext(context);

        mFragments.attachHost(null /*parent*/);
        //创建PhoneWindow实例,和Activity关联
        mWindow = new PhoneWindow(this, window, activityConfigCallback);
        mWindow.setWindowControllerCallback(this);
        mWindow.setCallback(this);
        mWindow.setOnWindowDismissedCallback(this);
        mWindow.getLayoutInflater().setPrivateFactory(this);
        if (info.softInputMode != WindowManager.LayoutParams.SOFT_INPUT_STATE_UNSPECIFIED) {
            mWindow.setSoftInputMode(info.softInputMode);
        }
        if (info.uiOptions != 0) {
            mWindow.setUiOptions(info.uiOptions);
        }
        mUiThread = Thread.currentThread();

        mMainThread = aThread;
        mInstrumentation = instr;
        mToken = token;
        mAssistToken = assistToken;
        mIdent = ident;
        mApplication = application;
        mIntent = intent;
        mReferrer = referrer;
        mComponent = intent.getComponent();
        mActivityInfo = info;
        mTitle = title;
        mParent = parent;
        mEmbeddedID = id;
        mLastNonConfigurationInstances = lastNonConfigurationInstances;
        if (voiceInteractor != null) {
            if (lastNonConfigurationInstances != null) {
                mVoiceInteractor = lastNonConfigurationInstances.voiceInteractor;
            } else {
                mVoiceInteractor = new VoiceInteractor(voiceInteractor, this, this,
                        Looper.myLooper());
            }
        }
        //调用WindowManager.setWindowManager 设置WindowManager
        mWindow.setWindowManager(
                (WindowManager)context.getSystemService(Context.WINDOW_SERVICE),
                mToken, mComponent.flattenToString(),
                (info.flags & ActivityInfo.FLAG_HARDWARE_ACCELERATED) != 0);
        if (mParent != null) {
            mWindow.setContainer(mParent.getWindow());
        }
        mWindowManager = mWindow.getWindowManager();
        mCurrentConfig = config;

        mWindow.setColorMode(info.colorMode);

        setAutofillOptions(application.getAutofillOptions());
        setContentCaptureOptions(application.getContentCaptureOptions());
    }
}
public abstract class Window {
    ...
    /**
     * Set the window manager for use by this Window to, for example,
     * display panels.  This is <em>not</em> used for displaying the
     * Window itself -- that must be done by the client.
     *
     * @param wm The window manager for adding new windows.
     */
    public void setWindowManager(WindowManager wm, IBinder appToken, String appName,
            boolean hardwareAccelerated) {
        mAppToken = appToken;
        mAppName = appName;
        mHardwareAccelerated = hardwareAccelerated;
        if (wm == null) {
            wm = (WindowManager)mContext.getSystemService(Context.WINDOW_SERVICE);
        }
        //创建WindowManager的实现 WindowManagerImpl
        mWindowManager = ((WindowManagerImpl)wm).createLocalWindowManager(this);
    }
    ...
}
到这里就创建好了一个PhoneWindow和Activity关联了,那什么时候,将Activity的View添加到Window上呢? 我们知道Activity设置View的方法是setContentView:
/**
     * Set the activity content from a layout resource.  The resource will be
     * inflated, adding all top-level views to the activity.
     *
     * @param layoutResID Resource ID to be inflated.
     *
     * @see #setContentView(android.view.View)
     * @see #setContentView(android.view.View, android.view.ViewGroup.LayoutParams)
     */
    public void setContentView(@LayoutRes int layoutResID) {
        getWindow().setContentView(layoutResID);
        initWindowDecorActionBar();
    }
这里看到直接调用了PhoneWindow的setContentView方法,将设置View的工作交给了PhoneWindow:
/**
 * Android-specific Window.
 * <p>
 * todo: need to pull the generic functionality out into a base class
 * in android.widget.
 *
 * @hide
 */
public class PhoneWindow extends Window implements MenuBuilder.Callback {
    ...
    @Override
    public void setContentView(int layoutResID) {
        // Note: FEATURE_CONTENT_TRANSITIONS may be set in the process of installing the window
        // decor, when theme attributes and the like are crystalized. Do not check the feature
        // before this happens.
        if (mContentParent == null) {
            //设置DecorView
            installDecor();
        } else if (!hasFeature(FEATURE_CONTENT_TRANSITIONS)) {
            mContentParent.removeAllViews();
        }

        if (hasFeature(FEATURE_CONTENT_TRANSITIONS)) {
            final Scene newScene = Scene.getSceneForLayout(mContentParent, layoutResID,
                    getContext());
            transitionTo(newScene);
        } else {
            //加载Activity Content 的布局到mContentParent里
            mLayoutInflater.inflate(layoutResID, mContentParent);
        }
        mContentParent.requestApplyInsets();
        final Callback cb = getCallback();
        if (cb != null && !isDestroyed()) {
            cb.onContentChanged();
        }
        mContentParentExplicitlySet = true;
    }
    ...
}
可以看到里面调用了installDecor方法,而里面又调用到了generateDecor方法去创建了一个DecorView:
private void installDecor() {
        mForceDecorInstall = false;
        if (mDecor == null) {
            mDecor = generateDecor(-1);
            mDecor.setDescendantFocusability(ViewGroup.FOCUS_AFTER_DESCENDANTS);
            mDecor.setIsRootNamespace(true);
            if (!mInvalidatePanelMenuPosted && mInvalidatePanelMenuFeatures != 0) {
                mDecor.postOnAnimation(mInvalidatePanelMenuRunnable);
            }
        } else {
            mDecor.setWindow(this);
        }
        if (mContentParent == null) {
            mContentParent = generateLayout(mDecor);
            ...
        }
        ...
}

protected DecorView generateDecor(int featureId) {
        // System process doesn't have application context and in that case we need to directly use
        // the context we have. Otherwise we want the application context, so we don't cling to the
        // activity.
        Context context;
        if (mUseDecorContext) {
            Context applicationContext = getContext().getApplicationContext();
            if (applicationContext == null) {
                context = getContext();
            } else {
                context = new DecorContext(applicationContext, getContext());
                if (mTheme != -1) {
                    context.setTheme(mTheme);
                }
            }
        } else {
            context = getContext();
        }
        //创建DecorView并关联PhoneWindow
        return new DecorView(context, featureId, this, getAttributes());
}
这里就完成了PhoneWindow和DecorView的关联。除了完成关联,PhoneWindow还会通过generateLayout方法,来加载布局到DecorView:
protected ViewGroup generateLayout(DecorView decor) {
        // Apply data from current theme.

    ...
    int layoutResource;
        int features = getLocalFeatures();
        // System.out.println("Features: 0x" + Integer.toHexString(features));
        if ((features & (1 << FEATURE_SWIPE_TO_DISMISS)) != 0) {
            layoutResource = R.layout.screen_swipe_dismiss;
            setCloseOnSwipeEnabled(true);
        } else if ((features & ((1 << FEATURE_LEFT_ICON) | (1 << FEATURE_RIGHT_ICON))) != 0) {
            if (mIsFloating) {
                TypedValue res = new TypedValue();
                getContext().getTheme().resolveAttribute(
                        R.attr.dialogTitleIconsDecorLayout, res, true);
                layoutResource = res.resourceId;
            } else {
                layoutResource = R.layout.screen_title_icons;
            }
            // XXX Remove this once action bar supports these features.
            removeFeature(FEATURE_ACTION_BAR);
            // System.out.println("Title Icons!");
        } else if ((features & ((1 << FEATURE_PROGRESS) | (1 << FEATURE_INDETERMINATE_PROGRESS))) != 0
                && (features & (1 << FEATURE_ACTION_BAR)) == 0) {
            // Special case for a window with only a progress bar (and title).
            // XXX Need to have a no-title version of embedded windows.
            layoutResource = R.layout.screen_progress;
            // System.out.println("Progress!");
        } else if ((features & (1 << FEATURE_CUSTOM_TITLE)) != 0) {
            // Special case for a window with a custom title.
            // If the window is floating, we need a dialog layout
            if (mIsFloating) {
                TypedValue res = new TypedValue();
                getContext().getTheme().resolveAttribute(
                        R.attr.dialogCustomTitleDecorLayout, res, true);
                layoutResource = res.resourceId;
            } else {
                layoutResource = R.layout.screen_custom_title;
            }
            // XXX Remove this once action bar supports these features.
            removeFeature(FEATURE_ACTION_BAR);
        } else if ((features & (1 << FEATURE_NO_TITLE)) == 0) {
            // If no other features and not embedded, only need a title.
            // If the window is floating, we need a dialog layout
            if (mIsFloating) {
                TypedValue res = new TypedValue();
                getContext().getTheme().resolveAttribute(
                        R.attr.dialogTitleDecorLayout, res, true);
                layoutResource = res.resourceId;
            } else if ((features & (1 << FEATURE_ACTION_BAR)) != 0) {
                layoutResource = a.getResourceId(
                        R.styleable.Window_windowActionBarFullscreenDecorLayout,
                        R.layout.screen_action_bar);
            } else {
                layoutResource = R.layout.screen_title;
            }
            // System.out.println("Title!");
        } else if ((features & (1 << FEATURE_ACTION_MODE_OVERLAY)) != 0) {
            layoutResource = R.layout.screen_simple_overlay_action_mode;
        } else {
            // Embedded, so no decoration is needed.
            layoutResource = R.layout.screen_simple;
            // System.out.println("Simple!");
        }

        mDecor.startChanging();
        mDecor.onResourcesLoaded(mLayoutInflater, layoutResource);
        ViewGroup contentParent = (ViewGroup)findViewById(ID_ANDROID_CONTENT);
        ...
        return contentParent;
}
这里的layoutResource即布局id,是加载DecorView布局的id(不是Activity contentView 的),它跟系统版本和主题有关,得到layoutResource之后,便通过DecorView的onResourcesLoaded方法加载布局,并添加到DecorView当中:
void onResourcesLoaded(LayoutInflater inflater, int layoutResource) {
        if (mBackdropFrameRenderer != null) {
            loadBackgroundDrawablesIfNeeded();
            mBackdropFrameRenderer.onResourcesLoaded(
                    this, mResizingBackgroundDrawable, mCaptionBackgroundDrawable,
                    mUserCaptionBackgroundDrawable, getCurrentColor(mStatusColorViewState),
                    getCurrentColor(mNavigationColorViewState));
        }

        mDecorCaptionView = createDecorCaptionView(inflater);
        //加载布局
        final View root = inflater.inflate(layoutResource, null);
        if (mDecorCaptionView != null) {
            if (mDecorCaptionView.getParent() == null) {
                addView(mDecorCaptionView,
                        new ViewGroup.LayoutParams(MATCH_PARENT, MATCH_PARENT));
            }
            mDecorCaptionView.addView(root,
                    new ViewGroup.MarginLayoutParams(MATCH_PARENT, MATCH_PARENT));
        } else {

            // Put it below the color views.
            // 添加View,调用ViewGroup的addView 方法
            addView(root, 0, new ViewGroup.LayoutParams(MATCH_PARENT, MATCH_PARENT));
        }
        mContentRoot = (ViewGroup) root;
        initializeElevation();
    }
DecorView加载布局之后,在generateLayout方法里通过ViewGroup contentParent = (ViewGroup)findViewById(ID_ANDROID_CONTENT);获得到id为com.android.internal.R.id.content的ViewGroup,这个ViewGroup便是装Activity contentView的父容器。然后再在setContentView方法里,将Activity 的contentView的布局加载到mContentParent里。到此Activity的contentView就被添加到了DecorView中,DecorView也创建并初始化完毕了。
可总结下流程:
- Activity启动
- 创建Window(PhoneWindow)
- Activity setContentView
- 创建DecorView关联Window
- PhoneWindow 添加 contentView 到 DecorView 的mContentParent中
大致流程如图:

这个时候DecorView虽然创建初始化完成,但是还没有被WindowManager添加进去,还没有走到Window的添加过程。这个步骤可以看ActivityTread 的 handleResumeActivity 方法:
@Override
    public void handleResumeActivity(IBinder token, boolean finalStateRequest, boolean isForward,
            String reason) {
        // If we are getting ready to gc after going to the background, well
        // we are back active so skip it.
        ...
        final Activity a = r.activity;

        ...
        if (r.window == null && !a.mFinished && willBeVisible) {
            //获得Window
            r.window = r.activity.getWindow();
            //通过Window获得DecorView
            View decor = r.window.getDecorView();
            decor.setVisibility(View.INVISIBLE);
            ViewManager wm = a.getWindowManager();
            WindowManager.LayoutParams l = r.window.getAttributes();
            a.mDecor = decor;
            l.type = WindowManager.LayoutParams.TYPE_BASE_APPLICATION;
            l.softInputMode |= forwardBit;
            if (r.mPreserveWindow) {
                a.mWindowAdded = true;
                r.mPreserveWindow = false;
                // Normally the ViewRoot sets up callbacks with the Activity
                // in addView->ViewRootImpl#setView. If we are instead reusing
                // the decor view we have to notify the view root that the
                // callbacks may have changed.
                ViewRootImpl impl = decor.getViewRootImpl();
                if (impl != null) {
                    impl.notifyChildRebuilt();
                }
            }
            if (a.mVisibleFromClient) {
                if (!a.mWindowAdded) {
                    a.mWindowAdded = true;
                    //通过WindowManager添加DecorView
                    wm.addView(decor, l);
                } else {
                    // The activity will get a callback for this {@link LayoutParams} change
                    // earlier. However, at that time the decor will not be set (this is set
                    // in this method), so no action will be taken. This call ensures the
                    // callback occurs with the decor set.
                    a.onWindowAttributesChanged(l);
                }
            }

            // If the window has already been added, but during resume
            // we started another activity, then don't yet make the
            // window visible.
        } else if (!willBeVisible) {
            if (localLOGV) Slog.v(TAG, "Launch " + r + " mStartedActivity set");
            r.hideForNow = true;
        }

        ...
    }
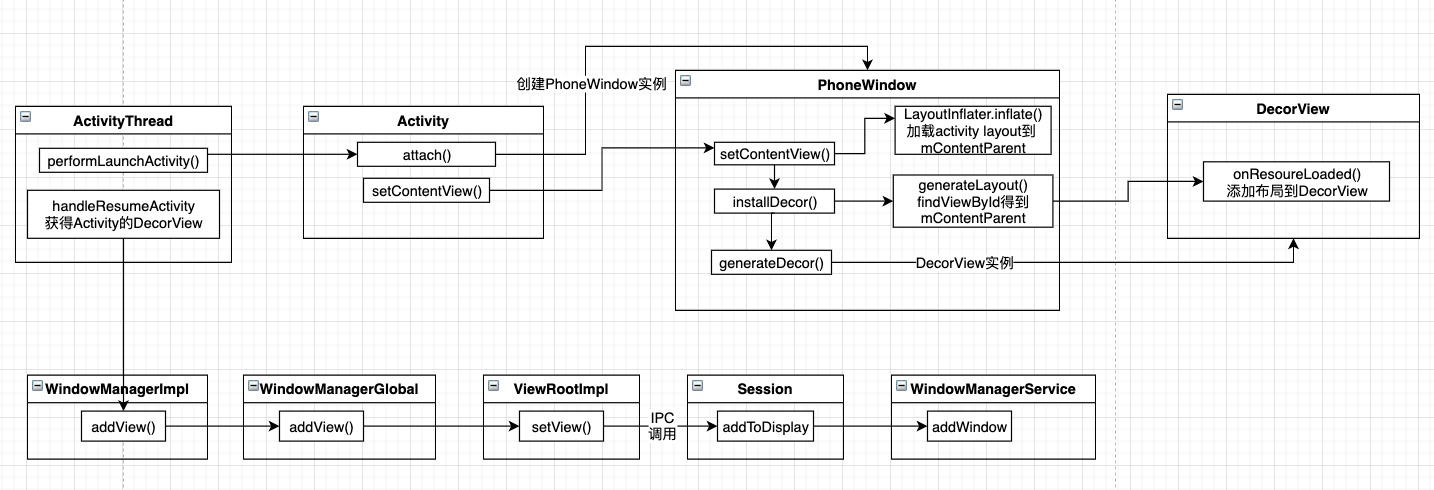
可以看到先获取了Activity,然后获取了Activity关联的Window,然后通过Window获取了DecorView和WindowManager,最后通过WindowManager的addView方法将DecorView添加进去,结合WindowMananger添加Window的流程,DecorView就被添加到Window上了。 Activity的Window的新建和添加大致流程如下图:
Window的删除流程
Window的删除流程和添加流程类似。也是通过WindowManager调用WindowManagerGlobal类中的方法removeView,然后调用到removeViewLocked方法:
public void removeView(View view, boolean immediate) {
        if (view == null) {
            throw new IllegalArgumentException("view must not be null");
        }

        synchronized (mLock) {
            int index = findViewLocked(view, true);
            View curView = mRoots.get(index).getView();
            removeViewLocked(index, immediate);
            if (curView == view) {
                return;
            }

            throw new IllegalStateException("Calling with view " + view
                    + " but the ViewAncestor is attached to " + curView);
        }
}

private void removeViewLocked(int index, boolean immediate) {
        ViewRootImpl root = mRoots.get(index);
        View view = root.getView();

        if (view != null) {
            InputMethodManager imm = view.getContext().getSystemService(InputMethodManager.class);
            if (imm != null) {
                imm.windowDismissed(mViews.get(index).getWindowToken());
            }
        }
        boolean deferred = root.die(immediate);
        if (view != null) {
            view.assignParent(null);
            if (deferred) {
                mDyingViews.add(view);
            }
        }
}
removeViewLocked方法里面会调用到ViewRootImpl 的 die 方法:
/**
     * @param immediate True, do now if not in traversal. False, put on queue and do later.
     * @return True, request has been queued. False, request has been completed.
     */
    boolean die(boolean immediate) {
        // Make sure we do execute immediately if we are in the middle of a traversal or the damage
        // done by dispatchDetachedFromWindow will cause havoc on return.
        if (immediate && !mIsInTraversal) {
            doDie();
            return false;
        }

        if (!mIsDrawing) {
            destroyHardwareRenderer();
        } else {
            Log.e(mTag, "Attempting to destroy the window while drawing!\n" +
                    "  window=" + this + ", title=" + mWindowAttributes.getTitle());
        }
        mHandler.sendEmptyMessage(MSG_DIE);
        return true;
    }
这里传入了一个immediate 参数,代表是否是立即移除,如果是并且没有进入View流程(测量、布局、绘制)的话,就执行doDie 这个方法,如果不是立即执行,则发送一个MSG_DIE的消息,最终也会调用到doDie方法:
void doDie() {
        checkThread();
        if (LOCAL_LOGV) Log.v(mTag, "DIE in " + this + " of " + mSurface);
        synchronized (this) {
            if (mRemoved) {
                return;
            }
            mRemoved = true;
            if (mAdded) {
                dispatchDetachedFromWindow();
            }

            if (mAdded && !mFirst) {
                destroyHardwareRenderer();

                if (mView != null) {
                    int viewVisibility = mView.getVisibility();
                    boolean viewVisibilityChanged = mViewVisibility != viewVisibility;
                    if (mWindowAttributesChanged || viewVisibilityChanged) {
                        // If layout params have been changed, first give them
                        // to the window manager to make sure it has the correct
                        // animation info.
                        try {
                            if ((relayoutWindow(mWindowAttributes, viewVisibility, false)
                                    & WindowManagerGlobal.RELAYOUT_RES_FIRST_TIME) != 0) {
                                mWindowSession.finishDrawing(mWindow);
                            }
                        } catch (RemoteException e) {
                        }
                    }

                    destroySurface();
                }
            }

            mAdded = false;
        }
        WindowManagerGlobal.getInstance().doRemoveView(this);
    }
doDie方法里会调用到dispatchDetachedFromWindow 这个方法:
void dispatchDetachedFromWindow() {
        mFirstInputStage.onDetachedFromWindow();
        if (mView != null && mView.mAttachInfo != null) {
            mAttachInfo.mTreeObserver.dispatchOnWindowAttachedChange(false);
            mView.dispatchDetachedFromWindow();
        }

        mAccessibilityInteractionConnectionManager.ensureNoConnection();
        mAccessibilityManager.removeAccessibilityStateChangeListener(
                mAccessibilityInteractionConnectionManager);
        mAccessibilityManager.removeHighTextContrastStateChangeListener(
                mHighContrastTextManager);
        removeSendWindowContentChangedCallback();

        destroyHardwareRenderer();

        setAccessibilityFocus(null, null);

        mView.assignParent(null);
        mView = null;
        mAttachInfo.mRootView = null;

        destroySurface();

        if (mInputQueueCallback != null && mInputQueue != null) {
            mInputQueueCallback.onInputQueueDestroyed(mInputQueue);
            mInputQueue.dispose();
            mInputQueueCallback = null;
            mInputQueue = null;
        }
        if (mInputEventReceiver != null) {
            mInputEventReceiver.dispose();
            mInputEventReceiver = null;
        }
        try {
            mWindowSession.remove(mWindow);
        } catch (RemoteException e) {
        }

        // Dispose the input channel after removing the window so the Window Manager
        // doesn't interpret the input channel being closed as an abnormal termination.
        if (mInputChannel != null) {
            mInputChannel.dispose();
            mInputChannel = null;
        }

        mDisplayManager.unregisterDisplayListener(mDisplayListener);

        unscheduleTraversals();
    }
这个方法里面首先做了一些移除回调、引用置空、View的回收工作,然后调用Binder对象的remove方法进行IPC调用,最终会调用到WindowManagerService的removeWindow方法,将remove的工作交给了WindowManagerService。
Window的更新流程
Window的更新流程同样也是从WindowMananger调用WindowManagerGlobal 中的updateViewLayout方法开始的:
public void updateViewLayout(View view, ViewGroup.LayoutParams params) {
        if (view == null) {
            throw new IllegalArgumentException("view must not be null");
        }
        if (!(params instanceof WindowManager.LayoutParams)) {
            throw new IllegalArgumentException("Params must be WindowManager.LayoutParams");
        }

        final WindowManager.LayoutParams wparams = (WindowManager.LayoutParams)params;

        view.setLayoutParams(wparams);

        synchronized (mLock) {
            int index = findViewLocked(view, true);
            ViewRootImpl root = mRoots.get(index);
            mParams.remove(index);
            mParams.add(index, wparams);
            root.setLayoutParams(wparams, false);
        }
}
接着调用到ViewRootImpl的setLayoutParams方法:
void setLayoutParams(WindowManager.LayoutParams attrs, boolean newView) {
        synchronized (this) {
            ...
            scheduleTraversals();
        }
    }

void scheduleTraversals() {
        if (!mTraversalScheduled) {
            mTraversalScheduled = true;
            mTraversalBarrier = mHandler.getLooper().getQueue().postSyncBarrier();
            mChoreographer.postCallback(
                    Choreographer.CALLBACK_TRAVERSAL, mTraversalRunnable, null);
            if (!mUnbufferedInputDispatch) {
                scheduleConsumeBatchedInput();
            }
            notifyRendererOfFramePending();
            pokeDrawLockIfNeeded();
        }
    }

final class TraversalRunnable implements Runnable {
        @Override
        public void run() {
            doTraversal();
        }
    }
    final TraversalRunnable mTraversalRunnable = new TraversalRunnable();
void doTraversal() {
    if (mTraversalScheduled) {
        mTraversalScheduled = false;
        mHandler.getLooper().getQueue().removeSyncBarrier(mTraversalBarrier);

        if (mProfile) {
            Debug.startMethodTracing("ViewAncestor");
        }

        performTraversals();

        if (mProfile) {
            Debug.stopMethodTracing();
            mProfile = false;
        }
    }
}
这里可以看到在updateViewLayout方法里将一个Runnable作为回调,设置给了Choreographer,这个类会接收一些底层的渲染控制信号,在下一帧渲染时执行回调,最终会调用到doTraversal,这个方法会调用到performTraversals方法,这个方法里会发起我们熟悉的View流程(测量、布局、绘制),同时会调用到relayoutWindow 方法。在这个方法里通过调用Binder对象的relayout方法,通过IPC调用将更新操作交给了WindowManagerService。
private int relayoutWindow(WindowManager.LayoutParams params, int viewVisibility,
            boolean insetsPending) throws RemoteException {

        ...

        int relayoutResult = mWindowSession.relayout(mWindow, mSeq, params,
                (int) (mView.getMeasuredWidth() * appScale + 0.5f),
                (int) (mView.getMeasuredHeight() * appScale + 0.5f), viewVisibility,
                insetsPending ? WindowManagerGlobal.RELAYOUT_INSETS_PENDING : 0, frameNumber,
                mTmpFrame, mPendingOverscanInsets, mPendingContentInsets, mPendingVisibleInsets,
                mPendingStableInsets, mPendingOutsets, mPendingBackDropFrame, mPendingDisplayCutout,
                mPendingMergedConfiguration, mSurfaceControl, mTempInsets);
        ...
        return relayoutResult;
    }
总结
由此Window的三个流程就介绍完了。Window的工作流程都是从View的增删改开始,将工作通过WindowManager传递给WindowManagerGlobal,然后传递给ViewRootImpl,然后通过IPC调用最终交给WindowManagerService,让它完成相应的操作。其中ViewRootImpl扮演十分重要的角色,它不光负责和WindowManagerService通信,同时还触发View的三大流程。真正的渲染和显示是交给WindowManagerService来管理了。我们不难发现,Window的工作其实是一种C/S架构。
