

多线程的优势
使用多线程,可以将原本需要串行执行的程序转化为并发执行,并发执行的意思并不是几个线程会同时执行,只不过cpu会在几个线程之间快速来回切换,在一段时间内同时执行几个不同的任务,所以在感觉上好像多个线程是同时运行的;然而在现代多核心的计算机上,每个核心可以单独执行任务,不同核心上的线程是真正的并行执行的;
创建多线程的三种方式
继承Thread类并重写run方法
package com.example.demo;

public class ThreadDemo1 extends Thread{

    @Override
    public void run() {
        System.out.println("子线程:" + currentThread().getName() + "开始执行");
        for (int i = 0; i < 100; i++){
            System.out.println(i);
        }
    }
}

public class MainClass {
    public static void main(String[] args) {
        System.out.println("主线程:" + Thread.currentThread().getName() + "开始执行");
        /** 继承Thread类创建子线程 */
        ThreadDemo1 threadDemo1 = new ThreadDemo1();
        threadDemo1.start();
    }
}
实现Runnable接口重写run方法
package com.example.demo;

public class ThreadDemo2 implements Runnable{

    @Override
    public void run() {
        System.out.println("子线程:" + Thread.currentThread().getName() + "开始执行");
        for (int i = 0; i < 100; i++){
            System.out.println(i);
        }
    }
}

public class MainClass {
    public static void main(String[] args) {
        System.out.println("主线程:" + Thread.currentThread().getName() + "开始执行");
        /** 实现Runnable接口创建子线程 */
        ThreadDemo2 threadDemo2 = new ThreadDemo2();
        new Thread(threadDemo2).start();
    }
}
使用静态内部类
package com.example.demo;

public class ThreadDemo3 {
    public static void main(String[] args) {
        new Thread(new Runnable() {
            @Override
            public void run() {
                System.out.println("子线程:" + Thread.currentThread().getName() + "开始执行");
                for (int i = 0; i < 100; i++){
                    System.out.println(i);
                }
            }
        }).start();
    }
}

public class MainClass {
    public static void main(String[] args) {
        System.out.println("主线程:" + Thread.currentThread().getName() + "开始执行");
        /** 匿名内部类创建子线程 */
        new Thread(new Runnable() {
            @Override
            public void run() {
                System.out.println("子线程:" + Thread.currentThread().getName() + "开始执行");
                for (int i = 0; i < 100; i++){
                    System.out.println(i);
                }
            }
        }).start();
    }
}
不管是哪种方式创建的线程,最终线程的运行都需要调用Thread类的start方法,下面看一下start源码,看线程到底是怎么被运行起来的:
/**
     * Causes this thread to begin execution; the Java Virtual Machine
     * calls the <code>run</code> method of this thread.
     * <p>
     * The result is that two threads are running concurrently: the
     * current thread (which returns from the call to the
     * <code>start</code> method) and the other thread (which executes its
     * <code>run</code> method).
     * <p>
     * It is never legal to start a thread more than once.
     * In particular, a thread may not be restarted once it has completed
     * execution.
     *
     * @exception  IllegalThreadStateException  if the thread was already
     *               started.
     * @see        #run()
     * @see        #stop()
     */
    public synchronized void start() {
        /**
         * This method is not invoked for the main method thread or "system"
         * group threads created/set up by the VM. Any new functionality added
         * to this method in the future may have to also be added to the VM.
         *
         * A zero status value corresponds to state "NEW".
         */
        if (threadStatus != 0)
            throw new IllegalThreadStateException();

        /* Notify the group that this thread is about to be started
         * so that it can be added to the group's list of threads
         * and the group's unstarted count can be decremented. */
        group.add(this);

        boolean started = false;
        try {
            start0();
            started = true;
        } finally {
            try {
                if (!started) {
                    group.threadStartFailed(this);
                }
            } catch (Throwable ignore) {
                /* do nothing. If start0 threw a Throwable then
                  it will be passed up the call stack */
            }
        }
    }

    private native void start0();
上述start方法的注释很好的解析了线程是怎么被运行起来的,翻译过来就是:该方法将使线程开始执行;java虚拟机会调用这个线程的run方法。结果会使调用这个start方法的线程和运行这个run方法的线程并发执行。
同时该段代码中的相关注释信息还告诉我们这样一些事实:
- It is never legal to start a thread more than once 一个线程决不能被start一次以上
- A zero status value corresponds to state "NEW" 能够start的线程状态必须为0(
只有新建态的线程才能被运行),否则会抛出IllegalThreadStateException
线程生命周期
线程从创建、运行到结束总是处于5个状态:新建、就绪、运行、阻塞、死亡
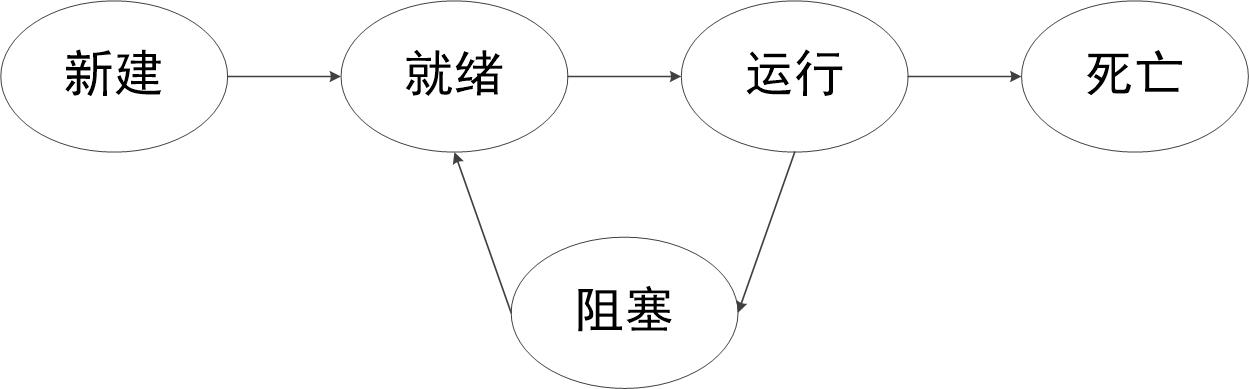
- 新建状态: 当使用new操作符新建一个Thread对象时,线程就处于新建状态
- 就绪状态: 当调用了start方法之后线程就处于就绪状态;就绪状态的线程并不会马上运行run方法,它还需要获得cpu的调度
- 运行状态:当就绪态的线程获得cpu时间片时,线程的状态就变成运行态
- 阻塞状态:线程在运行过程中可能会由于各种原因导致变成阻塞态:线程执行了sleep方法;正在试图获取被别的线程占有的锁;等待某个触发条件
- 死亡状态:当线程运行结束或在运行过程中遇到没有捕获的异常时就会导致线程终止
