

引言
App的分享功能一般都会有屏幕截图分享。一般Flutter的截图功能都是通过RepaintBoundary来实现的,具体实现很简单,这里不做阐述。本文章主要讲两点:长截图及图片拼接。
1.长截图
实际需求中,需要截图的区域可能会超过一屏,即需要长截图。这个区域一般嵌套在可滚动容器中,例如SingleChildScroolView等。
如果我们直接在滚动容器外层套上RepaintBoundary,例如:
RepaintBoundary(
  key: key ,
  child: SingleChildScrollView(
    child: Column(
      children:[
            widget1,
            widget2,
            widget3,
            ...
            ]
            ),
          ),
        );
获取到截图就会发现:截图仅有当前屏幕上正在显示的区域!
原因其实很简单:RepaintBoundary会测量直接子widget的宽高,而此时它的直接子widget(例子中的SingleChildScrollView)的最大宽高就是屏幕宽高。
解决方法也很简单:把RepaintBoundary套在真正要截的外层,一般就是Column(这个widget的宽高就是我们实际想截的宽高)。上面的例子就要改成:
SingleChildScrollView(
  child: RepaintBoundary(
    key: key ,
    child: Column(
      children:[
            widget1,
            widget2,
            widget3,
            ...
            ]
            ),
          ),
        );
还需要注意的一点是,如果页面背景颜色设置在RepaintBoundary外层,那么截图到的图片是透明背景的,此时就需要在内层设置一下背景颜色了。
2.图片拼接
上面长截图的理想情况是SingleChildScrollView这种允许我们在child套一层RepaintBoundary,但实际中也可能是CustomScrollView这种严格限制children类型的,此时我们可能就需要借助类似SliverToBoxAdapter这种容器,并且在每个child上都套一个RepaintBoundary,例如:
CustomScrollView(
          slivers: <Widget>[
            ///appbar
            SliverAppBar(
              flexibleSpace: RepaintBoundary(
                key: key,
                child: FlexibleSpaceBar(... ),
              ),
            ),
            ///内容
            SliverToBoxAdapter(
              child: RepaintBoundary(
                key: key2,
                child:Column(...)
                )
            ),
          ],
        )
但是这样就变成一小块区域一张截图了。或者,实际业务中很多都会要求在截图的底部拼接推广内容,比如二维码等。这些情况就要求我们进行图片拼接了。
对于图片拼接,我的实现思路是:使用paint,控制不同图片的位置,然后在canvas上绘制出来,最后再输出图片。
其中的要点有:
- 根据各个需要拼接的图片的宽高计算最大宽/高
- 如果要支持横向和纵向排列,还需要确定方向
- 图片之间可能宽高不同,需要缩放以保持一致(竖向排列宽度要一致,横向排列高度要一致)
具体实现如下:
(1) 确定开放给外界传入的参数。 imageList图片list(必传)、direction方向、fit是否缩放以保持一致。
(2) 计算最大图片宽/高。 遍历imageList,判断direction,若纵向则取最大图片宽作为maxWidth;若横向则取最大图片高作为maxHeight。
 ///计算最大图片宽/高
 int maxWidth = 0;
 int maxHeight = 0;
 imageList.forEach((image) {
      if (direction == Axis.vertical) {
        if (maxWidth < image.width) maxWidth = image.width;
      } else {
        if (maxHeight < image.height) maxHeight = image.height;
      }
    });
///建立变量记录总高及总宽
int totalHeight = maxHeight;
int totalWidth = maxWidth;
(3)初始化绘制控件。
    ui.PictureRecorder recorder = ui.PictureRecorder();
    final paint = Paint();
    Canvas canvas = Canvas(recorder);
(4)根据是否fit进行具体绘制。 若fit,需要缩放canvas以匹配宽/高,并记录坐标点
  double dx = 0;
  double dy = 0;
    //draw images into canvas
    imageList.forEach((image) {
      double scaleDx = dx;
      double scaleDy = dy;
      double imageHeight = image.height.toDouble();
      double imageWidth = image.width.toDouble();
      if (fit) {
        //scale the image to same width/height
        canvas.save();
        if (direction == Axis.vertical && image.width != maxWidth) {
          canvas.scale(maxWidth / image.width);
          scaleDy *= imageWidth/maxWidth;
          imageHeight *= maxWidth/imageWidth;
        } else if (direction == Axis.horizontal && image.height != maxHeight) {
          canvas.scale(maxHeight / image.height);
          scaleDx *= imageHeight/maxHeight;
          imageWidth *= maxHeight/imageHeight;
        }
        canvas.drawImage(image, Offset(scaleDx, scaleDy), paint);
        canvas.restore();
      } else {
        //draw directly
        canvas.drawImage(image, Offset(dx, dy), paint);
      }
      //accumulate dx/dy
      if (direction == Axis.vertical) {
        dy += imageHeight;
        totalHeight += imageHeight.floor();
      } else {
        dx += imageWidth;
        totalWidth += imageWidth.floor();
      }
    });
(5)输出image。 默认格式为ui.Image,若需要Uint8List或File等,需要自己转换。
return recorder.endRecording().toImage(totalWidth, totalHeight);
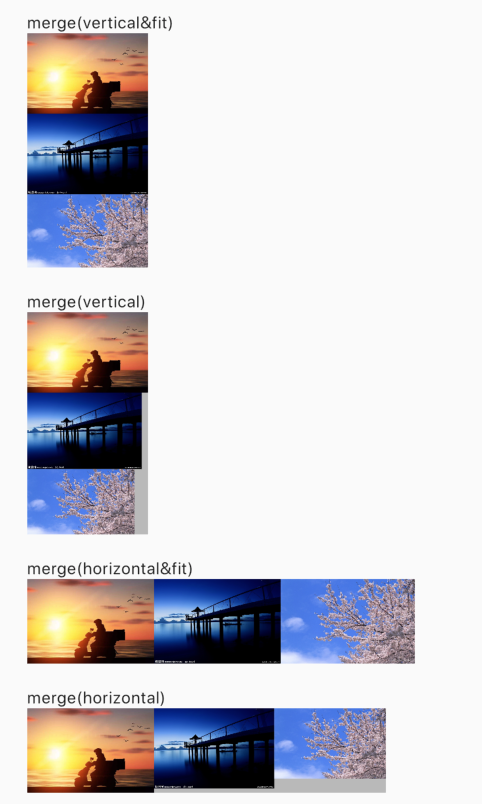
效果预览:
图片拼接的控件已经传到pub市场:merge_images, 里面附带了一些图片格式的转换及直接使用widget显示的功能,有需要的可以使用。
