今天笔者用这篇文章带领大家复习一下 发布订阅模式
这时候就可能有朋友会说

当然不行!

不然不就还没开始就结束了?
好吧,皮这一下也还蛮开心的,接下来就进入正题把!
介绍
相信我们很多人都使用过 vue 这个框架,也使用过它的一种跨组件通信方案 EventBus (事件总线)。
没用过也没关系。其实它也就 3 个常用 API。
@on(event: string, cb: function)监听@emit(event: string, ...args: any[])触发@off(event, cb: function)解除监听
我要介绍 EventBus 不是因为要使用它解决我们的浏览器 tab 页通信,而是接下来我们要使用它的这个使用方法去实现我们的通信!
初步代码编成
talk is cheap, show me the code

一开始是采用类的方式在项目中简单的实现了一下这个机制
这里笔者利用了 localStorage 触发更新的功能去实现了发布订阅机制,但是受限于这个 API,只能做同源的通信,同 tab 更新也不会触发相应的监听事件。
我们绑定的监听函数只有一个,但是每次触发的时候都去看看有没有相对应的监听的 event 被触发,触发了就找出相应的 cb进行回调
/**
 * 事件总线
 * 基于 postMessage 设计,目的是解决多 tab 之间通信
 */

class EventBus {
  constructor() {
    // 初始化订阅事件对象
    this.subscribes = {};

    window.addEventListener('storage', this.handlerMethod.bind(this));
  }

  handlerMethod(e) {
    const {key: event, newValue} = e;

    // localStorage 没字段,或者没订阅就直接返回
    if (!localStorage.getItem(event) || !this.subscribes[event]) return;

    // 删除也会触发
    if (!newValue) return;

    let data = null;

    try {
      data = JSON.parse(newValue);
    } catch (error) {
      console.log('this is a error in data parse');
    }

    this.subscribes[event].forEach(cb => {
      cb && cb(data);
    });
  }

 // 监听
  on(event, cb) {
    this.subscribes[event] = (this.subscribes[event] || []).concat(cb);
    localStorage.setItem(event, 'init');
  }

 // 监听一次
  once(event, cb) {
    const fun = () => {
      cb && cb();
      this.off(event, fun);
    };
    this.on(event, fun);
  }

  // 删除
  off(event, callback) {
    (this.subscribes[event] || []).forEach((cb, i) => {
      if (cb === callback) {
        this.subscribes[event].splice(i, 1);
        localStorage.removeItem(event);
      }
    });
  }

  offAll() {
    Object.keys(this.subscribes).forEach(event => {
      delete this.subscribes[event];
      localStorage.removeItem(event);
    });
  }

  /* eslint-disable */
  emit(event, payload) {
    // 如果只是单纯触发,不传参数的话,给个随机数
    localStorage.setItem(event, payload ? JSON.stringify(payload) : Math.random());
  }
  /* eslint-enable */
}

export default {
  install(Vue) {
    Vue.prototype.$eventBus = new EventBus();
  },
};
使用
上面的代码已经可以直接在项目中使用了
in your project main.js
import Vue from 'vue'
import eventBut from './my-eventBus';

Vue.use(eventBut)

function cb(...args) {
    console.log(args)
}

<!-- 监听事件 -->
Vue.$eventBus.on('someEvent', cb)

<!-- 触发事件 -->
Vue.$eventBus.emit('someEvent', 'hello')
enhance 加强
其实上面的东西已经满足需求了,但是生命不息,折腾不止~
不能到处复制粘贴对吧!?
所以我把它封装📦成了一个 npm 包
// yarn add enhance-eventbus or npm i -S enhance-eventbus
使用起来也是很方便的,压缩过后的代码,才 1kb, ts 项目的话,还有相应的 API 提示呢~
// in the main.js
import enhanceEventbus from "enhance-eventbus"
import Vue from "vue"

Vue.use(enhanceEventbus, {
  type: "storage",
  globalKey: "$eventBus" // 这里配置的是 vue.prototype 挂载的属性名叫什么
})

// and then you can use it by the gloalKey that your define

new Vue({

  mounted() {
    this.$eventBus.on('someEvent', (data) => {
      // ...to do sth
    })

    this.$eventBus.emit('someEvent', data)
  }
})
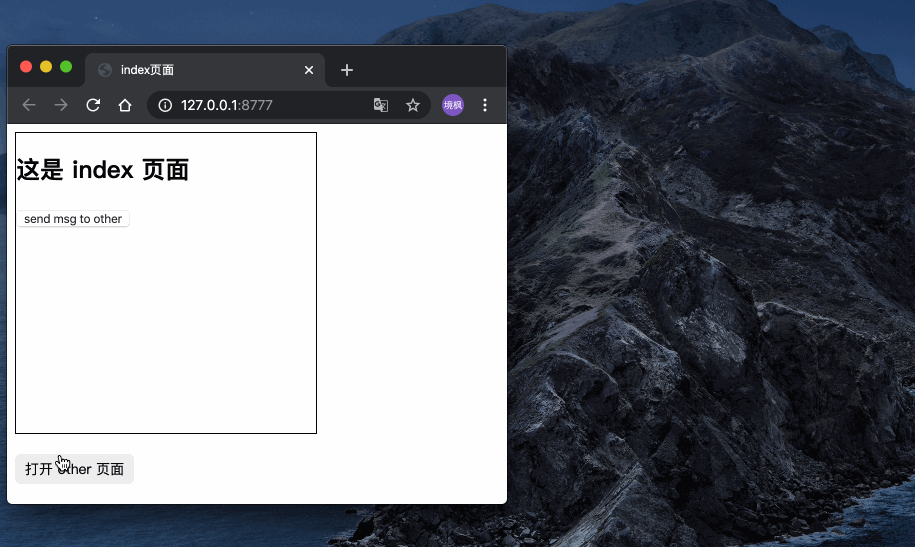
最后我们来看看使用例子~~
然后,恬不知耻的求个 star github.com/cjfff/enhan…