
前言
本文是对上篇cli的完善
本篇文章对应的项目地址: (github.com/DIVINER-onlys/…)
首先献上整个实现的流程图,我们看着流程图来一步一步实现
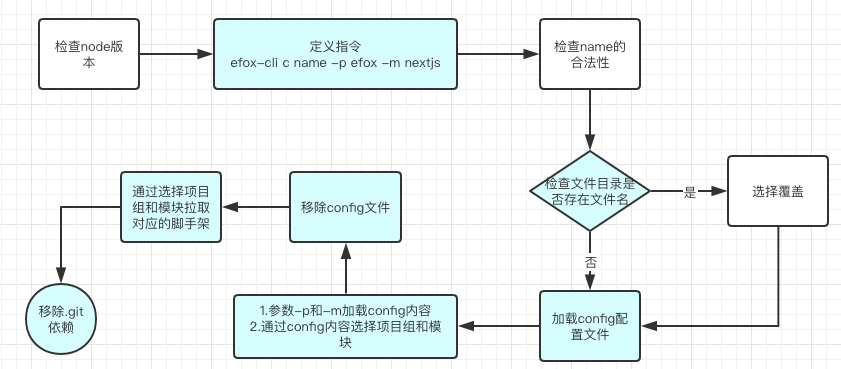
定义指令,我们将继续下面的流程

1. 检查name的合法性
在上篇文章中,我们在create指令下注释掉了这个逻辑,现在需要调用这个方法
// bin/efox.js

// 下面这个逻辑后面会说
// require('../lib/create')(name, options)
关于name的合法性我们用到validate-npm-package-name,执行
npm i validate-npm-package-name
新建 lib/create.js文件
// lib/create.js

const validateAppName = require('validate-npm-package-name') // 检查名字是否合法

async function create(appName, options) {
    let name = appName || 'efox'

  // 验证项目名称合法性
  const result = validateAppName(name)
  if (!result.validForNewPackages) {
    console.error(chalk.red(`非法的项目名: ${name}`))
    result.errors && result.errors.forEach(err => console.error(chalk.red.dim(`Error: ${err}`)))
    result.warnings && result.warnings.forEach(warn => console.warn(chalk.yellow.dim(`Warnings: ${warn}`)))
    exit('命名非法')
    process.exit(1)
  }
}
function exit(err) {
  console.log(`${chalk.red('运行错误!❌ 终止运行!')}`)
  console.log(`${chalk.white(err)}`)
}
当我们输入非法项目名时,提示错误并退出程序运行

2. 检查文件目录是否存在文件名
判断文件名用到 fs-extra',执行npm i fs-extra
为了能在命令行中进行交互使用inquirer,执行npm i inquirer
// lib/create.js

const fs = require('fs-extra')  // fs-extra是fs的一个扩展
const inquirer = require('inquirer') // 命令行交互行工具
const cwd = typeof process.cwd === 'function' ? process.cwd() :  process.cwd // 当前工作路径
const targetDir = path.resolve(cwd, name)  // 目标路径
// 存在同名目录
  if (fs.existsSync(targetDir)) {
    // 强制生成则直接删除原有目录
    if (options.force) {
      await fs.remove(targetDir)
    } else {
      const { action } = await inquirer.prompt([
        {
          name: 'action',
          type: 'list',
          message: `使用的项目名 ${chalk.cyan(targetDir)} 已存在。 选择以下操作:`,
          choices: [
            {
              name: '覆写',
              value: 'overwrite'
            },
            // {
            //   name: '合并',
            //   value: 'merge'
            // },
            {
              name: '取消',
              value: false
            }
          ]
        }
      ])
      if (!action) {
        return
      } else if (action === 'overwrite') {
        console.log(`\n${chalk.green('删除')} ${chalk.cyan(targetDir)}\n`)
        await fs.remove(targetDir)
      }
    }
  }

  // 下面开始加载config配置文件
  // const creator = new Creator(name, targetDir, path.resolve(cwd))
  // await creator.create(options)
若存在同名文件夹,则选择文件操作

3. 加载config配置文件
为能运行git命令,安装git-promise, 执行 npm i git-promise
新建 lib/Creator.js 文件
// lib/Creator.js

const git = require('git-promise') // 运行git命令

async getConfig(localPath, projectName) {
    // Efox/cli 脚手架模板库地址
    const httpPath = `https://github.com/DIVINER-onlys/efox-cli-config.git`
    return downloadRepo(httpPath, localPath, projectName, '')
  }

async function downloadRepo(repoPath, localPath, appName, branch) {
  const _branch = branch ? `-b ${branch} --` : '--'
  const _repoPath = `clone ${_branch} ${repoPath} ${localPath}`
  // console.log('\ngit:', _repoPath)
  return git(_repoPath)
}
接下来调用getConfig 方法就能加载到我们的config配置文件,到这里应该有同学知道后续也是同样的操作,从github上加载对应的文件

4. 通过config内容选择项目
// lib/Creator.js

const ora = require('ora') // 实现node.js命令行环境的loading效果,和显示各种状态的图标等
const inquirer = require('inquirer')
const fs = require('fs')

async create(cliOptions = {}, preset = null) {
    // console.log('开始', cliOptions, this.context, this.name, this.cwd)
    const spinner = ora('加载efox-cli-config配置文件').start()
    const params = await this.getConfig(this.context, this.name).then(
      async log => {
        const res = fs.readFileSync(`${this.context}/config.json`, 'utf8')
        spinner.succeed('efox-cli-config配置文件加载完成')
        const config = JSON.parse(res)
        let selectData = {}
        if(cliOptions.project) {
          if (!config.modules[cliOptions.project]) {
            logger.info(`你所选项目组 ^^${cliOptions.project}^^ 不存在任何模板,请重新选择`)
            selectData = await this.selectProject(config, true)
          }
        } else {
          selectData = await this.selectProject(config)
        }

        return {
          project: selectData.project,
          module: selectData.module,
          localPath: this.context,
          projectName: this.name
        }
      }
    )
  }

  async selectProject(moduleConfig, isAgain) {
    const res = await inquirer.prompt([
      {
        name: 'project',
        type: 'list',
        message: `${isAgain !== undefined ? '重新':''}选择模板所在的项目组:`,
        choices: [...moduleConfig.projects]
      }
    ]).then(async answers => {
      const { project } = answers
      return { project }
    })
    return res
  }

5. 移除config文件
我们已经从config文件中获取到需要的数据,这时候需要把config文件夹移除,执行npm i shelljs
// lib/Creator.js

const shell = require('shelljs')
const { project, module, localPath, projectName } = params  // params是上面返回的
shell.rm('-rf', path.join(localPath))
6. 通过选择项目拉取对应的脚手架 并且 移除.git依赖
执行 npm i simple-git
// lib/Creator.js

spinner.start('开始加载模板文件')
await this.getBaseProject(localPath, project, module)
const git = require('simple-git')(localPath)
git.pull('origin', 'master', (err, result) => {
  if (!err) {
    shell.rm('-rf', path.join(localPath, '.git'))
    spinner.succeed('加载模板文件完成')
  }
})

async getBaseProject(localPath, project, module) {
    const httpPath = `https://github.com/DIVINER-onlys/${project}.git`
    return downloadRepo(httpPath, localPath, project, '')
  }
执行 efox-cli c snn,就能拉取对应的脚手架了


最后
- npm login
- npm publish 可以发布自己的npm包
如果本文对你有帮助的话,给本文点个赞吧