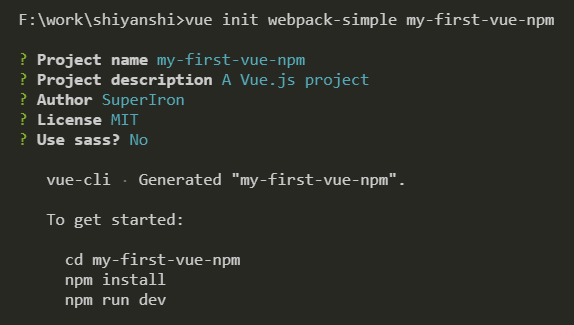
1、使用 vue init 初始化项目
我用的是webpack-simple模板,目的是为了缩小包体。
vue init webpack-simple my-first-vue-npm
如果没有全局安装@vue/cli-init,还需要先安装@vue/cli-init
npm install -g @vue/cli-init
// or
yarn global add @vue/cli-init
安装完@vue/cli-init之后后,重新执行vue init,填写项目信息。因为我用习惯less,这里就不安装sass。

“无脑三连”启动项目,项目初始化完成。
cd my-first-vue-npm
npm install
npm run dev
2、创建 vue 组件
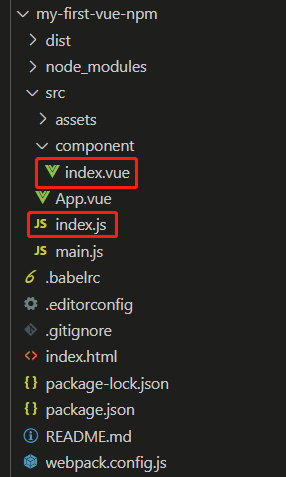
新建/src/component/index.vue跟/src/index.js两个文件

/src/component/index.vue:按普通 vue 组件编写即可
<template>
  <div>
    my-first-vue-npm
  </div>
</template>

<script>
  export default {};
</script>
/src/index.js:将编写 vue 的 vue 组件导出
import MyFirstVueNpm from "./component";

export default MyFirstVueNpm;
修改app.vue,主要是用于dev环境调试,当然不改也是可以的。
<template>
  <div id="app">
    <MyFirstVueNpm />
  </div>
</template>

<script>
  import MyFirstVueNpm from "./component";

  export default {
    name: "app",

    components: {
      MyFirstVueNpm
    }
  };
</script>
3、修改 webpack.config.js
需要做三件事情:
- 修改入口文件,根据环境选择不同的入口文件;
- 设置打包格式为
UMD,UMD模式是一种兼容模式,可同时以AMD、CommonJS和globals形式输出,这里可以回顾一下UMD的模块定义:
(function(root, factory) {
  if (typeof define === "function" && define.amd) {
    // AMD. Register as an anonymous module.
    define(["b"], factory);
  } else if (typeof module === "object" && module.exports) {
    // Node. Does not work with strict CommonJS, but
    // only CommonJS-like environments that support module.exports,
    // like Node.
    module.exports = factory(require("b"));
  } else {
    // Browser globals (root is window)
    root.returnExports = factory(root.b);
  }
})(this, function(b) {
  //use b in some fashion.

  // Just return a value to define the module export.
  // This example returns an object, but the module
  // can return a function as the exported value.
  return {};
});
- 剔除通用包,比如我写的是
vue组件,那么引用之前就必须引入vue.js,所以我们可以在externals属性里面剔除vue。
module.exports = {
  entry:
        process.env.NODE_ENV == "development"
            ? "./src/main.js"
            : "./src/index.js",
    output: {
        path: path.resolve(__dirname, "./dist"),
        publicPath: "/dist/",
        filename: "my-first-vue-npm.min.js",
        libraryTarget: "umd",
        umdNamedDefine: true // 给 AMD 模块命名,否则匿名
    },
    externals: {
        vue: "vue"
    },
    ...
}
4、修改 package.json
- 为
package.json添加属性main,main属性指定了程序的主入口文件,可以引用的时候简化,例如原本需要require("my-first-vue-npm/dist/my-first-vue-npm.min.js"),现在只需要写成require("my-first-vue-npm"); - 将
private设置为 false,否则发布npm会失败。
"main": "dist/my-first-vue-npm.min.js",
"private": false,
5、发布到 npm
- 先打包
npm run build一下; - 创建
/.npmignore文件,忽略源文件以及配置文件等:
.*
/node_modules
/src
package-lock.json
webpack.config.js
index.html
- 到npm创建一个账号;
- 需要查询包名是否已存在,发布到
npm:
// 如果之前设置过淘宝镜像,则需要设置回来
npm config set registry https://registry.npmjs.org/
// 登录npm,然后输入账号密码
npm login
// 发布包,每次发布都需要更改package.json里的version
npm publish
// 删除包
npm unpublish
至此将vue组件发布到npm就完成了,下面是如何调用,当然只是列举了其中一种。
6、调用
<template>
	<div id="app">
		<MyFirstVueNpm />
	</div>
</template>

<script>
import MyFirstVueNpm from "my-first-vue-npm";

export default {
	name: "App",

	components: {
		MyFirstVueNpm
	}
};
</script>
7、示例
最后提一下我最近发的npm包,这是一个基于Vue.js设置移动端h5显示方向(横屏或者竖屏)的vue组件,有兴趣可以了解下www.npmjs.com/package/vue…。