

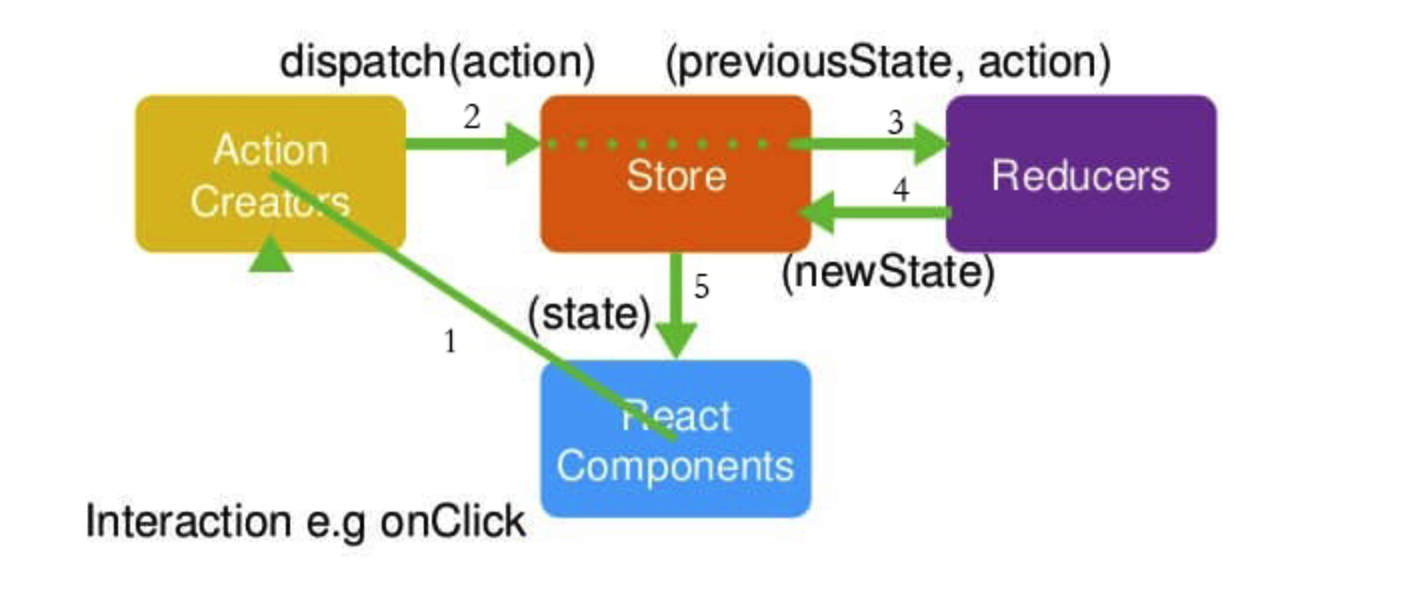
Store:整个应用的数据存储中心,集中大部分页面需要的状态数据; ActionCreators:view 层与data层的介质; Reducer:接收action并更新Store。
所以流程是用户通过界面组件触发ActionCreator,携带Store中的旧State与Action流向Reducer,Reducer返回新的state,并更新界面。
- react中使用方式
首先我们要安装一下库:
npm install  redux --save
npm install react-redux --save
npm install redux-thunk --save
对于稍微复杂的页面都会是将store分解到各个组件中,所以基本是总的store用来汇总所有 "子store" 中的reducers.然后组件用来触发 对应"子store"的actionCreator.
1、首先,我们要完成 数据流从 store -》 component 这一步。因为我们已经装好了react-redux, 可以在项目的index.js里面包裹一下, 这时state就可以传递给所有组件。
//redux
import {Provider} from 'react-redux'
import store from './store'
//css
import './common/frame.scss'

ReactDOM.render(
    (
        <Provider store={store}>
            <App/>
        </Provider>
    ),
    document.getElementById('root')
);
总store:
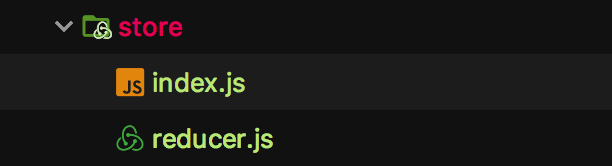
// index.js
import {createStore, applyMiddleware, compose} from 'redux'
import reducer from './reducer'
import thunk from 'redux-thunk'

// 这里让项目支持浏览器插件Redux DevTools
const composeEnhancers = typeof window === 'object' &&
window.__REDUX_DEVTOOLS_EXTENSION_COMPOSE__ ?
    window.__REDUX_DEVTOOLS_EXTENSION_COMPOSE__({}) : compose;

const enhancer = composeEnhancers(
    applyMiddleware(thunk)
);

const store = createStore(
    reducer,
    enhancer
);

export default store
// reducer.js
import { combineReducers } from 'redux-immutable'

import {reducer as loginReducer} from '../pages/login/store'

const reducer = combineReducers({
    login: loginReducer
});

export default reducer
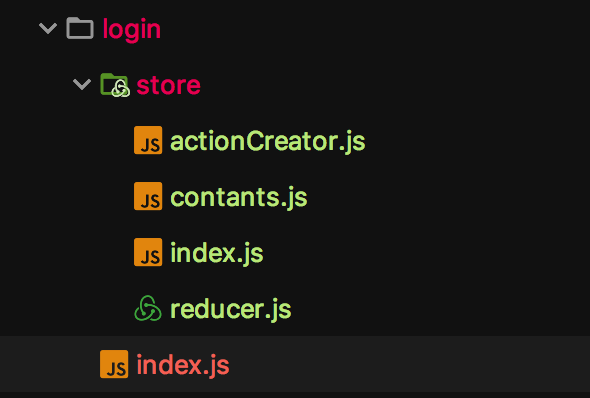
2、然后我们要定义各个"子store"
子store:
这里拿一个Login组件来举例.
a. 首先定义好action常量名和actionCraetor
// contants.js 注意这里的常量为了保持唯一,可以加上zone也就是路径标识下
const ZONE = 'pages/login/';

export const SET_DATA = ZONE + 'SET_DATA';
// actionCreator.js
import * as constants from './contants'

export const getData = (data) => ({
    type: constants.SET_DATA,
    data
});
b. 然后定义子store的reducers, 最后这些reducers会被汇总到总store中(第1步中的reducer.js).
// 子store的reducer.js, 其中的immutable是一个比较常用的库,自行研究
import * as constants from './contants'
import { fromJS } from 'immutable'

// 初始默认的state immutable的介入,就是利用fromJS方法,把原始的JS类型转化为immutable类型。
const defaultState = fromJS({
    myData: null
});

const getData = (state, action) => {
    return state.set('myData', action.data)
};

export default (state = defaultState, action) => {
    // 由于state是引用型,不能直接修改,否则是监测不到state发生变化的。因此需要先复制一份进行修改,然后再返回新的state。
    switch (action.type) {
        case constants.SET_DATA:
            return getData(state, action);
        default:
            return state
    }
}
c. a、b做完后,在子store的index.js里暴露一下即可
import reducer from './reducer'
import * as actionCreators from './actionCreator'
import * as constants from './contants'

export {reducer, actionCreators, constants}
3、最后就是在component中进行dispatchAction, react-redux中已经给了工具,connect一下即可,使用方法如下:
// login.js
//redux
import {connect} from 'react-redux'
import * as actionCreators from './store/actionCreator'
...
// 把store中的数据映射到组件的props
const mapStateToProps = (state) => {
    const myData = state.getIn(['login', 'myData']);
    return {
        myData
    }
};

// 把store的Dispatch映射到组件的props
const mapDispatchToProps = (dispatch) => ({
    getData(data) {
        const action = actionCreators.getData(data);
        dispatch(action)
    }
});


export default connect(mapStateToProps, mapDispatchToProps)(Login);
这样就可以在组件中通过props拿到myData, 以及修改myData的函数(getData), 每次dispatch后,相对应的reducer.js就会进行处理并更新state.
这样就完成了一次redux的数据流。
附加: redux-thunk的用法
在上面总store中我们已经应用了redux-thunk中间件。这时我们就可以在子store中的action进行异步操作了.
举个栗子:
为了可以使用redux-thunk中间件,需要在总store的index.js中应用一下:
// store/index.js
import thunk from 'redux-thunk'
...
const enhancer = composeEnhancers(
    applyMiddleware(thunk)
);

const store = createStore(
    reducer,
    enhancer
);

export default store
然后就可以在actionCreator中应用了。让我们看下如何使用吧:
// login/store/acionCreator
import * as constants from './contants'

// 普通的actionCreator,返回一个对象
export const getData = (data) => ({
    type: constants.SET_DATA,
    data
});

// 异步的actionCreator,返回一个函数,入参是dispatch,getState
export const thunkData = data => (dispatch, getState) => {
    setTimeout(() => {
        dispatch({
            type: constants.THUNK_DADA,
            data
        })
    }, 2000)
};
此时在组件中的分发用法和普通的action一样:
// login/index
...
// 把store中的数据映射到组件的props
const mapStateToProps = (state) => {
    const myData = state.getIn(['login', 'myData']);
    return {
        myData
    }
};

// 把store的Dispatch映射到组件的props
const mapDispatchToProps = (dispatch) => ({
    getData(data) {
        const action = actionCreators.getData(data);
        dispatch(action)
    },
    thunkData(data) {
        // 这时action返回的是个入参为dispatch和getState的函数
        const action = actionCreators.thunkData(data);
        dispatch(action)
    }
});


export default connect(mapStateToProps, mapDispatchToProps)(Login);
此时就可以正常进行dispatch并更新state了。
有时我们需要在组件中得知异步更新state的完成状态,此时可以将actionCreator写成返回一个promise:
export const getData = (data) => ({
    type: constants.SET_DATA,
    data
});

export const thunkData = data => (dispatch, getState) => {
    return new Promise((resolve, reject) => {
        setTimeout(() => {
            dispatch({
                type: constants.THUNK_DADA,
                data
            })
            resolve('2秒后')
        }, 2000)
    })
};
此时在组件中就可以拿到resolve的状态, 因为此时组件里dispatch返回值就是actionCreator中返回的promise。同理,如果就是普通的dispatch,不用redux-thunk的话,返回值也就是 actionCreator中返回的action。
...
<button onClick={() => {
                    this.props.thunkData('hhh').then(res => {
                        console.log(this.props.tData)
                    })
                }}>goToHome
                </button>
...
const mapDispatchToProps = (dispatch) => ({
    getData(data) {
        const action = actionCreators.getData(data);
        dispatch(action)
    },
    thunkData(data) {
        const action = actionCreators.thunkData(data);
        return dispatch(action)
    }
});
