

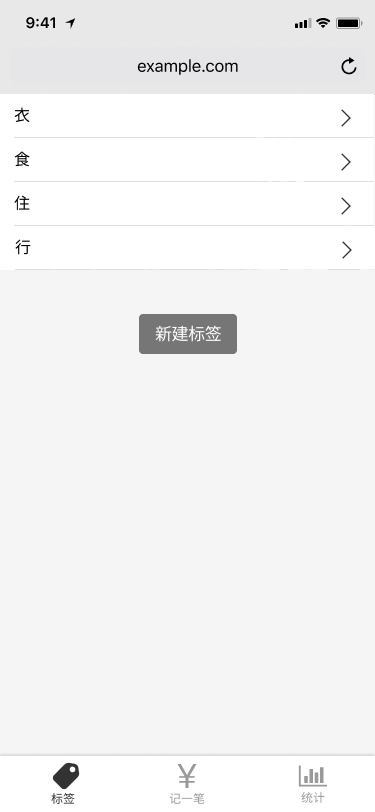
标签页面Label.vue
一、基本需求
- 点击标签会跳转到编辑标签页面
- 编辑标签页面的删除标签会跳回标签页面
- 新建标签按钮和记账页面的新增标签按钮功能一模一样
二、HTML和CSS
<template>
  <div>
    <Layout>
      <ol class="tags">
        <li>
          <span>衣</span>
          <Icon iconId="right"/>
        </li>
        <li>
          <span>食</span>
          <Icon iconId="right"/>
        </li>
        <li>
          <span>住</span>
          <Icon iconId="right"/>
        </li>
        <li>
          <span>行</span>
          <Icon iconId="right"/>
        </li>
      </ol>
      <div class="creatTag">
        <button>新建标签</button>
      </div>
    </Layout>
  </div>
</template>

<script lang="ts">

  export default {
    name: 'Labels',
  };
</script>

<style lang="scss" scoped>
  @import "~@/assets/style/helper.scss";

  .tags {
    font-size: 18px;
    padding: 0 8px;
    background: white;

    > li {
      border-bottom: 1px solid #e6e6e6;
      min-height: 44px;
      display: flex;
      align-items: center;
      justify-content: space-between;

      > svg {
        color: #999999;
        width: 26px;
        height: 26px;
      }
    }
  }

  .creatTag {
    text-align: center;
    margin-top: 44px;
    > button {
      background: $color-four;
    padding: 10px 18px;
      border-radius: 5px;
      border: none;
    }
  }

</style>
三、TypeScript
(一)新建标签功能
1、需求描述
- 回顾Money组件里的标签。被我们写死在Money组件的tags数据里,然后作为Tags组件的外部数据dataSource的值传给Tags组件的
<Tags :data-source.sync="tags" @update:tags="onUpdateTags"/>
- Money组件和Label组件里的标签应该全都是从像recordList一样,从数据库中读出来(然后渲染),可以修改,可以保存进数据库
2、步骤
(1)新建src/models目录,把recordListModel.ts放进去,也在新建一个tagsListModel.ts
(2)tagsListModel.ts里面写对标签的所有操作。
- 标签列表这个数据写在了这个文件夹中,只暴露了API供别人使用
- 标签列表应该像这样,每个标签有id和标签名name

const localStorageKeyName = 'tagList';
type Tag = {
  id: string;
  name: string;
}
type TagListModel = {
  data: Tag[]
  fetch: () => Tag[]
  create: (name: string) => 'success' | 'duplicated' // 联合类型
  save: () => void
}
const tagListModel: TagListModel = {
  //声明标签列表data
  data: [],
  //从数据库中获取最新的标签列表
  fetch() {
    this.data = JSON.parse(window.localStorage.getItem(localStorageKeyName) || '[]');
    return this.data;
  },
  //往标签列表里面新增标签 ①如果已经有了就返回duplicated ②没有就往标签列表里面新增标签,保存,返回success
  create(name) {
    // this.data = [{id:'1', name:'1'}, {id:'2', name:'2'}]
    const names = this.data.map(item => item.name);
    if (names.indexOf(name) >= 0) {return 'duplicated';};
    this.data.push({id:name, name: name});
    this.save();
    return 'success';
  },
  //把标签列表保存到数据库里
  save() {
    window.localStorage.setItem(localStorageKeyName, JSON.stringify(this.data));
  }
};
export {tagListModel};
(3)Label组件如何使用
- 首先需要从数据库获取最新的标签列表data
- 其次本组件用tags表示标签列表,内容就是tagListModel里的data
- 把标签渲染到页面
- 当点击新建标签按钮,事件处理函数createTag会让用户输入标签名,然后执行tagListModel的create函数,返回值命名为message
- 如果message是duplicated,那肯定就是重复了,那就提醒用户重复了;如果message是success,那就加入成功,提醒用户成功了
<template>
  <div>
    <Layout>
      <ol class="tags">
<!--        把标签渲染到页面-->
        <li v-for="tag in tags" :key="tag.id">
          <span>{{tag.name}}</span>
          <Icon iconId="right"/>
        </li>
      </ol>
      <div class="creatTag">
        <button @click="createTag">新建标签</button>
      </div>
    </Layout>
  </div>
</template>

<script lang="ts">
  import Vue from 'vue';
  import {Component} from 'vue-property-decorator';
  import {tagListModel} from '@/models/tagListModel';
  //首先需要从数据库获取最新的标签列表data
  tagListModel.fetch();
  @Component
  export default class Labels extends Vue {
    //其次本组件用tags表示标签列表,内容就是tagListModel里的data
    tags = tagListModel.data;
    //当点击新建标签按钮,事件处理函数createTag会让用户输入标签名,然后执行create函数,返回值命名为message
    //如果message是duplicated,那肯定就是重复了,那就提醒用户重复了;如果message是success,那就加入成功,提醒用户成功了
    createTag() {
      const name = window.prompt('请输出标签名');
      if (name) {
        const message = tagListModel.create(name);
        if (message === 'duplicated') {
          window.alert('标签名重复了');
        } else if (message === 'success') {
          window.alert('添加成功');
        }
      }
    }
  }
</script>
面试官问你遇到最难的技术性问题是什么?
我们曾经对于创建一个东西成功返回什么存在一些疑问。一开始觉得只要返回true和false;但是失败的情况有很多种,所以又想着能不能用数字表示。于是列了一个数组列表定义了不同的数组分别代表不同的错误。最后发现数字还是容易忘记。最后直接返回字符串表示错误。那又想着中文也是字符串啊,所以干脆返回中文表示错误得了。
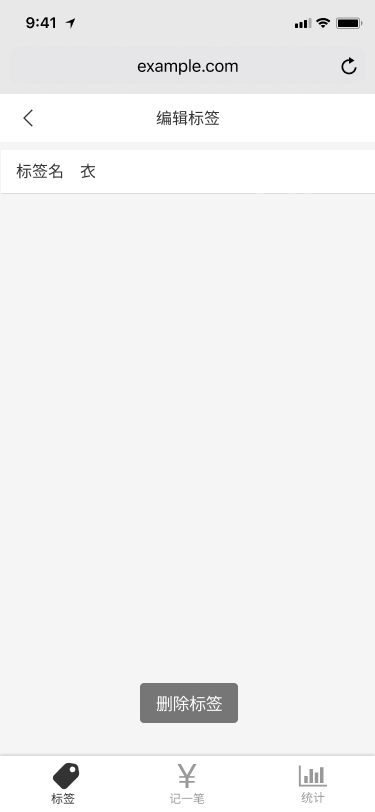
四、编辑标签页面
(一)新建路由
import EditLabel from '@/views/EditLabel.vue';
{
    path: '/label/edit/:id',     //编辑标签页面
    component: EditLabel
  },
:id就是用来占位,之后会被替换成字符串- 如果访问
/label/edit/1,那么在对应组件EditLabel里就可以用this.$route.params获取到当前路由的信息{id:'1'}
(二)新建 编辑标签页面 的 组件view/EditLabel.vue
- 由上面可知如果访问
/label/edit/x,那么在对应组件EditLabel里就可以用this.$route.params获取到当前路由的信息{id:'x'} - 那么就去标签列表里面找看看有没有id为x的标签,有就是成功了;没有那就说明访问的
/label/edit/x根本不是东西,那就调到404页面去
<template>
  <Layout>
    编辑页面
  </Layout>
</template>

<script lang="ts">
  import Vue from 'vue';
  import {Component} from 'vue-property-decorator';
  import {tagListModel} from '@/models/tagListModel';

  @Component
  export default class EditLabel extends Vue {
     created(){
        const id = this.$route.params.id;
        tagListModel.fetch();
        const tags = tagListModel.data;
        const tag = tags.filter(t=>t.id===id)[0];
        if(tag){
           console.log(tag);  //这样就获得了这个编辑标签页面所对应的标签了!
         }else {
          this.$router.replace('/404')
            }
}
  }
</script>

<style lang="scss" scoped>

</style>
(三)修改标签页面
因为是从标签页面点击标签跳转到对应编辑标签页面的。
<template>
  <div>
    <Layout>
      <div class="tags">
    <!- 点击标签跳转到对应编辑标签页面的。-->
        <router-link class="tag" v-for="tag in tags" :key="tag.id"
                     :to="`/labels/edit/${tag.id}`">
          <span>{{tag.name}}</span>
          <Icon iconId="right"/>
        </router-link>
      </div>
      <div class="creatTag">
        <button @click="createTag">新建标签</button>
      </div>
    </Layout>
  </div>
</template>
小结:举例描述全过程
- 在标签页面点击id为1的标签,那么会跳转到
/label/edit/1路由 - 在对应组件EditLabel里就可以用
this.$route.params获取到当前路由的信息{id:'1'} - 从标签列表里找有没有id为1的标签,有就是成功了(没有那就说明访问的
/label/edit/x根本不是东西,那就调到404页面去)
(四)写HTML和CSS

1、先来个小插曲:封装通用组件
(1)把Money/Notes.vue封装成通用组件,这样编辑标签页面也可以用了
① 原来代码
<template>
  <div>
    <label class="notes">
      <span class="name">备注</span>    //备注应该是外部数据由外面传过来
      <input type="text"
             v-model="value"
             placeholder="在这里输入备注">   //应该是外部数据 由外面传过来
    </label>
  </div>
</template>

<script lang="ts">
  import Vue from 'vue';
  import {Component,Watch} from 'vue-property-decorator';
  @Component
  export default class Notes extends Vue {
    value = '';  //还是得声明一个value,用户不写当做写了个空字符串
  @Watch('value')
    onValueChanged(newValue: string,oldValue: string){
     this.$emit('update:notes',newValue)
  }
  }
</script>
② 添加两个外部数据
   @Prop({required: true}) fieldName!: string;  //{required: true}表示必须给值   !表示我就不给你初始值
   @Prop() placeholder?: string;      //!表示有可能不存在
③ 修改<template>标签
<template>
  <div>
    <label class="formItem">
      <span class="name">{{this.fieldName}}</span>
      <input type="text"
             :value="value"
             @input="onValueChanged($event.target.value)"
             :placeholder="this.placeholder">
    </label>
  </div>
</template>
④ Money组件用到了这个组件,所以得修改
<Notes fieldName="备注" placeholder="请在这里输入备注" @update:notes="onUpdateNotes"/>
⑤ 既然成为了通用组件,那叫Notes.vue就不合适了。改个名字吧(好怕怕有bug)
- 先改名字FormItem.vue,再把文件里的
export default class FormItem extends Vue改了 - 用到这个组件的父组件都要改一下!修改Money.vue
(2)把标签页面里的按钮封装成通用组件,这样编辑标签页面也可以用了
① 新建components/Button ② 把标签页面里的按钮代码剪切进去
<template>
  <button class="button" @click="$emit('click',$event)" >
  //之后在使用本组件时,肯定要有点击事件。但是Button组件的点击事件其实没有的,所以加上这句话
  //button被点击了,就会触发Button组件的点击事件
    <slot/>
  </button>
</template>

<script lang="ts">
  import Vue from 'vue';
  import {Component} from 'vue-property-decorator';
  @Component
  export default class Button extends Vue {
  }
</script>

<style lang="scss" scoped>
  @import "~@/assets/style/helper.scss";
  .button {
    background: $color-four;
    padding: 10px 18px;
    border-radius: 5px;
    border: none;
    color: #4d424c;
    margin-top: 44px;
    margin-left: 37%;
  }
</style>
③ 修改标签页面,使用Button组件
//原代码
 <div>
   <button class="creatTag" @click="createTag">新建标签</button>
 <div>

//新代码
<div>
   <Button @click="createTag">新建标签</Button>
</div>
2、HTML和CSS
有个向左的箭头icon,应该和标签页面的向右的箭头icon完全对称。所以自己做一下吧
- 在iconfont里把向右的箭头icon(right.svg)上传(重命名left),然后编辑的时候旋转好保存,最后svg下载就行了
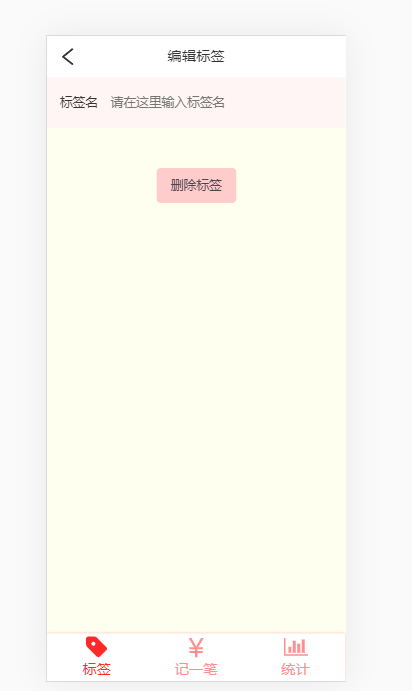
<template>
  <Layout>
    <div class="navBar">
      <Icon class="leftIcon" iconId="left"/>
      <span class="title">编辑标签</span>
      <span class="leftIcon"> </span>   //用来space-between的
    </div>
    <FormItem fieldName="标签名" placeholder="请在这里输入标签名"/>
    <Button>删除标签</Button>
  </Layout>
</template>

<script lang="ts">
  import Vue from 'vue';
  import {Component} from 'vue-property-decorator';
  import {tagListModel} from '@/models/tagListModel';
  import FormItem from '@/components/Money/FormItem.vue';
  import Button from '@/components/Button.vue';

  @Component({
    components: {Button, FormItem}
  })
  export default class EditLabel extends Vue {
    created() {
      const id = this.$route.params.id;
      tagListModel.fetch();
      const tags = tagListModel.data;
      const tag = tags.filter(t => t.id === id)[0];
      if (tag) {
        console.log(tag);
      } else {
        this.$router.replace('/404');
      }
    }
  }
</script>

<style lang="scss" scoped>
  .navBar {
    text-align: center;
    font-size: 18px;
    padding: 12px;
    background: white;
    display: flex;
    align-items: center;
    justify-content: space-between;

    .leftIcon {
      width: 28px;
      height: 28px;
    }
    .title {
    }
  }
</style>
(五)TypeScript
1、需要让标签名后面默认就展示当前的标签名
(1)修改FormItem组件
- 把value改成外部属性。又因为input的value属性等于我们的外部属性value。所以编辑标签页面在使用这个组件的时候传标签名给外部属性value就行
<template>
  <div>
    <label class="notes">
      <span class="name">{{this.fieldName}}</span>
      <input type="text"

             //EditLabel父组件专属
             :value="value"   //input的value属性等于我们的value

             //Money父组件专属
             //当用户输入的时候就触发了input事件,那么这个函数onValueChanged($event.target.value)就执行了,这个函数就是把用户输入的内容传给父组件Moeny
             @input="onValueChanged($event.target.value)"

             :placeholder="placeholder">
    </label>
  </div>
</template>

<script lang="ts">
  import Vue from 'vue';
  import {Component,Watch,Prop} from 'vue-property-decorator';
  @Component
  export default class FormItem extends Vue {
    @Prop({default: ''}) readonly value!: string; //value是外部属性,将被我们当成input标签的value属性。所以得给他个默认值空字符串,因为在Money父组件不用

    @Prop({required: true}) fieldName!: string;
    @Prop() placeholder?: string;

  onValueChanged(newValue: string){          //这个函数就是把用户输入的内容传给父组件Moeny
     this.$emit('update:notes',newValue)
  }
  }
</script>
(2)修改EditLabel组件
- 首先声明一个我们自己的tag
- 把找到的tag赋值给我们的tag
- 使用FormItem组件时把标签名当成value传进去就行了
<template>
  <Layout>
    <div class="navBar">
      <Icon class="leftIcon" iconId="left"/>
      <span class="title">编辑标签</span>
      <span class="leftIcon"> </span>
    </div>
    <FormItem :value="tag.name" fieldName="标签名" placeholder="请在这里输入标签名"/>
    //使用FormItem组件时把标签名当成value传进去就行了
    <Button>删除标签</Button>
  </Layout>
</template>

<script lang="ts">
  import Vue from 'vue';
  import {Component} from 'vue-property-decorator';
  import {tagListModel} from '@/models/tagListModel';
  import FormItem from '@/components/Money/FormItem.vue';
  import Button from '@/components/Button.vue';

  @Component({
    components: {Button, FormItem}
  })
  export default class EditLabel extends Vue {
    tag?: {id: string; name: string}=undefined;  //首先声明一个tag
    created() {
      const id = this.$route.params.id;
      tagListModel.fetch();
      const tags = tagListModel.data;
      const tag = tags.filter(t => t.id === id)[0];
      if (tag) {
        this.tag=tag;                   //找到的tag赋值给我们的tag
      } else {
        this.$router.replace('/404');
      }
    }
  }
</script>
2、修改标签名
(1)在FormItem子组件中,用户在修改标签名肯定就是在input里面输入嘛,当用户输入的时候就触发了input事件,那么函数onValueChanged($event.target.value)就执行了,这个函数就是把用户输入的内容传给父组件
(2)EditLabel父组件监听update:notes事件,那就可以拿到用户输入的内容了。
就可以把新的标签名保存到标签列表里去了
<FormItem :value="tag.name"
              fieldName="标签名"
              placeholder="请在这里输入标签名"
              @update:notes="updateTag"/>


updateTag(value: string) {  //value就是用户输入的内容(新标签名)
      if (this.tag) {
        tagListModel.update(this.tag.id, value);
      }
    }
(3)在标签列表的文件里新加一个函数用于更新标签名
type TagListModel = {
  data: Tag[];
  fetch: () => Tag[];
  create: (name: string) => 'success' | 'duplicated'; // 联合类型
  save: () => void;
  update: (id: string, name: string) => 'success' | 'not found' | 'duplicated'
}


 update(id, name) {
    const idList = this.data.map(item => item.id);
    if (idList.indexOf(id) >= 0) {
      const names = this.data.map(item => item.name);
      if (names.indexOf(name) >= 0) {
        return 'duplicated';
      } else {
        const tag = this.data.filter(item => item.id === id)[0];
        tag.name = name;
        this.save();
        return 'success';
      }
    } else {
      return 'not found';
    }
  },
3、删除标签
(1)在标签列表的文件里新加一个函数用于删除标签
remove: (id: string) => boolean

 remove(id: string) {
      let index = -1;

      //遍历标签列表中的每一个标签
      for (let i = 0; i < this.data.length; i++) {
      //如果有一个标签的id和我们给的id一样
        if (this.data[i].id === id) {
        //就记下他的下标,退出遍历
          index = i;
          break;
        }
      }
      //把这个标签删掉,然后保存
      this.data.splice(index, 1);
      this.save();
      return true;
    },
(2)监听Button组件的点击事件,事件处理函数是removeTag
<Button @click="removeTag">删除标签</Button>


 removeTag(){
      if (this.tag) {
        tagListModel.remove(this.tag.id);
      }
    }
4、点击icon返回标签页面
<Icon class="leftIcon" iconId="left" @click(.native)="goBack"/>


goBack(){
      this.$router.back()
    }
但是注意!Icon子组件是没有点击事件的。
所以加个.native( .native主要是给自定义的组件添加原生事件。)
或者要在Icon子组件的svg标签里透传点击事件
<template>
  <svg class="icon" @click="$emit('click',$event)" >
    <use v-bind:xlink:href="'#'+iconId"/>
  </svg>
</template>
优化id:新建id生成器
需求描述
- 因为还没有使用数据库,所以id之前和name同名所以会出现bug。
- ID的原则:①一旦给了id就不能修改 ②id不能重复
- 因为先暂时写一个id生成函数缓一缓
步骤
- 新建src/lip/createId.ts
//每次刷新后都是从localStorage读出id
let id: number = parseInt(window.localStorage.getItem('_idMax') || '0') || 0;

//creatId()函数会把id增加一个然后返回最新的id
function createId() {
  id++;
  window.localStorage.setItem('_idMax',id.toString());
  return id;
}

export default createId;
- 那么修改tagListModel.ts里的create函数
 //往标签列表里面新增标签 ①如果已经有了就返回duplicated ②没有就往标签列表里面新增标签,保存,返回success
    create(name) {
      // this.data = [{id:'1', name:'1'}, {id:'2', name:'2'}]
      const names = this.data.map(item => item.name);
      if (names.indexOf(name) >= 0) {return 'duplicated';}
      const id = createId().toString();           //每次新增标签都生成一个新id
      this.data.push({id: id, name: name});
      this.save();
      return 'success';
    },
小插曲
- 把recordListModel.ts改造成和tagListModel一样的
import clone from '@/lib/clone';

const localStorageKeyName = 'recordList';

const recordListModel = {
  data: [] as RecordItem[],

  fetch() {
    this.data= JSON.parse(window.localStorage.getItem(localStorageKeyName) || '[]') as RecordItem[];
    return this.data
  },  //获取数据

  create(record: RecordItem){
    const record2: RecordItem = clone(record);
    record2.createdAt = new Date();
    this.data.push(record2);
    this.save()
  },


  save() { return window.localStorage.setItem(localStorageKeyName, JSON.stringify(this.data));} //保存数据
};
  export {recordListModel}
- Money组件用到了这个,所以需要修改
