

hexo 介绍
Hexo 是一个快速、简洁且高效的博客框架。Hexo 使用 Markdown(或其他渲染引擎)解析文章,在几秒内,即可利用靓丽的主题生成静态网页。
以下的安装步骤以 macOS 为例,也会针对Linux和Windows有一些说明。
hexo 安装前提
Node.js(Should be at least nodejs 6.9)Git
以下是利用Homebrew进行安装:
利用 brew 安装 Git:
brew install node #不用它,会出问题
brew install git
利用 brew 安装 nvm:
为什么不用 brew 直接安装 node ?因为可能存在一些问题(让人很恼火) :
如果你是 macOS 用户,或者是通过软件管理器从默认软件仓库安装 Node.js 的 Linux 用户,在使用 npm 的 -g 参数时可能会遇到一些权限相关的问题。请遵循 由 npmjs 发布的指导 修复该问题,并且不要使用 root、sudo 等方法覆盖权限
我们使用节点版本管理器(OSX和Linux用nvm,Windows可用nodist或nvm窗口版,详见下载并安装Node.js和npm)重新安装npm(推荐)。本小节参考 brew 下 安装node 和 npm:
如果之前采用brew install node安装过node.js,那么需要先删除:
brew uninstall node
sudo rm -r /usr/local/lib/node_modules
Homebrew扩展知识:
- brew 安装目录 /usr/local/Cellar
- brew 配置目录 /usr/local/etc
- brew 命令目录 /usr/local/bin
然后安装 nvm:
brew install nvm
安装过程中注意到如下提示,按照提示操作就行 (博主使用的是zsh而非bash):
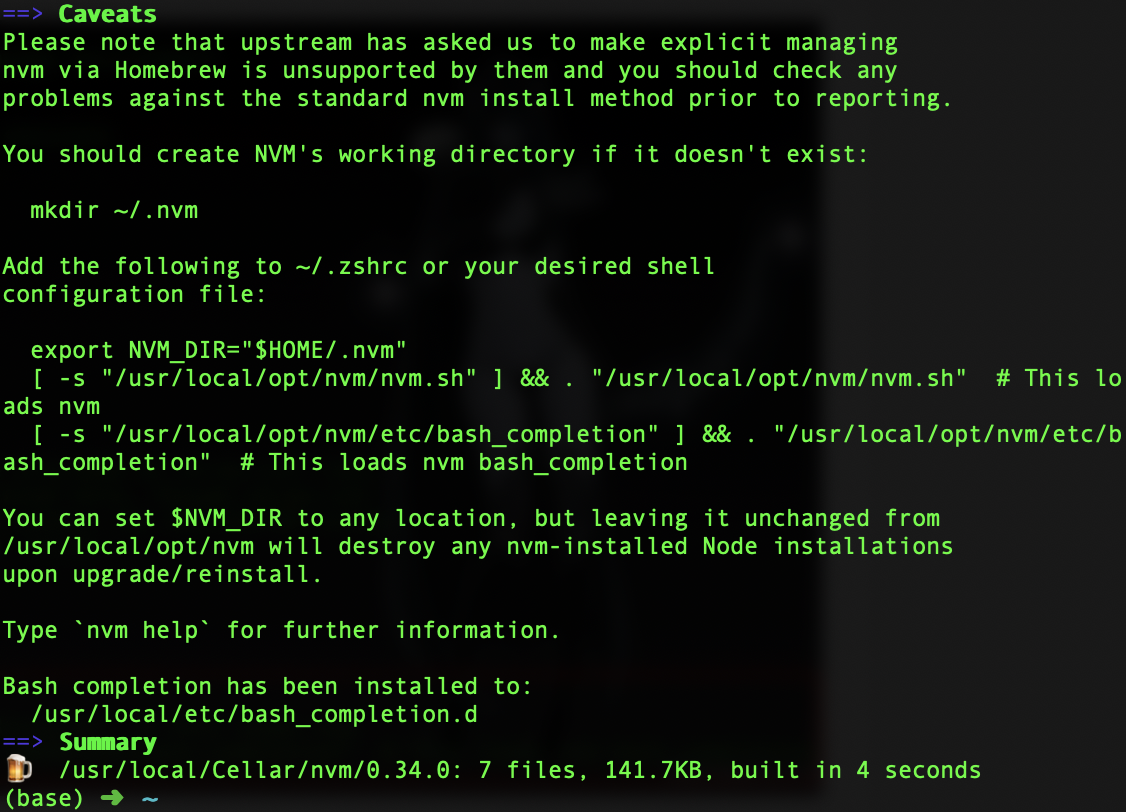
然后需要在shell的配置文件(~/.bashrc, ~/.profile, or ~/.zshrc)中添加如下内容:
# For NVM
export NVM_DIR=~/.nvm
source $(brew --prefix nvm)/nvm.sh
用 命令行 的方式,例如 zsh,这样做:
cat >> ~/.zshrc << EOF
heredoc> # For NVM
export NVM_DIR=~/.nvm
source $(brew --prefix nvm)/nvm.sh
heredoc> EOF
注意配置的顺序,以防开启新终端,node 出现找不到的情况。
重启终端,命令行下即可使用nvm。
利用 nvm 安装 node :
最后使用nvm安装node:
nvm install node # "node" is an alias for the latest version
nvm install 6.14.4 # or 10.10.0, 8.9.1, etc
nvm ls-remote # You can list available versions using ls-remote
nvm use node # And then in any new shell just use the installed version
注意可能存在的任何提示,例如:
nvm is not compatible with the npm config "prefix" option: currently set to "/Users/dfface/.npm-global"
Run `nvm use --delete-prefix v12.9.1` to unset it.
(base) ➜  ~ nvm use --delete-prefix node
Now using node v12.9.1 (npm v6.10.2)
(base) ➜  ~ npm -v
6.10.2
使用 npm 之前 都应该 nvm use <version> 一下哦。
hexo 安装
npm install -g hexo-cli
hexo 建站
从无到有
hexo init <folder> # 新建一个网站。如果没有设置 folder ,Hexo 默认在目前的文件夹建立网站。
cd <folder>
npm install
_config.yml 配置
详情请见:配置
# Site
title: dfface's blog
subtitle: 专注于分享
description: 等闲识得东风面,分享我的小感悟。
keywords: 互联网,算法,软件
author: dfface
language: zh-CN
timezone: Asia/shanghai

# Writing
new_post_name: :year-:title.md # File name of new posts 详见:https://hexo.io/zh-cn/docs/writing

deploy:
  - type: git
    repo:
      github: git@github.com:dfface/dfface.github.io.git,master
hexo 使用
hexo 基本命令
hexo new [layout] <title>
如果标题包含空格的话,请使用引号括起来。
hexo new "post title with whitespace"
对于独立页面来说,Hexo 会创建一个以标题为名字的目录,并在目录中放置一个 index.md 文件。
hexo new page --path about/me "About me" # 创建一个 source/about/me.md 文件,同时 Front Matter 中的 title 为 "About me"
hexo generate
生成静态文件。-d, --deploy文件生成后立即部署网站。可简写为 hexo g。
hexo server
启动服务器。默认情况下,访问网址为: http://localhost:4000/ 。-p, --port 可重设端口号。可简写为 hexo s。
hexo deploy
-g, --generate在 部署之前预先生成静态文件。可简写为 hexo d。
hexo clean
清除缓存文件 (db.json) 和已生成的静态文件 (public)。
hexo version
显示 Hexo 版本。
部署问题
首先如果要使用Git部署,则必须安装:hexo-deployer-git:
npm install hexo-deployer-git --save
注意部署在 github 上时,要在 hexo 的 source 文件夹下增加 CNAME 文件!
如果要部署在多个Git上,以及添加ssh密钥的方法,请参考我的早期文章,在简书上:Mac 上配置多个ssh公私钥
,里面有详细的配置方法,下面 给出 速查表:
ssh-keygen -t rsa -C "your_email@example.com"  # 生成rsa公私钥并存储在指定位置
ssh-keygen -t rsa -b 4096 -C "your_email@example.com"  # 生成4096位的rsa公私钥并存储在指定位置,默认2048位
Enter file in which to save the key (/Users/you/.ssh/id_rsa): /Users/you/.ssh/id_rsa_coding  # 必须是从根目录开始的完整的路径加文件名
ssh-add  # 查看已添到ssh-agent的私钥
ssh-add  # 默认添加:id_rsa
ssh-add -A  # 默认添加:id_rsa
ssh-add -K ~/.ssh/id_rsa_coding  # 指定添加
ssh-add -D  # 全部删除
ssh-add -d  ~/.ssh/id_rsa_coding  # 指定删除
ssh -T git@git.coding.net # 测试
Ssh -T git@github.com  # 测试
还有与部署有关的更多问题,包括SFTP、Netlify、Heroku,详见 :部署
hexo 美化
选择 NexT 主题
官方文档:theme-next.org/docs/
本文撰写时,使用的主题版本号为 :v7.3.0。
安装 NexT
切换到站点根目录并克隆 NexT 主题的最新主分支:
git clone https://github.com/theme-next/hexo-theme-next themes/next
在hexo/_config.yml中,更改主题:
theme: next
配置 NexT
在next/_config.yml中,更换方案:
# Schemes
#scheme: Muse
scheme: Mist
#scheme: Pisces
#scheme: Gemini
next/_config.yml中的一些配置,请直接参考 主题设置 :
以下是一些摘要:
添加标签导航栏,分三步,具体可以看自定义页面:
hexo new page tags

---
title: tags
date: 2019-08-27 19:34:15
type: "tags"
---

menu:
  home: / || home
  archives: /archives/ || archive
  tags: /tags/ || tags
-
That is it only render those page which has
mathjax: truein Front-matter. -
Add
quicklink: truein Front-matter of the page or post you need.
使用到的插件:
注意:本小节记载的用到的插件不全面。
其他有趣的配置
使永久链接变短
参考:永久链接变短
npm install hexo-abbrlink --save
打开根目录下的 _config.yml 文件,修改如下配置:
# permalink: :year/:month/:day/:title/
# permalink_defaults:
permalink: :abbrlink.html
abbrlink:
  alg: crc32  # 算法:crc16(default) and crc32
  rep: hex    # 进制:dec(default) and hex
主动推送到百度
参看 :Hexo插件之百度主动提交链接
安装 hexo-baidu-url-submit 插件:
npm install hexo-baidu-url-submit --save
该插件在GitHub上:hexo-baidu-url-submit
在根目录的配置文件中新增baidu_url_submit字段,更改deploy字段:
baidu_url_submit:
  count: 1000 ## 提交最新的一个链接
  host: alili.tech ## 在百度站长平台中注册的域名
  token: xxxxx ## 请注意这是您的秘钥, 所以请不要把博客源代码发布在公众仓库里!
  path: baidu_urls.txt ## 文本文档的地址, 新链接会保存在此文本文档里
  xz_appid: 'xxxxxx' ## 你的熊掌号 appid
  xz_token: 'xxxxxx' ## 你的熊掌号 token
  xz_count: 10 ## 从所有的提交的数据当中选取最新的10条,该数量跟你的熊掌号而定

deploy:
- type: git
    repo: https://github.com/dfface/dfface.github.io.git
    branch: master
- type: baidu_url_submitter # 百度
- type: baidu_xz_url_submitter # 百度熊掌号
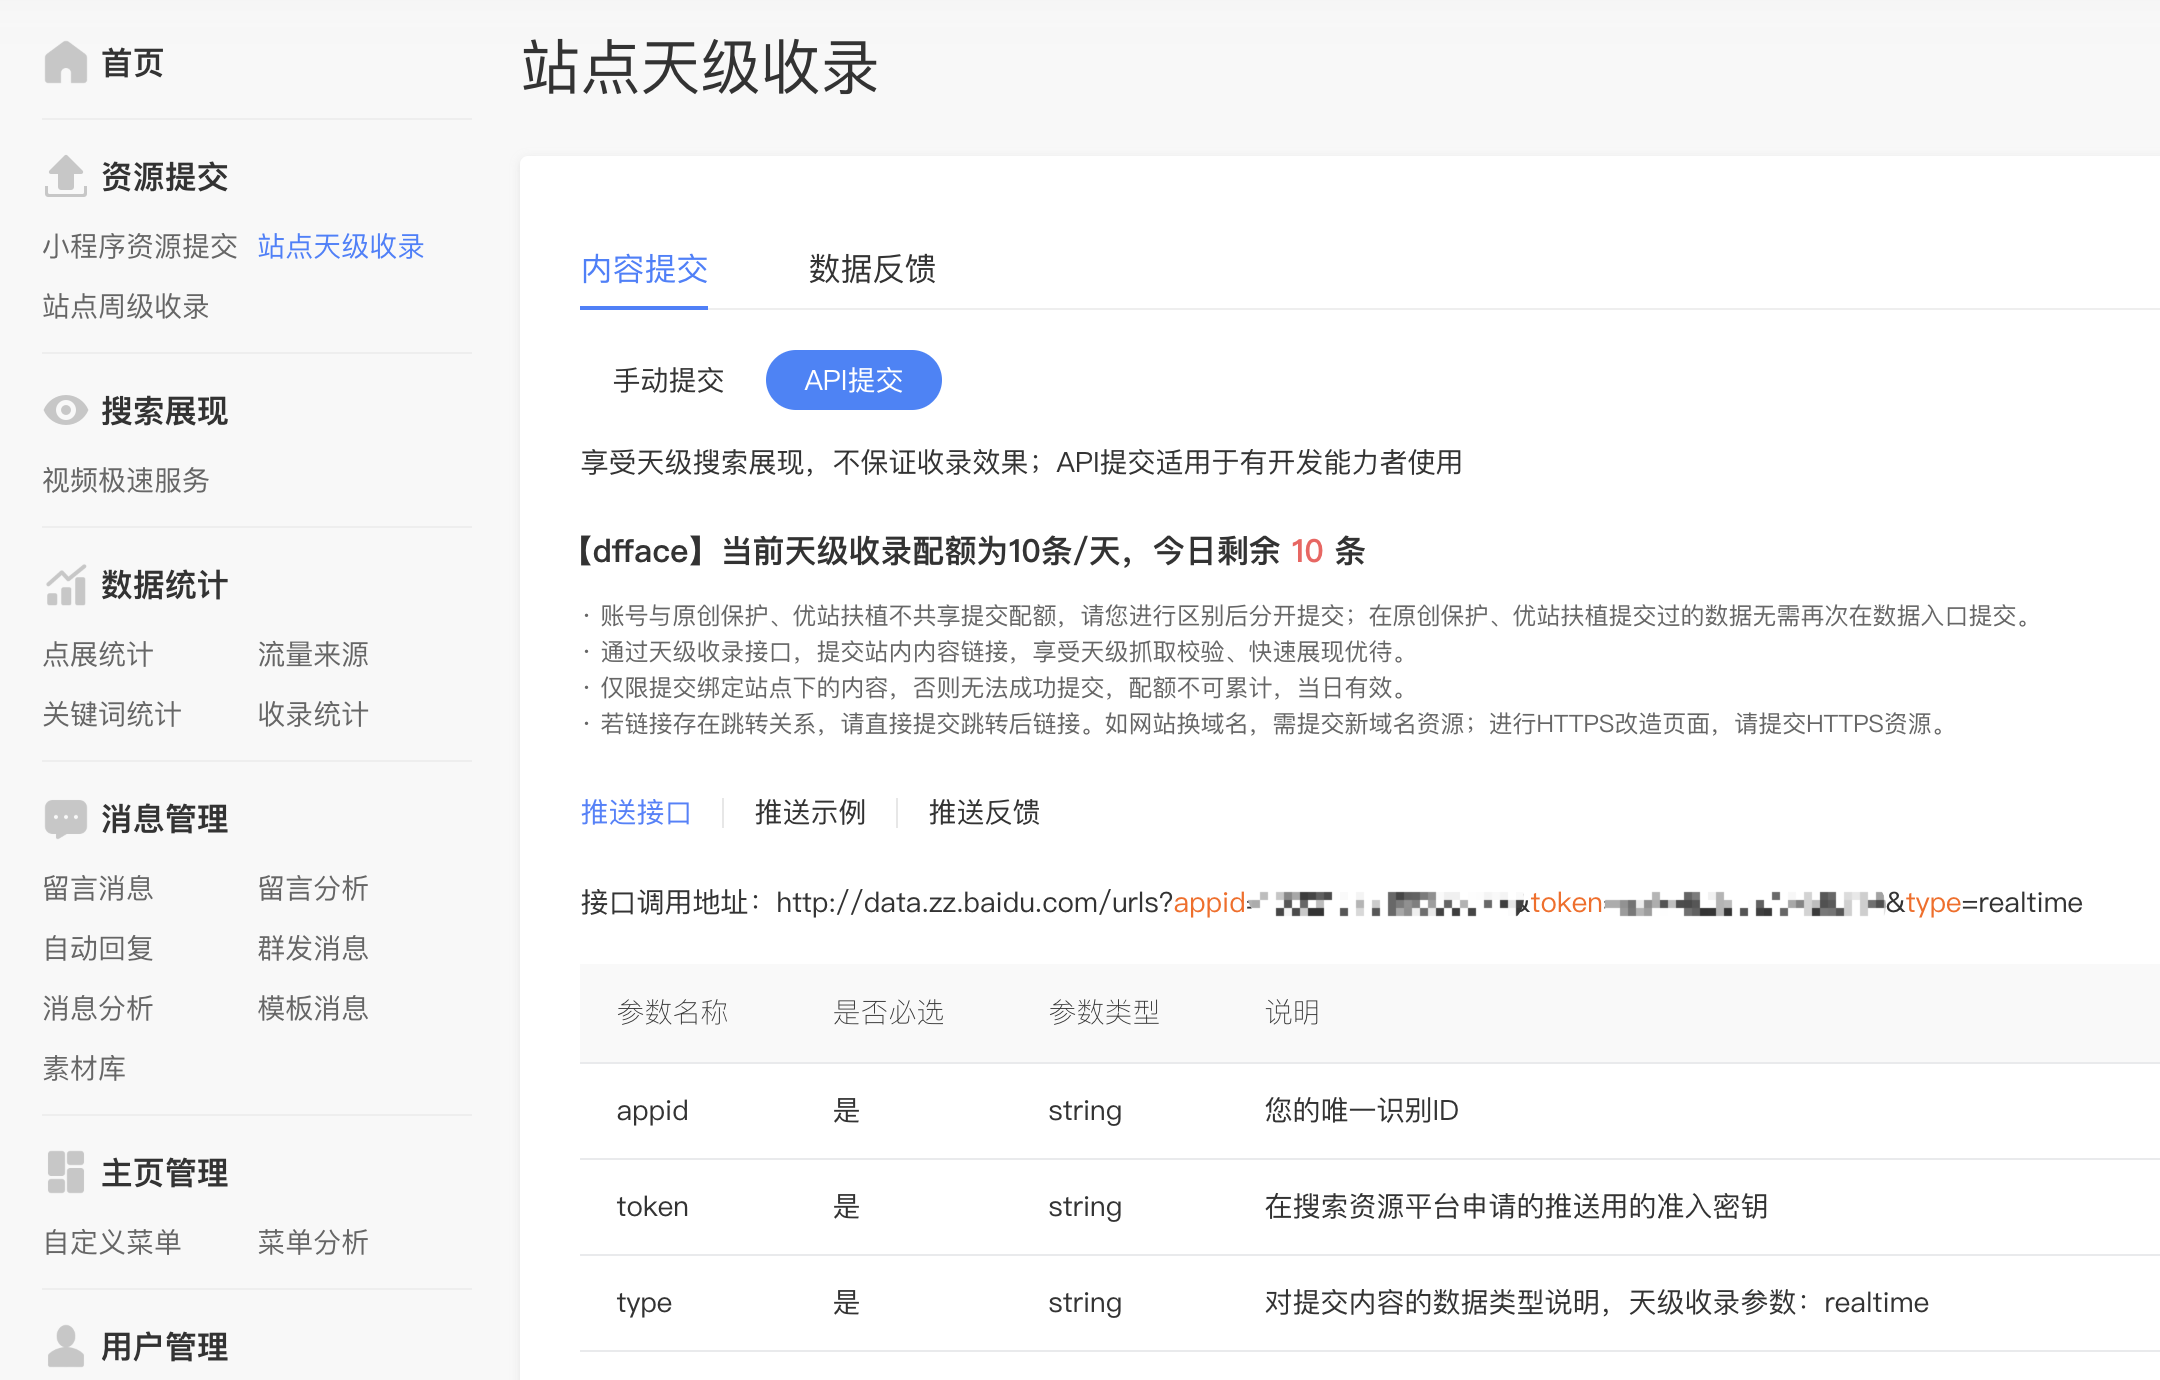
熊掌号的id和token,请看图:
然后在主题中开启:
# Enable baidu push so that the blog will push the url to baidu automatically which is very helpful for SEO
baidu_push: true
自动换背景
参看: injects
首先写入:source/_data/auto-bg.styl:
// 背景更换设置,原来:background:url(https://source.unsplash.com/random/1600x900);
body {
    background:url("https://img.xjh.me/random_img.php?type=bg&ctype=nature&return=302");
    background-repeat: no-repeat;
    -webkit-background-size:100%;
    background-size:cover;
    -webkit-background-size: cover !important;
    -moz-background-size: cover !important;
    -o-background-size: cover;
    background-attachment:fixed, scroll;
    padding-top: 0px;
}

.main-inner {
    margin-top: 2rem;
    padding: 2rem;
    background: #fff;
	opacity: 0.7;
    min-height: 500px;
    transition: opacity 1s;
}

header,footer {
    opacity: 0.7;
    transition: opacity 1s;
}

.main-inner:hover {
    opacity:1.0;
}

header:hover {
    opacity:1.0;
}
footer:hover {
    opacity:1.0;
}

body {
  -moz-user-select:none; /* Firefox私有属性 */
  -webkit-user-select:none; /* WebKit内核私有属性 */
  -ms-user-select:none; /* IE私有属性(IE10及以后) */
  -khtml-user-select:none; /* KHTML内核私有属性 */
  -o-user-select:none; /* Opera私有属性 */
  user-select:none; /* CSS3属性 */
}
然后在 _config.yml中注释掉:
custom_file_path:
  #head: source/_data/head.swig
  #header: source/_data/header.swig
  #sidebar: source/_data/sidebar.swig
  #postMeta: source/_data/post-meta.swig
  #postBodyEnd: source/_data/post-body-end.swig
  #footer: source/_data/footer.swig
  #bodyEnd: source/_data/body-end.swig
  #variable: source/_data/variables.styl
  #mixin: source/_data/mixins.styl
  style: source/_data/auto-bg.styl
网页禁止复制
参考:网页禁止复制的实现方法
body {
  -moz-user-select:none; /* Firefox私有属性 */
  -webkit-user-select:none; /* WebKit内核私有属性 */
  -ms-user-select:none; /* IE私有属性(IE10及以后) */
  -khtml-user-select:none; /* KHTML内核私有属性 */
  -o-user-select:none; /* Opera私有属性 */
  user-select:none; /* CSS3属性 */
}
同上一小节,可以直接添加进入 source/_data/auto-bg.styl 文件中。
leancloud 统计安全设置
npm install hexo-leancloud-counter-security --save
然后 hexo的 _config.yml加入:
leancloud_counter_security:
  enable_sync: true
  app_id: <<your app id>>
  app_key: <<your app key>>
  username: <<your username>> # Will be asked while deploying if is left blank
  password: <<your password>> # Recommmended to be left blank. Will be asked while deploying if is left blank
期间可能报错Cannot find module 'babel-runtime/regenerator',需要 安装:npm install babel-runtime。
然后在 next 中配置:
leancloud_visitors:
  enable: true
  app_id: <<your app id>>
  app_key: <<your app key>>
  # Dependencies: https://github.com/theme-next/hexo-leancloud-counter-security
  security: true
  betterPerformance: false
命令行使用:
hexo lc-counter r <<username>> <<password>>
鼠标点击爱心效果
首先写入:source/_data/click-heart.swig:
<script>
!function(e,t,a){function n(){c(".heart{width: 10px;height: 10px;position: fixed;background: #f00;transform: rotate(45deg);-webkit-transform: rotate(45deg);-moz-transform: rotate(45deg);}.heart:after,.heart:before{content: '';width: inherit;height: inherit;background: inherit;border-radius: 50%;-webkit-border-radius: 50%;-moz-border-radius: 50%;position: fixed;}.heart:after{top: -5px;}.heart:before{left: -5px;}"),o(),r()}function r(){for(var e=0;e<d.length;e++)d[e].alpha<=0?(t.body.removeChild(d[e].el),d.splice(e,1)):(d[e].y--,d[e].scale+=.004,d[e].alpha-=.013,d[e].el.style.cssText="left:"+d[e].x+"px;top:"+d[e].y+"px;opacity:"+d[e].alpha+";transform:scale("+d[e].scale+","+d[e].scale+") rotate(45deg);background:"+d[e].color+";z-index:99999");requestAnimationFrame(r)}function o(){var t="function"==typeof e.onclick&&e.onclick;e.onclick=function(e){t&&t(),i(e)}}function i(e){var a=t.createElement("div");a.className="heart",d.push({el:a,x:e.clientX-5,y:e.clientY-5,scale:1,alpha:1,color:s()}),t.body.appendChild(a)}function c(e){var a=t.createElement("style");a.type="text/css";try{a.appendChild(t.createTextNode(e))}catch(t){a.styleSheet.cssText=e}t.getElementsByTagName("head")[0].appendChild(a)}function s(){return"rgb("+~~(255*Math.random())+","+~~(255*Math.random())+","+~~(255*Math.random())+")"}var d=[];e.requestAnimationFrame=function(){return e.requestAnimationFrame||e.webkitRequestAnimationFrame||e.mozRequestAnimationFrame||e.oRequestAnimationFrame||e.msRequestAnimationFrame||function(e){setTimeout(e,1e3/60)}}(),n()}(window,document);
</script>
然后在 _config.yml中添加:
custom_file_path:
  #head: source/_data/head.swig
  #header: source/_data/header.swig
  #sidebar: source/_data/sidebar.swig
  #postMeta: source/_data/post-meta.swig
  #postBodyEnd: source/_data/passage-end.swig
  #footer: source/_data/site-run-time.swig
  bodyEnd: source/_data/click-heart.swig
  #variable: source/_data/variables.styl
  #mixin: source/_data/mixins.styl
  style: source/_data/auto-bg.styl

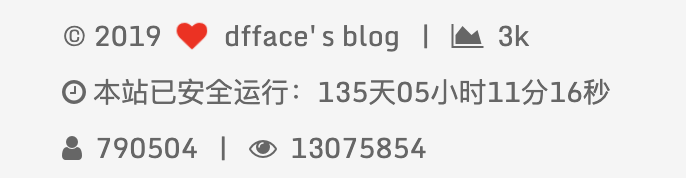
本站安全运行时间
首先写入:source/_data/site-run-time.swig:
<div id="days"></div>
<script>
function show_date_time(){
    window.setTimeout("show_date_time()", 1000);
    BirthDay=new Date("04/14/2019 19:28:35");//修改为自己的blog建站时间
    today=new Date();
    timeold=(today.getTime()-BirthDay.getTime());
    sectimeold=timeold/1000
    secondsold=Math.floor(sectimeold);
    msPerDay=24*60*60*1000
    e_daysold=timeold/msPerDay
    daysold=Math.floor(e_daysold);
    e_hrsold=(e_daysold-daysold)*24;
    hrsold=setzero(Math.floor(e_hrsold));
    e_minsold=(e_hrsold-hrsold)*60;
    minsold=setzero(Math.floor((e_hrsold-hrsold)*60));
    seconds=setzero(Math.floor((e_minsold-minsold)*60));
    document.getElementById('days').innerHTML="<i class=\"fa fa-clock-o\"></i>"+"  运行时间:"+daysold+" 天 "+hrsold+" 时 "+minsold+" 分 "+seconds+" 秒";
}
function setzero(i){
    if (i<10)
    {i="0" + i};
    return i;
}
show_date_time();
</script>
然后在 _config.yml中添加:
custom_file_path:
custom_file_path:
  #head: source/_data/head.swig
  #header: source/_data/header.swig
  #sidebar: source/_data/sidebar.swig
  #postMeta: source/_data/post-meta.swig
  #postBodyEnd: source/_data/passage-end.swig
  footer: source/_data/site-run-time.swig
  bodyEnd: source/_data/click-heart.swig
  #variable: source/_data/variables.styl
  #mixin: source/_data/mixins.styl
  style: source/_data/auto-bg.styl
本文结束感谢阅读
首先写入:source/_data/passage-end.swig:
<div>
    {% if not is_index %}
        <div style="text-align:center;color: #ccc;font-size:1rem;">--------本文结束 <i class="fa fa-paw"></i> 感谢阅读--------</div>
    {% endif %}
</div>
然后在 _config.yml中添加:
custom_file_path:
custom_file_path:
  #head: source/_data/head.swig
  #header: source/_data/header.swig
  #sidebar: source/_data/sidebar.swig
  #postMeta: source/_data/post-meta.swig
  postBodyEnd: source/_data/passage-end.swig
  footer: source/_data/site-run-time.swig
  bodyEnd: source/_data/click-heart.swig
  #variable: source/_data/variables.styl
  #mixin: source/_data/mixins.styl
  style: source/_data/auto-bg.styl

博客后端写作插件
npm install --save hexo-admin
hexo s
open http://localhost:4000/admin/
hexo 的 _config.yml:
admin:
  username: myfavoritename
  password_hash: be121740bf988b2225a313fa1f107ca1 # 采用 bcrypt hash
  secret: a secret something

metadata:
  author_id: defaultAuthorId
  language: zh-CN
高阶知识
hexo 模板引擎
Hexo 内建 Swig 模板引擎,您可以另外安装插件来获得 EJS、Haml 或 Jade 支持,Hexo 根据模板文件的扩展名来决定所使用的模板引擎,例如:
layout.ejs   - 使用 EJS
layout.swig  - 使用 Swig
swig
有关 swig 模板引擎入门,可以看nodejs前端模板引擎swig入门。 以下是一个 速查表:
{{ name }}  // 变量

{{ student.name }}  // 属性

{% block content %}{% endblock  %} // layout.html 写模板空出位子来
{% extends './layout.html' %}  // 另一个 html 继承这个 layout.html
{% block content %}

{% endblock %}
{% include "./includes/head.html" %}

{ % if name === '郭靖' % }
  hello 靖哥哥
{ % endif % }

{ % if name === '郭靖' % }
  hello 靖哥哥
{ % elseif name === '黄蓉' % }
  hello 蓉妹妹
{ % else % }
  hello 欧阳峰
{ % endif % }

// arr = [1, 2, 3]
{ % for key, val in arr % }
  { { key } } -- { { val } }
{ % endfor % }   // for循环内置变量,例如loop.index、loop.index0

{{ name|title }}  // 内置过滤器,例如title:大写首字母

{% set foo = [0, 1, 2, 3, 4, 5] %}  // 用来设置一个变量,在当前上下文中复用
{% for num in foo %}
    {{ num }}
{% endfor %}
ejs
有关 ejs 模板引擎入门,可以看 node.js学习(14)——nodejs模板引擎ejs。
ejs是非破坏式(非侵入式)引擎,它不改变html的任何语法,可以让我们直接在标签内书写简单、直白的 JavaScript 代码。以下是一个速查表:
<%=变量或表达式%>

<div><%=a+b%></div>

<%js代码%>  // 执行js代码, 不会输出,被称作无缓冲的代码

<% for(var i=0;i<arr.length;i++){ %>  //不输出代码,在html中展示为空行
<div>用户名:<%=arr[i].name%> 密码:<%=arr[i].pass%></div>
<% } %> //不输出代码,在html中展示为空行

<%_js代码_%> // 自动删除不输出产生的空行
<%-变量或表达式%>  // 默认使用<%%> 会将<>转义输出,可以使用<%-%>声明不转义输出

<%_var str='<div>test</div>'_%>
<%=str%>
<%-str%>

<% include ../test.js %>  // 引入代码,不增加http请求
hexo 写作
hexo 基本写作说明
新建一篇文章
hexo new [layout] <title> # 以在命令中指定文章的布局(layout),默认为 post,可以通过修改 _config.yml 中的 default_layout 参数来指定默认布局。

hexo n "这是在此网站上的第一篇文章"
更多个性配置:
Hexo有三种默认布局:post、page和draft。在创建者三种不同类型的文件时,它们将会被保存到不同的路径。Hexo默认以标题做为文件名称,但您可编辑new_post_name参数来改变默认的文件名称。- 在新建文章时,
Hexo会根据scaffolds文件夹内相对应的文件来建立文件。scaffolds,模板文件夹。当您新建文章时,Hexo会根据scaffold来建立文件。Hexo的模板是指在新建的文章文件中默认填充的内容。例如,如果您修改scaffold/post.md中的Front-matter内容,那么每次新建一篇文章时都会包含这个修改。
编辑 source/_posts 文件夹中的该源文件
Front-matter
是文件最上方以 --- 分隔的区域,用于指定个别文件的变量。
只有文章支持分类和标签,您可以在 Front-matter 中设置。
---
title: Hello World
date: 2013/7/13 20:46:25
categories:
- Diary
tags:
- PS3
- Games
---
Tag Plugins
标签插件和 Front-matter 中的标签不同,它们是用于在文章中快速插入特定内容的插件。
// 引用块
{% blockquote [author[, source]] [link] [source_link_title] %}
content
{% endblockquote %}
// 代码块
{% codeblock [title] [lang:language] [url] [link text] %}
code snippet
{% endcodeblock %}
// 反引号代码块(删空格)
` ` ` [language] [title] [url] [link text]
code snippet
` ` `
// Pull Quote
{% pullquote [c lass] %}
content
{% endpullquote %}
// jsFiddle
{% jsfiddle shorttag [tabs] [skin] [width] [height] %}
// Gist
{% gist gist_id [filename] %}
// iframe
{% iframe url [width] [height] %}
// Image
{% img [c lass names] /path/to/image [width] [height] "title text 'alt text'" %}
// Link
{% link text url [external] [title] %}
// Include Code: 插入 source/downloads/code 文件夹内的代码文件。
{% include_code [title] [lang:language] path/to/file %}
// Youtube
{% youtube video_id %}
// Vimeo
{% vimeo video_id %}
// 引用文章
{% post_link slug [title] %}
// 引用资源
{% asset_path slug %}
{% asset_img slug [title] %}
{% asset_link slug [title] %}
// Raw: 在文章中插入 Swig 标签
{% raw %}
content
{% endraw %}
// 文章摘要和截断
// 在文章中使用 <!-- more -->,那么 <!-- more --> 之前的文字将会被视为摘要。
hexo 每篇文章单独一个(图片)资源文件夹
首先设置:
post_asset_folder: true
当资源文件管理功能打开后,Hexo将会在你每一次通过
hexo new [layout] <title>命令创建新文章时自动创建一个文件夹。这个资源文件夹将会有与这个文章文件一样的名字。将所有与你的文章有关的资源放在这个关联文件夹中之后,你可以通过相对路径来引用它们。
用法:
{% asset_path slug %}
{% asset_img slug [title] %}
{% asset_link slug [title] %}

{% asset_img example.jpg This is an example image %}
hexo 的数据文件夹 source/_data
举例来说,在 source/_data 文件夹中新建 menu.yml 文件:
Home: /
Gallery: /gallery/
Archives: /archives/
您就能在模板中使用这些资料:
<% for (var link in site.data.menu) { %>
  <a href="<%= site.data.menu[link] %>"> <%= link %> </a>
<% } %>
渲染结果如下 :
<a href="/"> Home </a>
<a href="/gallery/"> Gallery </a>
<a href="/archives/"> Archives </a>
next 主题可使用的一些 tag
视频
通过查看该标签的定义,如下:
'use strict';

function postVideo(args) {
  return `<video src="${args}" preload="metadata" controls playsinline poster="">Sorry, your browser does not support the video tag.</video>`;
}

hexo.extend.tag.register('video', postVideo, {ends: false});
可知,转换成了 HTML5 中的video标签 ,而目前<video>元素支持三种视频格式:MP4、WebM、Ogg(最好是 MP4,因为绝大多数浏览器都支持)。可以参考HTML video 标签。
网络视频的源地址利用you-get,一行命令即可获取,参考《you-get 一个很强的视频地址抓取工具》:
you-get --json <<your url>>

例如:
(base) ➜  ~ you-get --json https://v.qq.com/x/page/r086243vwn1.html\?spm\=a2h0k.11417342.soresults.dtitle
{
    "site": "QQ.com",
    "streams": {
        "__default__": {
            "container": "mp4",
            "size": 25635496,
            "src": [
                "http://ugcws.video.gtimg.com/uwMROfz2r5zAoaQXGdGnC2dfJ6nM3DInWQqp2axRinGnB-kO/r086243vwn1.p701.1.mp4?vkey=5AABAAB6C96FF4C689AA3F34547149447559D508284B75FB3C1B8C945B0FF65823ABF3881EF9D4BBD88FDC85585173212E7E153E9BEB3866B5484C796F3AFC6F94E1195BBF88F1B64FA2D1890A7CA87932DF8A92B58D63FBBF5685C692788E6DCF8BAB17C63376D28A119AF9F8494A5A",
                "http://ugcws.video.gtimg.com/uwMROfz2r5zAoaQXGdGnC2dfJ6nM3DInWQqp2axRinGnB-kO/r086243vwn1.p701.2.mp4?vkey=A61353BB1E969A93116F26C418B0E69B63C68F8DE5169E41D331D106E685D4C2754CE664E84DF01961BA07DC555F2196ED2E1B85104712FE9945F41A085311643EA449A28DD4AFD0FF7E746C50DD8CB6414BBD1BDA81732908C50111A54EE5DDBB5C73878DC5CC51D4A80EF86C100735",
                "http://ugcws.video.gtimg.com/uwMROfz2r5zAoaQXGdGnC2dfJ6nM3DInWQqp2axRinGnB-kO/r086243vwn1.p701.3.mp4?vkey=73D4F4CD31B0BACBA723AC9E3846FE6504A922F91E2B7A44F899CA62EC9B31F8E60458F8EC403659DCB54FAEC2EEED32F4F9AE47B0C0C47CF73D89CE342D061B42D481DD5432291CF5DFFBFDA06E1961318FF49909BA7D8EEB3F6DD2CD7E8ABCF333F9C2C06A785460F680224BAD560D"
            ],
            "video_profile": "__default__"
        }
    },
    "title": "KMP算法易懂版-天勤率辉2020全程班公开一期讲解",
    "url": null
}
视频标签使用方法:
{% video https://example.com/sample.mp4 %}
{% video /path/to/your/video.mp4 %}

例如:
{% video http://ugcws.video.gtimg.com/uwMROfz2r5zAoaQXGdGnC2dfJ6nM3DInWQqp2axRinGnB-kO/r086243vwn1.p701.3.mp4?vkey=73D4F4CD31B0BACBA723AC9E3846FE6504A922F91E2B7A44F899CA62EC9B31F8E60458F8EC403659DCB54FAEC2EEED32F4F9AE47B0C0C47CF73D89CE342D061B42D481DD5432291CF5DFFBFDA06E1961318FF49909BA7D8EEB3F6DD2CD7E8ABCF333F9C2C06A785460F680224BAD560D %}
