

本篇文章使用 Vue 重新写一个轮播组件,之前也写过:使用Vue写一个图片轮播组件,但写的比较麻烦,本篇更会更加注重使用 Vue 的 API。
一、效果预览及整体设计
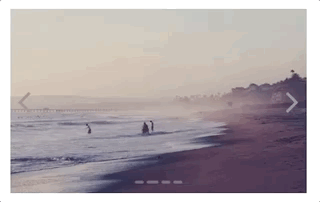
先看预览:
组件的使用:
<Carousel>
  <CarouselItem>
    <div class="img-wrapper"><img src="1.jpg"></div>
  </CarouselItem>
  <CarouselItem>
    <div class="img-wrapper"><img src="2.jpg"></div>
  </CarouselItem>
  <CarouselItem>
    <div class="img-wrapper"><img src="3.jpg"></div>
  </CarouselItem>
  <CarouselItem>
    <div class="img-wrapper"><img src="4.jpg"></div>
  </CarouselItem>
</Carousel>
可以看到,它分成了两部分,视窗里每一个可以滚动图片都被包裹在了 CarouseItem 里,之所之样设计,是可以在父组件里通过 this.$children 拿到所有子组件的根节点$el,方便后续的操作。
二、基本布局
CarouselItem的布局非常非常,内部就是一个 slot,组件根元素需要absolute定位。代码如下:
<template>
  <div class="carousel-item-container">
    <slot></slot>
  </div>
</template>
作为父组件的Carousel布局上分三部分
- 视窗部分
- 两侧箭头
- 下方小点
代码如下:
<template>
  <div class="carousel2-container">
    <div class="window">
      <slot></slot>
    </div>
    <div class="arrows">
      <i class="fa fa-angle-left"></i>
      <i class="fa fa-angle-right"></i>
    </div>
    <div class="dots">
      <span
        v-for="(child, index) in children"
        :key="index"
        :class="{active: index === currentIndex}"
        ></span>
    </div>
  </div>
</template>
注意下方小点数量是根据children的数量来的。 github对应的的commit在这里。
三、让图片切换起来
因为CarouselItem组件是absolute定位,默认会叠加在一起。在Carousel父组件中使用this.$children拿到所有子组件实例并存起来。
init () {
  this.children = this.$children
  this.children[this.currentIndex].$el.style.zIndex = 10 // 让第一张图片放在最上面
},
接下来给左右两个箭头和下面的小点添加点击事件,通过改变this.children每个元素的根节点的z-index值来实现切换。
  resetZIndex () {
    this.children.forEach(vm => {
      vm.$el.style.zIndex = 0
    })
  },
  // 点击左侧箭头
  clickLeft () {
    const { children, currentIndex } = this
    this.currentIndex = currentIndex - 1 < 0 ? children.length - 1 : currentIndex - 1
    this.resetZIndex()
    this.children[this.currentIndex].$el.style.zIndex = 10
  },
  // 点击右侧箭头
  clickRight () {
    const { children, currentIndex } = this
    this.currentIndex = currentIndex + 1 > children.length - 1 ? 0 : currentIndex + 1
    this.resetZIndex()
    this.children[this.currentIndex].$el.style.zIndex = 10
  },
  // 点击下面的点
  jump (index) {
    this.currentIndex = index
    this.resetZIndex()
    this.children[this.currentIndex].$el.style.zIndex = 10
  }
以上的代码请留意以下问题:
- 每个 Vue 组件都可以通过
this.$el拿到组件根节点 - 注意切换时候的边界值
- 每次把需要展示的子组件
z-index值设高使其居于最上方,都要把其它的z-index设低点
此时效果如下:
本次完整的github提交在 这里。
四、添加过渡动画,先实现点击左箭头的
这一部分是我觉得这个组件最麻烦的地方。组件动画的过渡使用的是 requestAnimationFrame,它比 setTimeout 和 setInterval 性能更好。至于为什么没用 CSS3 的 transition 属性,是因为有时候图片在过渡完成之后会留有1px的空白,没有完全接合。
动画过渡的原理:
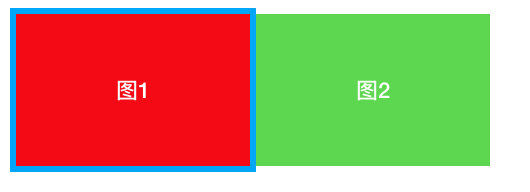
蓝色的部分是视窗,它设置了overflow:hidden;它要开始过渡的时候,假设它要向左侧移动,将下一张要展示的图2移到最右侧,使用transform:translateX(100%),然后借助 requestAnimationFrame 将图1和图2缓慢向左移动,当图2完全占据视窗,动画结束。
代码实现:
clickLeft () {
  const { children, currentIndex } = this
  this.currentIndex = currentIndex - 1 < 0 ? children.length - 1 : currentIndex - 1
  this.resetZIndex()
  this.children[this.currentIndex].$el.style.zIndex = 10
  // this.resetZIndex()
  // this.children[this.currentIndex].$el.style.zIndex = 10
  this.addAnimation(currentIndex, this.currentIndex)
},

// 添加动画
addAnimation (currentIndex, nextIndex) {
  const currentDom = this.children[currentIndex].$el
  const nextDom = this.children[nextIndex].$el
  currentDom.style.zIndex = 10
  nextDom.style.zIndex = 10
  this.go(currentDom, nextDom)
},

// 使用requestAnimationFrame 实现动画
go (currentDom, nextDom) {
  let currentDomPosition = 0
  let nextDomPosition = -100
  nextDom.style.transform = `translateX(${nextDomPosition}%)`
  const render = () => {
    currentDomPosition += 2
    nextDomPosition += 2
    if (nextDomPosition > 0) {
      return
    }
    currentDom.style.transform = `translateX(${currentDomPosition}%)`
    nextDom.style.transform = `translateX(${nextDomPosition}%)`
    window.requestAnimationFrame(render)
  }
  // 第一帧开始
  window.requestAnimationFrame(render)
}
以上的代码请留意:
- requestAnimation 的具体问法,它和 setTimeout 很相似
- 请注意当前视窗展示的图,和它接下来要展示的图,以及它们的索引及对应的根节点
- 该动画的实现还是通过操作 DOM 来完成的
以上部分代码完整的Github提交在这里
五、再实现点击右箭头添加动画
方法和原理和上面是一样的,但是要注意:一个是方向上的区别,需要添加一个方向的参数,第二个是 requestAnimationFrame里过渡停止的条件要注意修改。
代码如下:
// 点击左侧的箭头
clickLeft () {
  const { children, currentIndex } = this
  this.currentIndex = currentIndex - 1 < 0 ? children.length - 1 : currentIndex - 1
  // 注意这里,多传了一个方向参数
  this.addAnimation(currentIndex, this.currentIndex, 1)
},

// 点击右侧箭头
clickRight () {
  const { children, currentIndex } = this
  this.currentIndex = currentIndex + 1 > children.length - 1 ? 0 : currentIndex + 1
  // 注意这里,多传了一个方向参数
  this.addAnimation(currentIndex, this.currentIndex, -1)
},

// 添加方向参数
addAnimation (currentIndex, nextIndex, direction) {
  const currentDom = this.children[currentIndex].$el
  const nextDom = this.children[nextIndex].$el
  currentDom.style.zIndex = 10
  nextDom.style.zIndex = 10
  // 方向要传给 go
  this.go(currentDom, nextDom, direction)
},

// 使用requestAnimationFrame 实现动画
go (currentDom, nextDom, direction) {
  let currentDomPosition = 0
  let nextDomPosition = -100 * direction
  nextDom.style.transform = `translateX(${nextDomPosition}%)`
  const render = () => {
    currentDomPosition += (2 * direction)
    nextDomPosition += (2 * direction)
    // 注意动画停止的条件哦
    if ((direction === 1 && nextDomPosition > 0) || (direction === -1 && nextDomPosition < 0)) {
      return
    }
    currentDom.style.transform = `translateX(${currentDomPosition}%)`
    nextDom.style.transform = `translateX(${nextDomPosition}%)`
    window.requestAnimationFrame(render)
  }
  // 第一帧
  window.requestAnimationFrame(render)
}
以上代码请注意:
- 方向使用1和-1来控制,向左移动时,下一张图片开始时就得放在视窗最右边,反之放在最左边
- 注意动画停止的条件,有变更
这一部分逻辑的完整的Github提交在这里。
六、点击下方小点的动画过渡
jump (index) {
  if (index === this.currentIndex) return
  const current = this.currentIndex
  const direction = index > this.currentIndex ? -1 : 1
  this.currentIndex = index
  this.addAnimation(current, index, direction)
},
这一部分很简单,只要区分当前图,和下一张要展示的图的索引即可,其它的逻辑都是复用的。
这一部分的Github提交记录在这里。
七、每次动画完成,给个回调
这样做的目的是重置部分图的 z-index 等。
go (currentDom, nextDom, direction) {
  let currentDomPosition = 0
  let nextDomPosition = -100 * direction
  nextDom.style.transform = `translateX(${nextDomPosition}%)`
  const render = () => {
    currentDomPosition += (2 * direction)
    nextDomPosition += (2 * direction)
    if ((direction === 1 && nextDomPosition > 0) || (direction === -1 && nextDomPosition < 0)) {
      // 在这里噢
      this.onFinish()
      return
    }
    currentDom.style.transform = `translateX(${currentDomPosition}%)`
    nextDom.style.transform = `translateX(${nextDomPosition}%)`
    window.requestAnimationFrame(render)
  }
  // 第一帧
  window.requestAnimationFrame(render)
},

// 动画过渡完成的回调
onFinish () {
  this.children.forEach((vm, index) => {
    if (index !== this.currentIndex) {
      vm.$el.style.zIndex = 0
      vm.$el.style.transform = 'translateX(0)'
    }
  })
}
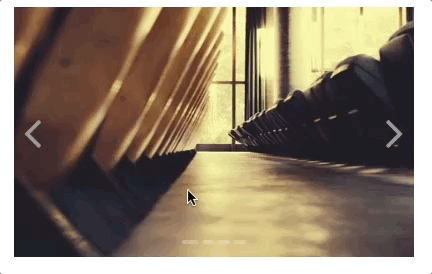
到这里的整体效果:

八、自动播放和鼠标悬停
这一部分就很简单了
// 需要在 mounted 里调用
autoPlay () {
  if (this.timer) window.clearInterval(this.timer)
  this.timer = window.setInterval(() => {
    this.clickRight()
  }, 3000)
},

// 鼠标悬停
mouseEnter () {
  window.clearInterval(this.timer)
},

// 鼠标离开开始自动播放
mouseLeave () {
  this.autoPlay()
}
这里的Github提交记录。
九、用节流解决快速频繁地点的bug
到这里,有一个 bug,如下图:

这是因为在没有过渡完成的情况连续点击造成的,解决方法也很简单,只要当前的过渡没有完成,那就不让点,点击左箭头、右箭头、小点都要改。
data () {
  return {
    // data 里添加一个标记
    canClick: true // 是否可点
  }
},

clickLeft () {
  // 下面两行噢
  if (!this.canClick) return
  this.canClick = false
  const { children, currentIndex } = this
  this.currentIndex = currentIndex - 1 < 0 ? children.length - 1 : currentIndex - 1
  this.addAnimation(currentIndex, this.currentIndex, 1)
},

...

// 动画过渡完成的回调
onFinish () {
  this.children.forEach((vm, index) => {
    if (index !== this.currentIndex) {
      vm.$el.style.zIndex = 0
      vm.$el.style.transform = 'translateX(0)'
    }
  })
  // 在过渡结束后将其恢复
  this.canClick = true
},
完整的Github提交记录。
到这里,基本完成!下面是总结:
- 这个轮播拆分成两个组件,Carousel 和 CarouselItem 来完成
this.$children及$el等使用- slot 的使用
- 动画过渡用的
requestAnimationFrame,注意区分当前图片和下一张要展示的图片 - 使用节流思想来解决频繁点击的问题
- 自动播放、播放时间、轮播速度其实是可配置的,直接放在 props 里就可以
这个组件的 Github 地址在此,注意,地址里 Carousel 和 Carousel2 两个都是可以的,为了写这篇文章,我把父组件写了两遍。感谢您的阅读!
最后,作者目前正在找工作,坐标上海,求推荐,Vue 用的多,React 也会,Github上的简历在此。感谢感谢!
